background image

3

ENGLISH

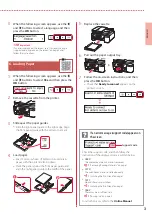
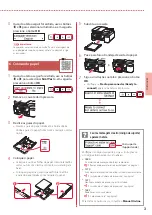
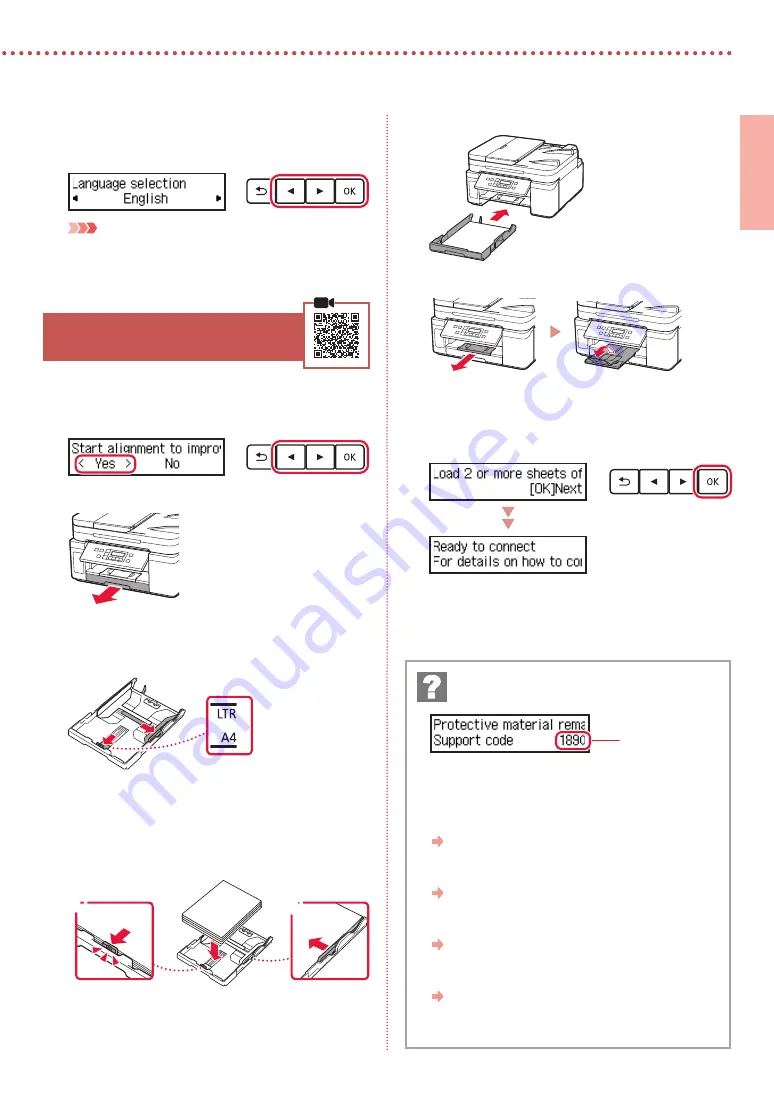
When the following screen appears, use the 

[


and 

]

 buttons to select a language, and then 

press the 

OK

 button.

 Important

If an error appears on the screen, see "If an error message 

(support code) appears on the screen" on page 3 and 

follow the instructions.

6. Loading Paper

When the following screen appears, use the 

[


and 

]

 buttons to select 

Yes

, and then press the 

OK

 button.

Remove the cassette from the printer.

Slide apart the paper guides.

• 

Slide the right paper guide to the right edge. Align 
the front paper guide with the Letter or A4 mark.

Load paper.

• 

Load 2 or more sheets of Letter or A4 sized plain 
paper with the print side facing down.

• 

Place the paper against the front paper guide, and 
align the right paper guide to the width of the paper.

a

b

Replace the cassette.

Pull out the paper output tray.

Follow the on-screen instructions, and then 

press the 

OK

 button.

• 

Check that 

Ready to connect

 appears on the 

printer's screen.

Check the support code, and then follow the 
instructions if the displayed code is written below.

• 

1890

The protective materials are not removed.

 "2. Removing Packing Materials" on page 1

• 

1470

The print heads are not installed correctly.

 "3. Installing the Print Head" on page 1

• 

1471

No print heads are installed.

 "3. Installing the Print Head" on page 1

• 

1642

There may be insufficient ink.

  "4. Pouring Ink" on page 2

For all other cases, refer to the 

Online Manual

.

If an error message (support code) appears on 

the screen

Support code

Summary of Contents for PIXMA GM4010

Page 1: ...ia Informa es Importantes e Sobre Seguran a adendo primeiro Gu a de inicio Lea primero Informaci n de seguridad e informaci n importante ap ndice Getting Started Read Safety and Important Information...

Page 2: ...ucionais Segurando a impressora Instalaci n de la impresora p gina 1 Conexi n con un ordenador tel fono inteligente o tableta p gina 4 V deos instructivos C mo sujetar la impresora Installing the Prin...

Page 3: ...ge tape 2 Open the scanning unit cover remove and dispose of the orange tape and protective material inside a b 3 Installing the Print Head 1 Open the print head locking cover on the right 2 Take out...

Page 4: ...of the ink bottle with the inlet 4 Slowly stand the ink bottle upside down and push down to pour the ink If the ink does not pour gently remove the ink bottle and try again a b 5 Gently remove the in...

Page 5: ...int side facing down Place the paper against the front paper guide and align the right paper guide to the width of the paper a b 5 Replace the cassette 6 Pull out the paper output tray 7 Follow the on...

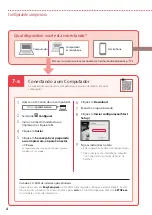
Page 6: ...inter driver What device are you connecting To use your printer without connecting to any other devices 7 c 7 a Connecting to a Computer 1 Access the Canon website from a computer 2 Select Set Up 3 En...

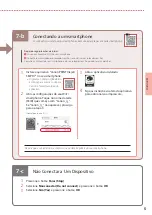
Page 7: ...hese steps on each smartphone Prepare the following before starting a Enable the Wi Fi setting on your smartphone b Connect your smartphone to the wireless router if you have a wireless router Refer t...

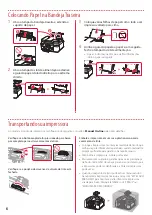
Page 8: ...Check that the joint button is pressed down completely to avoid ink leaks Check that the position of the ink valve lever is closed Pack the printer in a plastic bag in case ink leaks Pack the printer...

Page 9: ...a cubierta unidad de escaneado retire y tire la cinta naranja y el material de protecci n que hay dentro a b 3 Instalar el cabezal de impresi n 1 Abra la cubierta de bloqueo del cabezal de impresi n a...

Page 10: ...ta con la entrada 4 Coloque el frasco de tinta boca abajo despacio y empuje hacia abajo para verter la tinta Si la tinta no se vierte retire suavemente el frasco de tinta e int ntelo de nuevo a b 5 Re...

Page 11: ...linee la gu a del papel derecha con el ancho del papel a b 5 Reemplace el cassette 6 Extraiga la bandeja de salida del papel 7 Siga las instrucciones en pantalla y luego pulse el bot n OK Compruebe qu...

Page 12: ...ora sin conectar con ning n otro dispositivo 7 c 7 a Conexi n con un ordenador 1 Acceda al sitio web de Canon desde un ordenador 2 Seleccione Configurar 3 Escriba el nombre del modelo de su impresora...

Page 13: ...eligente Prepare lo siguiente antes de empezar a Active la configuraci n de Wi Fi en su tel fono inteligente b Conecte su tel fono inteligente al router inal mbrico si tiene un router inal mbrico Cons...

Page 14: ...de uni n se haya presionado hacia abajo completamente para evitar derrames de tinta Compruebe que la posici n de la palanca de la v lvula de tinta est cerrado Embale la impresora en una bolsa de pl st...

Page 15: ...nja 2 Abra a unidade de digitaliza o tampa remova e descarte a fita laranja e o material de prote o que est o dentro a b 3 Instalando a Cabe a de Impress o 1 Abra a tampa de fixa o da cabe a de impres...

Page 16: ...com a entrada 4 Levante lentamente a garrafa de tinta de cabe a para baixo e empurre para baixo para despejar a tinta Se a tinta n o for despejada remova lentamente a garrafa de tinta e tente novamen...

Page 17: ...oloque o papel na guia do papel frontal e alinhe a guia do papel direita com a largura do papel a b 5 Substitua o cassete 6 Puxe para fora a bandeja de sa da do papel 7 Siga as instru es na tela e pre...

Page 18: ...l dispositivo voc est conectando Para usar sua impressora sem conect la a nenhum outro dispositivo 7 c 7 a Conectando a um computador 1 Acesse o site Canon de um computador 2 Selecione Configurar 3 In...

Page 19: ...em cada smartphone Prepare o seguinte antes de iniciar a Ative a configura o Wi Fi no seu smartphone b Conecte seu smartphone ao roteador sem fio se voc tiver um roteador sem fio Consulte os manuais d...

Page 20: ...ado para baixo por completo para evitar vazamentos de tinta Verifique se a posi o da alavanca da v lvula de tinta est fechada Embale a impressora em um saco pl stico caso ocorra vazamento de tinta Col...

Page 21: ...RMC Regulatory Model Code K10494...

Page 22: ...Acesse o Manual On line Do seu navegador Acceso al Manual en l nea Desde su navegador Access Online Manual From your browser PRINTED IN XXXXXXXX QT6 2926 V01 CANON INC 2019 XXXXXXXX...

Reviews: