background image

6

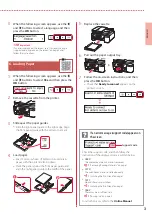
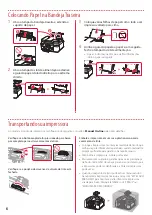
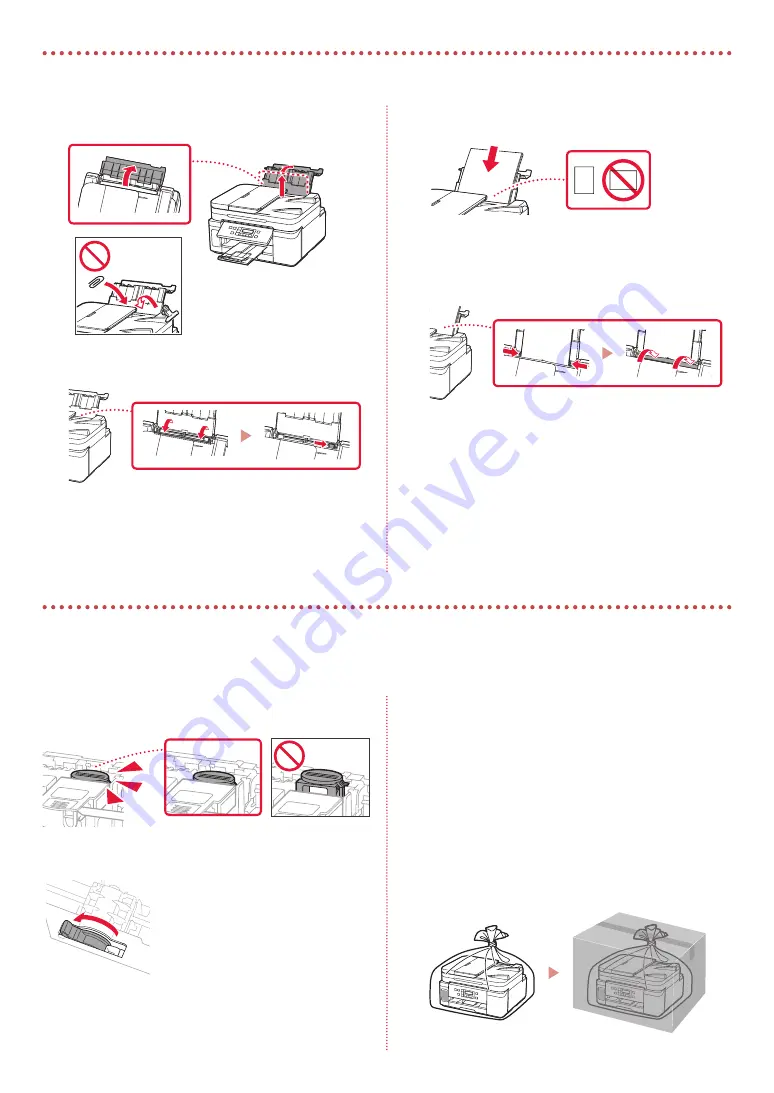
Loading Paper into the Rear Tray

Open the rear tray cover and extend the paper 

support.

b

a

Open the feed slot cover and slide the right-

hand side paper guide to the far right.

Load several sheets of paper with the print side 

facing up.

Align the paper guide to the paper, and then 

close the feed slot cover.

• 

Follow the on-screen instructions to set information 
for the loaded paper.

Transporting Your Printer

When relocating the printer, make sure of the following. Refer to the 

Online Manual

 for details.

Check that the joint button is pressed down completely to 

avoid ink leaks.

Check that the position of the ink valve lever is closed.

Pack the printer in a plastic bag in case ink leaks.

• 

Pack the printer in a sturdy box so that it is placed with its 
bottom facing down, using sufficient protective material 
to ensure safe transport.

• 

Do not tilt the printer. Ink may leak.

• 

Please handle with care and ensure the box remains flat 
and NOT turned upside down or on its side, as the printer 
may be damaged and ink in the printer may leak.

• 

When a shipping agent is handling transport of the 
printer, have its box marked "THIS SIDE UP" to keep the 
printer with its bottom facing down. Mark also with 
"FRAGILE" or "HANDLE WITH CARE".

Summary of Contents for PIXMA GM4010

Page 1: ...ia Informa es Importantes e Sobre Seguran a adendo primeiro Gu a de inicio Lea primero Informaci n de seguridad e informaci n importante ap ndice Getting Started Read Safety and Important Information...

Page 2: ...ucionais Segurando a impressora Instalaci n de la impresora p gina 1 Conexi n con un ordenador tel fono inteligente o tableta p gina 4 V deos instructivos C mo sujetar la impresora Installing the Prin...

Page 3: ...ge tape 2 Open the scanning unit cover remove and dispose of the orange tape and protective material inside a b 3 Installing the Print Head 1 Open the print head locking cover on the right 2 Take out...

Page 4: ...of the ink bottle with the inlet 4 Slowly stand the ink bottle upside down and push down to pour the ink If the ink does not pour gently remove the ink bottle and try again a b 5 Gently remove the in...

Page 5: ...int side facing down Place the paper against the front paper guide and align the right paper guide to the width of the paper a b 5 Replace the cassette 6 Pull out the paper output tray 7 Follow the on...

Page 6: ...inter driver What device are you connecting To use your printer without connecting to any other devices 7 c 7 a Connecting to a Computer 1 Access the Canon website from a computer 2 Select Set Up 3 En...

Page 7: ...hese steps on each smartphone Prepare the following before starting a Enable the Wi Fi setting on your smartphone b Connect your smartphone to the wireless router if you have a wireless router Refer t...

Page 8: ...Check that the joint button is pressed down completely to avoid ink leaks Check that the position of the ink valve lever is closed Pack the printer in a plastic bag in case ink leaks Pack the printer...

Page 9: ...a cubierta unidad de escaneado retire y tire la cinta naranja y el material de protecci n que hay dentro a b 3 Instalar el cabezal de impresi n 1 Abra la cubierta de bloqueo del cabezal de impresi n a...

Page 10: ...ta con la entrada 4 Coloque el frasco de tinta boca abajo despacio y empuje hacia abajo para verter la tinta Si la tinta no se vierte retire suavemente el frasco de tinta e int ntelo de nuevo a b 5 Re...

Page 11: ...linee la gu a del papel derecha con el ancho del papel a b 5 Reemplace el cassette 6 Extraiga la bandeja de salida del papel 7 Siga las instrucciones en pantalla y luego pulse el bot n OK Compruebe qu...

Page 12: ...ora sin conectar con ning n otro dispositivo 7 c 7 a Conexi n con un ordenador 1 Acceda al sitio web de Canon desde un ordenador 2 Seleccione Configurar 3 Escriba el nombre del modelo de su impresora...

Page 13: ...eligente Prepare lo siguiente antes de empezar a Active la configuraci n de Wi Fi en su tel fono inteligente b Conecte su tel fono inteligente al router inal mbrico si tiene un router inal mbrico Cons...

Page 14: ...de uni n se haya presionado hacia abajo completamente para evitar derrames de tinta Compruebe que la posici n de la palanca de la v lvula de tinta est cerrado Embale la impresora en una bolsa de pl st...

Page 15: ...nja 2 Abra a unidade de digitaliza o tampa remova e descarte a fita laranja e o material de prote o que est o dentro a b 3 Instalando a Cabe a de Impress o 1 Abra a tampa de fixa o da cabe a de impres...

Page 16: ...com a entrada 4 Levante lentamente a garrafa de tinta de cabe a para baixo e empurre para baixo para despejar a tinta Se a tinta n o for despejada remova lentamente a garrafa de tinta e tente novamen...

Page 17: ...oloque o papel na guia do papel frontal e alinhe a guia do papel direita com a largura do papel a b 5 Substitua o cassete 6 Puxe para fora a bandeja de sa da do papel 7 Siga as instru es na tela e pre...

Page 18: ...l dispositivo voc est conectando Para usar sua impressora sem conect la a nenhum outro dispositivo 7 c 7 a Conectando a um computador 1 Acesse o site Canon de um computador 2 Selecione Configurar 3 In...

Page 19: ...em cada smartphone Prepare o seguinte antes de iniciar a Ative a configura o Wi Fi no seu smartphone b Conecte seu smartphone ao roteador sem fio se voc tiver um roteador sem fio Consulte os manuais d...

Page 20: ...ado para baixo por completo para evitar vazamentos de tinta Verifique se a posi o da alavanca da v lvula de tinta est fechada Embale a impressora em um saco pl stico caso ocorra vazamento de tinta Col...

Page 21: ...RMC Regulatory Model Code K10494...

Page 22: ...Acesse o Manual On line Do seu navegador Acceso al Manual en l nea Desde su navegador Access Online Manual From your browser PRINTED IN XXXXXXXX QT6 2926 V01 CANON INC 2019 XXXXXXXX...

Reviews: