background image

Summary of Contents for PIXMA iP6320D Series

Page 1: ...Canon Photo Printer PI MA iP6320DI iP631ODSeries Quick Start Guide t ExitPtint PictBridge 7 J AiIlIl1IiIIf _ illl l8 _ JJIIIIIIIIIf AlIIIIIIIIIIIf_ JI1fI1fff _ 4iii iIr ...

Page 2: ...solutions to your inquiries within 24 hours 3 ToU Free Live Tech Support 1 800 828 4040 This option provides live telephone technical support free of service charges Monday Saturday excluding holidays during your product s 1 year limited warranty period Telephone Device for the Deaf TOO support is available at 1 866 251 3752 4 Extended Service and Support www canonesp com Canon CarePAK Extended Se...

Page 3: ...Canou PI MA iP6320D iP6310D Photo Printer Quick Start Guide ...

Page 4: ...AR guidelines for energy efficiency AU information regarding non Canon products was compiled from publicly available information No representation is made regarding the accuracy thereof About Consumables Consumables ink tanks FINE cartridges are available for 5 years after production has stopped Trademarks IIWindowsll and Internet Explorerll are trademarks of Microsoft Corporation registered in th...

Page 5: ...nting Becomes Faint or Colors are Incorrect 18 Troubleshooting Cannot Install the Printer Driver 20 Cannot Connect to PC Properly 21 Print Quality is Poor or Contains Errors 22 Printer Does Not Start or Stops During Print Jobs 25 Paper Does Not Feed Properly 26 Paper Jams 26 An Error Message Appears on the Screen 27 POWER lamp and Alarm lamp Flash Alternately 28 Appendix Specifications 29 Safety P...

Page 6: ...lp button when displayed While in the Page Setup dialog box or Print dialog box click in the lower left corner Clicking provides detailed information about each setting When the Help window appears select your desired topic Turning on the Printer 1 To turn on the printer press the POWER button The POWER lamp flashes while the printer warms up and changes to steady non flashing when the printer is ...

Page 7: ...g the printer is turned off Important About the Power Plug When removing the power plug after turning off the printer be sure to check that the POWER lamp is not lit If the power plug is removed from the wall outlet with the POWER lamp lit or blinking the printer cannot protect its print heads and may be unable to print 3 ...

Page 8: ...ed or wrinkled paper Damp paper Paper that is too thin less than 64 gsm 17 lb Paper that is too thick more than 105 gsm 28Ib Paper with holes Picture postcards Postcards with an affixed photo or sticker Envelopes with double flaps Envelopes with pressure seals Envelopes with an embossed or treated surface Non Canon genuine paper Also do not use a cut paper or memo pad when printing on a paper smal...

Page 9: ... support 2 Pull out the paper output tray 3 Move the paper thickness lever to the correct position for the media in use Move the lever to its left position for plain paper and move it to the right position for envelopes and T Shirt Transfers See Canon genuine paper on page 10 W Note Place the printer on a flat surface Do not place any obstacles in front of the printer to keep this area open for pa...

Page 10: ...oading the 4 x 6 paper load sheets in the portrait position short side facing down 2 Align the paper stack against the right side of the auto sheet feeder 6 W Note You can use general copy paper or Canon s Super White Paper You can load up to 100 sheets of plain paper 64 gsm or 17lb 10 mm or 0 39 inches in height in the auto sheet feeder Do not touch the printed surfaces until the ink dries For sp...

Page 11: ...the right side of the auto sheet feeder Set the envelope with its flap facing down on the left side A maximum of 10 envelopes can be loaded at one time Printing direction 2 Pinch the paper guide and slide it against the left side of the envelope W Note When printing the envelope set the paper thickness lever to the right When using a special paper to inverse the print result open the printer prope...

Page 12: ...d slide it against the left side of the paper stack 3 Select 4x6in 101 6x152 4mm 5x7in 127 0x177 8mm or Credit Card 2 13x3 39in 54x86mm from Page Size in the printer driver For the printer driver setting see Printing with Windows on page 11 or Printing with Macintosh on page 13 Important Always load paper in portrait orientation Loading paper in landscape orientation can cause the paper to be jamm...

Page 13: ...on genuine paper to ensure optimal print quality Photo Quality Media Glossy Photo Paper Matte Photo Paper Photo Paper Plus Double Sided Photo Paper Plus Glossy Photo Paper Plus Semi Gloss Photo Paper Pro Photo Stickers Media for Business Documents High Resolution Paper 9 ...

Page 14: ...Paper Pro Letter up to 10 sheet Left Photo Paper Pro 4 x611 up to 20 sheets 4I x8 up to 20 sheets 8I1 x10 up to 10 sheets Photo Stickers 3 4 1 sheet Left Photo Paper Plus Glossy T Shirt Transfers 1 sheet Right T Shirt Transfers 1 When loading a stack of paper the printed side may be marked when it is fed in If this happens load paper one sheet at a time 2 Photo Paper Plus Double Sided is not suppo...

Page 15: ...ions when printing photographs Easy PhotoPrint is provided on the Setup CD ROM For details on how to use Easy PhotoPrint refer to the Photo Application Guide 1 Turn your printer on then set papers 2 Create a document or open a file to print 3 Open the printer properties dialog box 1 Select Print from the application1s File menu The Print dialog box opens 2 2 Ensure that your printer is selected St...

Page 16: ...ick Set on the Main tab You can control the quality in the Custom dialog box For details about other printer driver functions click Help or Instructions to view the Help or Printer Driver Guide Instructions is displayed on the Main and Maintenance tabs only If the On screen Manual is not installed Instructions is not displayed Click the check box to select Preview before printing This will allow y...

Page 17: ...ed hereafter called Macintosh You can use Easy PhotoPrint to easily do print operations when printing photographs Easy PhotoPrint is provided on the Setup CD ROM For details on how to use Easy PhotoPrint refer to the Photo Application Guide 1 Turn your printer on then set papers 2 Create a document or open a file to print 3 Select Paper Size 1 Select Page Setup from the application1s File menu The...

Page 18: ...s and graphics illustrations with strong color definition Printing a composite document Select when printing documents which are mainly just text Detailed Setting You can fine tune Print Quality and Halftoning settings here For details about the printer driver refer to the Printer Driver Guide To view the Printer Driver Guide click 1J on any Print dialog box that has a Quality Media Color Options ...

Page 19: ... Status Monitor click Canon iP6320D Canon iP6310D on the taskbar 1 Click the printer s icon in the Dock and display the list of print jobs in progress If you are using Mac OS Xv l0 2 8 click on the printer icon in the Dock to start up the Print Center and double click on the name of your printer in the Printer List to open a list of print jobs in progress 2 Select an undesired document and click t...

Page 20: ...lected Then click Preferences or Properties The printer properties dialog box opens Opening the Printer Properties Dialog Box Directly from the Start Menu This method is used for printer maintenance and configuring shared print settings for all application programs 1 Click Start and select Control Panel Printers and Other Hardware and then Printers and Faxes For non Windows XP users click Start se...

Page 21: ...mpatible with ExifPrint PhotoRecord Windows You can create fun and unique photo albums with decorative themes such as frame background and clip art You can also copy or move the decorated photos It is compatible with ExifPrint Easy WebPrint Windows You can easily print out homepages displayed on Internet Explorer in full size without its right hand side being cropped This application is automatica...

Page 22: ...Guide I 1 i i i i r j After print head cleaning print the nozzle check pattern If the print quality is poor 11 perform print head cleaning If the pattern is printed normally click Exit Step 2 Refer to Print Head Cleaning in the Direct Printing Guide If the problem remains after performing print head cleaning twice Step 3 Refer to Print Head Deep Cleaning in the Direct Printing Guide If the problem...

Page 23: ...igital Camera in the Troubleshooting section of the Direct Printing Guide Cannot Install the Printer Driver on page 20 Cannot Connect to PC Properly on page 21 Print Quality is Poor or Contains Errors on page 22 Printer Does Not Start or Stops During Print Jobs on page 25 Paper Does Not Feed Properly on page 26 Paper Jams on page 26 An Error Message Appears on the Screen on page 27 POWER Lamp and ...

Page 24: ...ct My Computer drive 2 Double click the CD ROM icon For non Windows XP users open the My Computer window and then doubl e click the CD ROM icon 1 1 jS m Double click the CD ROM icon on your desktop to start installation If the CD ROM icon is not displayed on the desktop there is a problem with the CD ROM Contact the Customer Care Center 20 lVf1I mm Unable to proceed beyond the Printer Connection s...

Page 25: ...ified USB 2 0 Hi Speed cable You are recommended to use the cable no longer than 3 meters Your PC supports the USB 2 0 Hi Speed connection Obtain the latest version of the OS update program and install it on your PC The USB 2 0 Hi Speed driver operates properly Obtain the latest version of the USB 2 0 Hi Speed driver and install it on your PC Important For details on checking the above contact the...

Page 26: ...n page 16 2 On the Page Setup tab click Print Options 3 Select the Reduce spool data size check box and click OK When Reduce spool data size is selected the print quality may be degraded II Ink Does Not Eject Properly Not Printed Printing is Blurred Colors are Wrong White Streaks Appear FINE Cartridge is not installed properly there is no ink left Remove the FINE Cartridge then reinstall it Small ...

Page 27: ...y Media from the pop up menu and then click Detailed Setting 3 Drag the Print Quality slide bar towards the Fine side Media is not loaded Check that your paper is loaded with the correct print side facing up with print side up Consult Printing Media in the User s Guide for detailed instructions on how to load and use your media Printed Ruled Lines Print head is Align the print head Refer to Aligni...

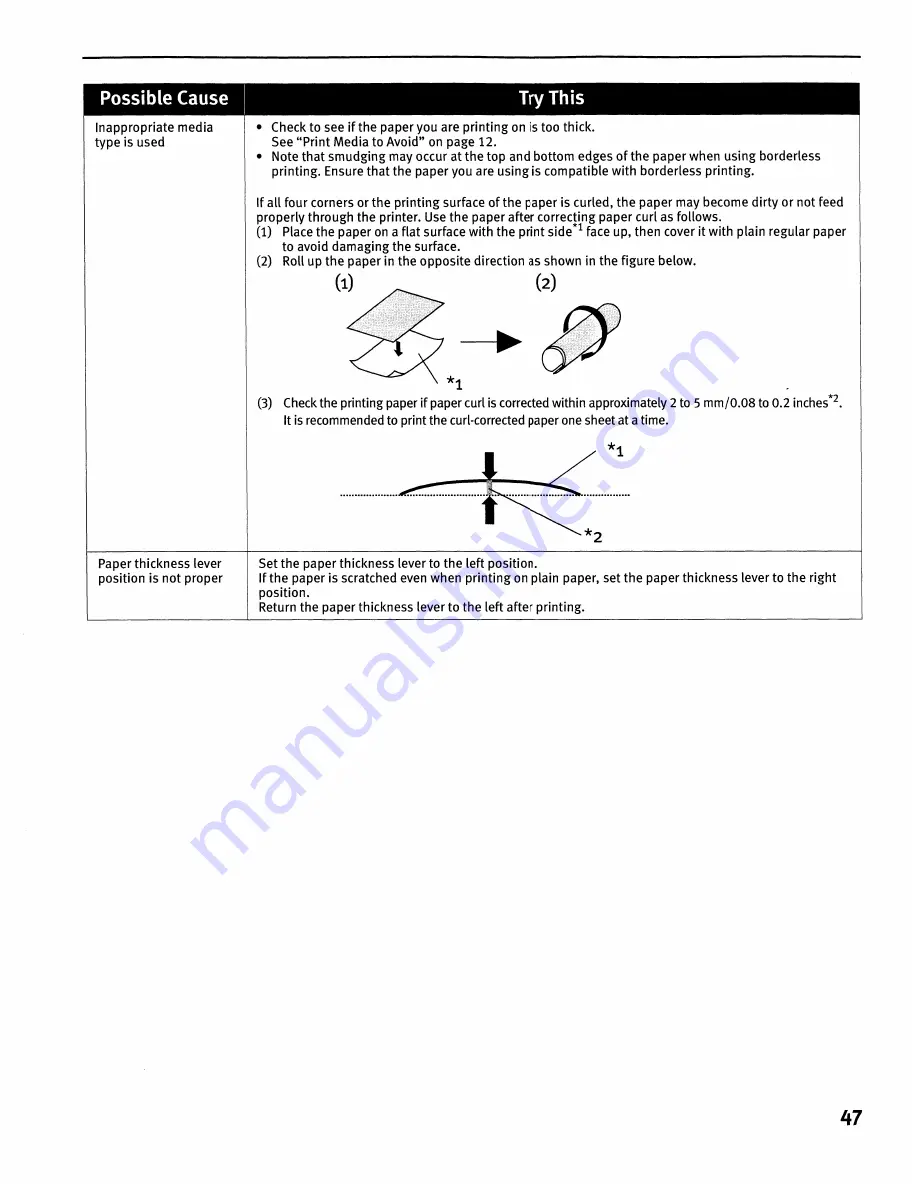
Page 28: ...ce is Scratched in the Direct Printing Guide Check to see if the paper you are printing on is too thick or curled See Print Media to Avoid on page 4 Note that smudging may occur at the top and bottom edges of paper when using Borderless Printing Ensure that the paper you are using is compatible with Borderless Printing If all four corners or the printing surface of the paper is curled the paper ma...

Page 29: ...ble click the Printer Setup Utility icon in the Utilities folder When using Mac as xv 10 2 double click the Print Center icon 3 Double click the name of your printer displayed upder Name in the Printer List 4 Click to select an undesired document and click The print job is deleted Cannot Print to Incorrect page size Ensure that the page size setting matches the size of the paper loaded in the End ...

Page 30: ...in the Direct Printing Guide Paper is loaded Load in the portrait orientation regardless of the print direction of the auto sheet incorrectly feed Ensure that paper is loaded correctly Pinch the paper guide and slide it against the paper stack See loading Paper on page 4 Paper Jams Problem I Possible Cause I Try This Paper Jams Landscape credit Remove the paper inside of the printer Refer to Paper...

Page 31: ...Printer driver is not Uninstall then reinstall the printer driver installed properly 1 Click Start and select All Programs or Programs the name of your printer and Uninstall 2 Follow the on screen instructions to uninstall the driver 3 Follow the procedures described in the Easy Setup Instructions and reinstall the printer driver to Printer not ready Ensure that the POWER lamp lights Error No 300 ...

Page 32: ...ve to select a print mode before connecting the device You may also have to turn on the device or select Play mode manually after connecting the device to the printer Perform necessary operations according to the instruction manual supplied with your device If the error is still unresolved there is a possibility that you are using a digital camera or digital video camcorder that is not supported b...

Page 33: ...ppm 203 2 mm max S O in for Borderless Printing 215 9 mm S 5 in USB 2 0 Hi Speed l 2 Direct Print Port lrDA v 1 2 3 Bluetooth v 1 2 Option 1 All operations are not guaranteed for computers standard equipped with a USB 2 0 Hi Speed interface 2 Since the USB 2 0 Hi Speed interface is fully upwardly compatible with USB Full Speed USB 1 1 it can be used at USB Full Speed USB 1 1 3 IrDA v l 2 is not su...

Page 34: ...sed on the printer setting Photo Photo Paper Plus Glossy Photo Paper Plus Semi Gloss Glossy Photo Paper Fast Photo Paper Pro Plain Paper A4 Letter only Default selections based on the printer setting Borderless Bordered N up 2 4 9 16 3S up 2 1 Layout compatible with Canon brand sticker above For details refer to Printing Photographs Directly from a PictBridge Compliant Device in the Direct Printin...

Page 35: ...Operation can only be guaranteed on a PC with built in USB or USB 2 0 Hi Speed port and pre installed Windows XP 2000 Me 98 or Mac OS Xv 10 2 8 v l0 4 3 Including compatible processors 4 For bundled software installation CD ROM drive lV4 imnm Display 800 x 600 Color 16 bit Display 800 x 600 Thousands Colors Mac File System Mac OS Extended Oournaled Mac OS X Extended Additional Systems Requirements...

Page 36: ...ange noises around the printer immediately unplug the printer at the power supply and call for service Periodically unplug the printer and use a dry cloth to wipe off any dust or dirt collected on the plug and the power outlet If the printer is placed at a location exposed to a lot of dust smoke or high humidity dust collected on the plug will absorb moisture and may cause insulation failure and f...

Page 37: ...idges Never use a power supply source other than the one rated for the printer in the country of where you purchased the printer AC 100 240 V 50 60 Hz Never put your hands or fingers in the printer while it is printing When moving the printer carry the printer at both ends Do not place any object on the printer Do not place any metal objects paper clips staples etc or containers of flammable solve...

Page 38: ...s encouraged to try to correct the interference by one or more of the following measures Reorient or relocate the receiving antenna Increase the separation between the equipment and receiver Connect the equipment into an outlet on a circuit different from that to which the receiver is connected Consult the dealer or an experienced radiollY technician for help Use of a shielded cable is required to...

Page 39: ...m misuse abuse or failure to operate the Product as set forth in the user s manual or other documentation for the Product b Use of parts or supplies other than those sold by Canon USA that cause damage to the Product or cause abnormally frequent service calls or service problems c If the Product has had its serial number or dating defaced altered or removed ANY SYSTEM SOFTWARE WHETHER FACTORY LOAD...

Page 40: ...lacement Product was packed and include the reference number A COPY OF YOUR DATED PROOF OF PURCHASE BILL OF SALE and a complete explanation of the problem DO NOT INCLUDE ANY OTHER ITEMS WITH THE DEFECTIVE PRODUCT IN THE RETURN SHIPPING CARTON AND BE SURE TO RETAIN YOUR PRINTHEAD AND INK CARTRIDGE S AND TANK S InstantExchange Service expedites usually by the second business day the exchange of a de...

Page 41: ...Windows 16 p Page Setup Macintosh 13 Page Setup dialog box Macintosh 13 Paper feed roller 26 Paper Size 13 Paper Support Load limit 10 Paper thickness lever 5 Paper Thickness Lever Position 10 Photo Paper Plus Double Sided 10 Photo Paper Plus Glossy 10 Photo Paper Plus Semi Gloss 10 Photo Paper Pro 10 Photo Stickers 10 PhotoRecord 17 POWER button 2 POWER lamp 2 POWER Lamp and Alarm Lamp Flash Alte...

Page 42: ...Index USB 2 0 Hi Speed 21 Using Specialty Media 9 w When Printing Becomes Faint or Colors are Incorrect 18 ...

Page 43: ...hoto Paper Pro 8 511 x 1111 30 sheets Matte Photo Paper 4 x 6 120 sheets Matte Photo Paper 8 511 x 1111 50 sheets Photo Paper Glossy 411 x 6 50 sheets Photo Paper Glossy 411 x 611 100 sheets Photo Paper Glossy 8 511 x 1111 50 sheets Photo Paper Glossy 8 511 x 11 100 sheets Glossy Photo Paper Credit Card Size Photo Stickers High Resolution Paper 8 5 x 1111 100 sheets Call1 800 0K CANON to locate a ...

Page 44: ...nc 703 Waterford Way Suite 400 Miami FL 33126 U s A Canon Mexicana Boulevard Man uel Avila Camacho No 138 PB YPisos 15 16 Y17 Colonia Lomas de Chapultepec Delegaci6n Miguel Hidalgo CP 11000 Mexico D F The following FINE Cartridges are compatible with this printer CL 41 CL S1 CL 52 For details on FINE Cartridge replacement refer to Replacing a FINE Cartridge in the Direct Printing Guide xxxxxxxx CA...

Page 45: ...Canon Photo Printer PI MAiP631ODSeries Direct Printing Guide t ExilPtint PictBridge ...

Page 46: ...Canon PI MAiP6310D Photo Printer Direct Printing Guide ...

Page 47: ...g Other Settings 23 Printing Photographs Directly from a Digital Camera 24 Printing Photographs Directly from a PictBridge Compliant Device 24 Printing Photographs from a Wireless Communication Device 29 Setting the Page Size Media Type and Layout When Printing From a Mobile Phone 29 Performing Bluetooth Communication 31 Using Data in the Memory Card on the Computer 33 Browsing Photos in the Memor...

Page 48: ...Contents Replacing a FINE Cartridge 39 Replacing a FINE Cartridge 39 What is Low Ink Warning 42 Troubleshooting 43 Index 52 2 ...

Page 49: ...t ready to print When the POWER lamp and the Alarm lamp flash alternately an error has occurred that may require a service call 3 LCD Monitor When you perform direct printing the menus and the setting items are displayed here 4 Save Button Saves data in the memory card onto the computer s hard disk See Saving Data in the Memory Card onto the Computer on page 33 5 Easy PhotoPrint Startup Button Sta...

Page 50: ...ressed during printing the printer aborts printing 4 13 14 15 16 Card Slot Cover Close this after inserting a memory card Card Slot Set the memory card containing photos here Indicator Lamp The indicator lamp lights when memory card reading is enable and flashes while the printer is accessing the memory card Direct Print Port Connects the printer to a PictBridge compatible digital camera or digita...

Page 51: ... Card Mode When you press the Menu button Memory Card Mode screens appear on the LCD By using button you can select the following modes INDEX See Printing a Photo list Print Index on page 15 PRINT ALL PHOTOS See Printing All Photos on page 20 SELECT PHOTO See Specifying Photos to Print on page 16 SELECT RANGE See Specifying the Range of Photos in the Memory Card on page 18 STICKR See Printing on t...

Page 52: ...ge 36 CLEANING See Print Head Cleaning on page 37 DEEP CLEANING See Print Head Deep Cleaning on page 38 AUTO HEAD ALIGN See Aligning the Print Head Auto head align on page 38 ALIGN PRINT HEAD See Adjusting the Print Head Manually on page 44 HEAD ALIGN PRINT See Aligning the Print Head Auto head align on page 38 ROLLER CLEANING See Back of Paper is Smudged Paper Does Not Feed Properly Printed Surfa...

Page 53: ...d in the card slot of the printer Print a Photo ListofAll Photos in the Memory Cord Step 1 Turn on the Printer Step 2 Load the paper See Loading Paper on page 12 Step 3 Insert the memory cord Step 4 Print a Photo Listin the Memory Cord See Printing a Photo List Print Index on page 15 7 ...

Page 54: ...Print on page 16 SELECT RANGE You can specify the range of photos you want to print using the file number or shooting date See Specifying the Range of Photos in the Memory Card on page 18 STICKR You can print your favorite photo on the Canon Photo Stickers See Printing on the Sticker Sticker Print on page 19 DPOF Prints photos according to the DPOF settings set on the digital camera See Printing A...

Page 55: ...iniSD Card 2 1 Purchase the CompactFlash Card Adapter for xD Picture Card separately 2 Use the special adapter supplied with the card Important This printer accepts images taken with a camera compatible with the Design rule for Camera File system Exif2 21 compliant TIFF Exif2 21 compliant and DPOF Ver 1 00 compliant Photos stored in a memory card not supported by the digital camera may fail in loa...

Page 56: ...nsert it into the slot on the upper until it stops with its end projecting as shown The indicator lamp lights If you use a Memory Stick Memory Stick PROI SD card Multimedia card ver 3 31 Insert it into the slot on the upper until it stops with its end projecting as shown The indicator lamp lights For Memory Stick Duo Memory Stick PRO Duo miniSD Card use the special adapter 1 lrnportant Do not try ...

Page 57: ... the data stored in the memory card be sure to print photos from the computer Using the operation panel to print photos may result in improper printing Removing a Memory Card WNote If you use the printer connected to your computer follow the instructions for removal of the memory card from the computer For the procedure see Setting up the Card Slot as the Memory Card Drive of the Computer on page ...

Page 58: ... lb non Canon genuine paper ePicture postcards ePostcards with an affixed photos or stickers Envelopes Any type of paper with holes Loading the Print Media in the Auto Sheet Feeder In this example description is provided using Photo Paper Plus Glossy 4 x 6 11 101 6 x 152 4 mm in your printer See Media Types for Card Direct Printing on page 14 for compatible paper 1 Flatten the four corners of the ...

Page 59: ...h print side facing UP Load the pc tper C o lengthways regardless of the direction of t the photo 2 Align the paper stack snug against the right side of the auto sheet feeder 3 Pinch the paper guide and slide it against the left side of the stack of paper Important Always load paper in portrait orientation Loading paper in landscape orientation can cause paper to be jammed Portrait Landscape WNote...

Page 60: ...52 4 mm 4 x 6 4I x6 PLUS up to 20 sheets Matte Photo Paper A4 Letter up to 10 sheets A4 8 5I1 x11 MAnE PHOTO 101 6 x 152 4 mm 4 x 6 4I x6 PAPR up to 20 sheets Glossy Photo Paper A4 Letter up to 10 sheets A4 8 5 x11 GLOSSY 101 6 x 152 4 mm 4 x 6 4 x6 up to 20 sheets Credit Card up to 20 CREDIT CARD sheets SIZE Photo Stickers 2 1 sheet WNotes 14 When using plain paper 64 gsm or 17 lb up to 100 sheet...

Page 61: ...SIZE Use the buttons to select the page size and then press the OK button You can select the following page size 8 5I1xl111 A4 4I1x611 Sllx711 CREDIT CARD SIZE MEDIA lYPE Use the buttons to select the media type and then press the OK button You can select the following media type PLAIN PAPER PHOTO PAPER PRO PHOTO PAPER PLUS MAITE PHOTO PAPR GLOSSY PRINT QLlY Use the buttons to select the print qua...

Page 62: ...the buttons to select a file number and then press the OK button 3 Use the buttons to select YES or NO and then press the OK button r J yES Select when you want to specify other SELECT INEXT PHOTO photos YES NO NO Select when you finished specifying all the photos you want to print 4 Confirm the file numbers to print Confirm the file numbers on the display correspond with the numbers you selected ...

Page 63: ...he OK button IMAGE Use the 4lIII buttons to select SET or SKIP and then press the ENHANCEMENT OK button Selecting SET allows you to optimize photos with various functions For details see Print Setting Items on page 22 This item is not available for DPOF printing This item is not available for INDEX printing WNote Press the Back button to return to the previous screen 7 Start printing Press the Pri...

Page 64: ...ect PHOTO NO or DATE and then press the OK button PHOTO NO You can specify the range of photos by photo number of the printed photo list DATE You can specify the range of photos by date of the printed photo list 4 Specify the range of photos you want to print looking at the printed photo list Ifyou selected PHOTO NO 1 Use the buttons to specify the first file number and then press the OK button 2 ...

Page 65: ...t a photo to print on the sticker looking at the printed photo list 1 Select a photo a file number to print from the printed photo list 2 Use the buttons to select a file number and then press the OK button WNote You can select one file as the photo to print on the sticker Specify the number of copies to print Using the buttons to specify the number of copies and then press the OK button Specify t...

Page 66: ... Exif Tift JFIF Print type Standard The photos for which you specified Standard using the DPOF function are printed Print type Index The photos for which you specified Index using the DPOF function are printed according to the printer s index print layout Photos to Print Only the photos specified using the DPOF function are printed photos cannot be specified on the operation panel Copies The photo...

Page 67: ... on page 15 2 Select the DPOF from the Memory Card Mode 1 Press the Menu button 2 Use the buttons to select DPOF and then press the OK button 3 Check the print setting items See Specifying Photos to Print on page 16 4 Start printing Press the Print button 21 ...

Page 68: ...T allows you to optimize photos with the functions below RED EYECORR Correct the red eyes caused by the reflection when the flash hits a person s eyes VIVID This function makes green and blue more lively POP This function automatically optimizes brightness and tone of a photo REMOVE NOISE This function reduces the noise on blue areas like the sky as well as on black areas FACE BRIGHT This function...

Page 69: ...the printer driver Date Display Format You can change the format for printing the date 1 Press the Configuration button repeatedly to select OTHERS 2 Use the buttons to select DATE TIME SETUP and then press the OK button 3 Use the buttons to select date display format and then press the OK button 4 Press the Stop Reset button WNote The shooting date format is as specified in the DPOF setting from ...

Page 70: ...rder or camera equipped mobile phone are collectively called a PictBridge compliant device Connecting to a PictBridge Compliant Device To connect a PictBridge compliant device to this printer use the USB cable supplied with the device Do not connect any equipment other than PictBridge compliant devices or the Bluetooth unit option to the direct print port of the printer If you do so electric shock...

Page 71: ...era to the printer using the USB cable for connection to a computer supplied with the device WNote Some types of the PictBridge compliant devices turn on automatically when connected to the printer If the device does not turn on automatically turn it on manually 3 Turn on and set up the device for direct printing When the connection between the device and printer has been established the POWER lam...

Page 72: ...ting from a PictBridge compliant device 1 Turn on the printer 2 Press the Configuration button repeatedly to select the PICTBRIDGE SET and then press the OK button 3 Confirm or change the settings Use the buttons to select the item to set and then press the OK button About the Settings Explained Below The settings explained on the following pages cannot be made on some devices If any setting canno...

Page 73: ...s 3 Plain Paper can be selected for Paper type when A4 or 8 5 x 11 Letter is selected for Paper size When Plain Paper is selected for Paper type bordered printing will be performed even when Borderless is selected for Layout 4 When A4 or 8 5 x 1111 Letter is selected for Paper size you can print in 4 up layout About layout and Trimming For Layout when you have selected Default selections based on ...

Page 74: ...ver the embedded date Other Settings If you use a Canon PictBridge compliant device you can use the following print settings Note that these print settings cannot be used for some models For details refer to your device s instruction manual Shooting Info Exif Data You can print shooting Info Exif Data on photos in list format or in the margins of specified photos Select Layout then select the item...

Page 75: ... manual When printing photos through Bluetooth communication _ See Setting the Page Size Media Type and Layout When Printing From a Mobile Phone below See Performing Bluetooth Communication on page 31 Setting the Page Size Media Type and Layout When Printing From a Mobile Phone You can select the page size media type layout and borderless printing on the wireless print setting screen when printing...

Page 76: ...rinted according to the following settings Setting Items PAGE SIZE MEDIA TYPE 3 4 WHote For information on wireless compatible page size and media type see Media Types for Card Direct Printing on page 14 LAYOUT Select the layout of photos as below Sticker print STICKR x16 Printing on paper other than sticker Borderless print ON OFF IMAGE OPTIMIZER Correct the contours and smooths out the jaggednes...

Page 77: ... you select the device name select the initial value of this printer Canon iP6310D 1 If you are required to enter the passkey enter the initial value 0000 You can change the device name of the printer or passkey in Bluetooth settings on the printer See Changing the Bluetooth Settings Bluetooth settings on page 32 WNotes Communication is possible up to about ten meters depending on the conditions b...

Page 78: ...l the Bluetooth unit is connected Press the Configuration button repeatedly to select the BLUETOOTH SET and then press the OK button Change the setting Use the buttons to select the setting item you want to change and then press the OK button Setting Items DEVICE NAME ACCESS REFUSAL SECURI1Y PASSKEY 32 Select the device name of this printer displayed on the screen of the Bluetooth devices When you...

Page 79: ...ted by a USB cable 2 Press the Easy PhotoPrint Startup button Easy PhotoPrint starts on the computer WNote For information on printing with Easy PhotoPrint and other details refer to the Photo Application Guide Saving Data in the Memory Card onto the Computer By pressing the Save button you can save the data in the memory card on the hard disk of the computer Important To use the Save button conne...

Page 80: ... card then be sure to select ON in the READ ONLY MODE screen again 1 2 3 4 Ensure that both the printer and the computer are turned on and connected by a USB cable Press the Configuration button repeatedly to select OTHERS Use the buttons to select READ ONLY MODE and then press the OK button Specify the READ ONLY MODE 1 Use the buttons to select a mode When selecting OFF the card slot is used as t...

Page 81: ...rtridge on page 39 Step 1 AD rua__ __ Printing the NOlzle Check Pattern on page 36 1 4 After print head cleaning print the nozzle check pattern Step 2 W J __ __ __ iaM I Print Head Cleaning on page 37 If the problem remains after performing print head cleaning twice Print Head Deep Cleaning on page 38 Replacing a FINE Cartridge on page 39 If the problem still remains after performing print head de...

Page 82: ... button Do not open the front cover while printing 3 Examine the nozzle check pattern See below Examining the Nozzle Check Pattern The nozzle check pattern should appear as follows when ink is discharged properly Examine the nozzle check pattern output by the printer WNote If the ink level is low the nozzle check pattern is not printed properly Stop printing the nozzle check pattern and replace th...

Page 83: ...to select MAINTENANCE 2 Use the buttons to select CLEANING and then press the OK button Important WNote Do not perform any other operations until the print head cleaning finishes This takes about 30 50 seconds After print head cleaning finishes After print head cleaning finishes print the nozzle check pattern to verify that the print head nozzles are clean See Printing the Nozzle Check Pattern on ...

Page 84: ...ng again If the problem remains the printer may have run out of ink See Replacing a FINE Cartridge on page 39 Ifthe problem continues to exist the printer may be damaged Contact the Customer Care Center Aligning the Print Head Auto head align If ruled lines are misaligned or a printout is unsatisfactory print head alignment is required 1 With the printer on load a sheet of A4 Letteroosized plain p...

Page 85: ...CL 51 WNote The High Yield Color FINE Cartridge Cl 51 can be installed as option Replacing a FINE Cartridge When a FINE Cartridge runs out of ink replace them using the following steps 1 Ensure that the printer is on 2 Open the card slot cover first and then open the front cover The FINE Cartridge holder moves to the left 3 Remove the empty FINE Cartridge 1 Push down the FINE Cartridge 2 Remove th...

Page 86: ...s dirty or staining surrounding work area Once the protective tape is removed do not touch the electrical contacts or print head nozzles on a FINE Cartridge The printer may not print out properly if you touch it 5 Install the new FINE Cartridge The Color FINE Cartridge should be installed into the left slot C and the Photo FINE Cartridge should be into the right slot P u 0 tl U 0 tl 000 000 1 Inse...

Page 87: ...y Do not leave the FINE Cartridge removed When a FINE Cartridge runs out of ink replace the FINE Cartridge with a new one immediately If you replace it with the FINE Cartridge that has been removed once the printer may not print properly due to clogged print head nozzles And the low ink warning message which relays the exchange time of a FINE Cartridge will be off To maintain optimal print quality...

Page 88: ...the LCD CINK LOW PINK LOW You should purchase new FINE Cartridge CHECK INK U162 Printing stops Possible causes are as follows This FINE Cartridge has previously been used Ink may have run out The function for detecting the remaining ink level will be disabled since the remaining ink level cannot be correctly detected Pressing the OK button cancels the error messages and enables continuation of pri...

Page 89: ...on See Paper Jams on page 48 CHECK INK Replace the FINE Cartridge and close the front cover U041 If lines are misaligned or the resulting output is not satisfactory carry out the Print Head Alignment If printing is in progress and you want to continue printing press the OK button Then printing can continue under the ink out condition with the FINE cartridge installed Replace the empty FINE cartrid...

Page 90: ... details on manual print head alignment see Adjusting the Print Head Manually on page 44 CHECK INK The FINE Cartridge may not be the compatible with this printer U140 Install the appropriate FINE Cartridge If lines are misaligned or the resulting output is not satisfactory carry out the Print Head Alignment CHECK INK Possible causes are as follows U162 This FINE Cartridge has previously been used ...

Page 91: ...ime s o 2 3 4 5 6 Language Portuguese Swedish Russian Czech Hungarian Polish Turkish Time s 7 8 9 10 11 12 13 8 Press the OK button The desired language is displayed on the LCD 9 Press the Stop Reset button Ink Does Not Come Out Printing is Blurred Colors are Wrong White Streaks Possible Cause I Try This A FINE Cartridge is not seated properly FINE Cartridge is empty Incorrect media type Print hea...

Page 92: ...ant Before cleaning be sure to turn off the printer Paper feed roller is dirty Follow the steps described below to clean the paper feed rollers Since the paper feed roller cleaning exhausts the paper feed roller perform only when it is needed 1 Ensure that the printer is turned on If the paper is loaded in the printer remove the paper 2 Press the Configuration button repeatedly to select MAINTENAN...

Page 93: ...through the printer Use the paper after correcting paper curl as follows 1 Place the paper on a flat surface with the print side 1 face up then cover it with plain regular paper to avoid damaging the surface 2 Roll up the paper in the opposite direction as shown in the figure below 1 2 1 3 Check the printing paper if paper curl is corrected within approximately 2 to 5 mmjO 08 to 0 2 inches 2 It is...

Page 94: ...r If the paper tears and a piece remains inside the printer open the card slot cover first and the front cover next and remove it A Caution Be careful not to touch any com ponents inside the printer After removing all paper close the front cover first and the card slot cover next If you cannot pull the paper out turn the printer off and turn it back on The paper will be ejected automatically 2 Rel...

Page 95: ...elect Stop in the display on your camera to stop printing Remove the jammed paper load new paper and press the OK button on the printer and retry printing Paper lever error Set the paper thickness lever to the left position If the paper is scratched even when printing on plain paper set the paper thickness lever to the right position Return the paper thickness lever to the left after printing Prin...

Page 96: ... may have run out The function for detecting the remaining ink level will be disabled since the remaining ink level cannot be correctly detected If you want to continue printing without this function press the OK button Canon recommends to use new genuine Canon cartridges in order to obtain optimum qualities Printer error An error requiring servicing might have occurred Printer POWER lamp and Alar...

Page 97: ...ecessary operations according to the instruction manual supplied with your device The print head nozzles may be clogged if printing becomes faint of colors are incorrect See When Printing Becomes Faint or Colors are Incorrect on page 35 If the paper is curled or its surface is scratched during printing make sure that you are using the correct type of paper If this error occurs even when you are us...

Page 98: ...39 H HEAD ALIGN PRINT 6 38 IMAGE ENHANCEMENT 22 52 IMAGE ENHANCEMENT PictBridge 6 26 Image optimize PictBridge 28 IMAGE OPTIMIZER Wireless 6 30 INDEX 5 15 Ink absorber 49 Ink Does Not Come Out 45 L LANGUAGE SETIING 6 Layout PictBridge 27 LAYOUT Wireless 6 30 LCD 5 LCD Troubleshooting 43 LOAD CONFGURATION 6 17 Load limit mark 13 Loading Paper 12 Low ink warning 42 M MAINTENANCE 6 MEDIA TYPE 22 Memo...

Page 99: ... MODE 6 RED EYE CORR 22 REMOVE NOISE 22 RESTORE DEFAULT 6 23 ROLLER CLEANING 6 46 5 Save Button 3 33 SAVE CONFGURATION 6 17 SELECT PHOTO 5 16 SELECT RANGE 5 18 Specifying Photos to Print 16 Specifying the Range of Photos in the Memory Card 18 STICKR 5 19 T Trimming PictBridge 27 v VIVID 22 w White Streaks 45 WIRELESS SETTINGS 6 29 Index 53 ...

Page 100: ...54 ...

Page 101: ... U S A anon Mexicana Boulevard Manuel Avila Camacho No 138 PB y Pisos 15 16y 17 Colonia Lomas de Chapultepec Delegaci6n Miguel Hidalgo CP 11000 Mexico D E The following FINE Cartridges are compatible with this printer 41 52 CL 41 CL 52 The following FINE Cartridge High Yield is compatible with this printer as an option 51 Cl 51 For details on FINE Cartridge replacement refer to Replacing a FINE Ca...

Page 102: ... Quick Start Guide Color FINE Cartridge Cl 41 Photo FINE Cartridge Cl 52 Documentation and Software Kit W NOTE Do not connect the USB cable at this stage o When the screen appears on the LCD confirm a language and then press the OK button W NOTE If the language you want to be displayed is not selected refer to An Unintended Language is Displayed on the LCD in the Direct Printing Guide If you leave...

Page 103: ...olor FINE Cartridge until it clicks into place A IMPORTANT For correct printer operation make sure the FINE Cartridge is secure in slots e Repeat the procedure for the Photo FINE Cartridge Cl 52 inserting it into the right slot P W NOTE Ensure that the paper thickness lever is set to the left position Ensure that the message requesting head alignment is displayed on the lCD select YES using the bu...

Page 104: ...e Installation Results Follow the on screen instructions to install the remaining software When the Installation Results screen appears click Next Select the installation method and follow the instructions on the screens Insert the Setup CD ROM The setup program should run automatically canon PIXMA iP6310D e When the majn menu screen appears click Easy Install and follow the on screen instructions...

Page 105: ...essfully screen appears click Restart Canon Installation completed successfully After restarting the computer select Applications from the Go menu Double click the Utilities folder and then double click the Printer Setup Utility Print Center when you use Mac as x v 10 2 8 icon Check that your printer name is displayed on the Printer List If your printer name is not displayed on the Printer List cl...

Page 106: ......

Page 107: ......

Page 108: ......

Page 109: ... advanced Print Share button to a PictBridge compatible printer Then with the desired image displayed on the camera s LCD in playback mode press the Print Share button In seconds you ll have a brilliant photograph of that image How easy was that For a list of Canon cameras featuring a Print Share button visit www usa canon com consumer directprint ...

Page 110: ...re about Canon products Checl out www usa canon com consumer Canon imageANYWARE 2006 Canon U S A Inc Canon EOS EOS Rebe l and Powershot are registered trademarks and PIXMA and digital revolutionized photography we revolutionized digital are trademarks of Canon Inc in the United States and may also be registered trademarks or trademarks in other countries IMAGEANYWARE is atrademark of Canon QT1 011...

Page 111: ...ce when these software and firmware updates are available for your product DYes 0 No IT On occasion Consumer Imaging Group of Canon U s A Inc may want to send you information about other Canon products and promotions that may be of interest to you Would you like to receive this information DYes 0 No The following questions are strictly 9 P1 1 and will only be used by Canon Please tape closed DO NO...

Page 112: ...UT 84130 9776 11111111 111 11 11 1111 1 1 1 1111 111 1111 1 1 1 Please be sure to register using only 1 of the 4 easy methods Registration Card Congratulations on purchasing a Canon PIXMA iP6310D Photo Printer Register now to receive information about other Canon products and promotions that may be of interest to you Fold Here easy ways to register o Visit our Web site at www registercanon com or ...

Reviews: