Changing the Printer Operation Mode
If necessary, switch between various modes of printer operation.
The procedure for configuring
Custom Settings
is as follows:
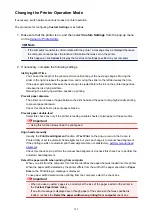
1. Make sure that the printer is on, and then select
Custom Settings
from the pop-up menu
on the
Note
• If the computer is unable to communicate with the printer, a message may be displayed because
the computer cannot access the function information that was set on the printer.
If this happens, click
Cancel
to display the most recent settings specified on your computer.
2. If necessary, complete the following settings:
Ink Drying Wait Time
You can set the length of the printer rest time until printing of the next page begins. Moving the
slider to the right increases the pause time, and moving the slider to the left decreases the time.
If the paper gets stained because the next page is ejected before the ink on the printed page dries,
increase the ink drying wait time.
Reducing the ink drying wait time speeds up printing.
Prevent paper abrasion
The printer can increase the gap between the print head and the paper during high-density printing
to prevent paper abrasion.
Check this check box to prevent paper abrasion.
Prevent paper double-feed
Select this check box only if the printer is feeding multiple sheets of plain paper at the same time.
Important
• Using this function slows down the print speed.
Align heads manually
Usually, the
Print Head Alignment
function of
Test Print
on the pop-up menu in the Canon IJ
Printer Utility is set to automatic head alignment, but you can change it to manual head alignment.
If the printing results of automatic print head alignment are not satisfactory,
.
Check this check box to perform the manual head alignment. Uncheck this check box to perform the
automatic head alignment.
Detect the paper width when printing from computer
When you print from the computer, this function identifies the paper that was loaded into this printer.
When the paper width detected by the printer differs from the width of the paper specified in
Paper
Size
on the Print dialog, a message is displayed.
To use paper width detection when printing from the computer, select the check box.
Important
• When you use a custom page size, correctly set the size of the paper loaded in the printer in
the
Custom Paper Sizes
dialog.
If an error message is displayed even though paper of the same size that was specified is
loaded, uncheck the
Detect the paper width when printing from computer
check box.
195
Summary of Contents for PIXMA MG3660
Page 23: ...Using the Machine Printing Photos from a Computer Copying Originals 23...
Page 27: ...My Image Garden Guide Mac OS 27...
Page 30: ...Note For details on copy features see Copying 30...
Page 115: ...Loading Paper Loading Plain Paper Photo Paper Loading Envelopes 115...
Page 128: ...Replacing a FINE Cartridge Replacing a FINE Cartridge Checking Ink Status 128...
Page 168: ...Safety Safety Precautions Regulatory Information 168...
Page 173: ...Main Components and Their Use Main Components Power Supply 173...
Page 174: ...Main Components Front View Rear View Inside View Operation Panel 174...
Page 197: ...Changing Settings from Operation Panel Quiet setting Turning on off Machine Automatically 197...
Page 202: ...Network Connection Network Connection Tips 202...
Page 216: ...Changing Settings in Direct Connection 4 Help menu Instructions Displays this guide 216...
Page 224: ...Note This machine supports WPA WPA2 PSK WPA WPA2 Personal and WPA2 PSK WPA2 Personal 224...
Page 234: ...Network Communication Tips Using Card Slot over Network Technical Terms Restrictions 234...
Page 262: ...Printing Area Printing Area Other Sizes than Letter Legal Envelopes Letter Legal Envelopes 262...
Page 292: ...Related Topics Cleaning Inside the Printer Changing the Printer Operation Mode 292...
Page 299: ...Printing with ICC Profiles Specifying an ICC Profile from the Printer Driver 299...
Page 303: ...Adjusting Brightness Adjusting Intensity Adjusting Contrast 303...
Page 338: ...Printing Using Canon Application Software My Image Garden Guide Easy PhotoPrint Guide 338...
Page 414: ...Defaults You can restore the settings in the displayed screen to the default settings 414...
Page 424: ...Defaults You can restore the settings in the displayed screen to the default settings 424...
Page 459: ...Scanning Tips Resolution Data Formats 459...
Page 478: ...Note For Windows you can use the Setup CD ROM to redo setup 478...
Page 512: ...Back of Paper Is Smudged Vertical Line Next to Image Uneven or Streaked Colors 512...
Page 586: ...For paper jam support codes see also List of Support Code for Error Paper Jams 586...
Page 602: ...1202 Cause Paper output cover is open What to Do Close the paper output cover 602...


