background image

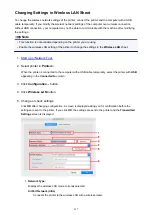
Connecting to Another Computer via LAN/Changing from USB to
LAN Connection

For Windows:

For Mac OS:

For Windows:

To add a computer to connect to the machine on a LAN or to change from USB to LAN connection,
perform setup using the Setup CD-ROM or follow the instructions on the Canon website.

For Mac OS:

To connect an additional computer to the machine via LAN, or to change from USB to LAN connection,
follow the instructions on the Canon website.

206

Summary of Contents for PIXMA MG3660

Page 1: ...MG3600 series Online Manual Read Me First Printer Functions Overview Printing Copying Scanning Troubleshooting English...

Page 2: ...Scan Multiple Originals at One Time 45 Using PIXMA MAXIFY Cloud Link 46 Notice for Web Service Printing 47 Using PIXMA MAXIFY Cloud Link from Your Smartphone Tablet or Computer 48 Before Using Canon I...

Page 3: ...Printing the Nozzle Check Pattern 141 Examining the Nozzle Check Pattern 142 Cleaning the Print Head 143 Cleaning the Print Head Deeply 144 Aligning the Print Head 145 Performing Maintenance Functions...

Page 4: ...a Changed Printing Profile 189 Setting the Ink Cartridge to be Used 191 Managing the Printer Power 192 Reducing the Printer Noise 193 Changing the Printer Operation Mode 195 Changing Settings from Op...

Page 5: ...etwork Communication Tips 234 Using Card Slot over Network 235 Technical Terms 237 Restrictions 244 Ensuring Optimal Printing Results 245 Ink Tips 246 Printing Tips 247 Be Sure to Make Paper Settings...

Page 6: ...tom Size 294 Changing the Print Quality and Correcting Image Data 295 Setting the Print Quality Level Custom 296 Printing a Color Document in Monochrome 297 Specifying Color Correction 298 Optimal Pho...

Page 7: ...oogle Cloud Print 342 Getting Google Account 344 Registering Machine with Google Cloud Print 345 Printing from Computer or Smartphone with Google Cloud Print 347 Deleting Machine from Google Cloud Pri...

Page 8: ...nning Multiple Originals at One Time 395 Saving after Checking Scan Results 398 Sending Scanned Images via E mail 401 Extracting Text from Scanned Images OCR 404 IJ Scan Utility Screens 407 IJ Scan Ut...

Page 9: ...Machine Suddenly Cannot Be Used 483 Network Key Unknown 487 Administrator Password Set for Machine Unknown 489 Machine Cannot Be Used After Replacing Wireless Router or Changing Its Settings 490 Print...

Page 10: ...at One Time 543 Cannot Scan Properly with Auto Scan 544 Slow Scanning Speed 545 There is not enough memory Message Is Displayed 546 Computer Stops Operating during Scanning 547 Scanned Image Does Not...

Page 11: ...sage Appears 575 Error Message Appears on PictBridge Wireless LAN Compliant Device 582 If You Cannot Solve a Problem 584 List of Support Code for Error 585 List of Support Code for Error Paper Jams 58...

Page 12: ...2101 625 2102 626 2103 627 2900 628 2901 629 3402 630 3403 631 3405 632 3412 633 4100 634 4103 635 5011 636 5012 637 5050 638 5100 639 5200 640 5400 641 5B02 642 5B03 643 5B04 644 5B05 645 5B12 646 5...

Page 13: ...6900 654 6901 655 6902 656 6910 657 6911 658 6930 659 6931 660 6932 661 6933 662 6936 663 6937 664 6938 665 6940 666 6941 667 6942 668 6943 669 6944 670 6945 671 6946 672 B202 673 B203 674 B204 675 B...

Page 14: ...on may suspend or stop the disclosure of this site due to unavoidable reasons Canon shall not be liable for any damage suffered by customers as a result of changes in or deletion of information in thi...

Page 15: ...1 Select Chrome Menu Print 2 Select the Background graphics checkbox in Options For Mac OS To print background colors and images follow the steps below to display the Print dialog options then select...

Page 16: ...must be observed for safe operation Important Instructions including important information To avoid damage and injury or improper use of the product be sure to read these indications Note Instruction...

Page 17: ...edistribution and use in source and binary forms with or without modification are permitted provided that the following conditions are met 1 Redistributions of source code must retain the above copyri...

Page 18: ...bind by name to the interfaces of the Work and Derivative Works thereof Contribution shall mean any work of authorship including the original version of the Work and any modifications or additions to...

Page 19: ...notices cannot be construed as modifying the License You may add Your own copyright statement to Your modifications and may provide additional or different license terms and conditions for use reprod...

Page 20: ...ollowing conditions are met Redistributions of source code must retain the above copyright notice this list of conditions and the following disclaimer Redistributions in binary form must reproduce the...

Page 21: ...e all products supported by this guide will be considered for the search If you want to narrow down the search results add your product s model name or your application s name to the keywords Searchin...

Page 22: ...e search window and perform a search Searching for Reference Pages Enter your model name and a reference page title You can find reference pages more easily by entering the function name as well Examp...

Page 23: ...Using the Machine Printing Photos from a Computer Copying Originals 23...

Page 24: ...hereinafter referred to as Windows 8 1 is used 1 Open the front cover A 2 Extend the paper support B 3 Load paper vertically WITH THE PRINT SIDE FACING DOWN Push the paper stack all the way to the bac...

Page 25: ...Guide Menu screen is displayed Note The number and types of icons displayed vary depending on your region the registered printer scanner and the installed applications 9 Click the Photo Print icon G 1...

Page 26: ...ime click photos while pressing the command key 12 Click Print J 13 Specify the number of copies your machine name media type etc K 14 Click Print L For Mac OS Click OK when the confirmation message a...

Page 27: ...My Image Garden Guide Mac OS 27...

Page 28: ...cover A 2 Extend the paper support B 3 Load paper vertically WITH THE PRINT SIDE FACING DOWN Push the paper stack all the way to the back of the front tray 4 Align the paper guides with the paper wid...

Page 29: ...COPY FACING DOWN and align it with the alignment mark G 10 Close the document cover gently 11 Press the Paper button H to light the upper Paper lamp I 12 Press the Black button or Color button J Impor...

Page 30: ...Note For details on copy features see Copying 30...

Page 31: ...ls Print Items with Easy PhotoPrint Web Application Available Connection Methods Easy Scan with the Auto Function Scan Originals Larger than the Platen Scan Multiple Originals at One Time Using PIXMA...

Page 32: ...or smartphone even in an environment without an access point wireless router Switch to access point mode with simple steps to enjoy scanning and printing wirelessly When you use the machine with the...

Page 33: ...otos easily when you search for them later on Calendar View People View Display Recommended Items in Slide Shows Based on the information registered to photos Quick Menu automatically selects the phot...

Page 34: ...the selected photos are placed automatically according to the theme Other Various Functions My Image Garden has many other useful functions Refer to the following for details What You Can Do with My I...

Page 35: ...service where customers using models that support PREMIUM Contents can download exclusive printing materials PREMIUM Contents can be downloaded easily via My Image Garden or Easy PhotoPrint Downloade...

Page 36: ...ng Easy PhotoPrint on the web from a computer or tablet By using Easy PhotoPrint you can create items in the latest environment without going through the trouble of installation Moreover you can use v...

Page 37: ...router The two connection methods cannot be used at the same time If you have a wireless router we recommend you use the method described in Connection Using a Wireless Router When connecting another...

Page 38: ...a wireless router to the printer that is in the access point mode the connection between the device and wireless router will be disabled In that case the connection of the device may switch to a mobil...

Page 39: ...sword Network key are unknown print the LAN setting information and check the SSID Password Network key field How to print the LAN setting information Press the Wi Fi button on the printer The LAN set...

Page 40: ...6 Enter the Password Network key then click Connect 7 When connection is complete click Back until the screen below appears Proceed with the setup 40...

Page 41: ...creen of this guide until setup is complete For office use consult your network administrator Note that if you connect to a network with no security protection your personal information could be discl...

Page 42: ...with each other Firmware updates for the printer are not available while using Direct Connection When a device has been connected to the printer without using a wireless router and you want to set it...

Page 43: ...unction By using the auto function of IJ Scan Utility you can scan easily by automatically detecting the item type Refer to the following for details Easy Scanning with Auto Scan Windows Easy Scanning...

Page 44: ...ght halves of an item larger than the platen and combine them back into one image Items up to approximately twice as large as the platen are supported Refer to the following for details Scanning Origi...

Page 45: ...Utility you can scan two or more photos small items placed on the platen at one time and save each image individually Refer to the following for details Scanning Multiple Originals at One Time Window...

Page 46: ...w ink levels In addition you can use various functions by adding and registering apps that are linked with various cloud services Using PIXMA MAXIFY Cloud Link from Your Printer Using PIXMA MAXIFY Clo...

Page 47: ...aved in our server Canon is unable to identify specific customers using this information Before you transfer ownership or dispose of a printer that supports a color LCD monitor select Device settings...

Page 48: ...er Before Using Canon Inkjet Cloud Printing Center Registering User Information to Canon Inkjet Cloud Printing Center Using Canon Inkjet Cloud Printing Center Adding a Printer Adding a PIXMA MAXIFY Cl...

Page 49: ...d Printer specification Check that Canon Inkjet Cloud Printing Center supports the printer Some models do not support this function To check whether your model supports this function see Models that S...

Page 50: ...OS 6 1 or later OS standard browser 320 x 480 HVGA or higher Android 2 3 3 or later 480 x 800 HVGA or higher Android3 x is not supported The operation requirements may change without prior notice If t...

Page 51: ...inting Center To use the Canon Inkjet Cloud Printing Center you need to follow the steps described below and register My account information If your model has color LCD monitor If your model has monoc...

Page 52: ...ion For details go to the Online Manual home page and see Checking Printer Information for your model 3 Select IJ Cloud Printing Center setup Register with this service 4 Follow the instructions displ...

Page 53: ...enter contains a character that cannot be used If you registered a different e mail address by mistake you can cancel the registration by Displaying Printer Information and selecting IJ Cloud Printing...

Page 54: ...cess the URL in the e mail Register the Information and Complete the User Registration 1 Check that e mail containing URL has been sent to registered e mail address and access URL 2 In the License agr...

Page 55: ...ter password for logging in to Canon Inkjet Cloud Printing Center In the My account registration screen enter the password you want to register into Password and Password Confirmation and then select...

Page 56: ...yte alphanumeric characters and symbols _ Alphabets are case sensitive 4 Enter Nickname Enter any user name you want to use Important The user name entry field has the following character restrictions...

Page 57: ...is a daylight saving time in the Time zone that you selected Select whether or not to apply the daylight saving time The registration is complete A registration completion message is displayed When y...

Page 58: ...ct the check box the login screen is skipped for 14 days since the last day that the service screen was accessed Important If you fail to log in five straight times you will not be able to login again...

Page 59: ...ormats that can be printed differ depending on the app Before you print check that printer is on and is connected to the network Then start This is available if you are using a smartphone or tablet No...

Page 60: ...4 In the displayed image list select the image that you want to print and then select Next 5 Make the necessary print settings and then select Print 60...

Page 61: ...nting select Apps The screen returns to the apps list screen Important If a print job is not printed within 24 hours after the print job is issued the print job will expire and cannot be printed With...

Page 62: ...e to log in for about the next 60 minutes You remain logged in for 60 minutes after the last access Language Select the language you will be using E mail address Enter the e mail address that you ente...

Page 63: ...ting Center is displayed Description of the Main screen When you log in to the Canon Inkjet Cloud Printing Center the Main screen appears If you are using a smartphone or a tablet you can also print p...

Page 64: ...e Select how to manage and set Manage by group for office users Mng printer screen From the Mng printer screen you can check or update printer information registered to the Canon Inkjet Cloud Printing...

Page 65: ...ct how to manage has been set you can use this function only when you select Manage app availability by printer For details see Tips on Using Canon Inkjet Cloud Printing Center at Work Change the prin...

Page 66: ...d to the Canon Inkjet Cloud Printing Center delete users add users and change the Administrator and Standard user settings User deletion Select the check box of the user to be deleted and select Delet...

Page 67: ...roups deleting groups adding groups and setting up users printers and apps belonging to each group Checking group information The registered group names appear If there are items that have not been se...

Page 68: ...service linking release select appears for items that do not have anything selected In the default settings all check marks are cleared for Printers and Users Only the system apps under Apps are set t...

Page 69: ...roups Apps available on printers that do not require a security code For printers without the Multiuser mode setting or Security code settings set the apps to be displayed when a user selects Cloud fr...

Page 70: ...screen select Require security code Each user can set a Security code start the app and perform printing and other operations This setting is linked with Multiuser mode on the Mng printer screen Note...

Page 71: ...r the default settings will allow all users to add delete and rearrange apps Also if you are using a MAXIFY series printer and you select Multiuser mode in the Mng printer screen only the administrato...

Page 72: ...you select the context menu appears The information displayed depends on the menu currently selected in the menu area The symbol indicates that there is a new unread notice Sort This displays the scre...

Page 73: ...ccount Displays user information From the My account screen you can change your account settings From the My account screen you can display the Permitted services screen and clear any linked service s...

Page 74: ...ps screen in the Display area The display can be toggled between Registered and Search apps The Registered screen lists registered apps You can check the information of these apps or deregister them N...

Page 75: ...displayed by category When you select the details of the app are displayed When you select you can choose to register or unregister the app Note Description of displayed icons Cannot be used because i...

Page 76: ...e Properties displayed may differ from the actual status at the display time depending on the printer status Manage jobs This screen displays the print or scan status and history You can check the pri...

Page 77: ...ld as an example If the father registers the printer to Canon Inkjet Cloud Printing Center only the father is managed by the service and the mother and the child cannot use the service unless the fath...

Page 78: ...d by following the screen instructions registers the mother and child as users After this registration is complete the mother and child can individually use the service If Father Mother and Child Want...

Page 79: ...istrator father specifies settings according to the procedure below the father the mother and the child will be able to manage apps individually 1 As the Administrator the father logs in to Canon Inkj...

Page 80: ...ilability by user and selects OK 4 The screen for checking the management method change appears To complete the setup and return to the Advanced management window select OK All registered users can re...

Page 81: ...he new hire Note If the second printer has not been registered select Adding a Printer and register the printer by following the procedure Creating a Group for All Office Members to Use Set the basic...

Page 82: ...4 The senior clerk selects Advanced management from 5 For Select how to manage the senior clerk selects Set 82...

Page 83: ...office users and selects OK Note If Group management has already been set up refer to step 10 and the subsequent steps 7 On the screen for checking management method changes the senior clerk checks t...

Page 84: ...Group name and selects OK The chief clerk enters Office here because the clerk is setting up a group that everyone in the office will use Important The following restrictions apply to entering the Gro...

Page 85: ...11 On Printers tab check that all printers are selected 12 On Apps tab set only Evernote app to 85...

Page 86: ...dd a group To create a new group use Add group and then in the setup screen for the added group add users and printers Limiting Apps That Each User Can Use Limiting Apps That All Members Can Use on Pr...

Page 87: ...1 From select Group management Note This appears only if Manage by group for office users is set in Advanced management 2 In displayed screen select Add group 87...

Page 88: ...to entering the Group name The group name can have up to 20 single byte alphanumeric characters or up to 10 double byte characters The same group name cannot be registered more than once in the same d...

Page 89: ...6 On the Printers tab select printer to be used 7 On the Apps tab set the Evernote and Facebook apps to 89...

Page 90: ...The group setup screen displays all users and printers that are registered in the domain Limiting Apps That All Members Can Use on Printer To set the apps to be used on the printer use the following...

Page 91: ...s appears only if Manage by group for office users is set in Advanced management 2 For Apps available on printers that do not require a security code select Settings 3 On Apps tab set only Evernote ap...

Page 92: ...the only app that all users can use on the printer Limiting Apps That Individual Users Can Use on Printer For each user you can set the apps that the user can use on the printer As an example this se...

Page 93: ...ere the settings cannot be changed this function cannot be selected Some models do not support this function To check whether your model supports this function see Models that Support Security Codes 4...

Page 94: ...ication e mail select Cancel Important The following character restriction applies to Security code entries Up to 8 alphanumeric characters The Security code change process ends and the change complet...

Page 95: ...from My account and then Log in 8 Select Facebook app Only the president will be able to use the Facebook app from the printer Limiting Printers That Individual Users Can Use As an example this sectio...

Page 96: ...1 From select Group management Note This appears only if Manage by group for office users is set in Advanced management 2 Select Settings for the group containing all users 96...

Page 97: ...t screen select Close Important If a user is being managed in multiple groups and an app is deleted or the target printer is changed for one of those groups the user can still use that app or printer...

Page 98: ...e MAXIFY series you can set a Security code We recommend that you set a Security code to prevent other users from using your account This code is valid only when you use MAXIFY Cloud Link from the pri...

Page 99: ...to the registered e mail address and access the URL 2 Enter the information according to the instructions on the authentication screen and then select Log in 3 When printer addition complete message a...

Page 100: ...nitor 2 Enter the information according to the instructions on the authentication screen and then select Log in 3 When printer addition complete message appears select OK The printer addition process...

Page 101: ...er addition procedure and the user privileges Adding a user 1 On the service screen select Manage users from 2 Select Add user Note When you select Add user the service first checks whether the maximu...

Page 102: ...enter an e mail address that is already registered you will receive notification that the address is registered To specify another e mail address follow the displayed instructions 4 Access the URL re...

Page 103: ...sword into Password and Password Confirmation and select Next Important There are character restrictions for the Password as shown below The password must be between 8 and 32 characters long using sin...

Page 104: ...8 Specify the Time zone setting and select Done Select your region on the list If you cannot find your region on the list select the one closest to your region Apply daylight saving time This appears...

Page 105: ...n about the functions that each user can use refer to the Canon Inkjet Cloud Printing Center window If you are using MAXIFY Cloud Link from the printer select Multiuser mode in the Mng printer screen...

Page 106: ...gistered app is not in the Apps list Check the display language of Canon Inkjet Cloud Printing Center If the display language is switched to a language that does not support an app the app will not be...

Page 107: ...LAN and the LAN environment is connected to the Internet Check that no error message is displayed on the printer s LCD monitor If printing does not start even after you wait awhile go to the printer s...

Page 108: ...kjet Cloud Printing Center services If your model has color LCD monitor On the printer s Home screen select Setup Web service setup Web service connection setup IJ Cloud Printing Center setup Delete f...

Page 109: ...Canon PRINT Inkjet SELPHY to easily print photos saved on a smartphone or tablet wirelessly You can also receive scanned data PDForJPEG directly on a smartphone or tablet without using a computer Can...

Page 110: ...setup for using this product from your computer smartphone or tablet device When the connection is complete the Canon Inkjet Print Utility software which allows you to specify detailed print settings...

Page 111: ...ss and serial number by following the steps below 1 Make sure machine is turned on 2 Load two sheets of A4 or Letter sized plain paper 3 Press and hold Wi Fi button and release it when ON lamp flashes...

Page 112: ...rd The password is specified to the machine serial number at the time of purchase If you have not changed the password yet enter the machine serial number that is printed on the Serial Number column o...

Page 113: ...ber at the time of purchase For the password refer to Administrator Password The following character restrictions apply to the password that you change Set the password by using 4 to 32 characters The...

Page 114: ...Paper Loading Plain Paper Photo Paper Loading Envelopes Loading Originals Loading Originals on the Platen Glass Originals You Can Load How to Detach Attach the Document Cover Replacing a FINE Cartridg...

Page 115: ...Loading Paper Loading Plain Paper Photo Paper Loading Envelopes 115...

Page 116: ...repare paper Align the edges of paper If paper is curled flatten it Note Align the edges of paper neatly before loading Loading paper without aligning the edges may cause paper jams If paper is curled...

Page 117: ...aper stack all the way to the back of the front tray Important Always load paper in the portrait orientation D Loading paper in the landscape orientation E can cause paper jams 5 Slide the right paper...

Page 118: ...the stack touches the paper guides Load small size paper such as 4 x 6 10 x 15 cm by pushing it in all the way to the back of the front tray 6 Open the output tray extension 7 Open the paper output t...

Page 119: ...en the paper output tray when printing If not open the machine cannot start printing Note When printing select the size and type of the loaded paper on the print settings screen of the operation panel...

Page 120: ...Envelopes whose gummed flaps are already moistened and adhesive 1 Prepare envelopes Press down on all four corners and edges of the envelopes to flatten them If the envelopes are curled hold the oppo...

Page 121: ...p of the envelope will be faced up on the left side D Rear side E Address side Push the envelopes all the way to the back of the front tray Up to 5 envelopes can be loaded at once 5 Slide the right pa...

Page 122: ...extension 7 Open the paper output tray F gently then extend the paper output support G Important Be sure to open the paper output tray when printing If not open the machine cannot start printing Note...

Page 123: ...Loading Originals Loading Originals on the Platen Glass Originals You Can Load How to Detach Attach the Document Cover 123...

Page 124: ...wing when loading the original on the platen glass Do not place any objects weighing 4 4 lb 2 0 kg or more on the platen glass Do not put any pressure of 4 4 lb 2 0 kg or more on the platen glass such...

Page 125: ...Important After loading the original on the platen glass be sure to close the document cover before starting to copy or scan 125...

Page 126: ...Printed photo postcard business card or disc BD DVD CD etc Size width x height Max 8 5 x 11 7 inches 216 x 297 mm Note When loading a thick original such as a book on the platen glass you can load it...

Page 127: ...ng the document cover Hold up the document cover vertically and then pull it up Attaching the document cover Fit both hinges A of the document cover into the holder B and insert both hinges of the doc...

Page 128: ...Replacing a FINE Cartridge Replacing a FINE Cartridge Checking Ink Status 128...

Page 129: ...edure below 1 Make sure that the power is turned on then open the front cover A and the paper output tray B 2 Open the paper output cover C When the FINE cartridge holder moves to the replacement posi...

Page 130: ...lamp lights In this case close the paper output cover then open it again 3 Push down the ink cartridge lock lever of the empty FINE cartridge until it clicks 4 Remove the FINE cartridge Important Han...

Page 131: ...egulations regarding disposal of consumables Do not touch the electrical contacts or print head nozzle on a FINE cartridge The machine may not print properly if you touch them 6 Insert the new FINE ca...

Page 132: ...is locked into place when the ink cartridge lock lever clicks Important Check if the FINE cartridge is installed correctly The machine cannot print unless both the color FINE cartridge and black FINE...

Page 133: ...ical contacts A or print head nozzle B on a FINE cartridge The machine may not print properly if you touch them If you remove a FINE cartridge replace it immediately Do not leave the machine with the...

Page 134: ...E cartridge or black FINE cartridge is not installed an error occurs and the machine cannot print For information on how to configure this setting see below Setting the Ink Cartridge to be Used Window...

Page 135: ...king the Ink Status with the Ink Lamps on the Operation Panel You can also check the ink status on the computer screen Checking the Ink Status from Your Computer Windows Checking the Ink Status from Y...

Page 136: ...error Count the number of flashes and take appropriate action An Error Occurs In the copy standby mode you can check the ink status with the Color Ink lamp and Black Ink lamp A Alarm lamp B Color Ink...

Page 137: ...Maintenance If Printing Is Faint or Uneven Performing Maintenance Functions from Your Computer Windows Performing Maintenance Functions from Your Computer Mac OS Cleaning 137...

Page 138: ...Printing Is Faint or Uneven Maintenance Procedure Printing the Nozzle Check Pattern Examining the Nozzle Check Pattern Cleaning the Print Head Cleaning the Print Head Deeply Aligning the Print Head 1...

Page 139: ...bottom of the FINE cartridge is removed If the Alarm lamp lights or flashes see An Error Occurs Increasing the print quality in the printer driver settings may improve the print result Changing the P...

Page 140: ...m is not resolved turn off the power and clean the print head deeply again after 24 hours Do not unplug the power cord when turning off the power If the problem is still not resolved Step5 Replace a F...

Page 141: ...or Letter sized plain paper 1 Make sure that the power is turned on 2 Load a sheet of A4 or Letter sized plain paper in the front tray 3 Open the output tray extension open the paper output tray then...

Page 142: ...r of sheets printed so far If there are missing lines in the pattern A Cleaning the print head is required D Good E Bad lines are missing If there are horizontal white streaks in the pattern B Cleanin...

Page 143: ...2 Hold down the Stop button until the Alarm lamp flashes twice then release it immediately The machine starts cleaning the print head The cleaning will be complete when the ON lamp lights after flash...

Page 144: ...ine starts cleaning the print head deeply The cleaning will be complete when the ON lamp lights after flashing Do not perform any other operations until the machine completes the deep cleaning of the...

Page 145: ...led paper Be sure to use paper that is white and clean on both sides 1 Make sure that the power is turned on 2 Load a sheet of A4 or Letter sized plain paper in the front tray 3 Open the output tray e...

Page 146: ...fter flashing Remove the print head alignment sheet on the platen glass Important Do not open the document cover or move the print head alignment sheet on the platen glass until adjusting the print he...

Page 147: ...ning the Print Heads Cleaning Inside the Printer Cleaning the Paper Feed Rollers Printing a Nozzle Check Pattern Aligning the Print Head Aligning the Print Head Position Automatically Aligning the Pri...

Page 148: ...g in the tank Did you push in the ink tank completely until you heard a clicking sound If the orange tape is there has it been peeled off completely Any remaining tape will hinder ink output Did you i...

Page 149: ...nk output Did you install the ink tanks in their correct positions 3 Execute deep cleaning Make sure that the printer is on and then click OK Click OK when the confirmation message appears Print head...

Page 150: ...Canon IJ Printer Utility 2 Click the Bottom Plate Cleaning icon The dialog opens 3 Load paper in the printer As instructed in the dialog fold the A4 size or Letter size plain paper in half horizontall...

Page 151: ...2 Select Cleaning from the pop up menu on the Canon IJ Printer Utility 3 Click the Roller Cleaning icon The confirmation message appears 4 Execute paper feed roller cleaning Make sure that the printer...

Page 152: ...g items for each ink Then if necessary perform Nozzle Check Is there ink remaining in the tank Did you push in the ink tank completely until you heard a clicking sound If the orange tape is there has...

Page 153: ...djustment position are corrected and conditions such as color and line streaking are improved If the print results appear uneven because of line shifts or other conditions adjust the position of the p...

Page 154: ...ds manually check box 3 Apply the settings Click Apply and when the confirmation message appears click OK 4 Select Test Print from the pop up menu on the Canon IJ Printer Utility 5 Click the Print Hea...

Page 155: ...pick the setting that produces the least noticeable horizontal streaks A Least noticeable horizontal streaks B Most noticeable horizontal streaks 9 Confirm the displayed message and click OK The secon...

Page 156: ...ertical streaks B Most noticeable vertical streaks 11 Confirm the displayed message and click OK The third pattern is printed Important Do not open the paper output cover while printing is in progress...

Page 157: ...ceable horizontal stripes A Least noticeable horizontal stripes B Most noticeable horizontal stripes Note After head alignment is completed you can print and check the current setting To do so click t...

Page 158: ...icon A message is displayed 3 Load paper in the printer Load one sheet of A4 size or Letter size plain paper into the front tray Note The number of sheets to be used differs when you select the manua...

Page 159: ...rinter driver displays an icon to let you know 2 If necessary click Ink Details You can check the ink related information Note Ink Details is displayed when the ink level is low Click to check which F...

Page 160: ...Cleaning Cleaning the Exterior of the Machine Cleaning the Platen Glass and Document Cover Cleaning the Paper Feed Roller Cleaning the Inside of the Machine Bottom Plate Cleaning 160...

Page 161: ...ng Important Be sure to turn off the power and unplug the power cord before cleaning the machine Do not use tissue paper paper towels rough textured cloth or similar materials for cleaning so as not t...

Page 162: ...use volatile liquids such as thinners benzene acetone or any other chemical cleaner to clean the machine as this may cause a malfunction or damage the surface of the machine Use a soft clean lint fre...

Page 163: ...Alarm lamp flashes seven times then release it immediately The paper feed roller will rotate as it is cleaned without paper 4 Make sure that the paper feed roller has stopped rotating close the paper...

Page 164: ...then unfold the paper 3 Fold one side of the opened paper in another half aligning the edge with the center crease then unfold the paper 4 Load only this sheet of paper in the front tray with the ridg...

Page 165: ...r If the problem is not resolved after performing cleaning again the protrusions inside the machine may be stained Wipe off any ink from the protrusions using a cotton swab or the like Important Be su...

Page 166: ...zing Machine Settings Disabling Wireless LAN Function Network Connection Network Connection Tips Network Communication Windows Checking and Changing Network Settings IJ Network Tool Network Connection...

Page 167: ...Keeping Print Quality High Transporting Your Printer Legal Restrictions on Scanning Copying Specifications 167...

Page 168: ...Safety Safety Precautions Regulatory Information 168...

Page 169: ...the Specification Do not place any object on the machine Especially do not place metal objects paper clips staples etc or containers of flammable solvents alcohol thinners etc on top of the machine D...

Page 170: ...determined by turning the equipment off and on the user is encouraged to try to correct the interference by one or more of the following measures Reorient or relocate the receiving antenna Increase t...

Page 171: ...ption des extr mit s mains poignets pieds et chevilles Only for European Union and EEA Norway Iceland and Liechtenstein This symbol indicates that this product is not to be disposed of with your house...

Page 172: ...he product is not used for a time the device switches to its Power Save Mode The devices consume less power Watt in these modes If you wish to set a longer Activation Time or would like to completely...

Page 173: ...Main Components and Their Use Main Components Power Supply 173...

Page 174: ...Main Components Front View Rear View Inside View Operation Panel 174...

Page 175: ...al on the platen glass 5 paper guides Align with both sides of the paper stack 6 front tray Load paper here Two or more sheets of the same size and type of paper can be loaded at the same time and fed...

Page 176: ...10 operation panel Use to change the settings of the machine or to operate it Operation Panel 11 platen glass Load an original here 176...

Page 177: ...rd connector Plug in the supplied power cord 3 USB port Plug in the USB cable to connect the machine with a computer Important Do not touch the metal casing Do not plug in or unplug the USB cable whil...

Page 178: ...E cartridge should be installed into the right slot 4 head cover Opens to enable replacement of the FINE cartridge The head cover will open automatically when you open the paper output cover Note For...

Page 179: ...has occurred and the machine is not ready to print ON lamp flashes and Alarm lamp flashes alternately An error that requires contacting the service center may have occurred An Error Occurs 2 ON button...

Page 180: ...ton down lets you select maintenance options or machine settings 9 Color button Starts color copying You can also press this button to finalize your selection for the setting item 10 Black button Star...

Page 181: ...Power Supply Confirming that the Power Is On Turning the Machine On and Off Notice for the Power Plug Power Cord Notice for Unplugging the Power Cord 181...

Page 182: ...Confirming that the Power Is On The ON lamp is lit when the machine is turned on Note It may take a while for the machine to start printing immediately after you turn on the machine 182...

Page 183: ...Error Occurs You can set the machine to automatically turn on when a print or scan operation is performed from a computer connected by USB cable or wireless network This feature is set to off by defa...

Page 184: ...automatically turn off when no operations are performed or no print jobs are sent to the machine for a certain interval This feature is set to on by default Managing the Printer Power Windows Managin...

Page 185: ...r cord is hot The power plug power cord is rusty The power plug power cord is bent The power plug power cord is worn The power plug power cord is split Caution If you find anything unusual with the po...

Page 186: ...that the ON lamp is off Unplugging the power cord while the ON lamp is lit or flashing may cause drying or clogging of the print head and print quality may be reduced 1 Press the ON button to turn th...

Page 187: ...ngs Changing Printer Settings from Your Computer Windows Changing Printer Settings from Your Computer Mac OS Changing Settings from Operation Panel Initializing Machine Settings Disabling Wireless LAN...

Page 188: ...inter Settings from Your Computer Mac OS Registering a Changed Printing Profile Setting the Ink Cartridge to be Used Managing the Printer Power Reducing the Printer Noise Changing the Printer Operatio...

Page 189: ...t the necessary items 2 Select Save Current Settings as Preset from the Presets 3 Save the settings In the displayed dialog enter a name in Preset Name and if necessary set Preset Available For Then c...

Page 190: ...esets in the Presets section Then in the dialog that appears select the name of the printing profile to be deleted 2 Delete the printing profile Click Delete and click OK The selected printing profile...

Page 191: ...k cartridge only Black Only Uses the black ink cartridge only Both Black and Color Uses the color and black ink cartridges installed on the printer 3 Complete the setup Click OK when the confirmation...

Page 192: ...the printer when there are no operations from the printer driver or the printer for a specified period of time 1 Select Power Settings from the pop up menu on the Canon IJ Printer Utility 2 Check tha...

Page 193: ...lect this option when you wish to use the printer with volume of normal operating noise Always use quiet mode Select this option when you wish to reduce the operating noise of the printer Use quiet mo...

Page 194: ...Make sure that the printer is on and click Apply Click OK when the confirmation message appears The settings are enabled hereafter Note The effects of the quiet mode may be less depending on the print...

Page 195: ...this check box to prevent paper abrasion Prevent paper double feed Select this check box only if the printer is feeding multiple sheets of plain paper at the same time Important Using this function sl...

Page 196: ...3 Apply the settings Click Apply and when the confirmation message appears click OK The printer operates with the modified settings hereafter 196...

Page 197: ...Changing Settings from Operation Panel Quiet setting Turning on off Machine Automatically 197...

Page 198: ...olor button To disable the function press the Black button in step 4 Important Operating speed is reduced compared to when the quiet mode is not selected Note You can set the quiet mode from the opera...

Page 199: ...form printing or scanning operations from the computer For Windows you can select whether you turn the machine on automatically from ScanGear scanner driver Turning off Machine Automatically You can e...

Page 200: ...tion erases all network settings on the machine and printing operation from a computer over network becomes impossible To use the machine over network follow the instructions on the Canon website To i...

Page 201: ...ess and hold Wi Fi button and release it when ON lamp flashes 3 Press Black button twice and press Wi Fi button When the ON lamp changed from flashing to lit and the Wi Fi lamp goes off the wireless L...

Page 202: ...Network Connection Network Connection Tips 202...

Page 203: ...t Network Settings Cannot Proceed beyond Printer Connection Screen Connect Cable Screen Another Printer Found with Same Name Connecting to Another Computer via LAN Changing from USB to LAN Connection...

Page 204: ...ings Enable Timeout setting WSD settings 1 minute Enable disable Bonjour Bonjour settings Enable Service name Bonjour settings Canon MG3600 series LPR protocol setting Enable PictBridge communication...

Page 205: ...printer from the results For Mac OS The printer names appear with the MAC address added at the end or as the printer name specified by Bonjour Check identifiers such as the MAC address the printer nam...

Page 206: ...puter to connect to the machine on a LAN or to change from USB to LAN connection perform setup using the Setup CD ROM or follow the instructions on the Canon website For Mac OS To connect an additiona...

Page 207: ...uct Information Product information Product Name Product name XXXXXXXX ROM Version ROM version XXXXXXXX Serial Number Serial number XXXXXXXX Wireless LAN Wireless LAN Enable Disable MAC Address MAC ad...

Page 208: ...umeric characters Channel Channel 3 Encryption Encryption method AES Authentication Authentication method WPA2 PSK TCP IPv4 TCP IPv4 Enable IP Address IP address XXX XXX XXX XXX Subnet Mask Subnet mas...

Page 209: ...Primary Server Primary server address XXX XXX XXX XXX Secondary Server Secondary server address XXX XXX XXX XXX Proxy Server Proxy server setting Enable Disable Proxy Address Proxy address XXXXXXXXXX...

Page 210: ...Network Communication Mac OS Checking and Changing Network Settings Network Communication Tips 210...

Page 211: ...ging Settings in Wireless LAN Sheet Changing WEP Detailed Settings Changing WPA WPA2 Detailed Settings Changing Settings in Wired LAN Sheet Changing Settings in Admin Password Sheet Monitoring Wireles...

Page 212: ...ng that Canon software is attempting to access the network If the warning message appears set the security software to always allow access Starting up IJ Network Tool 1 Select Applications from Go men...

Page 213: ...modified 3 Update Performs printer detection again Click this button if the target printer is not displayed Important To change the printer s network settings using IJ Network Tool it must be connecte...

Page 214: ...ration Enabled when Utilities is selected Click to display the Configuration screen to configure settings of the selected printer Note This item has the same function as Configuration in the Settings...

Page 215: ...e printer is turned on and select Refresh It may take several minutes to detect printers If the printer is not yet detected connect the machine and the computer with a USB cable and select Refresh If...

Page 216: ...Changing Settings in Direct Connection 4 Help menu Instructions Displays this guide 216...

Page 217: ...ings in the Wireless LAN sheet 1 Start up IJ Network Tool 2 Select printer in Printers When the printer is connected to the computer with a USB cable temporarily select the printer with USB appearing...

Page 218: ...ss Routers Screen Note When IJ Network Tool runs over a LAN the button is grayed out and cannot be selected Connect the printer and the computer with a USB cable temporarily to change the settings 4 E...

Page 219: ...P IP Setting Sets the IP address of the printer to be used over the LAN Specify a value appropriate for your network environment Get IP address automatically Select this option to use an IP address au...

Page 220: ...evious screen and enter the network name SSID in Network SSID Note Make sure the wireless router is turned on 3 Set Click to set the network name SSID in Network SSID on the Wireless LAN sheet Note Th...

Page 221: ...mputer with a USB cable temporarily select the printer with USB appearing in the Connected to column 3 Click Configuration button 4 Click Wireless LAN button 5 Select Use Password WEP in Encryption Me...

Page 222: ...t Base Station Select 1 for Key ID Otherwise your computer will not be able to communicate with the printer via the wireless router 5 Authentication Select the authentication method to authenticate th...

Page 223: ...ation button 4 Click Wireless LAN button 5 Select Use WPA WPA2 in Encryption Method and click Configuration 6 Enter passphrase and click OK 1 Passphrase Enter the passphrase set to the wireless router...

Page 224: ...Note This machine supports WPA WPA2 PSK WPA WPA2 Personal and WPA2 PSK WPA2 Personal 224...

Page 225: ...he settings are sent to the printer If you click OK the settings are sent to the printer and the Transmitted Settings screen is displayed 1 TCP IP Setting Sets the IP address of the printer to be used...

Page 226: ...t is displayed 5 Change or check settings 1 Use admin password Sets an administrator password with privileges to set up and change detailed options To use this feature select this check box and enter...

Page 227: ...to the printer Admin Password Enter the administrator password that was set For security purposes your password is not displayed as you type it Important If you forget the administrator password you s...

Page 228: ...low the instructions on the screen to start measuring and display the status Measurement takes a few minutes When is displayed in Connection performance between the printer and the wireless router the...

Page 229: ...routers Check that the printer and the wireless router face each other Connection performance may depend on the orientations of the wireless devices Replace the wireless router and the printer in ano...

Page 230: ...ter screen is displayed 3 Check displayed message and click Next If the screen asking you to enter the password is displayed enter the password specified for your computer and click Install Helper 4 C...

Page 231: ...ings from the screen above you can update the SSID access point name and password at the same time using the operation panel You cannot change the encryption method For details search for UG500 UG501...

Page 232: ...settings of the printer to factory default 4 Click Initialize The Setting Initialization screen is displayed Click OK to initialize the network settings of the printer Do not turn off the printer dur...

Page 233: ...after you modified the printer settings on the Configuration screen When you click OK on the Confirmation screen the following screen is displayed for checking the modified settings 1 Settings A list...

Page 234: ...Network Communication Tips Using Card Slot over Network Technical Terms Restrictions 234...

Page 235: ...xxxxxxxxxx canon_memory and click Connect For example if the current printer name is 123ABC000000 then input smb 123ABC000000 canon_memory 5 Make sure card slot is mounted When the card slot is mounte...

Page 236: ...he operation in the memory card may be impossible or slow Operate after the Access lamp of the machine is lit When you access the network drive for the card slot over the network file names consisting...

Page 237: ...eless communication occurs on a peer to peer basis i e all clients in with the same SSID network name communicate directly with each other No wireless router is required This machine does not support...

Page 238: ...channel for wireless communication In the infrastructure mode the channel is automatically adjusted to match that set to the wireless router This machine supports channels 1 to 13 Channels 12 and 13 a...

Page 239: ...be influenced by the connected apparatus At the maximum transfer rate of 600 Mbps it is possible to communicate with multiple computer terminals within a dozen or so metre radius Compatible with 802 1...

Page 240: ...resented such as a network name or a wireless router name SSID distinguishes one wireless LAN from another to prevent interference The printer and all clients on a wireless LAN must use the same SSID...

Page 241: ...s network name Stealth In the stealth mode a wireless router hides itself by not broadcasting its SSID The client must specify the SSID set to the wireless router to detect it The stealth mode is call...

Page 242: ...and rebroadcasts it Required in an infrastructure network WPA Security framework announced by the Wi Fi Alliance in October 2002 The security has been strengthened more than WEP Authentication WPA de...

Page 243: ...l value WPS Wi Fi Protected Setup WPS is a standard for easy and secure establishment of a wireless network There are 2 primary methods used in the Wi Fi Protected Setup PIN entry a mandatory method o...

Page 244: ...s you should set a network key WEP or WPA WPA2 to the wireless router to encrypt wireless transmission Wireless communication with a product that does not comply with the Wi Fi standard cannot be guar...

Page 245: ...Ensuring Optimal Printing Results Ink Tips Printing Tips Be Sure to Make Paper Settings after Loading Paper Canceling a Print Job Keeping Print Quality High Transporting Your Printer 245...

Page 246: ...y The machine has the function to automatically clean the ink jet nozzles to prevent clogging In the cleaning procedure used ink for nozzle cleaning is limited to a small amount Does black and white p...

Page 247: ...r or performing borderless printing the area where papers go through may get smeared with ink Clean the inside of your machine with Bottom Plate Cleaning Check how to load the paper correctly Is the p...

Page 248: ...ts Are Unsatisfactory There are various types of paper paper with special coating on the surface for printing photos with optimal quality and paper suitable for documents Each media type has specific...

Page 249: ...press the ON button If you press the ON button while printing is in progress the print data sent from the computer queues in the machine and you may not be able to continue to print Press the Stop bu...

Page 250: ...ress the ON button to turn off the power the machine caps the print head nozzles automatically to prevent from drying If you unplug the power cord from the wall outlet before the ON lamp is turned off...

Page 251: ...rt of the machine have its box marked THIS SIDE UP to keep the machine with its bottom facing down Mark also with FRAGILE or HANDLE WITH CARE 1 Turn the machine off 2 Confirm that the ON lamp is off a...

Page 252: ...ertificates of deposit Postage stamps canceled or uncanceled Identifying badges or insignias Selective service or draft papers Checks or drafts issued by governmental agencies Motor vehicle licenses a...

Page 253: ...no condensation The performance of the printer may be reduced under certain temperature and humidity conditions Recommended conditions Temperature 59 to 86 F 15 to 30 C Humidity 10 to 80 RH no conden...

Page 254: ...ut Gray 16 bit 8 bit Color 48 bit 24 bit RGB each 16 bit 8 bit Network Specifications Communication protocol TCP IP Wireless LAN Supported Standards IEEE802 11n IEEE802 11g IEEE802 11b Frequency bandw...

Page 255: ...required to use Easy WebPrint EX and all the Online Manual Windows Operation can only be guaranteed on a computer with Windows 8 1 Windows 8 Windows 7 Windows Vista or Windows XP pre installed Window...

Page 256: ...Information about Paper Media Types You Can Use Paper Load Limit Media Types You Cannot Use Printing Area Printing Area Other Sizes than Letter Legal Envelopes Letter Legal Envelopes 256...

Page 257: ...ot sold in the US by Model Number Purchase paper by name Paper for printing documents Canon Red Label Superior WOP111 1 Canon Oc Office Colour Paper SAT213 1 Paper for printing photos Photo Paper Pro...

Page 258: ...ize paper within the following ranges Minimum size 3 50 x 5 00 inches 89 0 x 127 0 mm Maximum size 8 50 x 26 61 inches 215 9 x 676 0 mm Paper Weight You can use paper in the following weight range 17...

Page 259: ...OP111 Approx 100 sheets Approx 50 sheets Canon Oc Office Colour Paper SAT213 Approx 80 sheets Approx 50 sheets Paper for printing photos Media Name Model No Front Tray Photo Paper Pro Platinum PT 101...

Page 260: ...tal conditions either very high or low temperature or humidity In such cases reduce the number of paper you load at a time to less than half 2 We recommend that you remove the previously printed paper...

Page 261: ...r weighing more than 28 lb 105 g m2 except for Canon genuine paper Plain paper or notepad paper cut to a small size when printing on paper smaller than A5 Picture postcards Postcards affixed with phot...

Page 262: ...Printing Area Printing Area Other Sizes than Letter Legal Envelopes Letter Legal Envelopes 262...

Page 263: ...Borderless Printing use the following paper Photo Paper Pro Platinum PT 101 Glossy Photo Paper Everyday Use GP 501 GP 601 Photo Paper Glossy GP 601 Photo Paper Plus Glossy II PP 201 Photo Paper Pro Lu...

Page 264: ...90 x 9 80 inches 175 2 x 249 0 mm 4 x 6 10 x 15 cm 3 73 x 5 69 inches 94 8 x 144 4 mm 5 x 7 13 x 18 cm 4 73 x 6 69 inches 120 2 x 169 8 mm 8 x 10 20 x 25 cm 7 73 x 9 69 inches 196 4 x 246 0 mm Recomm...

Page 265: ...tter 8 00 x 10 69 inches 203 2 x 271 4 mm Legal 8 00 x 13 69 inches 203 2 x 347 6 mm Recommended printing area A 1 28 inches 32 5 mm B 1 32 inches 33 5 mm Printable area C 0 12 inch 3 0 mm D 0 20 inch...

Page 266: ...ting Area width x height Envelope DL 3 88 x 7 20 inches 98 8 x 183 0 mm Envelope Com 10 3 68 x 8 04 inches 93 5 x 204 3 mm Recommended printing area A 0 31 inch 8 0 mm B 1 14 inches 29 0 mm C 0 22 inc...

Page 267: ...aracters Model whose serial number is used as the administrator password For the models other than the above the printer serial number is used as the administrator password Where Serial Number Is Loca...

Page 268: ...ing on the printer you are using For security reasons we recommend you change the password Note Use an OS or web browser below to use Remote UI iOS devices OS iOS 6 1 or later Browser Default browser...

Page 269: ...s four alphabets followed by five numbers Example Note The printer serial number is written on the warranty Depending on the printer you are using you can check the serial number by printing out the n...

Page 270: ...G6730 MG6600 MG6500 MG6400 MG5700 No card slot MG5600 No card slot MG5500 No card slot MG3600 No card slot MG3500 No card slot MG2900 No card slot MG2500 No card slot MG2400 No card slot MX series MB...

Page 271: ...Printing Printing from Computer Printing from Smartphone Tablet Printing from Digital Camera 271...

Page 272: ...from Application Software Windows Printer Driver Printing from Application Software Mac OS Printer Driver Printing Using Canon Application Software Printing Using a Web Service Printing from an AirPri...

Page 273: ...Application Software Mac OS Printer Driver Printing with Easy Setup Basic Various Printing Methods Changing the Print Quality and Correcting Image Data Overview of the Printer Driver Updating the Prin...

Page 274: ...rned on 2 Load paper on the printer 3 Select the printer Select your model from the Printer list in the Print Dialog Note Click Show Details to switch the Setup window to the detailed display 4 Select...

Page 275: ...edia from the pop up menu 6 Select the media type For Media Type select the same paper type loaded in the printer 7 Select the print quality For Print Quality select High Standard or Draft according t...

Page 276: ...nt the document will be printed in accordance with the type and size of the media Important If you check the Do not show again check box when a guide message is displayed before printing starts this w...

Page 277: ...Paper Canon Oc Office Colour Paper SAT213 Plain Paper Canon genuine papers Photo Printing Media name Model No Media Type in the printer driver Photo Paper Plus Glossy II PP 201 Photo Paper Plus Glossy...

Page 278: ...of Copies and Printing Order Setting the Stapling Margin Execute Borderless Printing Scaling the Printing to Fit the Paper Size Scaled Printing Page Layout Printing Duplex Printing Printing on Postcar...

Page 279: ...rint Dialog 2 Select Paper Handling from the pop up menu 3 Check the Collate pages check box when you are specifying multiple copies in the Copies box Check the Collate pages check box to print all th...

Page 280: ...has the same function specify the settings on the printer driver However if the print results are not acceptable specify the function settings on the application software When you specify the number...

Page 281: ...n from the Stapling Side list Note The printer automatically reduces the print area depending on the staple position margin Depending on the Two Sided setting in the Layout pop up menu the Stapling Si...

Page 282: ...The procedure for performing borderless printing is as follows Setting Borderless Printing 1 Select the size of the paper for borderless printing Select XXX borderless from the Paper Size in the Prin...

Page 283: ...t to the width differs from the image data a portion of the image may not be printed depending on the size of the media used In this case crop the image data with an application software according to...

Page 284: ...the print depending on the size of the paper Note When the Amount of Extension slider is set to the leftmost position image data will be printed in the full size If you set this when printing the addr...

Page 285: ...andling from the pop up menu 3 Set the print paper size Check the Scale to fit paper size check box Then from the Destination Paper Size pop up menu select the paper size that is actually loaded in th...

Page 286: ...Click Print When you execute print the document will be enlarged or reduced to fit to the page size 286...

Page 287: ...nd click OK Note Depending on the Scale value that you set an error message may be displayed 3 Complete the setup On the Print Dialog click Print When you execute print the document will be printed wi...

Page 288: ...original you print on one page In Pages per Sheet specify the number of page you print on one page 3 If necessary set the following items Layout Direction To change the page placement order select an...

Page 289: ...4 Complete the setup Click Print When you execute print the specified number of pages will be arranged on each sheet of paper in the specified order 289...

Page 290: ...re for printing data on both sides of one sheet of paper is as follows 1 Set duplex printing Check the Two Sided check box in the Print Dialog 2 Select Layout from the pop up menu on the Print Dialog...

Page 291: ...ng cannot be executed When borderless printing is set duplex printing cannot be executed Duplex printing can be performed only when one of the following paper sizes is selected from Paper Size US Lett...

Page 292: ...Related Topics Cleaning Inside the Printer Changing the Printer Operation Mode 292...

Page 293: ...dition will cause line shifts or a paper jam With return postcards borderless printing cannot be used 3 Select Quality Media from the pop up menu 4 Select the media type For Media Type select the same...

Page 294: ...for Paper Size Select User Defined or your model for Non Printable Area and enter the margins 3 Registering the custom paper size Click OK The custom size is registered Important If the application so...

Page 295: ...Color Correction Optimal Photo Printing of Image Data Adjusting Colors with the Printer Driver Printing with ICC Profiles Specifying an ICC Profile from the Application Software Printing with ICC Prof...

Page 296: ...or Print Quality 3 Setting the print quality level Move the Quality slider to select the print quality level 4 Complete the setup Click Print When you execute print the image data is printed with the...

Page 297: ...m the pop up menu on the Print Dialog 2 Set grayscale printing Check the Grayscale Printing check box 3 Complete the setup Click Print When you execute print the document is converted to grayscale dat...

Page 298: ...Print Dialog 2 Select color correction Select the item below that matches your purpose ColorSync Perform color correction using ColorSync Canon Color Matching With Canon Digital Photo Color you can p...

Page 299: ...Printing with ICC Profiles Specifying an ICC Profile from the Printer Driver 299...

Page 300: ...sed There are two typical printing methods Check the color space sRGB of the image data and the application software to be used and then select the printing method suited to your purpose Adjusting Col...

Page 301: ...ng colors with the printer driver is as follows 1 Select Color Matching from the pop up menu of the Print Dialog 2 Select color correction Select Canon Color Matching 3 Set the other items From the po...

Page 302: ...image data Even if you print using a printing ICC profile that you created yourself from your application software be sure to select color management items from your application software For instruct...

Page 303: ...Adjusting Brightness Adjusting Intensity Adjusting Contrast 303...

Page 304: ...lect ColorSync You can leave Profile set to Automatic Important If you choose a Profile setting other than Automatic the printer will not be able to print with the correct colors 3 Complete the setup...

Page 305: ...all colors are more uniform No adjustment Adjust color balance The procedure for adjusting color balance is as follows 1 Select Color Options from the pop up menu of the Print Dialog 2 Adjust color ba...

Page 306: ...lity Media the color balance Cyan Magenta Yellow appear grayed out and are unavailable If you select ColorSync for Color Matching then the color balance Cyan Magenta Yellow appear grayed out and are u...

Page 307: ...ed Dark is selected The procedure for adjusting brightness is as follows 1 Select Color Options from the pop up menu of the Print Dialog 2 Specify the brightness Select Light Normal or Dark for Bright...

Page 308: ...Related Topics Setting the Print Quality Level Custom Specifying Color Correction Adjusting Color Balance Adjusting Intensity Adjusting Contrast 308...

Page 309: ...Print Dialog 2 Adjust intensity Moving the Intensity slider to the right intensifies darkens the colors and moving the slider to the left dilutes brightens the colors You can also directly enter a va...

Page 310: ...Related Topics Setting the Print Quality Level Custom Specifying Color Correction Adjusting Color Balance Adjusting Brightness Adjusting Contrast 310...

Page 311: ...ct Color Options from the pop up menu of the Print Dialog 2 Adjust the contrast Moving the Contrast slider to the right increases the contrast and moving the slider to the left decreases the contrast...

Page 312: ...Related Topics Setting the Print Quality Level Custom Specifying Color Correction Adjusting Color Balance Adjusting Brightness Adjusting Intensity 312...

Page 313: ...Window Page Setup Dialog Print Dialog Quality Media Color Options Borderless Printing Margin Canon IJ Printer Utility Opening the Canon IJ Printer Utility Maintenance of this Printer Display the Prin...

Page 314: ...to the printer Because different models support different print data formats you need a printer driver for the specific model you are using Using Help of the Printer Driver You can display Help funct...

Page 315: ...e Setup Dialog Use this procedure to set the page paper settings before printing 1 Select Page Setup from the File menu of the application software The Page Setup Dialog opens Opening the Print Dialog...

Page 316: ...and then select the following items Page Attributes Set the paper size or scaled printing Save as Default You can save the attributes of the displayed page as the default settings Format For Select th...

Page 317: ...the Print dialog Copies You can set the number of copies to be printed Note You can set collated printing by choosing Paper Handling from the pop up menu Two Sided You can set duplex printing Pages Y...

Page 318: ...order Cover Page You can output cover pages both before and after a document Quality Media You can set basic print settings that match the printer Color Options You can adjust the print colors as you...

Page 319: ...Size and then print again If you print on paper other than hagaki load the paper according to usage instructions and then click OK Paper Source Shows the source from which paper is supplied Print Qua...

Page 320: ...grayscale data in the printer to print it in monochrome When you check the check box both monochrome and color documents will be printed in monochrome When printing a color document be sure to unchec...

Page 321: ...s produced by color adjustment When you want to display the sample image with a color pattern check this check box When you want to display the sample image with one that you selected with Sample Type...

Page 322: ...ng printing To make the differences between the light and dark portions of images greater and more distinct increase the contrast On the other hand to make the differences between the light and dark p...

Page 323: ...borderless printing is performed Amount of Extension Use the Amount of Extension slider to adjust the amount of the document that extends off the paper Moving the slider to the right makes the amount...

Page 324: ...tween 0 inch 0 mm to 1 2 inches 30 mm Stapling Side Specify the stapling side Long side stapling Left Long side stapling Right Select this option to staple the long side of the paper Choose left or ri...

Page 325: ...leaning Inside the Printer Cleaning the Paper Feed Rollers Test Print Execute a test print to check the condition of the print head nozzle and to adjust the print head position Aligning the Print Head...

Page 326: ...er communicates with the printer to obtain information If the computer is unable to communicate with the printer an error message may be displayed If this happens click Cancel to display the most rece...

Page 327: ...ollow the steps below 1 Open System Preferences and select Printers Scanners Print Scan 2 Start the Canon IJ Printer Utility Select your model from the printer list and click Options Supplies Click Op...

Page 328: ...nter Cleaning the Paper Feed Rollers Printing a Nozzle Check Pattern Aligning the Print Head Position Checking the Ink Status from Your Computer Setting the Ink Cartridge to be Used Managing the Print...

Page 329: ...ners Print Scan To display the printing status screen select the name of your printer model from the printer list and then click Open Print Queue 2 Checking the printing status You can check the name...

Page 330: ...printing the specified document Resumes printing the specified document Displays the print job information Stops printing all documents Displayed only when printing of all documents is being stopped a...

Page 331: ...ng Delete unnecessary print jobs from the print status check screen 1 Open System Preferences and select Printers Scanners Print Scan 2 Select your model and then click Open Print Queue The print stat...

Page 332: ...t be displayed on the left side of the Print dialog Do not start up the Canon IJ Network Tool while printing Do not print when the Canon IJ Network Tool is running If you connect this printer and AirP...

Page 333: ...Updating the Printer Driver Obtaining the Latest Printer Driver Delete the Unnecessary Canon IJ Printer from the Printer List Before Installing the Printer Driver Installing the Printer Driver 333...

Page 334: ...olved problems may be solved You can access our website and download the latest printer driver for your model Important You can download the printer driver for free but any Internet access charges inc...

Page 335: ...inter from the printer list is as follows You cannot delete the Canon IJ Printer unless you are logged in as a user with the administrative right For information about an administrative user refer to...

Page 336: ...as a user who has the administrator account The installer will prompt you to enter the name and password of the administrative user When multiple users are using Mac OS log on with the account of the...

Page 337: ...Agreement you cannot install this software 4 Selecting the install destination If necessary select where you want to install the printer driver and then click Continue 5 Executing the installation Cli...

Page 338: ...Printing Using Canon Application Software My Image Garden Guide Easy PhotoPrint Guide 338...

Page 339: ...the latest application How to Check the Version Earlier Versions Select the version of your My Image Garden V3 1 x V3 0 x V2 1 x V2 0 x V1 1 x For Mac OS Latest Version My Image Garden V3 2 x It is re...

Page 340: ...Printing Using a Web Service Using PIXMA MAXIFY Cloud Link Printing with Google Cloud Print 340...

Page 341: ...ink levels In addition you can use various functions by adding and registering apps that are linked with various cloud services Using PIXMA MAXIFY Cloud Link from Your Printer Using PIXMA MAXIFY Clou...

Page 342: ...Printing without Going through Internet Important This function may not be available depending on the country or region you live in To use Google Cloud Print you need to get Google account and registe...

Page 343: ...LAN connection with the machine and internet connection are required to delete the machine from Google Cloud Print Internet connection fees apply 343...

Page 344: ...oud Print in advance Note If you already have Google account register the machine to Google Cloud Print Registering Machine with Google Cloud Print Access to Google Cloud Print with the web browser on...

Page 345: ...Print and to delete it Internet connection fees apply Registration Using Google Chrome 1 Start Google Chrome browser on your computer 2 Select Sign in to Chrome from Chrome menu 3 Log in to your Googl...

Page 346: ...the machine with Google Cloud Print the confirmation message to re register the machine is displayed 4 When confirmation screen to register machine is displayed select Yes 5 Select display language i...

Page 347: ...ume printing check the machine s status and print with Google Cloud Print again For print settings If you select the media type other than plain paper or if you select the paper size other than A4 or...

Page 348: ...inting with Google Cloud Print is complete the machine receives the print data and prints it automatically Sending Print Data without Going through Internet This section describes the operation to sen...

Page 349: ...s enabled the machine is turned on automatically when it receives the print data 2 Start Google Chrome browser on your computer 3 Select Sign in to Chrome from Chrome menu 4 Log in to your Google acco...

Page 350: ...8 Select Print When the preparation for printing with Google Cloud Print is complete the machine receives the print data and prints it automatically 350...

Page 351: ...Using Google Chrome 1 Start Google Chrome browser on your computer 2 Select Sign in to Chrome from Chrome menu 3 Log in to your Google account 4 Select Settings from Chrome menu 5 Select Show advance...

Page 352: ...ur environment AirPrint Operation Environment iPhone iPad and iPod touch running the latest version of iOS Mac running the latest version of Mac OS Connection method The iOS device or Mac and the mach...

Page 353: ...wireless LAN connection After you turn on the machine it may take few minutes before the machine can communicate through a wireless LAN connection Make sure the machine is connected to the wireless L...

Page 354: ...Printing from Smartphone Tablet Printing Directly from Smartphone Tablet Printing Using a Web Service 354...

Page 355: ...Printing Directly from Smartphone Tablet Android Print Printing from an AirPrint enabled Printer with iOS Device Using Machine with Access Point Mode 355...

Page 356: ...Play Installing and activating the plug in enables your Android smartphone or tablet to print to a Canon printer over a wireless LAN Printing via Mopria You can print to a Canon printer from a Mopria...

Page 357: ...abled Printer with Mac Checking Your Environment First check your environment AirPrint Operation Environment iPhone iPad and iPod touch running the latest version of iOS Mac running the latest version...

Page 358: ...rowser The screen differs depending on the devices or applications 4 Tap Print from menu options 5 Select your model name from Printer on Printer Options Important Because some applications do not sup...

Page 359: ...r other AirPrint troubleshooting see below Cannot Print Using AirPrint Paper Size With AirPrint the paper size is selected automatically according to the application being used on the iOS device and t...

Page 360: ...thods From machine Use Stop button to cancel the print job From iOS device Press the Home button on the iOS device twice to set the Multitasking mode and swipe to the right Tap the Print Center icon t...

Page 361: ...long time we recommend you change the default password to the combination of numbers and letters from the point of view of security Enabling Access Point Mode Enable the access point mode following t...

Page 362: ...h the computer over the wireless LAN set the machine to the wireless LAN connection following the procedure below when you finish using the machine with the access point mode temporarily 1 Press and h...

Page 363: ...9 alphanumeric characters four alphabets followed by five numbers Note To check the machine s MAC address and serial number and the current access point mode settings print out the network setting inf...

Page 364: ...Printing Using a Web Service Using PIXMA MAXIFY Cloud Link Printing with Google Cloud Print 364...

Page 365: ...ink levels In addition you can use various functions by adding and registering apps that are linked with various cloud services Using PIXMA MAXIFY Cloud Link from Your Printer Using PIXMA MAXIFY Clou...

Page 366: ...Printing without Going through Internet Important This function may not be available depending on the country or region you live in To use Google Cloud Print you need to get Google account and registe...

Page 367: ...LAN connection with the machine and internet connection are required to delete the machine from Google Cloud Print Internet connection fees apply 367...

Page 368: ...Printing from Digital Camera Printing Photographs Directly from PictBridge Wireless LAN Compliant Device PictBridge Wireless LAN Print Settings 368...

Page 369: ...g photos with the PictBridge Wireless LAN compliant device connected to the machine we recommend the use of the AC adapter supplied with the device If you are using the device battery be sure to charg...

Page 370: ...e LCD of your PictBridge Wireless LAN compliant device Select the size and type of paper that you loaded in the machine Settings on PictBridge Wireless LAN Compliant Device 5 Start printing from your...

Page 371: ...ss LAN compliant device Paper size 4 x 6 10 x 15 cm 5 x 7 13 x 18 cm 8 x 10 20 x 25 cm A4 8 5 x 11 Letter Can be selected only on certain Canon brand PictBridge Wireless LAN compliant devices May not...

Page 372: ...photo fix 1 On Auto photo fix 1 Off Red Eye correction 2 1 The scene or person s face of a shot photo is recognized and the most suitable correction for each photo is made automatically It makes a dar...

Page 373: ...Copying Making Copies on Plain Paper Basics Copying on Photo Paper Switching Page Size between A4 and Letter Copying from Smartphone Tablet 373...

Page 374: ...ck button for black white copying The machine starts copying Remove the original on the platen glass after copying is complete To make multiple copies Press the Color button or the Black button repeat...

Page 375: ...ck button for 2 or more seconds in step 5 The ON lamp flashes once 2 Release button The machine starts copying When the print quality is set to Draft print speed is given priority over quality To give...

Page 376: ...pying Remove the original on the platen glass after copying is complete To make multiple copies Press the Color button or the Black button repeatedly according to the number of copies you want Press t...

Page 377: ...Alarm lamp flashes 10 times The ON lamp starts flashing instead of remaining lit 3 Press Black button to select A4 or Color button to select Letter The ON lamp stops flashing and remains lit and the p...

Page 378: ...outer Using Machine with Access Point Mode 4 Start Canon PRINT Inkjet SELPHY from your smartphone tablet 5 Make sure your machine is selected If not select your machine 6 Tap Copy 7 Specify settings a...

Page 379: ...Scanning Scanning from Computer Windows Scanning from Computer Mac OS Scanning Using Smartphone Tablet 379...

Page 380: ...Using IJ Scan Utility Scanning Using Application Software ScanGear Other Scanning Methods IJ Network Scanner Selector EX Menu and Setting Screen Scanning Tips Positioning Originals Scanning from Comp...

Page 381: ...Scanning from Computer Mac OS Using IJ Scan Utility Using Scanner Driver Scanning Tips Positioning Originals Scanning from Computer Network Scan Settings 381...

Page 382: ...ents Scanning Photos Scanning with Favorite Settings Scanning Originals Larger than the Platen Image Stitch Adjusting Cropping Frames in the Image Stitch Window Scanning Multiple Originals at One Time...

Page 383: ...etter readability or Photo to scan with settings suitable for photos according to the item type or your purpose Note Refer to IJ Scan Utility Main Screen for details on the IJ Scan Utility main screen...

Page 384: ...Important Some functions are available only when My Image Garden is installed Note Refer to Settings Dialog for how to set the applications to integrate with 384...

Page 385: ...rom USB connection to network connection set up the network environment from IJ Scan Utility Network Scan Settings From the Go menu of Finder select Applications then double click the Canon Utilities...

Page 386: ...s turned on 2 Place items on the platen of your scanner or printer Positioning Originals Scanning from Computer 3 Start IJ Scan Utility 4 Click Auto Scanning starts Note Click Cancel to cancel the sca...

Page 387: ...ettings then set the paper size resolution etc in the Settings Document Scan dialog as required When setting is completed click OK 4 Click Document Scanning starts Note Click Cancel to cancel the scan...

Page 388: ...ck Settings then set the paper size resolution etc in the Settings Photo Scan dialog as required When setting is completed click OK 4 Click Photo Scanning starts Note Click Cancel to cancel the scan S...

Page 389: ...tings Custom Scan dialog as required When setting is completed click OK Note Once the settings are made you can scan with the same settings from the next time 3 Place the item on the platen Positionin...

Page 390: ...ote The following explains how to scan from the item to be placed on the left side 1 Start IJ Scan Utility 2 Click Settings then set the item type resolution etc in the Settings Scan and Stitch dialog...

Page 391: ...ide of the screen face down on the platen 7 Click Start Scanning Image 1 The first item is scanned and appears in 1 Note Click Cancel to cancel the scan 8 Place the item that is to be displayed on the...

Page 392: ...appears in 2 Note Click Cancel to cancel the scan 10 Adjust the scanned images as required Use the Toolbar to rotate or zoom in out or drag the images to adjust their positions Note Select the Adjust...

Page 393: ...the top of the screen then click Delete The selected image is deleted allowing you to scan the item again 11 Click Save The combined image is saved Note Refer to Image Stitch Window for details on th...

Page 394: ...you select the Adjust cropping frames checkbox an active cropping frame is automatically specified around the image in the Preview area You can drag the cropping frame to specify the area When you per...

Page 395: ...Items printed on white paper hand written documents business cards etc Thin items Thick items Using Auto Scan Whether there are multiple items or not is detected automatically Click Auto in the IJ Sc...

Page 396: ...5 Select Select Source according to the items to be scanned 6 Select Auto scan for Paper Size then click OK 396...

Page 397: ...can Dialog Settings Photo Scan Dialog Settings Custom Scan Dialog 7 Click Custom Multiple items are scanned at one time Note Click Cancel to cancel the scan Scanned images are saved in the folder set...

Page 398: ...You cannot check the scan results before saving when scanned using Auto scan Note The screens for scanning photos are used as examples in the following descriptions 1 Start IJ Scan Utility 2 Click Set...

Page 399: ...Photo Scan Dialog Settings Custom Scan Dialog Settings Scan and Stitch Dialog Settings Driver Dialog 5 Click Photo Scanning starts When scanning is completed the Save Settings dialog appears Note Clic...

Page 400: ...Note The default save folder is the Pictures folder 7 Click OK Scanned images are saved according to the settings 400...

Page 401: ...e mail Note The screens for scanning photos are used as examples in the following descriptions 1 Start IJ Scan Utility 2 Click Settings The Settings dialog appears 3 Click Photo Scan 4 Select Attach t...

Page 402: ...can add e mail clients to use for attachments from the pop up menu If None Attach Manually is selected manually attach scanned and saved images to e mail 5 Click OK The IJ Scan Utility main screen app...

Page 403: ...e attached to a new message Note Click Cancel to cancel the scan The scanned images are saved according to the settings made in the Settings dialog When the Check scan results checkbox is selected in...

Page 404: ...screens for scanning documents are used as examples in the following descriptions 1 Start IJ Scan Utility 2 Click Settings The Settings dialog appears 3 Click Document Scan Note For Resolution only 30...

Page 405: ...is extracted and appears in your text editor Text to be displayed is based on Document Language in the Settings General Settings dialog Select the language you want to extract in Document Language an...

Page 406: ...Note Click Cancel to cancel the scan Text displayed in your text editor is for guidance only Text in the image of the following types of documents may not be detected correctly Documents containing t...

Page 407: ...Settings Auto Scan Dialog Settings Document Scan Dialog Settings Photo Scan Dialog Settings Custom Scan Dialog Settings Scan and Stitch Dialog Settings Driver Dialog Settings General Settings Dialog N...

Page 408: ...Settings Auto Scan dialog Document Scans items as documents and saves them to a computer Scan save settings and the response after scanning can be specified in the Settings Document Scan dialog Photo...

Page 409: ...Instructions Opens this guide Settings Displays the Settings dialog in which you can specify the scan save settings and the response after scanning 409...

Page 410: ...specify how to respond when scanning from IJ Scan Utility or My Image Garden Settings Auto Scan Dialog Settings Document Scan Dialog Settings Photo Scan Dialog Settings Custom Scan Dialog Settings Sc...

Page 411: ...gazines newspapers documents and BD DVD CD Important To scan the following types of items specify the item type and size in the Settings Document Scan dialog Settings Photo Scan dialog or Settings Cus...

Page 412: ...d to the set file name in the _20XX0101_0001 format Note When you select the Save to a subfolder with current date checkbox the date and four digits are appended to the set file name Save in Displays...

Page 413: ...the folder specified in Save in 3 Application Settings Area Open with an application Select this when you want to enhance or correct the scanned images You can specify the application from the pop up...

Page 414: ...Defaults You can restore the settings in the displayed screen to the default settings 414...

Page 415: ...as documents 1 Scan Options Area 2 Save Settings Area 3 Application Settings Area Important When the Settings dialog is displayed from the Scan screen of My Image Garden the setting items for Applicat...

Page 416: ...e gutter shadow Correct slanted text document and Detect the orientation of text document and rotate image appear Apply Auto Document Fix Select this checkbox to sharpen text in a document or magazine...

Page 417: ...uments with extremely large or small fonts Documents with small amount of text Documents containing figures images Hand written text Documents containing both vertical and horizontal lines tables Note...

Page 418: ...ple Pages Important You cannot select JPEG Exif when Color Mode is Black and White When Start OCR is selected in Application Settings you cannot select PDF or PDF Multiple Pages Note With network conn...

Page 419: ...or correct the scanned images You can specify the application from the pop up menu Send to an application Select this when you want to use the scanned images as they are in an application that allows...

Page 420: ...Instructions Opens this guide Defaults You can restore the settings in the displayed screen to the default settings 420...

Page 421: ...plication Settings Area Important When the Settings dialog is displayed from My Image Garden the setting items for Application Settings do not appear 1 Scan Options Area Select Source Photo is selecte...

Page 422: ...the date and four digits are appended to the set file name in the _20XX0101_0001 format Note When you select the Save to a subfolder with current date checkbox the date and four digits are appended t...

Page 423: ...Open with an application Select this when you want to enhance or correct the scanned images You can specify the application from the pop up menu Send to an application Select this when you want to use...

Page 424: ...Defaults You can restore the settings in the displayed screen to the default settings 424...

Page 425: ...cation Settings Area Important When the Settings dialog is displayed from the Scan screen of My Image Garden the setting items for Application Settings do not appear 1 Scan Options Area Select Source...

Page 426: ...moire set Select Source to Magazine or select the Reduce moire checkbox in Image Processing Settings Color Mode Select the color mode in which to scan the item Note Only Color is available when Selec...

Page 427: ...White only Reduce gutter shadow Correct slanted text document and Detect the orientation of text document and rotate image appear Apply Auto Document Fix Select this checkbox to sharpen text in a docu...

Page 428: ...onts Documents with small amount of text Documents containing figures images Hand written text Documents containing both vertical and horizontal lines tables Note Scanning takes longer than usual when...

Page 429: ...en Auto is selected the save format may differ depending on how you place the item Positioning Originals Scanning from Computer You cannot select JPEG Exif when Color Mode is Black and White When Star...

Page 430: ...rce is Auto When the Settings dialog is displayed from My Image Garden this option does not appear 3 Application Settings Area Open with an application Select this when you want to enhance or correct...

Page 431: ...pop up menu select Add from the pop up menu then click Plus in the displayed dialog and specify the application or folder Instructions Opens this guide Defaults You can restore the settings in the di...

Page 432: ...Area 2 Save Settings Area 3 Application Settings Area Important When the Settings dialog is displayed from the Scan screen of My Image Garden the setting items for Application Settings do not appear 1...

Page 433: ...patterns Printed materials are displayed as a collection of fine dots Moire is a phenomenon where uneven gradation or a stripe pattern appears when such photos or pictures printed with fine dots are...

Page 434: ...heckbox to convert text in images into text data and create PDF files that support keyword search Important This appears only when PDF or PDF Multiple Pages is selected in Data Format Note PDF files t...

Page 435: ...n from the pop up menu Send to a folder Select this when you also want to save the scanned images to a folder other than the one specified in Save in You can specify the folder from the pop up menu Do...

Page 436: ...ear 1 Save Settings Area File Name Enter the file name of the image to be saved When you save a file the date and four digits are appended to the set file name in the _20XX0101_0001 format Note When y...

Page 437: ...work server Important This appears only when PDF or PDF Multiple Pages is selected in Data Format Create a PDF file that supports keyword search Select this checkbox to convert text in images into tex...

Page 438: ...pecify the application from the pop up menu Send to a folder Select this when you also want to save the scanned images to a folder other than the one specified in Save in You can specify the folder fr...

Page 439: ...elect the desired product from the list In addition for network connection select one with Network after the product name Note With network connection Select appears on the right side of the product n...

Page 440: ...les Displays the folder in which to save images temporarily Click Browse to specify the destination folder Instructions Opens this guide Defaults You can restore the settings in the displayed screen t...

Page 441: ...bled Enable Bonjour on your scanner or printer If you have changed the Bonjour service name after selecting your scanner or printer by Bonjour service name reopen the network selection screen and sele...

Page 442: ...an Results Area 3 Save Settings Area 1 Preview Operation Buttons Rotate Left 90 Rotate Right 90 Rotates scanned images 90 degrees counter clockwise or clockwise Select the image you want to rotate the...

Page 443: ...by clicking Photo in the IJ Scan Utility main screen The Enable large image scans checkbox is selected in Save Settings of the Settings Driver dialog Start OCR is selected in Application Settings of...

Page 444: ...s that are searchable in the language selected in Document Language on the General Settings tab of the Settings dialog are created Save to a subfolder with current date Select this checkbox to create...

Page 445: ...y depending on the select source and view 1 Settings and Operation Buttons Select Output Size B4 B5 x 2 Scans the left and right halves of a B4 size item separately A3 A4 x 2 Scans the left and right...

Page 446: ...ond item Adjust cropping frames You can adjust the scan area in preview If no area is specified the image of the size selected in Select Output Size will be saved If an area is specified only the imag...

Page 447: ...l clicking the Preview area reduces the displayed image Rotate Left Rotates the preview image 90 degrees counter clockwise Rotate 180 Rotates the preview image 180 degrees Rotate Right Rotates the pre...

Page 448: ...Scanning Image 1 The image is scanned in the direction specified in Scan Direction and 2 appears next to it After scanning the second item by clicking Start Scanning Image 2 The two scanned images ap...

Page 449: ...ctions and Color Adjustments for details on the setting procedures for image correction and color adjustment Refer to General Notes Scanner Driver for the scanner driver Refer to Updating the Scanner...

Page 450: ...mage correction or color adjustment is applied Image Adjustment When Image Adjustment is set the brightness of the specified portion of the image is optimized Images can be adjusted according to the a...

Page 451: ...effective for some types of photos Note It is recommended that you select None when scanning printed materials Fading Correction Use this function to correct photos that have faded with time or have a...

Page 452: ...recommended that you normally select this setting High Select this when the effect level is too weak with the medium setting Important Do not place objects that weigh 4 4 lbs 2 0 kg or more on the pla...

Page 453: ...harp Mask If Unsharp Mask is enabled some moire effects may remain Note Scanning takes longer than usual when you enable Descreen Reduce Show through Use this function to reduce show through in duplex...

Page 454: ...t the USB cable from the computer and reconnect it 3 Turn on the machine Do not connect two or more scanners or multifunction printers with scanner function to the same computer simultaneously If mult...

Page 455: ...Updating the Scanner Driver Obtaining the Latest Scanner Driver Before Installing the Scanner Driver Installing the Scanner Driver 455...

Page 456: ...lve some problems you have experienced To obtain the scanner driver access our website and download the scanner driver for your model Important Scanner driver can be downloaded for free however Intern...

Page 457: ...uter You will be required to enter the name and password of the user with administrator privileges If you have multiple user accounts on Mac OS X log in with the first administrator account created Im...

Page 458: ...software If an authentication screen appears enter the administrator s name and password then click Install Software 4 Complete the installation The scanner driver is installed Set up the network envi...

Page 459: ...Scanning Tips Resolution Data Formats 459...

Page 460: ...hoto Copying Printing Color 300 dpi Creating a postcard Color 300 dpi Saving to a computer Color 300 dpi Using on a website or attaching to e mail Color 150 dpi Black and white photo Saving to a compu...

Page 461: ...every time they are saved and cannot be returned to their original state JPEG is not available for black and white images TIFF Standard File Extension tif A data format featuring a relatively high co...

Page 462: ...ve disc labels may not be scanned as expected When scanned using the scanner driver the response may differ In that case adjust the cropping frame selection box manually For Photos Postcards Business...

Page 463: ...nally striped area of the platen and items and between items Portions placed on the diagonally striped area cannot be scanned more than 0 4 inch 1 cm Note In IJ Scan Utility you can place up to 12 ite...

Page 464: ...nd by following the instructions on the web page With network connection scanning takes longer than USB connection Setting for Scanning with IJ Scan Utility In the IJ Scan Utility main screen select y...

Page 465: ...following scan functions PIXMA MAXIFY Cloud Link PIXMA MAXIFY Cloud Link is a web service provided by Canon Save scanned images to data storage services through integration with various cloud services...

Page 466: ...ink levels In addition you can use various functions by adding and registering apps that are linked with various cloud services Using PIXMA MAXIFY Cloud Link from Your Printer Using PIXMA MAXIFY Clou...

Page 467: ...nt Scan from Smartphone Tablet Cannot Set Correctly Cannot Find Machine on Check Printer Settings Screen Message Appears on Computer During Setup Cannot Find Machine on Wireless LAN USB Connection Pro...

Page 468: ...age Appears on PictBridge Wireless LAN Compliant Device IJ Scan Utility Error Messages Windows IJ Scan Utility Error Messages Mac OS ScanGear Scanner Driver Error Messages Scanner Driver Error Message...

Page 469: ...Network Communication Problems Cannot Find Machine on Network Network Connection Problems Other Network Problems 469...

Page 470: ...Cannot Find Machine on Network Cannot Find Machine on Printers on Network List Screen Cannot Find Machine on Check Printer Settings Screen Cannot Find Machine on Wireless LAN 470...

Page 471: ...tant If the machine cannot be detected while you are setting up the network communication using a USB cable the machine may be in the access point mode In this case finish the access point mode and en...

Page 472: ...procedures refer to the instruction manuals supplied with the computer and network device or contact their manufacturers If you can view web pages after configuring the computer and network device cl...

Page 473: ...k Printer Settings screen to redetect the machine If the machine is found follow the instructions on the screen to continue to set up network communication If no message appears Cancel the setup and t...

Page 474: ...e To check the settings of the wireless router see the instruction manual supplied with the wireless router or contact the manufacturer After checking the wireless router settings click Redetect on th...

Page 475: ...action Check for obstructions between the machine and the wireless router Wireless communication between different rooms or floors is generally poor Adjust the location of the machine and the wireless...

Page 476: ...e machine could not be detected with the current setup method Select the Setting printer could not be found on the list check box and click Next The screen to show another setup method is displayed Pe...

Page 477: ...ain Important For Mac OS make sure the lock icon is on the lower left of the Printers Scanners screen Print Scan screen in Mac OS X v10 8 or Mac OS X v10 7 If the icon locked is displayed click the ic...

Page 478: ...Note For Windows you can use the Setup CD ROM to redo setup 478...

Page 479: ...ine is temporarily connected to computer via USB cable make sure USB cable is connected properly If you set up the wireless LAN connection or change the wireless LAN settings using IJ Network Tool ove...

Page 480: ...ng Wireless Network Status For Mac OS Monitoring Wireless Network Status Check9 Make sure the machine is not placed too far away from the wireless router The machine can be up to 50 m 164 ft from the...

Page 481: ...router connect machine and computer to LAN side same network segment Check15 If machine is connected to an AirPort Base Station via LAN use alphanumeric characters for network name SSID Mac OS Check16...

Page 482: ...nly Cannot Be Used Network Key Unknown Administrator Password Set for Machine Unknown Machine Cannot Be Used After Replacing Wireless Router or Changing Its Settings Printing Is Slow Ink Level Not Sho...

Page 483: ...nt network settings of the machine print out the network setting information Printing Network Settings If the machine network settings do not match with those of the wireless router change the network...

Page 484: ...ecurity software s firewall is on a message may appear warning you that Canon software is attempting to access the network If this warning message appears set security software to always allow access...

Page 485: ...nabled Check3 Make sure machine is selected as connection for wireless communication device e g computer smartphone or tablet Select the access point name SSID specified for the machine as the connect...

Page 486: ...the MP Drivers using the Setup CD ROM or install them from the Canon website For Mac OS Install the MP Drivers from the Canon website Check3 Make sure wireless router does not restrict which computer...

Page 487: ...e machine and your computer To communicate with a wireless router that uses automatically generated WEP keys you must set the machine to use the key generated by the wireless router entering it in hex...

Page 488: ...namic encryption type must be the same for the wireless router the machine and your computer Enter the passphrase configured on the wireless router a sequence of between 8 and 63 alphanumeric characte...

Page 489: ...tialize the machine settings Initializing Machine Settings After initializing the machine settings redo setup For Windows Use the Setup CD ROM or follow the instructions on the Canon website For Mac O...

Page 490: ...heck the wireless router setting see the instruction manual provided with the wireless router or contact its manufacturer Make sure the computer and the wireless router can communicate with each other...

Page 491: ...the encryption type for the machine and it subsequently cannot communicate with the computer make sure the encryption type for the computer and the wireless router matches the type set for the machin...

Page 492: ...een different rooms or floors is generally poor Wireless communication can be impeded by building materials containing metal or concrete If the machine cannot communicate with the computer over a wire...

Page 493: ...tatus Monitor Windows Use the printer driver with bidirectional communication Select Enable bidirectional support in the Ports sheet of the properties dialog box of the printer driver How to Open the...

Page 494: ...Other Network Problems Message Appears on Computer During Setup Packets Are Sent Constantly Windows Checking Network Information Restoring to Factory Defaults 494...

Page 495: ...ing screen appears if the machine is set up for use with a network and an administrator password has been set For Windows For Mac OS Enter the administrator password set for the machine Note An admini...

Page 496: ...ings in Wireless LAN Sheet For Mac OS For more on encryption settings see Changing Settings in Wireless LAN Sheet You are connecting the machine to the non encrypted wireless network Appears Security...

Page 497: ...with the machine over the network If you are using your computer in a network environment other than the one used to set up the machine disable IJ Network Scanner Selector EX To disable IJ Network Sc...

Page 498: ...AC address of your computer follow the instructions below For Windows 1 Select Command Prompt as shown below In Windows 8 1 or Windows 8 select Command Prompt from the Start screen If Command Prompt i...

Page 499: ...time 10ms TTL 255 If Request timed out appears communication is not taking place For Mac OS 1 Start Network Utility as shown below In Mac OS X v10 10 or Mac OS X v10 9 select Computer from Go menu of...

Page 500: ...place Otherwise computer is communicating with target device Checking Network Settings Information To check the machine s network settings information print out the network settings information using...

Page 501: ...Setup CD ROM or follow the instructions on the Canon website to redo setup For Mac OS Initialization erases all network settings on the machine making printing or scanning operation from a computer ov...

Page 502: ...Problems while Printing Scanning from Smartphone Tablet Cannot Print Scan from Smartphone Tablet 502...

Page 503: ...tton and then release button when ON lamp flashes 2 Press Color button Black button and then Wi Fi button in this order When the ON lamp changed from flashing to lit and the Wi Fi lamp lights up the w...

Page 504: ...t Communicate with Machine while It Is in Access Point Mode If your smartphone tablet cannot communicate with the machine in the access point mode check the following Check1 Make sure machine is turne...

Page 505: ...Check8 Make sure there is no source of radio wave interference nearby If a device like a microwave oven that emits radio waves of the same frequency bandwidth as a wireless router is nearby it may ca...

Page 506: ...Printing Does Not Start Paper Jams Print Results Are Unsatisfactory No Ink Comes Out Paper Does Not Feed Properly No Paper Error Automatic Duplex Printing Problems Copying Printing Stops Cannot Print...

Page 507: ...arts normally there is a problem with the relay device Contact the vendor of the relay device There could also be a problem with the USB cable Replace the USB cable and retry the printing If you use t...

Page 508: ...column is selected for Print to the following port s Note When the machine is used over LAN the port name of the machine is displayed as CNBJNP_xxxxxxxxxx xxxxxxxxxx is the character string generated...

Page 509: ...e problem is not resolved reinstall the MP Drivers from the Setup CD ROM or the Canon website Check8 Is print data extremely large Windows Click Print Options on Page Setup sheet of the printer driver...

Page 510: ...utomatically Take the appropriate action described in the message For Windows For Mac OS The screen differs depending on the OS you are using To remove the jammed paper see List of Support Code for Er...

Page 511: ...achine for Printing from a PictBridge Wireless LAN compliant device Check the settings on your PictBridge Wireless LAN compliant device PictBridge Wireless LAN Print Settings Printing from your comput...

Page 512: ...Back of Paper Is Smudged Vertical Line Next to Image Uneven or Streaked Colors 512...

Page 513: ...er driver Select the Do not allow application software to compress print data check box and click OK Clear the check box once printing is complete Check2 Is print data extremely large Windows Click Pr...

Page 514: ...be printed To prevent this set reduced printing on the printer driver Important Reducing the printing size may affect the layout of your document If the application you used to create your document ha...

Page 515: ...Paper Is Blank Printing Is Blurry Colors Are Wrong White Streaks Appear Paper Is Blank Printing Is Blurry Colors Are Wrong 515...

Page 516: ...rforming print head deep cleaning turn off the machine and perform print head deep cleaning again 24 hours later If problem is not resolved after performing print head deep cleaning twice Ink may have...

Page 517: ...k6 Is platen glass dirty Clean the platen glass Cleaning the Platen Glass and Document Cover Check7 Make sure original is properly loaded on platen glass Loading Originals Check8 Is original loaded wi...

Page 518: ...t head deep cleaning twice Ink may have run out Replace the FINE cartridge Check2 When a FINE cartridge runs out of ink replace it with a new one Check3 Is FINE cartridge installed properly If the FIN...

Page 519: ...just the print head position Aligning the Print Head Note If the problem is not resolved after performing the print head alignment perform print head alignment manually from your computer For Windows...

Page 520: ...t Printing or Binding margin function is in use thin lines may not be printed Try thickening the lines in the document Check2 Is print data extremely large Click Print Options on Page Setup sheet of t...

Page 521: ...y be improved Click Print Options on Page Setup sheet of the printer driver Select Do not allow application software to compress print data check box and click OK Clear the check box once printing is...

Page 522: ...tting on plain paper the paper may absorb too much ink and become wavy causing paper abrasion Check the intensity setting in the printer driver For Windows Adjusting Intensity For Mac OS Adjusting Int...

Page 523: ...quality may be reduced at the top and bottom edges of the paper Printing Area Check3 Correct curl before loading paper When using Photo Paper Plus Semi gloss even if the sheet is curled load one sheet...

Page 524: ...g the setting to prevent paper abrasion will widen the clearance between the print head and the paper If you notice abrasion even with the media type set correctly to match the paper set the machine t...

Page 525: ...you print outside the recommended printing area of your paper ink may stain the lower edge of the paper Resize the document using application software Printing Area Check7 Is platen glass dirty Clean...

Page 526: ...Time slide bar to set the wait time and click OK 5 Check message and click OK For Mac OS 1 Make sure machine is turned on 2 Open the Canon IJ Printer Utility Opening the Canon IJ Printer Utility 3 Sel...

Page 527: ...s Print Results Are Unsatisfactory Check2 Perform bottom plate cleaning to clean inside of machine Cleaning the Inside of the Machine Bottom Plate Cleaning Note During borderless printing duplex print...

Page 528: ...Are Unsatisfactory Note The direction of the vertical line pattern may vary depending on the image data or the print setting This machine performs automatic cleaning when necessary to keep printouts...

Page 529: ...k pattern to determine whether the ink ejects properly from the print head nozzles For details on printing the nozzle check pattern print head cleaning and print head deep cleaning see If Printing Is...

Page 530: ...ter performing print head deep cleaning twice Ink may have run out Replace the FINE cartridge Check3 Perform print head alignment Aligning the Print Head Note If the problem is not resolved after perf...

Page 531: ...ck3 Are the print head nozzles clogged Print the nozzle check pattern to determine whether the ink ejects properly from the print head nozzles For details on printing the nozzle check pattern print he...

Page 532: ...the far end of the front tray Check3 Is paper too thick or curled Media Types You Cannot Use Check4 When loading postcards or envelopes consider the following If a postcard is curled it may not feed...

Page 533: ...Custom Settings in the pop up menu select Prevent paper double feed check box and then click Apply To open the Canon IJ Printer Utility see Opening the Canon IJ Printer Utility Note Prevent paper doub...

Page 534: ...he paper size setting is appropriate for automatic duplex printing Check the paper size setting in the application software Then check the paper size setting in the printer driver For Windows Check Pa...

Page 535: ...e following If you are printing three or more pages of a document with manual duplex printing one side of each sheet is printed first Turn over and reload the paper to print the reverse sides Do not c...

Page 536: ...ting several copies printing may pause to allow the ink to dry Check3 Has machine been printing continuously for a long period If the machine has been printing continuously for a long time the print h...

Page 537: ...ure machine is connected by LAN to same network subnet as AirPrint compliant device when printing over LAN Check3 Make sure machine has enough paper and ink Check4 Make sure machine s Alarm lamp is no...

Page 538: ...Scanning Problems Mac OS Scanning Problems Scan Results Are Unsatisfactory IJ Scan Utility Error Messages Scanner Driver Error Messages 538...

Page 539: ...sage Appears and the Scanner Driver Screen Does Not Appear Cannot Scan Multiple Originals at One Time Cannot Scan Properly with Auto Scan Slow Scanning Speed There is not enough memory Message Is Disp...

Page 540: ...ner or printer is turned on Check 2 Connect the USB cable to a different USB port on the computer Check 3 If the USB cable is connected to a USB hub remove it from the USB hub and connect it to a USB...

Page 541: ...anner or printer on the application s menu Note The operation may differ depending on the application Check 3 Make sure that the application supports the ICA Image Capture Architecture driver You cann...

Page 542: ...hub remove it from the USB hub and connect it to a USB port on the computer Check 5 Make sure that the scanner driver is installed If not installed install the scanner driver from the web page Check...

Page 543: ...ck 1 Make sure that the items are placed correctly Positioning Originals Scanning from Computer Check 2 Check if you can properly scan one item Some applications do not support multiple image scanning...

Page 544: ...Make sure that the items are placed correctly Positioning Originals Scanning from Computer Check 2 Multiple item scanning may not be supported Some applications do not support multiple image scanning...

Page 545: ...olution Check 2 Set Fading Correction Grain Correction etc to None Refer to Image Corrections and Color Adjustments for details Check 3 In IJ Scan Utility deselect the Correct slanted text document De...

Page 546: ...There is not enough memory Message Is Displayed Check 1 Exit other applications and try again Check 2 Reduce the resolution or output size and scan again Resolution 546...

Page 547: ...essage may appear if there is not enough hard disk space to scan and save when the image size is too large such as when scanning a large item at high resolution Check 3 In Folder to Save Temporary Fil...

Page 548: ...format is not supported by the application scan the image again and select a popular data format such as JPEG when saving it Refer to the application s manual for details If you have any questions co...

Page 549: ...Image Displayed on the Monitor Is Poor Scanned Image Is Surrounded by Extra White Areas Cannot Scan at the Correct Size Original Is Placed Correctly but the Scanned Image Is Slanted Scanned Image Is...

Page 550: ...s Document Scan Dialog Settings Custom Scan Dialog Settings Scan and Stitch Dialog Click Driver in the IJ Scan Utility main screen then set one of the following settings Select Magazine for Image Adju...

Page 551: ...hite Areas Check Specify the scan area Manually specify the scan area when there are white margins or unwanted areas along the edges of the scanned images in the Image Stitch window Adjusting Cropping...

Page 552: ...Cannot Scan at the Correct Size Check Make sure that the items are placed correctly Positioning Originals Scanning from Computer 552...

Page 553: ...t the Scanned Image Is Slanted Check When Document or Magazine is selected for Select Source deselect the Correct slanted text document checkbox and scan the item again Settings Document Scan Dialog S...

Page 554: ...tion Refer to the application s manual for details If you have any questions contact the manufacturer of the application Check 2 Click Driver in the IJ Scan Utility main screen then change the resolut...

Page 555: ...work connection check the connection status and reconnect as required If the same error message still appears restart the computer 201 A required file is missing or corrupted or settings are incorrect...

Page 556: ...e Check the access permission on the folder in Folder to Save Temporary Files in the Settings General Settings dialog or Save in in the corresponding Settings dialog 244 You do not have the required p...

Page 557: ...ng Wired LAN connection It is disconnected from Wired LAN If using wireless LAN connection Signal strength is poor due to obstructions Network connection is prohibited by security software Different s...

Page 558: ...Mechanical Problems Power Does Not Come On Power Shuts Off By Itself USB Connection Problems Cannot Communicate with Machine via USB Printer Status Monitor Not Displayed Windows 558...

Page 559: ...er plug is securely connected to machine and then turn it back on Check3 Unplug machine leave it for at least 2 minutes and then plug it back in and turn it on again If this does not solve the problem...

Page 560: ...er setup window and in Auto Power in Maintenance sheet select Disable for Auto Power Off If you are using a Mac OS and if you do not want the machine to turn off automatically Open Canon IJ Printer Ut...

Page 561: ...ts Hi Speed USB connection Does the USB port on your computer support Hi Speed USB connection Does the USB cable or the USB hub support Hi Speed USB connection Be sure to use a certified Hi Speed USB...

Page 562: ...ion below the USB port is at the back of the machine Check3 Do not start IJ Network Tool while printing Check4 Do not print while IJ Network Tool is running Check5 Make sure Enable bidirectional suppo...

Page 563: ...ure that Enable Status Monitor is selected on the Option menu of the printer status monitor 1 Open printer driver setup window How to Open the Printer Driver Setup Window 2 On Maintenance sheet click...

Page 564: ...and Download Problems Cannot Install MP Drivers Easy WebPrint EX Does Not Start or Easy WebPrint EX Menu Does Not Appear Windows Updating MP Drivers in Network Environment Windows Uninstalling IJ Netw...

Page 565: ...r In Windows XP click Start and then click My Computer 2 Double click CD ROM icon in the window that appears If the contents of the CD ROM appear double click MSETUP4 EXE If you cannot install the MP...

Page 566: ...omputer and then reinstall the MP Drivers Deleting the Unnecessary MP Drivers Reinstall the MP Drivers with the Setup CD ROM or install them from the Canon website Note If the installer was stopped du...

Page 567: ...l it may appear in the notification area on the desktop Click the message and follow the instructions to install Easy WebPrint EX Internet access is required to install or download Easy WebPrint EX Ch...

Page 568: ...ructions to install the latest MP Drivers that you downloaded In the connection method selection screen select Use the printer with wireless LAN connection The machine is detected automatically in the...

Page 569: ...m program list and then click Uninstall If User Account Control screen appears click Continue Windows 7 or Windows Vista 1 Click Start Control Panel Programs Programs and Features 2 Select Canon IJ Ne...

Page 570: ...ck Canon Utilities IJ Network Tool and then drag Canon IJ Network Tool icon into Trash 2 Restart computer Empty the Trash and restart your computer Note To reinstall IJ Network Tool uninstall IJ Netwo...

Page 571: ...Errors and Messages An Error Occurs Message Appears Error Message Appears on PictBridge Wireless LAN Compliant Device 571...

Page 572: ...Goes off Number of flashes Cause Support Code 2 flashes Machine is out of paper or paper does not feed 1003 Paper size in print settings and size of loaded paper do not match 2100 2101 3 flashes Pape...

Page 573: ...Machine has detected that paper has been fed aligned to one side 2102 Support Code Corresponding to Number of Alternate Flashes of ON Lamp and Alarm Lamp Example of 2 times flashing A Alternately flas...

Page 574: ...n differs depending on the OS you are using Note You can also search for details on resolving the errors indicated by the support code shown Search To resolve errors that do not have support codes see...

Page 575: ...matic Duplex Printing Is Displayed Check See Automatic Duplex Printing Problems and take the appropriate action Error Regarding Power Cord Being Unplugged Is Displayed Windows The machine may have bee...

Page 576: ...oes not start even though the machine is connected to the computer using a USB cable and the port named USBnnn is selected In Windows 8 1 or Windows 8 select My Printer on Start screen to start My Pri...

Page 577: ...ware and Sound Device Manager In Windows 7 or Windows Vista click Control Panel Hardware and Sound and Device Manager In Windows XP click Control Panel Performance and Maintenance System and Device Ma...

Page 578: ...sent via the Internet Once you have completed the procedure the information is subsequently sent automatically and the confirmation screen does not reappear Note When the information is being sent a...

Page 579: ...d in on an account with administrator privileges follow the on screen instructions 2 Select Canon Inkjet Printer Scanner Fax Extended Survey Program 3 Select Change If you select Yes after you have fo...

Page 580: ...next survey If you do not agree to participate in survey program Click Do not agree The confirmation screen closes and the survey is skipped The confirmation screen will reappear one month later To st...

Page 581: ...er Fax Extended Survey Program icon Do not display the confirmation screen when information is sent If the check box is selected the information will be sent automatically If the check box is not sele...

Page 582: ...machine is printing from the computer or warming up wait until it finishes When it is ready the machine starts automatically If the machine is not printing from a computer or warming up check the num...

Page 583: ...the error An Error Occurs Ink Error The ink may have run out When the Alarm lamp flashes 13 times see 1686 to resolve the error Hardware Error Check the number of how many the Alarm lamp flashes and...

Page 584: ...und smoke or odor turn it off immediately Unplug the machine and contact the seller you bought it from or your nearest Canon service center Never attempt to repair or disassemble the machine yourself...

Page 585: ...Computer Screen 1000 to 1ZZZ 1003 1200 1202 1250 1300 1303 1304 1310 1401 1403 1485 1486 1487 1682 1684 1686 1687 1688 1702 1703 1704 1705 1712 1713 1714 1715 1890 2000 to 2ZZZ 2100 2101 2102 2103 29...

Page 586: ...For paper jam support codes see also List of Support Code for Error Paper Jams 586...

Page 587: ...jammed paper at the paper output slot 1300 If you cannot see the jammed paper at the paper output slot 1303 If the paper is jammed during automatic duplex printing 1304 If the paper tears and you cann...

Page 588: ...g and you need to turn off the machine to remove it press the Stop button to stop the printing before you turn off the machine If you cannot pull the paper out from the paper output slot try to pull t...

Page 589: ...sizes other than A5 to print documents with photos or graphics A5 paper may curl and jam as it leaves the machine If the measures above do not solve the problem contact your nearest Canon service cent...

Page 590: ...Stand machine up on its right side If you can see the jammed paper at the front tray stand the machine with the front tray open Important Make sure the document cover is closed before you stand the m...

Page 591: ...remove pull out the edge of the paper first If you cannot remove the jammed paper from the transport unit close the transport unit return the machine to its original position and remove the paper from...

Page 592: ...back in and turn it back on 8 Reload paper All jobs in the print queue are canceled Redo the printing If the measures above do not solve the problem contact your nearest Canon service center to reques...

Page 593: ...ont tray even though you can see the jammed paper at the front tray Pulling the paper out forcibly from the front tray may damage the machine 2 Reload the paper and press machine s Black or Color butt...

Page 594: ...th your hand so that it does not fall over as you pull out the jammed paper Note If the paper is rolled up and difficult to remove pull out the edge of the paper first If you cannot remove the jammed...

Page 595: ...o its original position right away 7 Plug machine back in and turn it back on 8 Reload paper All jobs in the print queue are canceled Redo the printing If the measures above do not solve the problem c...

Page 596: ...n off the machine 1 Turn off the machine and unplug it 2 Open paper output cover Remove the paper in the cassette if any Important Do not touch clear film A If you soil or scratch the clear film by to...

Page 597: ...4 Hold jammed paper firmly in both hands If the paper is rolled up pull out it 5 Slowly pull out paper so as not to tear it 6 Make sure all jammed paper is removed 597...

Page 598: ...cover and reload paper All jobs in the print queue are canceled Redo the printing Note When reloading the paper make sure you are using suitable paper and loading it correctly If a paper jam message...

Page 599: ...Other Cases Check the following Check1 Is anything blocking paper output slot Check2 Is paper curled Load the paper after correcting its curl 599...

Page 600: ...s out of paper or paper does not feed What to Do Reload the paper and press machine s Black or Color button When you load the paper insert the paper stack until the leading edge touches the far end of...

Page 601: ...1200 Cause Paper output cover is open What to Do Close the paper output cover and wait for a while Do not close it while you are replacing a FINE cartridge 601...

Page 602: ...1202 Cause Paper output cover is open What to Do Close the paper output cover 602...

Page 603: ...1250 Cause Paper output tray is closed What to Do Open the paper output tray and resume printing 603...

Page 604: ...The sizes of media suitable for auto duplex printing are A4 and Letter Make sure paper of the correct size is loaded Press the Black or Color button to eject the paper and restart printing from the f...

Page 605: ...Cause FINE cartridge is not installed What to Do Install the FINE cartridge If the error is not resolved the FINE cartridge may be damaged Contact your nearest Canon service center to request a repair...

Page 606: ...use FINE cartridge cannot be recognized What to Do Replace the FINE cartridge If the error is not resolved the FINE cartridge may be damaged Contact your nearest Canon service center to request a repa...

Page 607: ...tridge is not installed What to Do Printing cannot be executed because the ink cartridge is not compatible with this machine Install the appropriate ink cartridge If you want to cancel printing press...

Page 608: ...1486 Cause FINE cartridge is not installed in correct position What to Do Make sure each FINE cartridge is installed in the correct position 608...

Page 609: ...1487 Cause FINE cartridge is not installed in correct position What to Do Make sure each FINE cartridge is installed in the correct position 609...

Page 610: ...use FINE cartridge cannot be recognized What to Do Replace the FINE cartridge If the error is not resolved the FINE cartridge may be damaged Contact your nearest Canon service center to request a repa...

Page 611: ...zed What to Do Printing cannot be executed because the ink cartridge may not be installed properly or may not be compatible with this machine Install the appropriate ink cartridge If you want to cance...

Page 612: ...detected If you want to continue printing without this function press the machine s Stop button for at least 5 seconds Canon recommends to use new genuine Canon cartridges in order to obtain optimum q...

Page 613: ...pen the paper output cover When the head cover opens push up the ink cartridge lock lever to make sure the FINE cartridges are installed properly After that close the paper output cover If the error i...

Page 614: ...e machine s Stop button for at least 5 seconds with the ink cartridge installed Then printing can continue under the ink out condition The function for detecting the remaining ink level will be disabl...

Page 615: ...1702 Cause Ink absorber is almost full What to Do Press the machine s Black or Color button to continue printing Contact your nearest Canon service center to request a repair 615...

Page 616: ...1703 Cause Ink absorber is almost full What to Do Press the machine s Black or Color button to continue printing Contact your nearest Canon service center to request a repair 616...

Page 617: ...1704 Cause Ink absorber is almost full What to Do Press the machine s Black or Color button to continue printing Contact your nearest Canon service center to request a repair 617...

Page 618: ...1705 Cause Ink absorber is almost full What to Do Press the machine s Black or Color button to continue printing Contact your nearest Canon service center to request a repair 618...

Page 619: ...1712 Cause Ink absorber is almost full What to Do Press the machine s Black or Color button to continue printing Contact your nearest Canon service center to request a repair 619...

Page 620: ...1713 Cause Ink absorber is almost full What to Do Press the machine s Black or Color button to continue printing Contact your nearest Canon service center to request a repair 620...

Page 621: ...1714 Cause Ink absorber is almost full What to Do Press the machine s Black or Color button to continue printing Contact your nearest Canon service center to request a repair 621...

Page 622: ...1715 Cause Ink absorber is almost full What to Do Press the machine s Black or Color button to continue printing Contact your nearest Canon service center to request a repair 622...

Page 623: ...aper output cover and make sure the protective material and tape have been removed from the FINE cartridge holder If the protective material or tape is still there remove it and close the paper output...

Page 624: ...ngs and size of loaded paper do not match What to Do Check the print settings and the loaded paper load paper of the correct size and then press the machine s Black or Color button To cancel printing...

Page 625: ...ngs and size of loaded paper do not match What to Do Check the print settings and the loaded paper load paper of the correct size and then press the machine s Black or Color button To cancel printing...

Page 626: ...ted that paper has been fed aligned to one side What to Do Load the paper into the center of the front tray and slide the paper guides to align with the both edges of the paper stack Press the machine...

Page 627: ...ccurs even after printing again set the machine not to detect the paper width by using the operation panel the printer driver or Remote UI Note Depending on the type of paper the machine may not detec...

Page 628: ...n the correct position and orientation on the platen glass Make sure the platen glass and the print head alignment sheet are not dirty Make sure the loaded paper is correct For automatic print head al...

Page 629: ...ad print head alignment sheet on platen glass Place the printed side down and align the mark in the upper left corner of the sheet with the alignment mark 2 Slowly close the document cover and press m...

Page 630: ...3402 Cause Machine could not make copies because its memory is full What to Do Press the machine s Black or Color button Wait a while and retry copying 630...

Page 631: ...3403 Cause Machine could not make copies because its memory is full What to Do Press the machine s Black or Color button Wait a while and retry copying 631...

Page 632: ...3405 Cause Machine could not make copies because its memory is full What to Do Press the machine s Black or Color button Wait a while and retry copying 632...

Page 633: ...original is placed on the platen glass Make sure that the original is set in the correct position and orientation After carrying out the above actions retry scanning or copying If the error is still...

Page 634: ...a cannot be printed What to Do If you are printing CREATIVE PARK PREMIUM contents check the message shown your computer make sure genuine Canon FINE cartridges are installed properly for all colors an...

Page 635: ...4103 Cause Cannot perform printing with current print settings What to Do Press the machine s Stop button to cancel printing Then change the print settings and retry printing 635...

Page 636: ...ter error has occurred What to Do Turn off the machine and unplug it Plug in the machine again and turn it back on If this does not solve the problem contact your nearest Canon service center to reque...

Page 637: ...ter error has occurred What to Do Turn off the machine and unplug it Plug in the machine again and turn it back on If this does not solve the problem contact your nearest Canon service center to reque...

Page 638: ...ter error has occurred What to Do Turn off the machine and unplug it Plug in the machine again and turn it back on If this does not solve the problem contact your nearest Canon service center to reque...

Page 639: ...s are properly installed Open the paper output cover When the head cover opens push up the ink cartridge lock lever to make sure the FINE cartridges are installed properly After that close the paper o...

Page 640: ...ter error has occurred What to Do Turn off the machine and unplug it Plug in the machine again and turn it back on If this does not solve the problem contact your nearest Canon service center to reque...

Page 641: ...ter error has occurred What to Do Turn off the machine and unplug it Plug in the machine again and turn it back on If this does not solve the problem contact your nearest Canon service center to reque...

Page 642: ...5B02 Cause Printer error has occurred What to Do Contact your nearest Canon service center to request a repair 642...

Page 643: ...5B03 Cause Printer error has occurred What to Do Contact your nearest Canon service center to request a repair 643...

Page 644: ...5B04 Cause Printer error has occurred What to Do Contact your nearest Canon service center to request a repair 644...

Page 645: ...5B05 Cause Printer error has occurred What to Do Contact your nearest Canon service center to request a repair 645...

Page 646: ...5B12 Cause Printer error has occurred What to Do Contact your nearest Canon service center to request a repair 646...

Page 647: ...5B13 Cause Printer error has occurred What to Do Contact your nearest Canon service center to request a repair 647...

Page 648: ...5B14 Cause Printer error has occurred What to Do Contact your nearest Canon service center to request a repair 648...

Page 649: ...5B15 Cause Printer error has occurred What to Do Contact your nearest Canon service center to request a repair 649...

Page 650: ...ter error has occurred What to Do Turn off the machine and unplug it Plug in the machine again and turn it back on If this does not solve the problem contact your nearest Canon service center to reque...

Page 651: ...ter error has occurred What to Do Turn off the machine and unplug it Plug in the machine again and turn it back on If this does not solve the problem contact your nearest Canon service center to reque...

Page 652: ...ter error has occurred What to Do Turn off the machine and unplug it Plug in the machine again and turn it back on If this does not solve the problem contact your nearest Canon service center to reque...

Page 653: ...ter error has occurred What to Do Turn off the machine and unplug it Plug in the machine again and turn it back on If this does not solve the problem contact your nearest Canon service center to reque...

Page 654: ...ter error has occurred What to Do Turn off the machine and unplug it Plug in the machine again and turn it back on If this does not solve the problem contact your nearest Canon service center to reque...

Page 655: ...ter error has occurred What to Do Turn off the machine and unplug it Plug in the machine again and turn it back on If this does not solve the problem contact your nearest Canon service center to reque...

Page 656: ...ter error has occurred What to Do Turn off the machine and unplug it Plug in the machine again and turn it back on If this does not solve the problem contact your nearest Canon service center to reque...

Page 657: ...ter error has occurred What to Do Turn off the machine and unplug it Plug in the machine again and turn it back on If this does not solve the problem contact your nearest Canon service center to reque...

Page 658: ...ter error has occurred What to Do Turn off the machine and unplug it Plug in the machine again and turn it back on If this does not solve the problem contact your nearest Canon service center to reque...

Page 659: ...ter error has occurred What to Do Turn off the machine and unplug it Plug in the machine again and turn it back on If this does not solve the problem contact your nearest Canon service center to reque...

Page 660: ...ter error has occurred What to Do Turn off the machine and unplug it Plug in the machine again and turn it back on If this does not solve the problem contact your nearest Canon service center to reque...

Page 661: ...ter error has occurred What to Do Turn off the machine and unplug it Plug in the machine again and turn it back on If this does not solve the problem contact your nearest Canon service center to reque...

Page 662: ...ter error has occurred What to Do Turn off the machine and unplug it Plug in the machine again and turn it back on If this does not solve the problem contact your nearest Canon service center to reque...

Page 663: ...ter error has occurred What to Do Turn off the machine and unplug it Plug in the machine again and turn it back on If this does not solve the problem contact your nearest Canon service center to reque...

Page 664: ...ter error has occurred What to Do Turn off the machine and unplug it Plug in the machine again and turn it back on If this does not solve the problem contact your nearest Canon service center to reque...

Page 665: ...ter error has occurred What to Do Turn off the machine and unplug it Plug in the machine again and turn it back on If this does not solve the problem contact your nearest Canon service center to reque...

Page 666: ...ter error has occurred What to Do Turn off the machine and unplug it Plug in the machine again and turn it back on If this does not solve the problem contact your nearest Canon service center to reque...

Page 667: ...ter error has occurred What to Do Turn off the machine and unplug it Plug in the machine again and turn it back on If this does not solve the problem contact your nearest Canon service center to reque...

Page 668: ...ter error has occurred What to Do Turn off the machine and unplug it Plug in the machine again and turn it back on If this does not solve the problem contact your nearest Canon service center to reque...

Page 669: ...ter error has occurred What to Do Turn off the machine and unplug it Plug in the machine again and turn it back on If this does not solve the problem contact your nearest Canon service center to reque...

Page 670: ...ter error has occurred What to Do Turn off the machine and unplug it Plug in the machine again and turn it back on If this does not solve the problem contact your nearest Canon service center to reque...

Page 671: ...ter error has occurred What to Do Turn off the machine and unplug it Plug in the machine again and turn it back on If this does not solve the problem contact your nearest Canon service center to reque...

Page 672: ...ter error has occurred What to Do Turn off the machine and unplug it Plug in the machine again and turn it back on If this does not solve the problem contact your nearest Canon service center to reque...

Page 673: ...B202 Cause An error requiring a repair has occurred What to Do Turn off the machine and unplug it Contact your nearest Canon service center to request a repair 673...

Page 674: ...B203 Cause An error requiring a repair has occurred What to Do Turn off the machine and unplug it Contact your nearest Canon service center to request a repair 674...

Page 675: ...B204 Cause An error requiring a repair has occurred What to Do Turn off the machine and unplug it Contact your nearest Canon service center to request a repair 675...

Page 676: ...B205 Cause An error requiring a repair has occurred What to Do Turn off the machine and unplug it Contact your nearest Canon service center to request a repair 676...

Reviews: