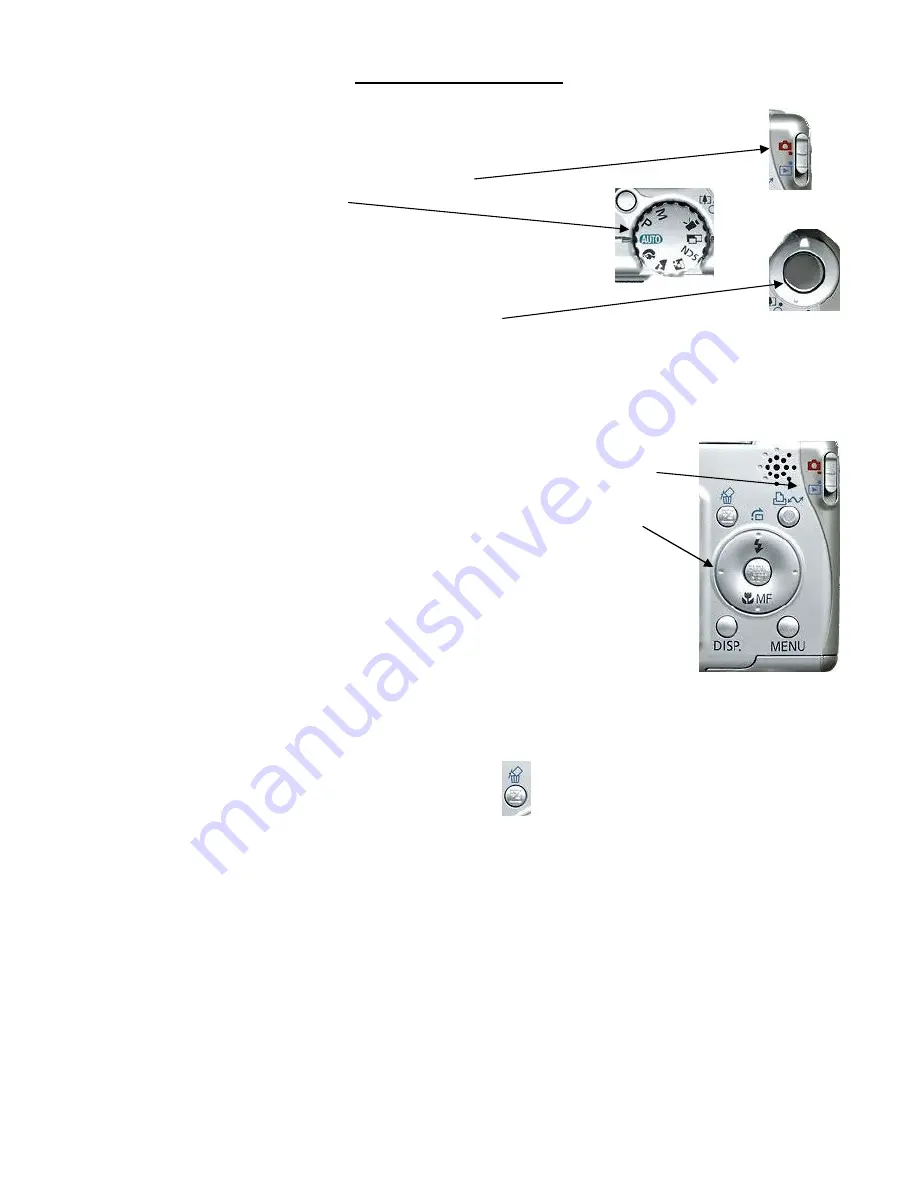
Using
the
Camera
Taking
a
Picture:
To
begin
taking
pictures
there
are
three
things
that
must
happen
first.
1.
Turn
the
camera
on
using
the
Power
Button
.
2.
Make
sure
the
Mode
Switch
is
slid
up
to
Camera.
3.
Turn
the
Shooting
Dial
to
Auto.
•
You
can
now
use
the
View
Finder
or
the
LCD
Screen
to
view
your
subject.
The
Zoom
Lever
on
the
top
front
of
the
camera
will
allow
you
to
zoom
closer
or
farther
away
from
your
subject.
•
To
snap
a
picture,
first
depress
the
Shutter
Button
half
way.
This
will
allow
the
lens
to
focus.
You
will
feel
it
click
when
it
is
pushed
down
half
way.
Give
it
a
second
to
focus
and
then
continue
to
depress
the
Shutter
Button
the
rest
of
the
way.
You
will
hear
the
“clicking
shutter”
sound
and
possibly
see
a
flash
if
one
is
needed.
Your
image
will
appear
on
the
LCD
Screen
for
2
seconds.
Viewing
Your
Pictures:
1.To
view
the
pictures
you
have
taken
you
must
slide
the
Mode
Switch
to
Play
.
2.The
last
picture
you
took
will
appear
on
the
LCD
Screen
.
You
can
then
use
the
Control
Arrows
to
move
left
and
right
through
the
pictures
you
have
taken.
•
While
previewing
a
picture
you
can
zoom
in
and
out
using
the
Zoom
Lever
.
If
you
are
zoomed
in
you
can
use
the
Control
Arrows
to
scroll
across
a
picture.
•
If
you
zoom
all
the
way
out
it
will
bring
up
an
index
page
displaying
nine
images
at
a
time.
You
can
then
use
the
Control
Arrows
to
move
to
an
image
you
want.
To
view
that
image
you
just
have
to
use
the
Zoom
Lever
and
zoom
in
on
the
picture.
Deleting
Unwanted
Pictures:
While
viewing
your
pictures
from
the
previous
steps
you
can
easily
delete
unwanted
pictures.
Simply
select
the
picture
you
no
longer
want
and
press
the
Delete
Button
.
You
will
be
asked
to
Erase
or
Cancel
,
select
Erase
.
•
IMPORTANT
–
While
in
the
“
Play
”
mode
and
viewing
pictures,
you
can
delete
all
the
pictures
at
once
by
pushing
the
Menu
Button
.
Then
arrow
down
the
menu
to
Erase
All
and
push
the
center
Function
Set
Button
.
Arrow
to
“
OK
”
to
confirm
the
erase
and
push
the
Function
Set
Button
.
Please
do
this
step
prior
to
returning
your
camera
to
the
Media
Center.
This
will
clean
out
your
camera
for
the
next
person.
Saving
Pictures
to
Your
Computer:
The
camera
has
a
memory
card
which
stores
the
pictures.
Open
the
battery
compartment
on
the
bottom
of
the
camera.
Push
down
on
the
memory
card
and
it
will
pop
up.
Carefully
remove
it
from
the
camera
and
slide
it
into
the
bottom
memory
card
slot
on
the
front
of
your
laptop.
The
card
should
be
sticker
side
up
with
the
arrow
pointing
to
the
edge
to
be
inserted.
Then,
open
Windows
Explorer
and
locate
the
drive
for
the
Memory
Card.
Now
you
can
Copy/Paste
or
Drag/Drop
the
pictures
to
your
H:
drive.


