background image

Summary of Contents for PowerShot SD630 Digital ELPH Camera

Page 1: ...65 I Before Using the Camera I PlaybacldErasing Settings I Viewing Images on a TV set I Customizing the Camera CDI E230 010 XXO6XXX 2006 CANON INC PRINTED IN JAPAN 2 3 Q _ O List of Messages Appendix...

Page 2: ...oting by using high ISO speed OAutomatically detects camera orientation with an Intelligent Orienta_on sensor OChanges image colors to create special effects Color Ac_nt Color _layback _ ePlays movies...

Page 3: ...e SD memory cards and MultiMediaCards with this camera These cards are collectively called memory cards in this guide SD stands for Secure Digital a copyright protection system Use of genuine Canon ac...

Page 4: ...nitor 18 Indicator 22 Power Saving Function 22 Setting the World Clock 23 Menus and Settings 25 Menu List 27 Resetting Settings to Their Default Values 31 Formatting Memory Cards 32 Changing the Recor...

Page 5: ...SO Speed 64 Setting the Auto Rotate Function 65 Checking for Focus Right After Shooting 66 Creating an Image Destination Folder 68 Resetting the File Number 69 O Magnifying Images 71 Viewing Images in...

Page 6: ...102 Shooting Movies 106 Playback 107 Battery Battery Charger 108 TV monitor output 108 Printing onDirect Print Compatible Printers 109 Battery Handling 113 Handling the Memory Card 115 Using anAC Ada...

Page 7: ...n digital cameras are intended for personal use and should never be used in a manner that infringes upon or contravenes international or domestic copyright laws and regulations Please be advised that...

Page 8: ...ecautions section of the Basic Camera User Guide Always ensure that the camera is operated correctly OThe safety precautions noted on the following pages are intended to instruct you in the safe and c...

Page 9: ...to come into contact with or become immersed in water or other liquids If the exterior comes into contact with liquids or salt air wipe it dry with a soft absorbent cloth Continued use of the equipmen...

Page 10: ...t power adapter from both the camera and the power outlet after recharging or when they are not in use to avoid fire and other hazards Do not place anything such as tablecloths carpets bedding or cush...

Page 11: ...irt to contact the charger terminals or plug Such conditions could lead to tire electrical shock or other damage Avoid using placing or storing the equipment in places subject to strong sunlight or hi...

Page 12: ...ck or injury Do not operate the flash with dirt dust or other items stuck to the surface of the flash Be careful not to cover the flash with your fingers or clothing when shooting The flash may be dam...

Page 13: ...g the equipment in an airtight resealable plastic bag and letting it adjust to temperature changes slowly before removing it from the bag Moving the equipment rapidly between hot and cotd temperatures...

Page 14: ...DIGITAL Terminal Basic Guide p 20 Terminal Cover Basic Guide p 20 _ Wrist Strap Mount Speaker Microphone p 81 _ AF assist Beam p 27 Red Eye Reduction Lamp Basic Guide p 9 Self Timer Lamp p 38 Flash Ba...

Page 15: ...Back View _ LCD Monitor p 16 Tripod Socket _ DC Coupler Terminal Cover p 117 _ Memory Card Slot Battery Cover Basic Guide p 2 m 5 t 3 I 4 O o 3 o o r0 o r0 13...

Page 16: ...Basic Guide p 5 _ M Print Share Button Basic Guide pp 15 23 _ FUNC SET Function Set Button p 25 _ Touch Control Dial p 15 Indicator p 22 MENU Button p 26 DISP Display Button p 16 _ _ Macro JA Infinit...

Page 17: ...shooting mode Using the Clock You can display the current date and time for a 5 second interval using the following two methods Default setting Method 1 Hold the FUNC SET button down while turning on...

Page 18: ...m No Information In_rmation View Playback Mode r_ Standard Detailed No Information In the shooting modes the shooting information displays for approximately 6 sec when a setting is changed regardless...

Page 19: ...The next time you turn on the camera the LCD monitor will be at the brightness setting selected in the Set up menu You cannot changethe brightness of the LCD monitor with this function if you have al...

Page 20: ...ngMode pp 34 40 44 59 62 BasicGuidepp 6 8 Wm ExposureCompensation p 51 El Long Shutter Mode p 52 nDO_W_ White Balance p 54 _Imm m mm My Colors p 57 AELock p 48 FE Lock p 49 AF Lock p 47 Time Zone p 23...

Page 21: ...aise the ISO speed p 64 or select a setting other than flash off or attach the camera to a tripod or other device Playback Information Playback Mode Standard W_AVE F rmat S und P 81 j Folder Number Fi...

Page 22: ..._Im m My Colors Shooting p 57 mmmmm_nm_lmm My Colors Playback p 79 mm MeteringMode p 50 White Balance p 54 File Size Recording Pixels StillImages p 33 Movie Length Movies p 40 The following informatio...

Page 23: ...the graph the darker the image The greater the bias toward the right the brighter the image If the image is too dark adjust the exposure compensation to a positive value Similarly adjust the exposure...

Page 24: ...tances Press the power button again to restore power Shooting Mode Powersdown approximately3 minutesafterthe last controlis accessedon the camera The LCDmonitor automaticallyturnsoff 1 minute afterthe...

Page 25: ...estination time zones You can enjoy the convenience of not having to switch the Date Time settings Setting the Home World Time Zones iSe enu _ime _ Zone _ _ m 5 re O n eO eYou can also select an area...

Page 26: ...Switching to the Destination Time Zone If you change the date and time when the World option is selected the Home date and time will also change automatically 24...

Page 27: ...the mode switch to I_l or D II _ Press the FUNC SET button _ Use the IF or 4k button to select a menu item 0 o Some items may not be selectable in some shooting modes _ Use the or k button to select a...

Page 28: ...nt Set up and My Camera menus display _ Press the MENU button Use the or k button to switch between menus You can also use the zoom lever to switch between menus Use the 4 or 41 button to select menu...

Page 29: ...enu Default setting Menu Item Options Page Topic AiAF On lOft p 46 Self timer 10 seconds l 2 secondslml Custom Timer Delay 0 10 15 20 30 p 38 sec Shots 1 3 10 AF assist Beam On Oft Digital Zoom On Oft...

Page 30: ...Default setting Menu Item Options Mute On Offf Volume Off 1 2 3 4 5 Start upVol OperationVol SelftimerVol Page Topic Set to On to silence allsounds except warningsounds Basicp 5 Adjuststhe volume of...

Page 31: ...the image in the LCD monitor Power Saving p 22 Time Zone Date Time Clock Display 0 5 10 sec 20 sec 30 sec 1 rain 2 rain 3 rain Format File Numbering Continuous Auto Reset CreateFolder CreateNewFolder...

Page 32: ...ce this setting is saved even when the power is turned off ensure that you return the setting to Auto to print other image sizes My Camera Menu Default setting Menu Item Available Settings Theme Selec...

Page 33: ...to a printer The following cannot be reset Shooting mode The Time Zone Date Time Language and Video System options in the Set up menu p 29 30 White balance data recorded with the custom white balance...

Page 34: ...tton to add a check mark eYou can stop formatting a card when Low Level Format is selected by pressing the FUNG SET button You can still use a card without problem when formatting is halted but its da...

Page 35: ...els Medium 2 1600x1200 pixels Small 640 x 480 pixels i_ J _ 1600x 1200 Postcard Date pixels Imprint Mode 2816x 1584 Widescreen pixels _r Low Pdnting to about A4 size 210 x 297 mm 8 3 x 11 7 in PAnting...

Page 36: ...timated p 126 See Memory Cards and Estimated Capacities p 125 You can shoot a subject 3 10 cm 1 2 3 9 in from the end of the lens at the maximum wide angle setting With the digital zoom the image area...

Page 37: ...zoom setting will display in _ the LCD monitor OWhen you press the zoom lever toward E43 the zoom stops when the lens reaches the maximum optical telephoto set ting when shooting still images Press t...

Page 38: ...parately newly formatted with low level formatting p 32 This reflects standard shooting criteria established by Canon Actual results may vary according to the subject and shooting conditions Even if c...

Page 39: ...idth to height ratio of approximately 3 2 shown in the LCD monitor C J o o Embedding the Date in the Image Data You can embed the date in image data when Postcard Date Imprint Mode is selected Rec Men...

Page 40: ...the self timer lamp will blink and then stay lit for the last 2 seconds To Cancel the Self Timer Press the _ button to display h I You can change the self timer sound p 97 Changingthe Self Timer Count...

Page 41: ...movie mode If the Shots option is set to 2 or more shots the following occurs The exposure and white balance are locked at the settings selected for the first shot If the flash is used the interval b...

Page 42: ...e few recording pixels and also the data size is small this mode is convenient for sending movies as e mail attachments or when the memory card capacity is low Recording Pixels 160 x 120 Frame Rate 15...

Page 43: ...ls and frame rate p 43 eSee Changing Colors p 59 for the procedures for using and I_ S oot ePressing the shutter button halfway automatically sets the exposure focus and white balance settings ePressi...

Page 44: ...canceled if you press the MENU button or change the white balance My Colors or shooting mode settings In movie shooting mode with AE lock set even if Touch Icons is set to On p 29 the touch icons will...

Page 45: ...ding Pixels and Frame Rates Frame rates indicate the number of frames recorded or played back each second The higher the frame rate the smoother the appearance of motion Frame Rate frames sec Recordin...

Page 46: ...an be used to shoot overlapping images that can later be merged stitched to create one panoramic image on a computer The overlap ping seams of sev eral adjacent images can be joined into a single pano...

Page 47: ...and shoot oo You can retake a shot by pressing the or _ button and return _ _ ing to the previously recorded image screen eMinor discrepancies in the overlapping portions can be cor rected when the i...

Page 48: ...ine the focus The camera focuses using the center AF frame This is Off convenient for focusing on a specific part of a subject with greater certainty The focus is locked to the center AF frame when th...

Page 49: ...center of the composition eSubjects that are moving quickly oSubjects through glass Try to shoot as close to the glass as possible to reduce the chances of light reflecting back off the glass Shootin...

Page 50: ...button to compose the image Moreover the AF Iock is still effective after the picture is taken allowing you to capture a second image with the same focus You can set the exposure and focus separately...

Page 51: ...and set it to flash on Focus on the part of the subject on which you wish to lock the flash exposure setting Press the shutter button halfway and press the ISO button eThe flash will pre fire and wil...

Page 52: ...the position of the subject the brightness the direct light and the backlighting and adjusts the settings to the correct exposure far the main subject Averages the light metered from the entire frame...

Page 53: ...bject too dark when it is backlit or shot against a bright background or to avoid making lghts appear too bright in night shots To Cancel the Exposure Compensation Restore the compensation value to 0...

Page 54: ...You can set the shutter speed to a slow setting to make dark subjects appear brighter 52...

Page 55: ...es a factor at low shutter speeds Shoot with the camera secured to a tripod Use of the flash may result in an over exposed image If this occurs shoot with the flash set to _ The following are unavaila...

Page 56: ...right day Cloudy For recording under overcast shady or twilight skies For recording under tungsten and bulb type 3 Tungsten wavelength fluorescent lighting For recording under warm white cool white or...

Page 57: ...cular take a custom white balance reading for the following situations that are difficult for the Auto setting to detect correctly oShooting close ups oShooting subjects of monotone color such as sky...

Page 58: ...ite balance may not be set In particular the following should not be changed ISO Speed Flash Setting the flash to on or off is recommended If the flash fires when reading the white balance data with t...

Page 59: ...r Skin Use this option to make skin tones darker Tone Use this option to emphasize blue tints It makes Vivid Blue blue subjects such as the sky or ocean more vivid Use this option to emphasize green t...

Page 60: ...he Camera to a Custom Color Mode This mode allows you to adjust the contrast sharpness and saturation and the color balance for red green blue and skin tones O M Oo o Custom Color _ See Menus and Sett...

Page 61: ...ot tdaI images and check the results If you set Save Original p 63 to On when shooting a still image you can record the original image as well the transformed one Use this optionto have only the color...

Page 62: ...play will altemate between the original image and the color accent image using the previously set color Aim the camera so that the color you wish to retain appears at the center of the LCD monitor and...

Page 63: ...after color input mode if you use the flash or change the white balance or metering settings The specified color accent is retained even if the camera s power is turned off Shooting in the Color Swap...

Page 64: ...etting for color swap mode changes green into white You may not obtain the expected results if you use the flash The colors specified in the color swap mode are retained even if the camera s power is...

Page 65: ...owing the original I_ When Save Original On is Set to Only the transformed image displays in the LCD monitor while shooting in the Color Accent or Color Swap mode The transformed image is reviewed in...

Page 66: ...O speed according to the light level when shooting Since the ISO speed setting will automatically be raised in dark places the camera will select a faster shutter speed and reduce the chances of camer...

Page 67: ...es the optimal white balance exposure and focus for vertical photography This function operates regardless of the on off status of the Auto Rotate function You can set the Auto Rotate function separat...

Page 68: ...You can check whether the image is in focus right after it is recorded To cancel press the shutter button halfway 66...

Page 69: ...e Change the display position using the the _ or 41 button ePressing the MENU button restores the standard dis play position If you have an image with multiple AF frames selected the focus will switch...

Page 70: ...er images To create an additional folder insert another check mark You can also specify a date and time if you wish to Auto Create create a new folder using a shooting time after the spec fled date an...

Page 71: ...Reset Function A number one higher than the last one recorded is assigned to the next image This is convenient for managing all your Continuous images together on a computer because you avoid file na...

Page 72: ...ay be saved to a new folder when there is insufficient free space even if the total number of images in a folder is less than 2 000 because the following types of image are always saved together into...

Page 73: ...press the FUNC SET button while in magnified display the camera switches to image advance mode and _ _ will display You can usethe or 4 buttonto advance to the next or previous image at the same level...

Page 74: ...es The jump bar will display if you press the zoom lever toward _r_while in index playback and you can switch the display between sets of nine images eUse the or 4 button to move to the previous or ne...

Page 75: ...hot Date IJumps to the first image of each shooting date Jump to Movie Jumpsto a movie Jump to Fo der D spays the first mage n each fo def button The camera will switch to jump search mode eThe screen...

Page 76: ...n use the button to slow down orthe t_ button to speed up playback Displays the first frame Previous Frame Rewinds if the FUNG SET button is held down Next Frame Fast Forwards if the FUNC SET button i...

Page 77: ...e editing panel and the movie editing bar will display Movie Editing Bar Beginning or Cut End and the or button to specify the cut point _ eTo check a temporarily edited movie select Play and press th...

Page 78: ...3 minutes to save an edited movie If the battery runs out of charge partway through edited movie clips cannot be saved When editing movies it is recommended to use a fully charged battery or the separ...

Page 79: ...Settings p 26 O Use the or button to select an image to rotate and press _ to rotate it Cycle through the 90 270 originaI orientations with each m press of the FUNC SET button eYou can also select an...

Page 80: ...and the next image gradually brightens until it is displayed I Press the button to have the previous image display from the left _ _I and the _ button to have the next image display from the right Th...

Page 81: ...the or _ button to select an image and press _ eYou can also select an image with the touch control dial _ Use the or button to _ select the My Colors type and press _ _ eThe displayed image will ref...

Page 82: ...ffects can be added any number of times to an image the image quality will gradually deteriorate with each application and the intended colors may not be achieved Color in images taken using My Colors...

Page 83: ...In playback mode including single image playback and index playback you can attach sound memos up to one minute to an image The sound data is saved in the WAVE format m P_ 81...

Page 84: ...Sound Memo Panel Exit Record Pause Play Erase Select Erase in the confirmation screen and press the FUNO SET button 82...

Page 85: ...ly in order Stills Plays still images only in order Plays the images selected for each slide show _11 _1 Custom 1 3 Custom 1 Custom 2 or Custom 3 in order p 86 Play Menu _ See Menus and Settings p 26...

Page 86: ...new image gradually brightens as it moves upward from the bottom The new image first appears in a cross shape and gradually expands to display the full image Portions of the new image move horizontal...

Page 87: ...Selecting an Image Date or Folder for Playback Select or and press _ i Usethe or buttonto seiectthe date or folder to be played back and press 0 Date Folder 133 P_ 85...

Page 88: ...ton Check mark to move between images indicating selection for playback and the _ Number indicating button to select or dese the selection order lect them eYou can also select an image with the touch...

Page 89: ...nds 15 seconds and 30 seconds Displaying time can vary slightly depending on the image Default setting eRepeat Sets whether the slide show stops when all the slides have been displayed or continues un...

Page 90: ...88 You can protect important images and movies from accidental erasure...

Page 91: ...Please format the memory card when you want toerase not only image data but also allthe data contained on the card p 32 m 89...

Page 92: ...s to a photo developing service that supports DPOE I The _ icon may display for a memory card with print I settings set by a different DPOF compliant camera These I settings will be overwritten by tho...

Page 93: ...All the Images on a Memory Card cn cn _0 91...

Page 94: ...er setting the print style select the image s to print The following print settings can be selected Default setting _ Standard Prints one image per page Prints the selected images together at a Print...

Page 95: ...ame time however the printable information may vary between printers Embedded dates in Postcard Date Imprint mode p 37 print out even when Date is set to Off Do not set the date in the DPOF print sett...

Page 96: ...ngs used on the camera comply with the Digital Print Order Format DPOF standards The _ icon may display for a memory card with transfer I settings set by a different DPOF compliant camera These I sett...

Page 97: ..._ 1 See Menus and Settings p 26 Mark all and press _ Select eSelecting Reset cancels all transfer order settings OK and press _ Select Images are transferred in order according to the file number A m...

Page 98: ...top edge _ II and plug the AV cable in all the _ I way I_ _ _mm I_ Piu ihe oiherends oiihe 2_ AV cable to the VIDEO IN _i_i0 _ and AUDIO IN jacks on Ye wll w the TV The video output signal can be swit...

Page 99: ...nd start up operation self timer and shutter sounds You can change and register these settings enabling you to customize the camera to suit your own tastes My Camera Menu_ Menu Item See Menus and Sett...

Page 100: ...s to the and menu items You can also use the supplied software to upload your computer s images and sounds to the camera A computer is required to restore the My Camera settings to the defaults Use th...

Page 101: ...Select Record and press the FUNC SET button After record ing select Register and press the FUNC SET button Recording will automatically stop when the recording time elapses To play it select Play To e...

Page 102: ...ays sold separately p 117 Poor contact between oPolish the terminals with a soft camera and battery cotton swab before charging or terminals using the battery p 113 The camera s horizontal eThe camera...

Page 103: ...a normal occurrence in devices containing CCDs and does not constitute a malfunction This bar of light will not be recorded when shooting still images but it will be recorded when shooting movies A sl...

Page 104: ...ge when it is charged You can then shoot Memory card is full Olnsert a new memory card Basic iI Guidep 2 oil required download the images to a computer and erase them from the memory card to make spac...

Page 105: ...er results can beobtained byplacing the camera onastable surface orbyusing atripod toshoot Subject isout offocal oShoot with the subject atthe correct range shooting distance p 121 The subject ishard...

Page 106: ...ooting angle directly into the camera or is being reflected off the subject Guide p 9 ISO speed is too high OHigher ISO speeds and the High ISO Auto setting may increase image noise For higher image q...

Page 107: ...ct The shutter will not activate for approximately 1 second after the red eye reduction lamp fires in order to improve the effect The memory card s performance has dropped oTo enhance the continuous s...

Page 108: ...s which have had excluding slow recording memory images recorded and cards p 32 erased repeatedly There is insufficient free Try the following procedures space in the camera s Format the card with a l...

Page 109: ...movies shot with another camera cannot be edited Movies recorded with high recording pixels and frame rates may momentarily stop playing if played on slow reading memory cards You may experience fram...

Page 110: ...C 73 F OReplace the battery with a new one Basic Guide p 2 Battery life exceeded OReplace the battery with a new one Basic Guide p 2 Incorrect video system OSet the video system to the setting approp...

Page 111: ...Attach the camera tothe prnter properly connected securely with the supplied cable Printer power isoff eTurn onthe prnter inco_e_ p_i_t i_theB iset_pi_e_ul s_te_t connecfJon Print Method and select Au...

Page 112: ...mory card has experienced an anomaly OMemory card is full of images and no more can be recorded or saved Or no more image settings or sound memos can be recorded OThe file name could not be created be...

Page 113: ...of another manufacturer etc or a movie clip recorded by another camera oYou attempted to magnify an image recorded in a different camera or data type an image edited with a computer or a movie oYou a...

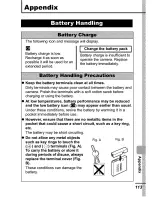
Page 114: ...unable to download the image due to the large amount of images approx 1000 stored on the memory card OCamera detected an error while moving the lens and cut the power automatically This error message...

Page 115: ...charging or using the battery At low temperatures battery performance may be reduced and the low battery icon _1 may appear earlier than usual Under these conditions revive the battery by warming it...

Page 116: ...charge it fully and discharge it fully in the camera about once a year before returning it to storage Since this is a lithium ion battery you need not completely discharge it before recharging It tak...

Page 117: ...he terminals with your hands or metal objects Do not peel away the original label on the memory card or cover it with another label or sticker When writing on the memory card do not use a pencil or ba...

Page 118: ...ed memory card might be the cause Reformatting the memory card may solve the problem When a non Canon brand memory card is malfunctioning reformatting it may solve the problem Memory cards formatted i...

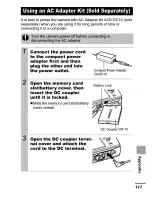
Page 119: ...to the compact power _L_ _ adapter first and then __ plug the other end into _ the power outlet CompactPowerAdapter CA DC 10 Open the memory card B ttr L k slot battery cover then a ely c e insert th...

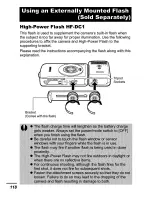
Page 120: ...ilt in flash when the subject is too far away for proper illumination Use the following procedures to affix the camera and High Power Flash to the supporting bracket Please read the instructions accom...

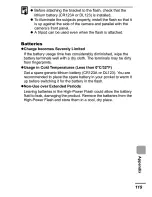
Page 121: ...considerably diminished wipe the battery terminals welI with a dry cloth The terminals may be dirty from fingerprints Usage in Cold Temperatures Less than 0 C 32 F Get a spare generic lithium battery...

Page 122: ...dirt off the camera body with a soft cloth or eyeglass lens wiper Lens First use a lens blower brush to remove dust and dirt then remove any remaining dirt by wiping the tens lightly with a soft cloth...

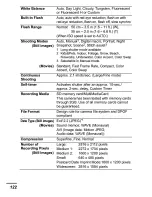
Page 123: ...0 pixels Picture coverage 100 AF System TTL autofocus Focusing frame 9 point AiAF 1 point AF fixed to center Shooting Distance Normal 30 cm 12 in infinity From the front of Macro 3 50 cm W 30 50 cm T...

Page 124: ...te Compact Color Accent Color Swap Continuous Approx 2 1 shots sec Large Fine mode Shooting Self timer Activates shutter after an approx 10 sec approx 2 sec delay Custom Timer Recording Media SD memor...

Page 125: ...y card recording may stop before reaching 1 hour or before the recorded data volume has reached 1 GB Single histogram displayable Index 9 thumbnail images Magnified approx 10x max in LCD monitor advan...

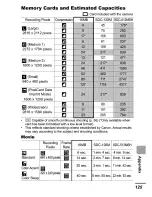
Page 126: ...eMovie data is excluded eAt low temperatures the battery performance may diminish and the low battery icon may appear very rapidly In these circum stances the performance can be improved by warming t...

Page 127: ...I I _ _ I 21 I _ I I I I I I _ 1 8 I I I I i _ 7i I I I lOl I I _2 I 205 Capable of smooth continuous shooting p 36 Only available when card has been formatted with a low level format This reflects s...

Page 128: ...ls Compression 2816 x 2112 pixels 2720 KB 1620 KB 780 KB 2272 x 1704 pixels 2002 KB 1116 KB 556 KB 1600 x 1200 pixels 1002 KB 558 KB 278 KB 640 x 480 pixels 249KB 150KB 84KB 1600 x 1200 pixels 558 KB...

Page 129: ...e 3 7 V DC Typical Capacity 760 mAh Cycle Life Approx 300 times Operating 0 40 C 32 104 F Temperatures Dimensions 35 4 x 40 3 x 5 9 mm 1 4 x 1 6 x 0 23 in Weight Approx 17 g 0 6 oz Battery Charger CB...

Page 130: ...y sold AC Adapter Kit ACK DCl0 Rated Input 100 240 V AC 50 60 Hz 16 VA 100 V 26 VA 240 V Rated Output 4 3 V DC 1 5 A Operating 0 40 C 32 104 F Temperatures Dimensions 42 6 x 10⁴ 4 x 31 4 mm 1 7 x 4 1...

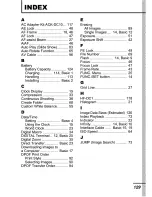
Page 131: ...ock 23 Digital Macro 34 DIGITAL Terminal 12 Basic 20 Digital Zoom 35 Direct Transfer Basic 23 Downloading Images to a Computer Basic 17 DPOF Print Order Print Style 92 Selecting Images 90 DPOF Transfe...

Page 132: ...Settings 25 My Camera Menu 30 Play Menu 28 Print Menu 28 Rec Menu 27 Set up Menu 28 MENU button 14 Messages 110 Metering Modes 50 Mode Switch 14 Basic 5 6 Movie Editing 75 Playback 74 Shooting 40 Mut...

Page 133: ...Selecting Basic 6 Stitch Assist 44 Shutter Button 14 Fully Basic 6 Halfway Basic 5 Shutter Speed 52 Slide Show 83 Repeat Settings 87 Selecting 86 Transition Effects 84 Smooth Continuous Shooting 36 S...

Page 134: ...mentioned above may be registered trademarks or trademarks of their respective companies IMPORTANT SAFETY INSTRUCTIONS SAVE THESE INSTRUCTIONS DANGER TO REDUCE THE RISK OF FIRE OR ELECTRIC SHOCK CAREF...

Page 135: ...or television reception which can be determined by turning the equipment off and on the user is encouraged to try to correct the interference by one or more of the following measures Reorient or reloc...

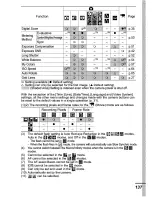
Page 136: ...rame Rate Auto Auto Red eye Redootbn Red eye Reduction Flash 3 On On Off Slow Synchro Macro Mode Infinity Mode AF Lock AE Lock FE Lock Single Conlinoous Shooting Shooting 10 sec Self Timer Method 2 se...

Page 137: ...r menu settings and changes made with the camera buttons can be reset to the default values in a single operation p 31 1 2 The recording pixets and frame rates for the Dll Movie mode are as follow Rec...

Reviews: