Chapter 4
4-10
T-4-5
Do not use the following setting.
T-4-6
12) Set SW504 bits 1 to 4 to OFF.
4.3.2.4
Adjusting the Stitching
Position (adjusting center
stitching)
0009-2575
Use the host machine user mode to perform this
adjustment.
4.3.2.5
Adjusting the Stitcher
Unit
0009-2576
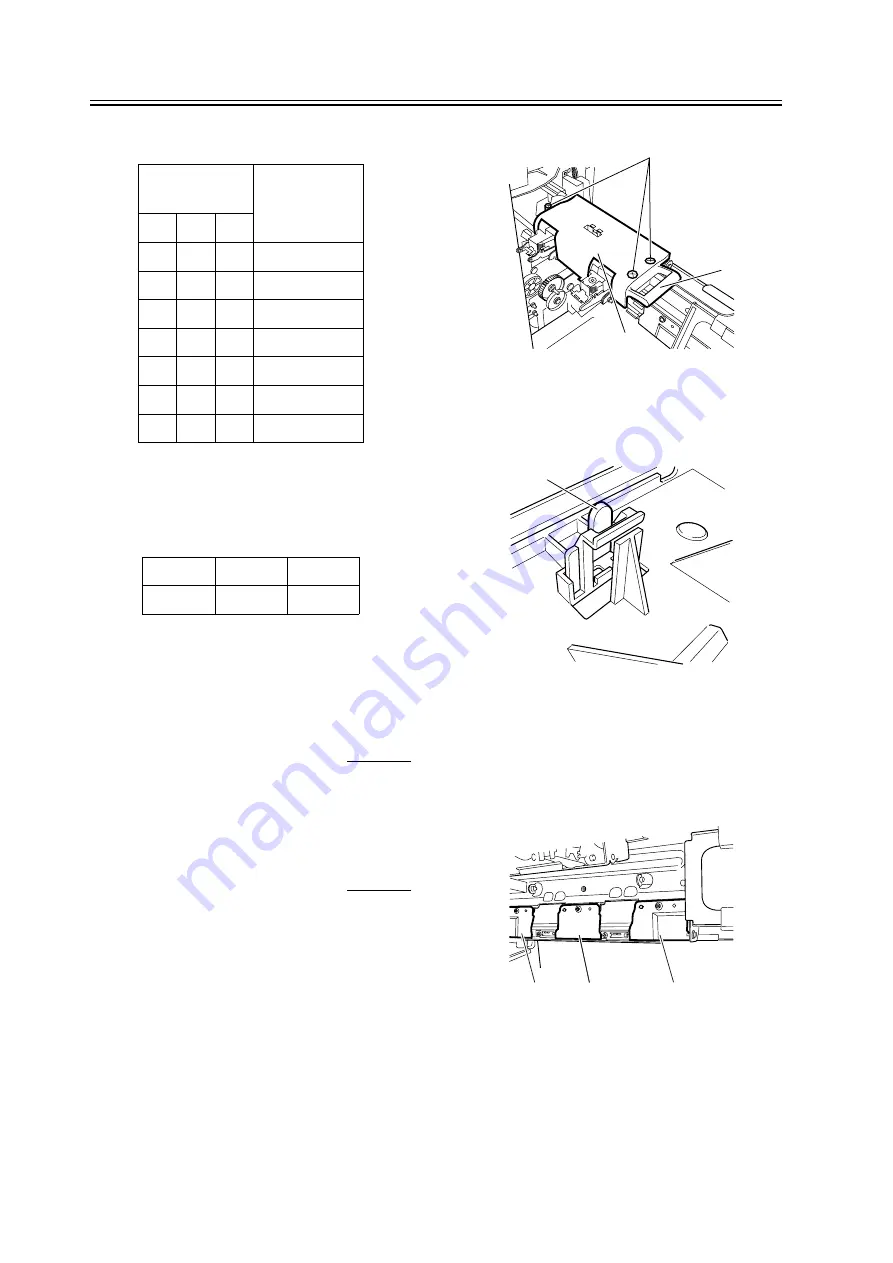
1) Open the front door.
2) Pull out the stitcher mount unit to the front, then
pull out the stitcher towards yourself and then pull up
the stitcher.
3) Remove three screws [2] and remove the stitcher
cover [3].
F-4-18
4) Remove the stitcher positioning tool [4] from the
back of the cover.
F-4-19
5) To adjust the front stitcher, remove the front guide
plate [4] and center guide plate [6]. To adjust the rear
stitcher, remove the center guide plate [6] and the rear
guide plate [7]. (one screw each)
F-4-20
6) To adjust the front stitcher, loosen the two screws
[9] on the stitcher mount [8]. To adjust the rear
stitcher, loosen the two screws [10] on the stitcher
SW504 bit
settings
Setting
(in units of 0.5 mm)
Bit 6
Bit 7
Bit 8
OFF
ON
ON
+3
OFF
ON
OFF
+2
OFF
OFF
ON
+1
OFF
OFF
OFF
0
ON
OFF
ON
-1
ON
ON
OFF
-2
ON
ON
ON
-3
Bit 6
Bit 7
Bit 8
ON
OFF
OFF
[2]
[3]
[1]
[4]
[7]
[6]
[5]
Summary of Contents for Saddle Finisher-T2
Page 1: ...Feb 21 2005 Service Manual Finisher Sorter DeliveryTray Saddle Finisher T2 ...
Page 2: ......
Page 6: ......
Page 15: ...Chapter 1 Specifications ...
Page 16: ......
Page 18: ......
Page 28: ......
Page 29: ...Chapter 2 Functions ...
Page 30: ......
Page 32: ......
Page 95: ...Chapter 3 Parts Replacement Procedure ...
Page 96: ......
Page 102: ......
Page 111: ...2 Remove two screws 1 and remove the escape door 2 F 3 33 2 1 ...
Page 182: ...F 3 325 2 1 3 2 2 ...
Page 183: ...Chapter 4 Maintenance ...
Page 184: ......
Page 225: ...Chapter 4 4 39 F 4 39 5 Select Register F 4 40 6 Select OK and register the data ...
Page 241: ...Chapter 5 Error Code ...
Page 242: ......
Page 244: ......
Page 261: ...Feb 21 2005 ...
Page 262: ......


