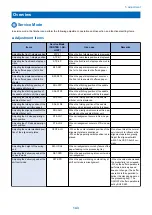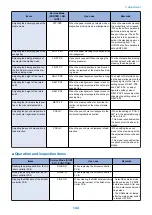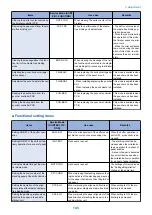
Items
Service Mode
(SORTER > OP-
TION)
Use case
Remarks
Setting whether to limit the stack ca-
pacity of the stapled or folded
sheets
TRY-STP
When stacking papers beyond the maxi-
mum number of stapled copies/folded
sheets.
When the stacking limit is
cleared, stacking capacity in-
creases, but stacking perform-
ance decreases.
Setting whether to limit the stack ca-
pacity of the stack tray
TRY-LMT
When the stacking performance decreases
by the curled paper during stacking a large
amount of the small size paper except the
thin paper and coated paper.
Switching the high-productivity
punch mode or high-accuracy
punch mode of the puncher unit
PUCH-SW
When switching the high-productivity punch
mode or high-accuracy punch mode.
- The settings of this mode and
the "Settings/Registration"
change at the same time.
- This mode is available when
the puncher unit has been in-
stalled.
Setting whether to perform the hor-
izontal registration operation of the
puncher unit for matching with the
center of the paper
PUN-Y-SW
When the adjustable range of the punch
hole horizontal registration adjustment
(PNCH-Y) is enlarged.
This mode is available when
the puncher unit has been in-
stalled.
Setting the punch hole specification
of the puncher unit
PNCH-SW2
When replacing the puncher unit.
This mode is available when
the puncher unit has been in-
stalled.
Setting ON/OFF of the mode to im-
prove the precision of the punch
hole position
PNCH-SW3
When the position of the punch hole is mis-
aligned.
- When setting to ON, the pro-
ductivity is decreased.
- When setting the punch mode
to the precision priority, this
mode enables.
- This mode is available when
the puncher unit has been in-
stalled.
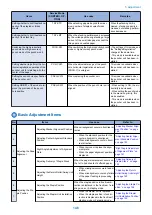
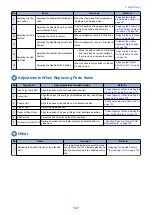
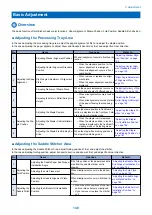
Basic Adjustment Items
No
Items
Use case
Refer to
1
Adjusting the Paper
Alignment
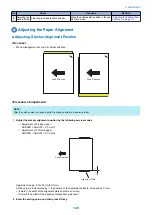
Adjusting Stacker Alignment Position
When misalignment occurs in front/rear di-
rection.
“Adjusting Stacker Align-
ment Position” on page
149
2
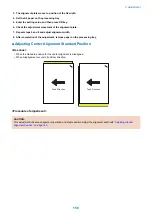
Adjusting Center Alignment Standard
Position
• When the standard position for the
center alignment is misaligned.
• When misalignment occurs in front/
rear direction.
“Adjusting Center Align-
ment Standard Position ”
on page 150
3
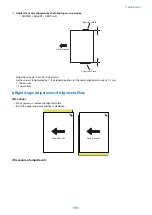
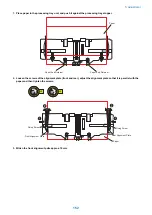
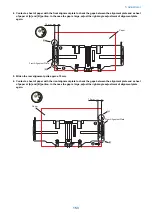
Right Angle Adjustment of Alignment
Plate
• When remove or replace the align-
ment plate.
• When the paper alignment position is
displaced.
“Right Angle Adjustment
of Alignment Plate ” on
page 151
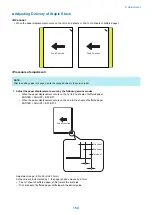
4
Adjusting Delivery of Staple Stack
When the paper displacement occurs on
the 1st to 2nd sheets of buffered paper.
“Adjusting Delivery of
Staple Stack ” on page
154
5
Adjusting the Return Roller/Swing Unit
Height
• When misalignment occurs in feed di-
rection.
• When misalignment occurs by failure
of the paper feeding to processing
tray.
“Adjusting the Return
Roller/Swing Unit Height ”
on page 155
6
Adjusting the Sta-
ple Position
Adjusting the Staple Position
When the staple position in front/rear di-
rection is displaced in the front/rear 1-sta-
pling mode or 2-stapling mode.
“Adjusting the Staple Po-
sition ” on page 158
7
Adjusting the Stapler Unit Installation
Position
• When the stapler unit is replaced.
• When the staple position in feed di-
rection is displaced in the front/rear 1-
stapling mode or 2-stapling mode.
“Adjusting the Stapler
Unit Installation Position ”
on page 159
5. Adjustment
146
Summary of Contents for Staple Finisher-AA1
Page 1: ...Revision 4 0 Staple Finisher AA1 Booklet Finisher AA1 Service Manual ...
Page 12: ...Product Overview 1 Features 5 Specifications 6 Names of Parts 14 Optional Configuration 20 ...
Page 83: ...Periodical Service 3 Periodic Servicing Tasks 76 ...
Page 87: ...3 Remove the 2 Connectors 1 2x 1 4 Parts Replacement and Cleaning 79 ...
Page 89: ...Main Units Parts 4 5 6 7 8 1 2 3 4 Parts Replacement and Cleaning 81 ...
Page 128: ...4x 1 2 2 3 3 2x 4 Parts Replacement and Cleaning 120 ...
Page 150: ...Adjustment 5 Overview 143 Basic Adjustment 148 Adjustments When Replacing Parts 173 Other 184 ...
Page 193: ...Troubleshooting 6 Making Initial Checks 186 Processing Tray Area 187 Saddle Stitcher Area 188 ...
Page 204: ...4 5 6 7 8 9 7 Installation 196 ...
Page 205: ...10 7 Installation 197 ...
Page 223: ...2 3 2x 7 Installation 215 ...
Page 224: ...APPENDICES Service Tools 217 General Circuit Diagram 218 ...


