background image

Before using the instrument, be sure to read this manual thoroughly.
Keep the manual where it is easily accessible.

Operation Manual

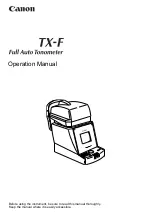
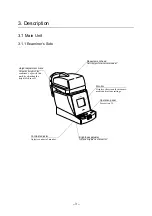
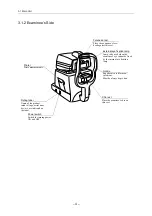
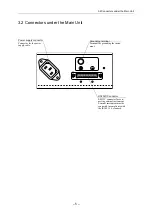
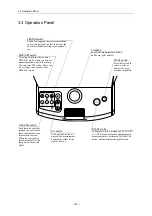
Summary of Contents for TX-F

Page 1: ...Before using the instrument be sure to read this manual thoroughly Keep the manual where it is easily accessible Operation Manual ...

Page 2: ...ect consequential damage arising out of the use of this product 3 This product may malfunction due to electromagnetic waves caused by portable personal telephones transceivers radio controlled toys etc Be sure to avoid having objects such as these which affect this product brought near the product 4 Canon reserves the right to change the specifications configuration and appearance of the product w...

Page 3: ...se limits are designed to provide reasonable protection against harmful interfer ence when the equipment is operated in a commercial environment This equipment generates uses and can radiate frequency energy and if not installed and used in accordance with the instruction manual may cause harmful interference to radio communications Operation of this equipment in a residential area is likely to ca...

Page 4: ...re the instrument near any flammable chemicals such as alcohol thinner benzine etc If chemicals are spilled or evaporate it may result in fire or electric shock through contact with electric parts inside the instruments Also some disinfectants are flammable Be sure to take care when using them WARNING Do not use or store the instrument in a location with the conditions listed below Otherwise it ma...

Page 5: ...t may result in death or serious injury WARNING Securely plug in the power cable into the AC outlet If contact failure occurs or if dust or metal object comes in contact with the exposed metal prong of the plug fire or electric shock may result WARNING Be sure to hold the plug or connector to disconnect the cable If you pull the cable the core wire may be damaged resulting in fire or electric shoc...

Page 6: ...nstru ment is used without it being repaired CAUTION Wipe the forehead rest with ethanol or glutaraldehyde solution to disinfect it each time a different patient uses the instrument in order to prevent infection Please consult a specialist for the procedure for disinfection CAUTION Change the chin rest paper each time the examinee changes in order to keep the chin rest clean CAUTION Measurement he...

Page 7: ... indicated in this manual are going to be performed Otherwise it may result in electric shock WARNING When the instrument is going to be cleaned be sure to turn OFF the power of each instrument and unplug the power cable from the AC outlet Never use benzine thinner or any other flammable cleaning agents Otherwise fire or electric shock may result WARNING Clean the plug of the power cable periodica...

Page 8: ...ose and positions where they are attached are indicated below See manual Mirar el manual Warning Label This unit weighs 21 kg it may tip over if proper care is not taken Rating Label This mark indicates that this is a Type B Applied Part according to UL2601 1 EN60601 1 This unit can be installed in the patient environment ...

Page 9: ...Operation Panel 6 3 4 Display on Measurement Screen 8 3 5 Display on DISPLAY and SET Modes Screens 11 4 Measurement Modes 12 4 1 Measurement Modes 12 4 2 Relation between Settings and Measurement Operation 13 5 Measurement 15 5 1 Preparation 15 5 2 FULL AUTO AUTO Measurement 20 5 3 MANUAL Measurement 27 6 Measurements Stored in Memory DISPLAY Mode 31 ...

Page 10: ...nternal Printer Page 3 3 39 8 Daily Inspection and Maintenance 43 8 1 Inspection 43 8 2 Before Calling a Service Person 45 8 3 Cleaning and Disinfection 51 8 4 Replacement 55 8 5 Expendable Parts List 59 9 Installation 60 9 1 Installation 60 9 2 Precautions when Moving the Instrument 62 10 Service Information 63 11 Specifications 64 12 Components 66 ...

Page 11: ...surement is apt to result in error Observation range of examinee s eye on the monitor has been widened and the depth of focus is deep It is easier to check the position of the eye or whether eyelashes are covering the pupil Level meter will be displayed The TX F obtains intraocular pressure from the waveform of the signal obtained by detect ing light reflected from the cornea when air is blown ont...

Page 12: ...is wiped when dust or dirt is on it it will be scratched Also do not wipe the objective lens with ethyl alcohol or with cleaning paper containing silicone Otherwise the surface will be corroded or will be stained See section 8 3 2 2 Do not use alcohol benzine or thinner for cleaning the cover of the instrument Also never wipe the cover with ethanol or glutaraldehyde solution Otherwise coating will...

Page 13: ...ontrast adjuster Adjusts contrast of monitor Measurement head Unit that performs measurement Height adjustment mark Align the height of the examinee s eye with this mark by adjusting the height of chin rest Monitor Displays the screen for measure ments and various settings Operation panel See section 3 3 ...

Page 14: ...ean Forehead rest Place the examinee s fore head against this rest Printer Prints measurements Rating label Name of the product rated voltage serial num ber etc are indicated on the label Power switch Switch for turning power ON and OFF External eye fixation lamp Lamp to be used when the examinee s eye cannot be fixed by the internal eye fixation lamp ...

Page 15: ...it Grounding terminal Terminal for grounding the instru ment RS232C Connector RS232C connector for con necting external instrument External instrument must be connected in compliance with the IEC601 1 1 standard Power supply connector Connector for the power supply cable ...

Page 16: ... When the external eye fixation lamp is ON the lamp below the switch lights PRINT switch Press this switch in order to print or transfer the mea surement manually Trackball Moves the measurement head up and down right and left LIMITER switch Switch for stopping the measurement head in a certain position in order to prevent the nozzle accidentally hitting the examinee s eye START switch When this s...

Page 17: ...itch Each time the switch is pressed the number of times of measurement 1 or 3 in FULL AUTO mode can be selected The number of times will be displayed within the brackets next to FULL AUTO AUTO MANU switch Press this switch to select measurement mode FULL AUTO AUTO MANUAL The selected mode will be displayed on the upper left side of the monitor Lamp above the switch lights when FULL AUTO or AUTO m...

Page 18: ...The initial value can also be set from the same page of SET mode Measurement mode Measurement mode FULL AUTO AUTO or MANUAL is displayed Measurement mode can be selected with AUTO MANU switch Number of times of measurement The number of times of measurement 1 or 3 to be per formed in FULL AUTO mode is displayed It is not displayed in AUTO and MANUAL mode Number of times can be selected by pressing...

Page 19: ...ory is displayed The upper data is the right side eye s STD value and the lower one is the left side eye s value After the first measurement Value to the first decimal place After the second measurement Value with higher reliability After more than three measurements The most appropriate value standard value obtained by reliability and statistically processing the data However measurement with low...

Page 20: ... ON on page 1 3 of SET mode Warning image will not be displayed when error is caused by blinking or when result is over the measurement range etc Eyelid warning line If the eyelid or eyelashes are below the eyelid warning line on the image instruct the examinee to keep the eye open wide or help them open their eye wide ERROR display ERROR is displayed when measurement was a failure Take the requir...

Page 21: ...e the functions differ from that screen in the display of the switches The diagram corresponds to the switches on the operation panel as follows mmHg I O P S T D SET PRINT END R I G H T 1 8 9 2 7 9 3 1 7 8 7 2 8 9 4 5 6 7 8 9 1 0 L E F T R E L I A B I L DISPLAY MODE CLEAR R L switch Trackball PRINT switch START switch Roller CHIN REST switches LIMITER switch FIXATION switch DISP SET switch CLEAR D...

Page 22: ...itial position PRINT ON See section 7 2 AUTO PRINT ON See section 7 2 AUTO Mode In the same way as in FULL AUTO mode the examiner presses the START switch after displaying the examinee s eye on the monitor However the instrument will automatically perform alignment focusing and measurement only once Press the START switch if you wish to repeat measurement It is recommended that AUTO mode be select...

Page 23: ...omati cally after full automatic measurement FULL AUTO AUTO OFF OFF ON Both eyes will automatically be mea sured as many times as set Result will be transferred by pressing PRINT switch Then measurement head returns to the initial position To transfer but not print the result after full auto matic measurement AUTO FULL AUTO AUTO ON ON OFF ON One eye will automatically be measured once If you wish ...

Page 24: ...TO mode To print and transfer the result after manual mea surement from FULL AUTO mode AUTO ON ON OFF ON Alignment and measurement are per formed manually Result is printed and transferred by pressing PRINT switch Then the measurement head returns to initial position After printing transferring deleting the result instrument returns to AUTO mode To print and transfer the result after manual mea su...

Page 25: ...le measurement is being performed WARNING Do not measure an eye of which cornea is frail due to corneal disease or due to it having undergone an operation Otherwise complications may occur WARNING Should any of the following occur immediately turn OFF the power switch unplug the power cable from the AC outlet and contact Canon representative or distributor When there is smoke odd odor or abnormal ...

Page 26: ...2 If you want to print a message with the result enter it see section 7 3 Explain about the measurement to the examinee Explain about the measurement to the examinee so he she will not be surprised by a sudden air puff By pressing CLEAR DEMO switch for more than two seconds you can demon strate the strength of air puff to the examinee even without examinee s eye dis played Select the eye to be mea...

Page 27: ...rk on the face rest CAUTION Ensure that the examinee has not placed his her hand or fingers under the chin rest Otherwise fingers may be hurt CAUTION Wipe the forehead rest with ethanol or glutraraldehyde solution to disinfect it each time a different examinee uses it in order to prevent infection Please consult a specialist for the procedure of disinfec tion If you are using disinfectant other th...

Page 28: ...e position where to stop the measurement head with LIMITER switch before measurement in order to pre vent accidental contact of nozzle with examinee Be sure to have the examinee firmly press his her fore head against the forehead rest and look from the side of the examinee when deciding the stop position If the stop position is not set the examinee may be injured Also if the message LIMITER OFF do...

Page 29: ...MITER OFF will disappear from the monitor 3 Slightly turn the roller back and forth in order to ensure that the nozzle does not go further the point where it has been locked NOTE Limiter turns OFF when turning ON the power of the instrument pressing PRINT switch clearing data or when recovering from power saving mode FULLAUTO 3 No 000001 mmHg STD L 30 R ...

Page 30: ...itch must be pressed each time you want to perform measurement in AUTO mode NOTES 1 Be sure to do the preparation mentioned in section 5 1 2 Measure the eye in AUTO mode if the examinee cannot keep his her eye open and continuous measurement cannot therefore be performed in FULL AUTO mode 3 Measure the eye in MANUAL mode if measurement in FULL AUTO or AUTO mode results in an error due to deformati...

Page 31: ... the measurement head using the trackball Adjustment of measurement head position Measurement head moves to right and left when trackball is turned to right and left Measurement head moves up and down when it is turned back and forth Have the examinee look at the eye fixation lamp Have the examinee look at the green internal eye fixation lamp If the examinee cannot see the lamp well and so the eye...

Page 32: ...RESS START SW AGAIN will be displayed Also in some cases auto matic alignment does not end due to the condition of examinee s eye In this case take the measures indicated below according to the cause Cause 1 The position of examinee s eye is off the automatic alignment range Remedy 1 Move the position of examinee s eye displayed on the monitor toward the center a little more using the roller and t...

Page 33: ...eri ous Cause 6 Effect of artificial light or sunlight reflected from the examinee s eye Remedy 6 Do not expose the examinee s eye directly to bright artificial light or sunlight If the alignment still cannot be performed align and measure the eye manually by referring to section 5 3 After the alignment measurement is performed automatically When the alignment is done air is puffed and the intraoc...

Page 34: ...d frequently Remedy 2 Tell the examinee to try not to blink for a while and measure again Cause 3 Corneal reflection rate is low Remedy 3 Maximum level of the level meter differs for each eye due to differ ences in corneal reflection rates Level meter will be low if corneal reflection rate is low Continue the measurement If any message appears and measurement is suspended Take the measures by refe...

Page 35: ...in to perform measurement Move measurement head toward the other eye FULL AUTO mode After the required number of data is obtained measurement head automatically moves toward the other eye AUTO mode Press R L switch in order to move the measurement head toward the other eye Alignment and measurement of the other eye are performed FULL AUTO mode Alignment and measurement are performed automatically ...

Page 36: ... section 6 Also data will be printed if PRINT switch is pressed NOTES 1 Results will be erased from the monitor after printing transfer is per formed Serial number will count up if COUNT is set to ON in SET mode 2 It is recommended that a hard copy of the printout be made if you wish to store it for a long time because printouts on the thermal paper are apt to deteriorate Measurement head returns ...

Page 37: ...ay occur Choose manual measurement Press AUTO MANU switch to display the word MANUAL on the monitor Display the examinee s eye on the monitor Use the roller and the trackball so that the right eye of the exam inee is seen approximately in the center of the monitor Adjustment of measurement head position Measurement head moves back and forth when the roller is turned It moves up and down when track...

Page 38: ... are covering the ring instruct the examinee to keep his her eye opened wide until measurement ends or help them open the eye wider by lifting up his her upper eyelid lightly with your fingers NOTE Value may become high when eye is covered by eyelid or eyelashes Perform alignment Use the trackball to position the bright dots inside the center alignment ring If you cannot see the dots clearly turn ...

Page 39: ...ter is set to ON in SET mode the level meter for the newest mea surement will be displayed While the instrument is charging up the mark indicating the eye being measured and the measurement value blinks After the charge up for the measurement is completed the result will be displayed within the brackets and the next measurement will start See section 3 4 2 for more information on the display If an...

Page 40: ...in SET mode If printing is unnecessary after the measurement Press CLEAR DEMO switch for an instant If the switch is pressed for more than two seconds air will be emitted from the nozzle for demonstration of air puff Measurement values of both eyes will be deleted from the monitor and serial num ber will count up if COUNT is set to ON in SET mode However measurement data remains in memory until th...

Page 41: ...RINT switch How to return to measurement mode Press CLEAR DEMO switch How to delete all data Press R L switch Confirmation message will appear Press START switch to delete or PRINT switch to can cel How to enter SET mode Press DISP SET switch in DISPLAY mode mmHg I O P S T D SET PRINT END R I G H T 1 8 9 2 7 9 3 1 7 8 7 2 8 9 4 5 6 7 8 9 1 0 L E F T R E L I A B I L DISPLAY MODE CLEAR Measurements ...

Page 42: ...ain even after power is turned OFF How to enter SET mode In measurement mode press DISP SET switch You will enter DISPLAY mode Press DISP SET switch again The first page of the SET mode will appear How to change the page To display the next page press AUTO MANU switch To display the previous page press PUFF TIMES switch How to go out of SET mode Press CLEAR DEMO switch PAGE END PAGE SET MODE RANGE...

Page 43: ...ted under the explanation of each item 7 1 2 Items RANGE Measurement range 30 Used for measuring the range 0 30 mmHg If the result is over 30 mmHg the range automatically changes to 60 This is recommended to be used for group examinations and normal screening 60 Used for measuring the range of 25 60 mmHg The air puff is stronger If the result is under 25 mmHg the range automati cally changes to 30...

Page 44: ...unt up even if PRINT switch is pressed No 6 digit number Serial number How to change the number 1 Turn the roller or press FIXATION switch or LIMITER switch to select the digit The number of the selected digit will be dis played in reverse image 2 The number increases when PRINT switch is pressed and decreases when START switch is pressed 6 digit number Serial number How to change the number 1 Tur...

Page 45: ... LIMITER switch 2 Press PRINT switch to select the required setting for UNDER OFF Warning message will not be displayed and mea surement will not stop 1 9 Warning message will be displayed and measure ment will stop when the result is below the intraoc ular pressure selected here 3 Select ABOVE by turning roller or by pressing FIXATION switch or LIMITER switch 4 Press PRINT switch to select the re...

Page 46: ...ngs must be changed in different ways The procedure for changing those settings will be indicated under the explanation of each item 7 2 2 Items PRINT Whether to print out the results with the internal printer of the TX F ON Results are printed OFF Not printed DATA Results to be printed transferred STD Standard values MEM 10 newest measurements and a standard value for each eye in memory PAGE LEVE...

Page 47: ...external instrument or not NOTE Please contact Canon representative or distributor when connecting external instrument to the TX F ON Data is output in RS232C interface OFF For no transfer FMT Transfer format NOTE For details concerning format please contact Canon repre sentative or distributor How to change the setting Press either START switch or PRINT switch BAU RS232C data transfer speed and d...

Page 48: ...ment returns to AUTO mode FULL AUTO The instrument returns to FULL AUTO mode LEVEL Choosing whether to display level meter on the measurement mode screen display mode screen and printout Level meter is a mark showing the waveform level of the signal obtained by detecting light reflected from the cornea when air is blown onto the eye ON Level meter will be displayed OFF Level meter will not be disp...

Page 49: ...sor Square in the character list or deletion message is called a character cursor Character being selected with character cursor will be entered Or deletion operation can be selected with the character cursor in the deletion message Character cursor moves to right or left by turning the roller Character list A list of characters that can be entered is displayed here Line that includes the required...

Page 50: ...racter Then turn the roller to select the character Enter the character Press START switch Enter the whole message Repeat the steps from 2 to 3 until the whole message is entered 7 3 3 How to Insert Move the position cursor to the required position Press FIXATION switch or LIMITER switch Insert a space Press CHIN REST switch A space of one character will be inserted at the place where the cursor w...

Page 51: ...ingle character without shifting the remaining characters Move the position cursor to the character to be deleted Press FIXATION switch or LIMITER switch Select the line CHAR CLEAR LINE CLEAR ALL CLEAR Press PRINT switch Select CHAR CLEAR CHAR CLEAR is first selected However if you have changed the selection turn the roller until CHAR CLEAR is displayed in reverse image Delete the character Press ...

Page 52: ... message Move the position cursor to the line you wish to delete Press FIXATION switch or LIMITER switch Select the line CHAR CLEAR LINE CLEAR ALL CLEAR Press PRINT switch Select ALL CLEAR Turn the roller until ALL CLEAR is displayed in reversed image Delete the whole message Press START switch Following message will be displayed for confirmation DELETE ALL DATA If it is OK to delete the whole mes...

Page 53: ...re electric shock or accident WARNING For safety reasons be sure to turn OFF the power switch when the following inspections are going to be performed Otherwise it may result in electric shock WARNING Clean the plug of the power cable periodically by unplugging it from the AC outlet and removing dust or dirt from the plug its periphery and AC outlet with a dry cloth If the cable is kept plugged in...

Page 54: ...Good Bad Good Bad Good Bad Clean the monitor See section 8 3 4 Inspection Result Remedy Date Date Date Main Unit 1 Check that the READY lamp lights and measurement display on the monitor is normal Good Bad Good Bad Good Bad Contact Canon or distributor if there is any problem 2 Check that the chin rest moves up ad down smoothly when CHIN REST switches are pressed Good Bad Good Bad Good Bad 3 Check...

Page 55: ...expose the examinee s eye directly to bright artificial light or sunlight Level meter is low Eyelid or eyelashes are covering the pupil Instruct the examinee to open the eye wider or lift up the eyelid lightly with your fingers and measure again Frequent blinking Tell the examinee to try not to blink or lift up the eyelid lightly with your fingers and measure again The reflection rate of the corne...

Page 56: ...ring alignment However measurement error will occur if the positioning is not accurate The pupil is obscured by eye lashes or eyelid Instruct the examinee to keep his her eye open wide or help them open the eye widely by lift ing up the upper eyelid lightly with your fingers Then press the START switch again Pupil is eccentric or deformed Use the roller and trackball to move the position of the ex...

Page 57: ... s face is properly fixed and set the measurement head stop position with LIMITER switch again MOTOR ERROR 1 2 3 PRESS ANY SW TO RESET Movement of measurement head has been interrupted Do not interrupt the movement of the measurement head such as by holding it Press any switch to reset the measurement head During measurement 2 ERROR TRY AGAIN The pupil is obscured by eye lashes Instruct the examin...

Page 58: ...e the switch is pressed After the mea surement press R L switch to measure the other eye Or if the other eye has already been measured press PRINT switch to print out the result 6 WARNING IMAGE TRY AGAIN The pupil is obscured by eye lashes Check the image and instruct the examinee to keep his her eye open wide or help them open the eye widely by lifting up the upper eyelid lightly with your finger...

Page 59: ...NT PAPER There is no printing paper Load role of printing paper PRINTER TOO HOT The printer head is too hot Wait for about 5 minutes and try again PRINTER TOO COLD The printer head is too cold During transfer TRANSMITTING Data is being transmitted TRANS COMPLETED Data transfer has been com pleted NO TRANS DATA There is no measurement data Transfer after performing mea surement TRANSMISSION CANCELL...

Page 60: ...e battery for data backup is low Although you can continue the measurement for time being the data that are backed up will be lost in time Immediately ask Canon or distributor for replace ment SYSTEM ERROR xxx Problem has occurred in the instrument Turn OFF the power switch and turn it ON again after about 10 seconds ILLEGAL CODE ERROR Problem has occurred in the instrument Turn OFF the power swit...

Page 61: ... wipe the objective lens with disinfecting alcohol or cleaning paper containing silicone as the surface may be damaged or be stained 3 Do not touch the nozzle during cleaning as lint of gauze etc may attach to it 4 Be sure to put the cap over the nozzle when the instrument is not in use Blow off dust Remove the brush from the blower brush and blow off the dust on the objective lens Wipe the object...

Page 62: ...has been used CAUTION Wipe the forehead rest with ethanol or glutaraldehyde solution to disinfect it each time a different examinee uses it in order to pre vent infection Please contact a specialist for the procedure for disinfection If you are using disinfectant other than those specified above or if you are mixing another disinfectant with ethanol please also consult a specialist because they ma...

Page 63: ...attached to it as the trackball will fall out easily Remove the trackball and wash it Remove the trackball from the claws of the trackball cover and wash it in water Wipe the roller and trackball cover There are three rollers inside the hole where trackball was placed Wipe those roll ers and the back of trackball cover with a piece of cloth soaked in water and wrung dry Return the trackball After ...

Page 64: ...over by align ing the longer claw of the cover with the arrow indicated on the edge of the aperture NOTE Cover will not fit into the hole unless the longer claw is properly aligned with the arrow Then turn the cover in clockwise direction until it stops 5 Longer claw Arrow ...

Page 65: ... rest paper is not going to be used disinfect the chin rest in the same ways as disinfecting the forehead rest each time the examinee changes Pull out the two pins on the chin rest Insert the pins into the holes on the chin rest paper Maximum of 100 sheets of paper can be attached Replace them in the chin rest NOTE Insert the pins straight into the holes 1 2 3 ...

Page 66: ... the printer cover Cut off the paper that has been fed through the printer and pull it out Pull the top part toward you Lower the printer lever Lower the lever on the right hand side Remove the old roll of paper Remove the old roll of paper together with the shaft and take the shaft out of the roll Insert the shaft into a new roll 1 2 3 4 ...

Page 67: ...ter as illustrated NOTE Be sure to check that the direction of roll is the same as shown in the illustration Raise the printer lever Turn ON the power Turn ON the power of the TX F Insert the end of paper into the slot Insert the end of paper into the slot in the printer 5 6 7 8 ...

Page 68: ... printer prop erly In this case pull out the paper neatly cut off the end of paper and reload 2 If the paper is fed through the printer aslant it may cause paper jam Lower the lever and straighten the paper Then raise the lever again Close the cover Pull out the edge of paper from the printer cover slot and close the cover CAUTION Do not touch the cutter for the printing paper Otherwise fingers ma...

Page 69: ...resentative or distributor for purchasing the following parts Name Reference Number Note Chin rest paper BA3 0151 500 sheets set Printing paper BH4 8143 Thermal printing paper 10 rolls set Width 58 mm Length 30 m Outside diameter of the roll 52 mm Inside diameter of the core 12 mm ...

Page 70: ...re ment head will be damaged 2 Do not lay the instrument on its side with the power turned ON Oth erwise the instrument may malfunction WARNING Only operate the instrument with the type of power supply indicated on the rating label Otherwise it may result in fire or electric shock WARNING Be sure to disconnect connect the cables as indicated in this manual The unit weighs 21 kg so bear in mind tha...

Page 71: ...nt See section 3 2 Set up the instrument Connect the power supply cable to an AC outlet Place the chin rest paper on the chin rest See section 8 4 1 Load the printing See section 8 4 2 Customize the settings as required Turn ON the power and change the settings concerning the measurement as required See chapter 7 If you are using external equipment Please contact Canon representative or distributo...

Page 72: ...ecting all the cables set the instrument upright again Carrying the instrument Support the instrument by holding the sides at the base WARNING When the instrument is going to be moved be sure to move the measurement head to the center turn OFF the power switch unplug the power cable from the AC outlet and disconnect other cables Otherwise the cable may be dam aged which may result in fire or elect...

Page 73: ...ow for repair Parts required to maintain the functioning of the product Expendable Parts Replaced by Service Person Following parts are apt to become worn out or to deteriorate due to the characteristics of the material or structure These parts cannot be replaced by the user If these parts are found to be worn out or to have deteriorated during daily inspection or use contact Canon representative ...

Page 74: ...from the above data due to following reasons Phthisis bulbi 1 eye corneal erosion 1 eye unstable stare 1 eye keratitis 1 eye too many blinks 31 eyes Regression and correlation Observation range Approximately 15 mm 12 mm Memory Maximum of 10 measurements for each eye Printer Thermal line printer Data output format RS232C Range Number of measured eyes Number of mea surements out of tolerable range P...

Page 75: ...to 85 RH Storage and Transportation Temperature 10 to 55 C Humidity 10 to 95 RH Atmospheric pressure 700 to 1060 hPa Power supply 100 240 VAC 50 60 Hz 0 8 0 4A Power consumption 80 VA Dimensions 280 W 520 L 480 15 H mm Mass Approximately 21 kg NOTE According to the International System of Units 1 mmHg is approximately 0 133 kPa ...

Page 76: ...nents TX F main unit 1 Power supply cable 1 Nozzle cap 1 Chin rest paper 100 sheets Printing paper 4 rolls Dust cover 1 Optional Accessories Chin rest paper 500 sheets Printing paper 10 rolls Motorized table CO MT ...

Page 77: ......

Page 78: ...2 Kiyohara Kogyodanchi Utsunomiyashi Tochigiken Japan Telephone 81 28 667 5711 CANON MEDICAL SYSTEMS Eye Care Systems Department 15955 Alton Parkway Irvine CA 92618 U S A Telephone 1 949 753 4162 PUB L IE 5124C 0000P0 000 Printed in Japan ...

Reviews: