Handle the media messages in the tray-to-media mode (PCL)
Procedure
1.
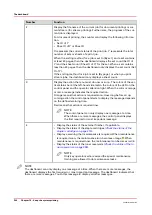
A message on the control panel indicates that a media is missing. Select one of the following
actions as a response to the message.
• Touch [Assign media].
Continue with step 2 when you select this option.
• Touch [Continue].
• Touch [Cancel stream].
The print job is stopped. You can now solve the problem. You will most likely be able to solve
the problem on the server.
NOTE
The following steps apply only when you chose to assign a media.
2.
From the list of media, select the media that must be used as the media the controller is asking
for, and touch [OK].
If you do not select media from the media catalog with the requested size or name, the printer
will select a media with the default size.
3.
Select one of the 16 memory locations of the logical-tray table to be used for the required media.
Note that the media that was previously allocated to that memory position in the setup will be
overwritten. Then that media will no longer be available to the transaction stream.
Now you can assign other media or continue the print job.
Handle the media messages in the tray-to-media mode (PCL)
Chapter 9 - Carry out print jobs
229
VarioPrint 6000 line
Summary of Contents for VarioPrint 6000 Series
Page 8: ...Contents 8 VarioPrint 6000 line ...
Page 9: ...Chapter 1 Introduction ...
Page 14: ...Information in this operation guide 14 Chapter 1 Introduction VarioPrint 6000 line ...
Page 15: ...Chapter 2 Explore the print system ...
Page 31: ...Chapter 3 Explore the ease of operation ...
Page 46: ...Transaction printing workflow 46 Chapter 3 Explore the ease of operation VarioPrint 6000 line ...
Page 47: ...Chapter 4 Start the print system ...
Page 56: ...Log in to the printer 56 Chapter 4 Start the print system VarioPrint 6000 line ...
Page 63: ...Chapter 5 Prepare the print system ...
Page 101: ...Chapter 6 Prepare the print jobs ...
Page 110: ...Print a page number via PRISMAsync 110 Chapter 6 Prepare the print jobs VarioPrint 6000 line ...
Page 111: ...Chapter 7 Plan the workload remotely ...
Page 115: ...Chapter 8 Plan the jobs ...
Page 127: ...6 Touch OK Move jobs to another destination Chapter 8 Plan the jobs 127 VarioPrint 6000 line ...
Page 139: ...5 Touch OK Create a note for the operator Chapter 8 Plan the jobs 139 VarioPrint 6000 line ...
Page 165: ...Chapter 9 Carry out print jobs ...
Page 232: ...Make an intermediate check print 232 Chapter 9 Carry out print jobs VarioPrint 6000 line ...
Page 233: ...Chapter 10 Keep the system printing ...
Page 246: ...Status indicators 246 Chapter 10 Keep the system printing VarioPrint 6000 line ...
Page 247: ...Chapter 11 Media handling ...
Page 289: ...Chapter 12 Maintain the print system ...
Page 316: ...Close the doors and covers 316 Chapter 12 Maintain the print system VarioPrint 6000 line ...
Page 317: ...Chapter 13 PRISMAlytics Dashboard ...
Page 319: ...Chapter 14 Troubleshooting ...
Page 334: ...Create and download a log file 334 Chapter 14 Troubleshooting VarioPrint 6000 line ...
Page 335: ...Chapter 15 Specifications ...
Page 353: ......


