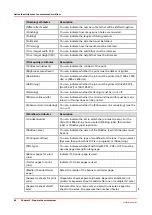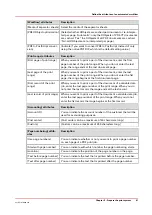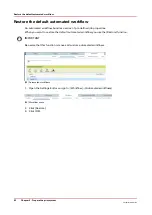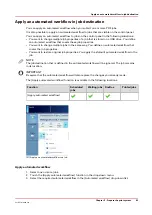
Setting
Values
Effect
[Next output tray] [After each job]
Each job is sent to the next available output tray. In this
context, the second stack of the stacker is also defined
as an output tray.
[When tray is full] All the jobs are stacked until an output tray is full. When
an output tray is full, the next jobs are sent to the next
output tray.
[Offset stacking]
[Each job]
Each printed job that is delivered to an output location is
stacked on top of the previous printed job with an offset.
This helps you to identify the various jobs.
[Each set]
Each printed set that is delivered to an output location is
stacked on top of the previous set with an offset. This
helps you to identify the various sets.
[As in job]
Each printed set is delivered to the output location as de-
fined in the job ticket or copy job. Therefore, the sets can
be stacked in one straight line or with an offset.
[Banner pages]
Each banner page of a job is delivered to the output lo-
cation with an offset. This helps you to identify the sepa-
rate jobs. The jobs themselves are stacked in one
straight line.
[Never]
All the printed jobs or sets are stacked in one straight
line. There is no offset between the jobs or sets.
[Tray linking]
You can enable
or disable the
linking of output
trays, when there
are two or more
high capacity
stackers.
Tray linking
means that the
prints delivery
automatically
switches to the
other high ca-
pacity stacker.
[Never]
There is no tray linking.
[When stacker is
full]
Tray linking occurs when the first high capacity stacker
tray is full.
[After each stack] Tray linking occurs by switching to the other high ca-
pacity after the delivery of a stack.
Work with workflow profiles
72
Chapter 5 - Prepare the print system
VarioPrint 6000 line
Summary of Contents for VarioPrint 6000 Series
Page 8: ...Contents 8 VarioPrint 6000 line ...
Page 9: ...Chapter 1 Introduction ...
Page 14: ...Information in this operation guide 14 Chapter 1 Introduction VarioPrint 6000 line ...
Page 15: ...Chapter 2 Explore the print system ...
Page 31: ...Chapter 3 Explore the ease of operation ...
Page 46: ...Transaction printing workflow 46 Chapter 3 Explore the ease of operation VarioPrint 6000 line ...
Page 47: ...Chapter 4 Start the print system ...
Page 56: ...Log in to the printer 56 Chapter 4 Start the print system VarioPrint 6000 line ...
Page 63: ...Chapter 5 Prepare the print system ...
Page 101: ...Chapter 6 Prepare the print jobs ...
Page 110: ...Print a page number via PRISMAsync 110 Chapter 6 Prepare the print jobs VarioPrint 6000 line ...
Page 111: ...Chapter 7 Plan the workload remotely ...
Page 115: ...Chapter 8 Plan the jobs ...
Page 127: ...6 Touch OK Move jobs to another destination Chapter 8 Plan the jobs 127 VarioPrint 6000 line ...
Page 139: ...5 Touch OK Create a note for the operator Chapter 8 Plan the jobs 139 VarioPrint 6000 line ...
Page 165: ...Chapter 9 Carry out print jobs ...
Page 232: ...Make an intermediate check print 232 Chapter 9 Carry out print jobs VarioPrint 6000 line ...
Page 233: ...Chapter 10 Keep the system printing ...
Page 246: ...Status indicators 246 Chapter 10 Keep the system printing VarioPrint 6000 line ...
Page 247: ...Chapter 11 Media handling ...
Page 289: ...Chapter 12 Maintain the print system ...
Page 316: ...Close the doors and covers 316 Chapter 12 Maintain the print system VarioPrint 6000 line ...
Page 317: ...Chapter 13 PRISMAlytics Dashboard ...
Page 319: ...Chapter 14 Troubleshooting ...
Page 334: ...Create and download a log file 334 Chapter 14 Troubleshooting VarioPrint 6000 line ...
Page 335: ...Chapter 15 Specifications ...
Page 353: ......


