Notes for the reader
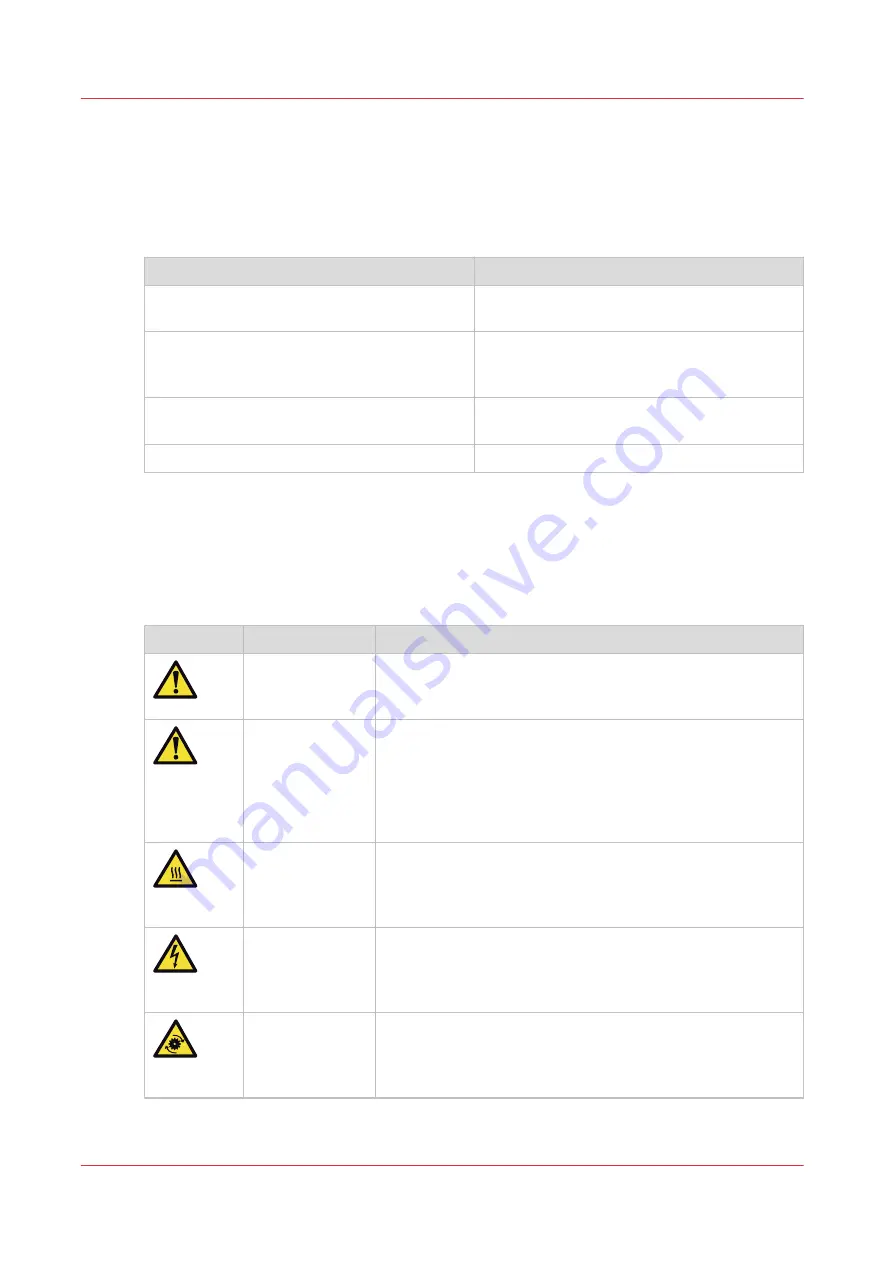
Typography
This manual uses the following typography to indicate elements that are part of the user
interface.
Typography
Indicates
[Text between square brackets]
Name of a button, tile, setting, value, or other
option of the user interface
<Text between angle brackets>
• Name of a key on a keyboard
• Name of a variable: item that varies accord-
ing to the context
Text displayed in courier font
• File path
• Command Prompt comment
[Text]
→
[displayed in]
→
[menucascade]
Names of options to be used in a fixed order
Safety symbols
Before you use this product, make sure you read and understand the safety information that
belongs to the product. Find the safety information on
to follow all warnings and instructions marked on the product.
This manual uses the following safety symbols to indicate hazards and precautions.
Symbol
Type of symbol
Indicates
WARNING
Indicates a warning concerning operations that may lead to
death or injury to persons if not performed correctly. To use
the machine safely, always pay attention to these warnings.
CAUTION
Indicates a caution concerning operations that may lead to in-
jury to persons if not performed correctly. To use the ma-
chine safely, always pay attention to these cautions.
This indication can concern hazards that have a specific CAU-
TION symbol. The 'hot surface', 'electric shock', 'moving
parts' and 'laser beam' cautions are listed below.
CAUTION
Hot surface
Indicates a caution concerning operations that may lead to in-
jury to persons if not performed correctly. To use the ma-
chine safely, always pay attention to these cautions.
CAUTION
Electric shock
Indicates a caution concerning operations that may lead to in-
jury to persons if not performed correctly. To use the ma-
chine safely, always pay attention to these cautions.
CAUTION
Moving parts
Indicates a caution concerning operations that may lead to in-
jury to persons if not performed correctly. To use the ma-
chine safely, always pay attention to these cautions.
4
Notes for the reader
10
Chapter 1 - Introduction
VarioPrint 6000 line
Summary of Contents for VarioPrint 6000 Series
Page 8: ...Contents 8 VarioPrint 6000 line ...
Page 9: ...Chapter 1 Introduction ...
Page 14: ...Information in this operation guide 14 Chapter 1 Introduction VarioPrint 6000 line ...
Page 15: ...Chapter 2 Explore the print system ...
Page 31: ...Chapter 3 Explore the ease of operation ...
Page 46: ...Transaction printing workflow 46 Chapter 3 Explore the ease of operation VarioPrint 6000 line ...
Page 47: ...Chapter 4 Start the print system ...
Page 56: ...Log in to the printer 56 Chapter 4 Start the print system VarioPrint 6000 line ...
Page 63: ...Chapter 5 Prepare the print system ...
Page 101: ...Chapter 6 Prepare the print jobs ...
Page 110: ...Print a page number via PRISMAsync 110 Chapter 6 Prepare the print jobs VarioPrint 6000 line ...
Page 111: ...Chapter 7 Plan the workload remotely ...
Page 115: ...Chapter 8 Plan the jobs ...
Page 127: ...6 Touch OK Move jobs to another destination Chapter 8 Plan the jobs 127 VarioPrint 6000 line ...
Page 139: ...5 Touch OK Create a note for the operator Chapter 8 Plan the jobs 139 VarioPrint 6000 line ...
Page 165: ...Chapter 9 Carry out print jobs ...
Page 232: ...Make an intermediate check print 232 Chapter 9 Carry out print jobs VarioPrint 6000 line ...
Page 233: ...Chapter 10 Keep the system printing ...
Page 246: ...Status indicators 246 Chapter 10 Keep the system printing VarioPrint 6000 line ...
Page 247: ...Chapter 11 Media handling ...
Page 289: ...Chapter 12 Maintain the print system ...
Page 316: ...Close the doors and covers 316 Chapter 12 Maintain the print system VarioPrint 6000 line ...
Page 317: ...Chapter 13 PRISMAlytics Dashboard ...
Page 319: ...Chapter 14 Troubleshooting ...
Page 334: ...Create and download a log file 334 Chapter 14 Troubleshooting VarioPrint 6000 line ...
Page 335: ...Chapter 15 Specifications ...
Page 353: ......


