3.
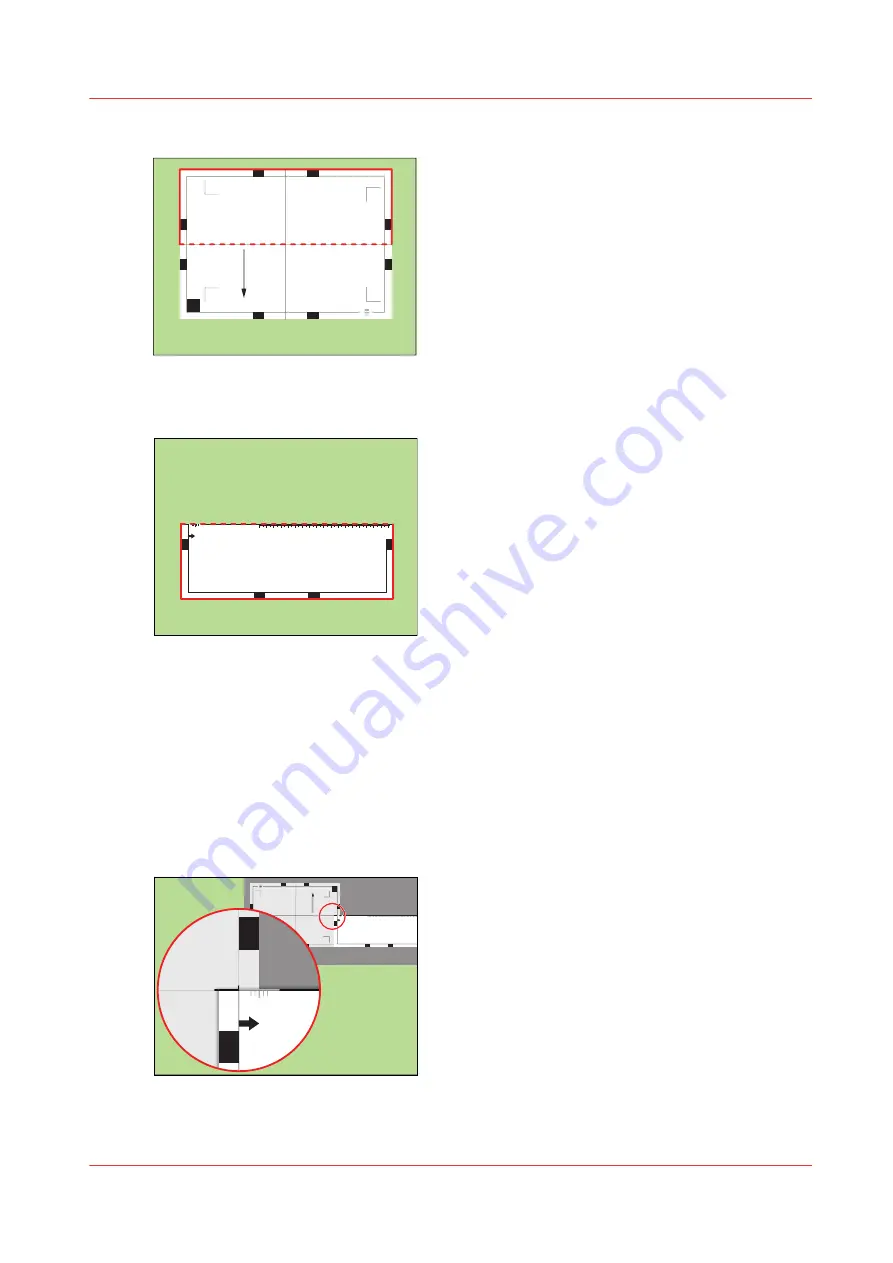
Fold the sheet along the line 'B-H' on side 1.
Te
st bitm
ap:
REG
IS
T
RAT
ION
Siz
e: 210 x 297 mm
2006-10-
09 / 14:
08:
36
Pa
g
e 1
1
Pr
ima
ry i
m
age
A
G
0
5
-
0
0
5
+
3
w
e
k
s
t
e
e
h
S
-
B
H
D
C
I
F
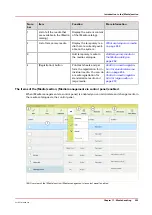
[91] Fold the sheet to create a ruler
This is your ruler.
Test
bi
tmap:
REG
IS
TRATION
Si
ze:
2
1
0 x 297 m
m
2006-10-09
/ 1
4
:0
8:3
6
Page
1
1
Pr
imary
im
age
A
G
0
5
-
0
0
5
+
3
w
e
k
s
t
e
e
h
S
-
B
H
D
Test
bi
tmap:
REG
IS
TRATION
Si
ze:
2
1
0 x 297 m
m
2006-10-09
/ 1
4
:0
8:3
6
Page
1
1
Pr
imary
im
age
A
G
0
5
-
0
0
5
+
3
w
e
k
s
t
e
e
h
S
-
B
H
D
100
0
105
0
1100
1150
120
0
125
0
130
0
135
0
140
0
145
0
150
0
155
0
160
0
165
0
170
0
175
0
180
0
185
0
190
0
195
0
200
0
205
0
210
0
215
0
220
0
225
0
230
0
235
0
240
0
245
0
250
0
255
0
260
0
265
0
270
0
275
0
280
0
-50
0
+50
Prima
ry X
imag
e po
sitio
n
Prima
ry Z i
mag
e po
sitio
n
Prima
ry d
iamon
d sh
ape
X len
gth
L
[92] The ruler
Perform a media registration for standard-size media - Adjust the
Z-position of side 1
Procedure
1.
Take the first test sheet.
2.
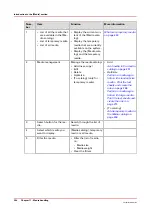
Align the start of the ruler with point 'B' of the test sheet.
Test
b
itmap:
REGI
ST
R
ATI
ON
Siz
e:
210
x 297 m
m
2006-10-09
/
1
4:08
:36
Pa
g
e 1
1
Pri
m
ary
imag
e
A
C
G
I
0
5
-
0
0
5
+
3
w
e
k
s
t
e
e
h
S
-
B
H
D
F
100
0
105
0
1100
1150
120
0
125
0
130
0
135
0
140
0
145
0
150
0
155
0
160
0
165
0
170
0
175
0
180
0
185
0
190
0
195
0
200
0
205
0
210
0
2150
2200
2250
230
0
235
0
240
0
245
0
250
0
255
0
260
0
265
0
-50
0
+50
Prima
ry X
imag
e po
sitio
n
Prima
ry Z i
mag
e po
sitio
n
Prima
ry d
iamon
d sh
ape
X len
gth
L
B
-50
0
+50
[93] Align the ruler with 'B'
3.
Read the value at the edge of the test sheet.
Perform a media registration for standard-size media - Adjust the Z-position of side 1
Chapter 11 - Media handling
267
VarioPrint 6000 line
Summary of Contents for VarioPrint 6000 Series
Page 8: ...Contents 8 VarioPrint 6000 line ...
Page 9: ...Chapter 1 Introduction ...
Page 14: ...Information in this operation guide 14 Chapter 1 Introduction VarioPrint 6000 line ...
Page 15: ...Chapter 2 Explore the print system ...
Page 31: ...Chapter 3 Explore the ease of operation ...
Page 46: ...Transaction printing workflow 46 Chapter 3 Explore the ease of operation VarioPrint 6000 line ...
Page 47: ...Chapter 4 Start the print system ...
Page 56: ...Log in to the printer 56 Chapter 4 Start the print system VarioPrint 6000 line ...
Page 63: ...Chapter 5 Prepare the print system ...
Page 101: ...Chapter 6 Prepare the print jobs ...
Page 110: ...Print a page number via PRISMAsync 110 Chapter 6 Prepare the print jobs VarioPrint 6000 line ...
Page 111: ...Chapter 7 Plan the workload remotely ...
Page 115: ...Chapter 8 Plan the jobs ...
Page 127: ...6 Touch OK Move jobs to another destination Chapter 8 Plan the jobs 127 VarioPrint 6000 line ...
Page 139: ...5 Touch OK Create a note for the operator Chapter 8 Plan the jobs 139 VarioPrint 6000 line ...
Page 165: ...Chapter 9 Carry out print jobs ...
Page 232: ...Make an intermediate check print 232 Chapter 9 Carry out print jobs VarioPrint 6000 line ...
Page 233: ...Chapter 10 Keep the system printing ...
Page 246: ...Status indicators 246 Chapter 10 Keep the system printing VarioPrint 6000 line ...
Page 247: ...Chapter 11 Media handling ...
Page 289: ...Chapter 12 Maintain the print system ...
Page 316: ...Close the doors and covers 316 Chapter 12 Maintain the print system VarioPrint 6000 line ...
Page 317: ...Chapter 13 PRISMAlytics Dashboard ...
Page 319: ...Chapter 14 Troubleshooting ...
Page 334: ...Create and download a log file 334 Chapter 14 Troubleshooting VarioPrint 6000 line ...
Page 335: ...Chapter 15 Specifications ...
Page 353: ......


