You specify which logical tray (indicated by a number) corresponds to a physical paper
tray. The print system will use the media that are loaded in the physical paper tray to which
the job refers via a logical tray. Also other paper trays that contain these media are used
when needed. The control panel shows the media which the job uses.
Transaction printing setups
A transaction printing setup is a collection of preset print settings for a transaction job, such as
output location, data resolution, face orientation, offset stacking, font capture, and logical page
size.
Create transaction printing setups in the Settings Editor.
Work in transaction printing mode
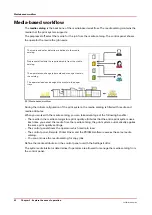
When you want to print in the transaction printing mode, first activate the transaction mode and
establish the connection with the IPDS or PCL host. When you print in the transaction printing
mode, the schedule informs you which types of media the streaming job uses. The schedule
cannot predict the time needed for a streaming job.
Image adjustment
You can create a transaction printing preset with an image shift definition. This is useful for better
alignment of variable data, such as names or addresses, on the page. You define the image shift
on the control panel, but also in the Settings Editor.
Secure error recovery
When an job error occurs in transaction printing mode, the job recovery takes place from the
page that caused the error. When multiple pages of the same document are not allowed, for
example, for lotteries and bank accounts, you must adjust the error recovery settings. When you
select the secure error recovery in the Settings Editor, the print system does not perform an
output recovery and deletes all remaining pages. A stack eject follows when the printed output
goes to the high capacity stacker. As a result, you must submit the job again.
Transaction printing workflow
Chapter 3 - Explore the ease of operation
45
VarioPrint 6000 line
Summary of Contents for VarioPrint 6000 Series
Page 8: ...Contents 8 VarioPrint 6000 line ...
Page 9: ...Chapter 1 Introduction ...
Page 14: ...Information in this operation guide 14 Chapter 1 Introduction VarioPrint 6000 line ...
Page 15: ...Chapter 2 Explore the print system ...
Page 31: ...Chapter 3 Explore the ease of operation ...
Page 46: ...Transaction printing workflow 46 Chapter 3 Explore the ease of operation VarioPrint 6000 line ...
Page 47: ...Chapter 4 Start the print system ...
Page 56: ...Log in to the printer 56 Chapter 4 Start the print system VarioPrint 6000 line ...
Page 63: ...Chapter 5 Prepare the print system ...
Page 101: ...Chapter 6 Prepare the print jobs ...
Page 110: ...Print a page number via PRISMAsync 110 Chapter 6 Prepare the print jobs VarioPrint 6000 line ...
Page 111: ...Chapter 7 Plan the workload remotely ...
Page 115: ...Chapter 8 Plan the jobs ...
Page 127: ...6 Touch OK Move jobs to another destination Chapter 8 Plan the jobs 127 VarioPrint 6000 line ...
Page 139: ...5 Touch OK Create a note for the operator Chapter 8 Plan the jobs 139 VarioPrint 6000 line ...
Page 165: ...Chapter 9 Carry out print jobs ...
Page 232: ...Make an intermediate check print 232 Chapter 9 Carry out print jobs VarioPrint 6000 line ...
Page 233: ...Chapter 10 Keep the system printing ...
Page 246: ...Status indicators 246 Chapter 10 Keep the system printing VarioPrint 6000 line ...
Page 247: ...Chapter 11 Media handling ...
Page 289: ...Chapter 12 Maintain the print system ...
Page 316: ...Close the doors and covers 316 Chapter 12 Maintain the print system VarioPrint 6000 line ...
Page 317: ...Chapter 13 PRISMAlytics Dashboard ...
Page 319: ...Chapter 14 Troubleshooting ...
Page 334: ...Create and download a log file 334 Chapter 14 Troubleshooting VarioPrint 6000 line ...
Page 335: ...Chapter 15 Specifications ...
Page 353: ......


