Use hotfolders
Introduction to hotfolders
Introduction
Technically, a hotfolder is a mapped network drive on a workstation that is linked to a shared
folder on the PRISMAsync controller.
Hotfolders enable you to submit print jobs by simply dragging and dropping ready-to-print PDF
files onto a shortcut on your desktop.
Hotfolders are primarily aimed at recurring workflows. In these workflows identical printable files
with identical settings are printed on a regular basis. Hotfolders should not be used in
combination with print job tickets.
The job settings for hotfolders
The settings of a hotfolder can be defined by:
• A hotfolder default ticket in the hotfolder itself, or
• The automated workflow to which the hotfolder is linked.
It is advisable to use the hotfolder functionality in combination with the hotfolder default ticket.
However, if you want to use the settings of the automated workflow where the hotfolder is linked
to, it is advised not to place a hotfolder default ticket in the hotfolder, to prevent mixing up
settings. Furthermore, you must make sure that the [Overrule the job ticket] setting in that
automated workflow is enabled (tick the checkbox).
Before you can use a hotfolder
To be able to use the hotfolder function, the following steps must be carried out first:
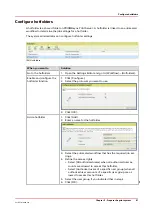
• In the Settings Editor, the system administrator must activate the hotfolder function.
• In the Settings Editor, the system administrator must create a hotfolder and link the hotfolder
to an automated workflow.
• On a workstation, the key operator must create a shared network drive that is linked to the
hotfolder.
• On the desktop of that workstation, the key operator can create a shortcut to the hotfolder, if
desired.
In the next paragraphs you can read more information about hotfolders. See the administration
guide for in depth information about hotfolders.
Use hotfolders
86
Chapter 5 - Prepare the print system
VarioPrint 6000 line
Summary of Contents for VarioPrint 6000 Series
Page 8: ...Contents 8 VarioPrint 6000 line ...
Page 9: ...Chapter 1 Introduction ...
Page 14: ...Information in this operation guide 14 Chapter 1 Introduction VarioPrint 6000 line ...
Page 15: ...Chapter 2 Explore the print system ...
Page 31: ...Chapter 3 Explore the ease of operation ...
Page 46: ...Transaction printing workflow 46 Chapter 3 Explore the ease of operation VarioPrint 6000 line ...
Page 47: ...Chapter 4 Start the print system ...
Page 56: ...Log in to the printer 56 Chapter 4 Start the print system VarioPrint 6000 line ...
Page 63: ...Chapter 5 Prepare the print system ...
Page 101: ...Chapter 6 Prepare the print jobs ...
Page 110: ...Print a page number via PRISMAsync 110 Chapter 6 Prepare the print jobs VarioPrint 6000 line ...
Page 111: ...Chapter 7 Plan the workload remotely ...
Page 115: ...Chapter 8 Plan the jobs ...
Page 127: ...6 Touch OK Move jobs to another destination Chapter 8 Plan the jobs 127 VarioPrint 6000 line ...
Page 139: ...5 Touch OK Create a note for the operator Chapter 8 Plan the jobs 139 VarioPrint 6000 line ...
Page 165: ...Chapter 9 Carry out print jobs ...
Page 232: ...Make an intermediate check print 232 Chapter 9 Carry out print jobs VarioPrint 6000 line ...
Page 233: ...Chapter 10 Keep the system printing ...
Page 246: ...Status indicators 246 Chapter 10 Keep the system printing VarioPrint 6000 line ...
Page 247: ...Chapter 11 Media handling ...
Page 289: ...Chapter 12 Maintain the print system ...
Page 316: ...Close the doors and covers 316 Chapter 12 Maintain the print system VarioPrint 6000 line ...
Page 317: ...Chapter 13 PRISMAlytics Dashboard ...
Page 319: ...Chapter 14 Troubleshooting ...
Page 334: ...Create and download a log file 334 Chapter 14 Troubleshooting VarioPrint 6000 line ...
Page 335: ...Chapter 15 Specifications ...
Page 353: ......


