background image

Summary of Contents for VIXIA HF20

Page 1: ...canon VIXIA HF20 VIXIA HF200 ...

Page 2: ...e to radio communications However there is no guarantee that interference will not occur in aparticular installation If this equipment does cause harmful interference to radio or television reception which can be determined by turning the equipment off and on the user is encouraged to try to correct the interference by one or more of the following measures Reorient or relocate the receiving antenn...

Page 3: ...O USER SERVICEABLE PARTS INSIDE REFER SERVICING TO QUALIFIED SERVICE PERSONNEL The lightning flash with arrowhead symbol within an equilateral triangle is intended to alert the user to the presence of uninsulated dangerous voltage within the product s enclosure that may be of sufficient magnitude to constitute arisk of electric shock to persons The exclamation point within an equilateral triangle ...

Page 4: ...servicing to qualified service personnel Servicing is required when the apparatus has been damaged in any way such as power supply cord or plug is damaged liquid has been spilled or objects have fallen into the apparatus the apparatus has been exposed to rain or moisture does not operate normally or has been dropped 13 Read Instructions All the safety and operating instructions should be read befo...

Page 5: ...rd Protection Power cords should be routed so that they are not likely to be walked on or pinched by items placed upon or against them Pay particular attention to plugs and the point from which the cords exit the product 25 Outdoor Antenna Grounding If an outside antenna is connected to the product be sure the antenna is grounded so as to provide some protection against voltage surges and bUilt up...

Page 6: ...31 Replacement Parts When replacement parts are required be sure the service technician has used replacement parts that are specified by Canon or that have the same characteristics as the original part Unauthorized substitutions may result in fire electric shock or other hazards 32 Safety Check Upon completion of any service or repairs to this product ask the service technician to perform safety c...

Page 7: ...soft Corporation in the United States and or other countries Macintosh and Mac as are trademarks of Apple Inc registered in the U S and other countries x v Color and the x v Color logo are trademarks HDMI the HDMIIogo and High Definition Multimedia Interface are trademarks or registered trademarks of HDMI Licensing LLC AVCHD and the AVCHD logo are trademarks of Panasonic Corporation and Sony Corpo...

Page 8: ... Full HD CMOS that captures video at a resolution of 1 920 x 1 080 pixels1 This results in video recordings of unparalleled high quality fine detail and lifelike vivid colors How does full high definition compare with standard definition TV broadcasts II Approximately 6 times the number of pixels II More than twice the number of scanning lines Full HD 1080 refers to Canon camcorders compliant with...

Page 9: ...ooting This is especially useful when it is difficult to predict when to start recording Face Detection With face detection CD 72 have the camcorder automatically detect people s faces and use this information to adjust the focus and set the best exposure for beautiful videos and photos Video Snapshot Discover a new fun way to shoot video with video snapshot scenes OJ 66 Shoot short approx 4 secon...

Page 10: ...r to the instruction manual of your TV or digital video recorder You can play back AVCHD discs of your recordings created using the optional DW 100 DVD Burner IJ 122 on the DVD Burner itself or on AVCHD compatible DVD players or Blu ray Disc players5 4 Depending on the device used correct playback may not be possible even if the device is AVCHD compatible In such case play back the recordings on t...

Page 11: ...11 I ...

Page 12: ...ccessories 31 Adjusting the Position and Brightness of the LCD Screen 34 Basic Operation of the Camcorder 34 Operating Modes 36 Joystick and Joystick Guide 36 Using the Menus 39 First Time Settings 39 Setting the Date and Time 40 Changing the Language 40 Changing the Time Zone 41 Using a Memory Card 41 Memory Cards Compatibleforl jsewiththeCarncorder 42 Inserting and Removing a Mernory Card 42 mm ...

Page 13: ...d Functions 61 Special Scene Recording Programs 63 Changing the Shutter Speed and Aperture 65 Cinema Mode Giving a Cinematic Look to your Recordings 65 Mini Video Light 66 Video Snapshot 68 Pre recording Function 69 Self Timer 70 Manual Exposure Adjustment and Automatic Backlight Correction 71 Manual Focus Adjustment 72 Face Detection 73 White Balance 75 Image Effects 76 Digital Effects 77 On Scre...

Page 14: ...ring Playback Additional Functions Flash Drive Mode Continuous Shooting and Exposure Bracketing Taking Photos while Recording Movies Simultaneous Recording Light Metering Mode Slideshow Rotating Photos Histogram Display Capturing Photos from the Playback Scene Protecting Photos _ Copying Photos Printing Photos Printing Photos Direct Print Selecting the Print Setting Trimming Settings Print Orders ...

Page 15: ...ernafVideo Recorder 127 Transferring Photos to a Computer Direct Transfer 131 Transfer Orders Additional Information 133 Appendix Menu Options Lists 133 FUNC Menu 136 Setup Menus 147 Trouble 147 Troubleshooting 152 List of Messages 162 Do s and Don ts 162 Handling Precautions 167 Maintenance Others 168 Using the Camcorder Abroad 169 General Information 169 System Diagram 170 Optional Accessories 1...

Page 16: ...to other instruction manuals This will be indicated with the following icons I DVSD Refer to the Digital Video Software instruction manual included as a PDF file in the supplied DIGITAL VIDEO Solution Disk CD ROM IOW l00 Refer to the instruction manual of the optional DW 100 DVD Burner IIIIm Text that applies only to the model shown in the icon The following terms are used in this manual When not ...

Page 17: ...s they are jflFUNCJ E IP Programmed AE E Portrait C Press to display the Special Scene SeN recording displayed on screen programs C Desired recording program C FUNC I CDNOTES The names of most buttons and t N I 9 _h tJ_ _ switches are indicated within a button frame For exampie I FU N Co I In this manual the arrow is used to abbreviate menu selections For a detailed explanation refer to Using the ...

Page 18: ...rder CA 570 Compact Power Adapter inc power cord BP 809 Battery Pack WL D88 Wireless Controller inc CR2025 lithium button battery SlV 250N Stereo Video Cable Yellow Red White plugs t 5 J OO S Component Cable Red Green Blue plugs IFC 400PCU USB Cable1llII WS 30 Wrist Strap 18 Introduction ...

Page 19: ... editing and playing back movies DIGITAL VIDEO Solution Disk CD ROM and Installation Guide Soft ware for saving managing and printing photos Music Data CD ROM Contains music files that can be used as back ground music during playback The music files on this CD ROM are for exclusive use with the supplied PIXELA applications Music Transfer Utility and ImageMixer 3 SE Video Tools For more details ref...

Page 20: ...ker CD 50 Memory card slot cover Memory card slot CD 42 CD AV OUT terminal CD 116 118 o headphones terminal CD 79 Camera mode dial CD 34 Strap mount CO 30 USB terminal OJ 116 119 5 r n HDMI OUT terminal CD 116 117 Grip belt OJ 30 Instant AF sensor OJ 138 j3 Stereo microphone CO 78 Mini video light OJ 65 Flash OJ 97 Right side view Left side view Front view 20 Introduction ...

Page 21: ...button CIJ 45 stop button CIJ 50 Zoom out W wide angle button CIJ 47 PLAYLIST button CIJ 84 Zoom in T telephoto button CIJ 47 E camera play button CIJ 35 MIC terminal CIJ 82 COMPONENT OUT terminal CIJ 116 118 ACCESS indicator CIJ 45 90 Battery attachment unit CIJ 27 START STOP button CIJ 45 DC IN terminal III 27 Serial number The serial number label is located in the battery attachment unit Remove...

Page 22: ...NC button OJ 37 133 MENU button OJ 37 136 PLAYLIST button OJ 84 Navigation buttons II frame reverse button CO 51 J fast reverse button CO 51 play button OJ 50 II pause button OJ 50 stop button OJ 50 PHOTO button OJ 90 Zoom buttons OJ 47 SET button frame advance button CD 51 fast forward button OJ 51 DISP on screen display button OJ 77 ...

Page 23: ...nt AF OJ 138 MF Manual focus OJ 71 Remaining battery time OJ 26 j3 While recording during playback Scene counter hours minutes seconds In record pause mode Total number of scenes Remaining recording time s2 1 On the memory card mm In the built in memory Image stabilizer CD 138 24F progressive frame rate OJ 26 65 Face detection OJ 72 Wind screen off OJ 139 J x v Color lJ 136 Audio level indicator C...

Page 24: ...quality size CIJ 91 Self timer CIJ 69 Playing Movies During Playback CD Data code CIJ 77 140 Scene number 24 Introduction Number of available photos s21 On the memory card GJD QJ In the built in memory Camcorder shake warning CIJ 138 AF frame OJ 138 Focus and exposure lock OJ 90 Flash CIJ 97 Joystick guide CD 36 ...

Page 25: ... Current photo Total number of photos Photo number IJ 144 Protected photo mark IJ 104 Date and time of recording Manual focus IJ 71 File size Manual exposure IJ 70 Photo size IJ 91 Aperture value IJ 63 Shutter speed IJ 63 Introduction 25 I ...

Page 26: ...26 Introduction ...

Page 27: ...ables on pages 171 172 1 Connect the power cord to the compact power adapter 2 Plug the power cord into a power outlet 3 Connect the compact power adapter to the camcorder s DC IN terminal 4 Attach the battery pack to the camcorder Press the battery pack softly into the battery attachment unit and slide it up until it clicks in place 5 Charging will start when the camcorder is turned off If the ca...

Page 28: ... C 32 OF to 104 OF charging will not start Do not connect to the camcorder s DC IN terminal or to the compact power adapter any electrical equipment that is not expressly recom mended for use with this camcorder To prevent equipment breakdowns and excessive heating do not con nect the supplied compact power adapter to voltage converters for overseas travels or special power sources such as those o...

Page 29: ... Accessories First insert the supplied CR2025 lithium button battery into the wire less controller 1 Press the tab in the direction of the arrow and pull out the battery holder 2 Place the lithium button battery with the side facing up 3 Insert the battery holder To use the wireless controller Point the wireless controller at the camcorder s remote sensor when you press the buttons I You can rotat...

Page 30: ...ace the battery Accessories Fasten the grip belt Adjust the grip belt so that you can reach the zoom lever with your index finger and the START STOP button with your thumb To remove the grip belt 1 Lift the padded handgrip s flap and detach the strap from the Velcro pad 2 Pull the strap to remove it first from the front bracket on the camcorder then to unthread it from the handgrip and finally to ...

Page 31: ...on the grip belt and adjust the length of the strap Y A t Ai L Jt t t A _ J c 0 1 zt t j MA L J 5 1 5 S l ff _ _ _ 3 At t1 Adjusting the Position and Brightness of the LCD Screen Rotating the LCD Panel Open the LCD panel 90 degrees I You can rotate the panel 90 degrees downward You can rotate the panel 180 degrees toward the lens Rotating the LCD panel 180 degrees can be useful in the following ca...

Page 32: ...en Turn on the LCD backlight to make it brighter With the camcorder on hold DISP pressed down for more than 2 seconds Repeat this action to turn the LCD backlight on bright or off normal If WI C LCD Screen Dimmer is set to lmi On CO 141 pressing OISP for more than 2 seconds will turn off the screen dimmer and return the LCD screen to its previous brightness setting CD NOTES The LCD backlight does ...

Page 33: ...Screen Dimmer setting OJ 141 to use in places where the light from the LCD screen can be a nuisance Preparations 33 I ...

Page 34: ...refer not to bother with detailed camcorder settings ffiIIrl Recording movies OJ 45 01 lOA Recording photos OJ 90 Flexible recording Use one of the dedicated recording modes to enjoy full access to the menus and advanced functions and change the camcorder s settings to your preference CDNOTES Only the following buttons functions are available in IIIB mode START STOP for recording movies PHOTO for ...

Page 35: ... help you with the settings For example you can use the Special Scene recording programs OJ 61 to set at once all the optimal settings to match special recording conditions Playback For playback the camcorder s operating mode is determined by the position of the camera mode dial and the EJ camera play button Press EJ to switch between camera recording mode and play back mode p or o Press EJ Playin...

Page 36: ...eed to make further adjustments 11 mode First select A a row of functions then press to operate the function in the middle or push the joystick or to operate the function on the left or right respectively The joystick guide will minimize after 2 seconds When the joystick guide is minimized you can still adjust or turn on off the selected func tion you can also maximize A the joystick guide to sele...

Page 37: ... from the left cv side column Menu items not available will appear grayed out 3 Select the desired setting from the available options at the bottom bar The selected option will be highlighted in orange With some settings you will need to make further selections and or press Follow the additional operation guides that will appear on the screen such as the m B icon small arrows etc 4 Press FUNC to s...

Page 38: ...s FUNC You can press lr F UN C to close the menu at any time CDNOTES A small font size is used in menu screens so you can see all options and current settings in one screen You can enlarge the font size by setting Wl Font Size to A Large but you may have to scroll down to find some menu options and only the icons of the current settings will be displayed 38 Preparations ...

Page 39: ...een CD NOTES When you do not use the camcorder for about 3 months the built in rechargeable lithium battery may discharge completely and the date and time setting may be lost In such case recharge the built in lithium battery IJ 165 and set the time zone date and time again The date appears in a year month day format only in the first setup screen In subsequent screen displays the date and time wi...

Page 40: ...on the camcorder and will not change regardless of the language selected Changing the Time Zone Change the time zone to match your location The default setting is New York J qq I OJ 34 To set the home time zone FUNC E Menu E E Time Zone DST E 11 C Your local time zone 0 FUNC When you travel select the icon and select the time zone that matches the local time at your destination To adjust for dayli...

Page 41: ...tion has been tested using SD SDHC memory cards made by Panasonic Toshiba and SanDisk We recommend using memory cards with a Speed Class 4 or higher 64 MB or less S SD memory cards 128 MB or more CLASS g CLASS or higher 1 2 SDHC CLAss g Over 2 GB i memory cards CLASS or higher 1 Movies cannot be recorded when the recording mode is set to MXP 24 Mbps or FXP 17 Mbps 2 Depending on the memory card us...

Page 42: ...inserted oIMPORTANT Memory cards have front and back sides that are not interchangeable Inserting a memory card facing the wrong direction can cause a mal function of the camcorder Be sure to insert the memory card as described in step 3 CDNOTES To remove the memory card Push the memory card once to release it When the memory card springs out pull it all the way out ih H _ _ _ __ _ _ J A mV Hm _ _...

Page 43: ...ory mtm only to permanently delete all the recordings it contains mtm At the time of purchase the built in memory comes pre initial ized and contains music files for use as background music during play back 1_ II 01 II II OJ 34 Options Quick Initialization Clears the file allocation table but does not physically erase the stored data Complete Initialization Erases all data completely mtm I FUNCo M...

Page 44: ...tware Music Transfer Utility to transfer music files from the supplied Music Data CD ROM to the camcorder For details refer to the Music Transfer Utility Software Guide PDF file m tm The Music Data CD ROM includes also extra music tracks that were not pre installed in the built in memory Power the camcorder using the compact power adapter before initializ ing the memory While the initialization is...

Page 45: ...ly you can set the memory card as the recording media CD 42 3 Press START STOP to begin recording Press S TA R T S TC O P again to pause the recording You can also press START STOP on the LCD panel When you have finished recording 1 Make sure that the ACCESS indicator is off 2 Turn off the camcorder 3 Close the LCD panel STARTI STOP I o IMPORTANT Observe the following precautions while the ACCESS ...

Page 46: ...backlight OJ 32 or adjust the brightness of the LCD screen OJ 141 accordingly Selecting the Video Quality Recording Mode The camcorder offers 5 recording modes Changing the recording mode will change the recording time available on the memory Select MXP or FXP mode for better movie quality select LP mode for longer recording times The following table gives approximate recording times OJ 34 FUNC C ...

Page 47: ... 5 hr 9 hr 12 hr Memory card 55 min 10 min 45 min 35 min 15 min __ _ j __ J _ N L _ Recorded in 1 920 x 1 08Clresolution Movi esfecorded using other recording modes are recorded jn 440 xt 080 resolution mim At the time of p rchase thabUilHnme T1ory contains about 1ZO MB of music files w K __ _X _ 3 JJ w l J J nM J U 3 _ J1 v _ _ ILt J U x M l1 l J s t 3l J s n L 4 lfmp iH Zooming I u n J I J Q lIl...

Page 48: ...ed Move the zoom lever toward W wide angle to zoom out Move it toward T telephoto to zoom in By default the zoom lever operates at a variable speed press gently for a slow zoom press harder for faster zooms Quick Start Function When you close the LCD panel with the camcorder on the camcorder enters the standby mode In standby mode the camcorder consumes only about 1f 3 the power used when record n...

Page 49: ...r while a menu is being displayed The camcorder may also not enter standby mode if the LCD panel is closed while the memory card slot cover is open or when the battery charge is too low Check that the ON OFF CHG indicator changes to orange The camcorder will shut off if left in standby mode for 10 minutes regardless of the 1 C Power Saving Mode setting OJ 143 Press POWER1 to turn on the camcorder ...

Page 50: ...and browse through index pages then return AT to select the desired scene 4 Press lffi or to begin the playback Playback will start from the scene selected and continue until the end of the last scene recorded Press II again to pause the playback Press 00 to stop the playback and return to the index screen Adjusting the Volume 1 During playback open Ji the joystick guide 2 Select AT the top row 3 ...

Page 51: ...lowing operation during normal playback Repeat to increase the playback speed to approximately 5x 15x 60x the normal speed Camcorder Open A the joystick guide E Select A the middle row E Push the joystick toward or Wireless controller Press or Slow playback Perform the following operation during playback pause Repeat to increase the playback speed 1 8 1 4 the normal speed Camcorder Open A the joys...

Page 52: ...ller The camcorder will return to its initial mode playback or playback pause CDNOTES During some special playback modes you may notice some anomalies blocky video artifacts banding etc in the playback picture The speed indicated on the screen is approximate X_ _ i S t i v _ J tn l I l _ _ k t _ t l _ _ _ hP h c Om lJ vs 9 n _ n l no px J h 3M 4 Selecting what Recordings to Play Back From the inde...

Page 53: ... you can search for recordings you made on a particular date for example to find all the movies you shot during a special event You can also search for scenes in which people s faces were detected j c I OJ 34 Selecting from the Calendar Screen 1 Open the original movies index screen 1m You can select the original movies in the built in memory or on the memory card OJ 52 You can press VIDEO SNAP to...

Page 54: ...t of Recordings 1 Open the original movies index screen GItm You can select the original movies in the built in memory or on the memory card CD 52 You can press o SNAPl to open the index screen for video snapshot scenes CD 66 2 Open the list of recordings IQ C rn Scene Search C Date Selection The list of recordings displays all dates in which recordings were made An orange selection frame appears ...

Page 55: ...th Faces The index screen will display only those scenes that contain people s faces 3 Select J T the scene you want to play back CDNOTES You can press IFUNC to return to the normal index screen at any time Selecting the Playback Starting Point If you have a very long scene you may want to start playing back the scene from a certain point You can use the movie timeline to break the scene to I segm...

Page 56: ...k 3 Select the playback starting point from the timeline ruler 4 Press ill to begin the playback To select another scene Move AT the orange selection frame to the large thumbnail and select another scene To move between timeline ruler pages Move AT the orange selection frame to the slidebar below the ruler and display the previous next 5 frames in the scene To change the interval between frames FU...

Page 57: ...r pages in the same way as in the movie timeline screen OJ 55 CDNOTES For a single scene up to 100 segments changes in main subject will appear in the Timeline by Faces screen Pre selecting Recordings from the Index Screen You can select in advance a number of original movies or photos from the index screen in order to perform certain actions on them collec I tively all at once fiiillij j mode Del...

Page 58: ...otos Press again to remove the checkmark Repeat this step to add all the scenes photos you want to include in your selection up to 100 Total number of scenes selected 1111 11 Selected scenes 4 Press FUNC twice to close the menu To cancel all the selections FUNC C Select C Remove All Selections C Yes C OK C FUNC NOTES The pre selection of scenes photos will be canceled if you turn off the camcorder...

Page 59: ... to delete or a scene recorded on the date you want to delete This step is not necessary to delete all scenes or previously selected scenes 3 Delete the scene s FUNC E tID Delete E Desired option C Yes C OK Q FUNC If you selected any option other than This Scene you can press to inter I rupt the operation while it is in progress Some scenes will be deleted neverthe less o IMPORTANT Be careful when...

Page 60: ...creen also deletes that scene from the playlist OJ 84 To delete all movies and make all recordable space available again you may prefer to initialize the memory OJ 43 You may not be able to delete scenes recorded or edited using another device 60 Video ...

Page 61: ... leave a trailing afterimage Picture quality may not be as good as in other modes White points may appear on the screen Autofocus may not work as well as in other modes In such case adjust the focus manually PIE Fireworks To avoid camcorder blur blur due to the camcorder moving we recommend using a tripod In liim l mode slower shutter speeds are used so blur is more likely to I occur Stabilize the...

Page 62: ...cord sports scenes such as tennis or golf J Night To record in low light situations Snow To record in bright ski resorts without the subject being underexposed Beach To record on a sunny beach without the subject being underexposed Sunset To record sunsets in vibrant colors lSpotlight To record spotlit scenes IE Fireworks To record fireworks 62 Video ...

Page 63: ...f movement AV Aperture Priority AE Set the aperture value The camcorder automatically sets the appropriate shutter speed Use low aper ture values larger lens opening to softly blur the background in a portrait use high aperture values smaller lens opening to get a wider depth of field giving a sharp focus all throughout a land scape IFUNC E p Programmed AE Desired recording program C IFUNC When yo...

Page 64: ...oundings you can obtain a brighter picture by using slow shutter speeds however image quality may not be as good and autofocus may not work well The image may flicker when recording with fast shutter speeds Recording movies under fluorescent lights If the screen starts to flicker select Tv Shutter Priority AE and set the shutter speed to 1 100 AV Aperture Priority AE The actual range of values ava...

Page 65: ...rame rate FUNC Menu E Frame Rate C lim PF24 E FUNC 4 n _ __ _ t 1 A m t M t 3 w _ _ _ _ n Mini Video Light _ P J 1 m f J M tl n J J t ffi 1 i J w m Y _ fW_ _ _ _r r tr t Jt JVP f J You can turn on the mini video light to shoot video or take photos in dark places OJ 34 1 Open 6 the joystick guide 2 Select T Video Light and press appears on the screen Press again to turn the mini video light off Vid...

Page 66: ...nd combine them with music to add a new level of enjoyment to your movies By changing the background music you can give your scenes an entirely new feel Recording Video Snapshot Scenes CD 34 o 1 Press VIDEO SNAP The button s blue light will turn on and a blue border appears on the screen 2 Press START STOP The camcorder records for about 4 seconds the blue frame serves as a visual progress bar and...

Page 67: ...es with their original sound 4 Back in the index screen select AT the scene from which to start playback S Press II or to begin the video snapshot playback set to the background music selected Press to stop the playback Press VIDEO SNAP again to return to the normal index screen To delete a music track After step 2 in the previous procedure select the track you want to delete 1 Select the I ff ico...

Page 68: ...in memory mtm only or to a memory card after repeatedly recording and deleting recordings fragmented memory the movies and background music track may not be played back correctly In such case we recommend saving your recordings on a computer CO 121 initializing the memory OJ 43 transferring the music files and only then writing the video files back to the camcorder If the USB cable is disconnected...

Page 69: ...rding function Leaving the camcorder without any operation for 5 minutes Pressing FUNC B or VIDEO SNAP Changing the position of the camera mode dial SetUng the camcorder to standby mode Self Timer OJ 34 FUNC C J Menu or rdl E Self Timer E On C FUNC appears 1 1 mode In record pause mode press START STOP I The camcorder starts recording after a 10 second countdown The countdown appears on the screen...

Page 70: ...INTS TO CHECK Select a recording program other than Pl Fireworks Manual Exposure Adjustment 1 Open the joystick guide 2 Select AT Exposure and press The current exposure is locked The exposure adjustment indicator 0 1 0 and the neutral value O appear on the screen The adjustment range and the length of the exposure adjustment Indicator will vary depending on the initial brightness of the picture I...

Page 71: ... Focus Adjustment Autofocus may not work well on the following subjects In such case focus manually Reflective surfaces Subjects with low contrast or without vertical lines Fast moving subjects Through wet windows Night scenes POINTS TO CHECK Adjust the zoom before you start the procedure OJ 34 I FOCUS 1 Open A the joystick guide 2 Select Focus and press The current focus is locked and MF appears ...

Page 72: ...camcorder to autofocus Face Detection You can have the camcorder automatically detect people s faces and use this information to adjust the focus and set the best exposure for beautiful videos and photos When there are a number of people in the picture one person with the white face frame will be determined to be the main subject You can also select the main subject manually so the camcorder optim...

Page 73: ...detection cannot be used when the shutter speed used is slower than 1 30 1 24 if the frame rate is set to lim PF24 or when the digital zoom is activated at more than 60x zoom dark blue area on the zoom bar When face detection is activated the slowest shutter speed used by the camcorder is 1 30 1 24 if the frame rate is set to lim PF24 4t White Balance __ W_ __ l_ f L _ Z U W tA _ A _ _ _ K _ z m A...

Page 74: ... C FUNC When you select r Ll Custom WB do not press FUNC and continue instead with the following procedure To set the custom white balance 1 Point the camcorder at a white object zoom in until it fills the whole screen and press When the adjustment is completed r stops flashing and stays on The camcorder retains the custom setting even if you turn off the camcorder 2 Press FUNC to save the setting...

Page 75: ... no image enhancing effects v Vivid Emphasizes the contrast and color saturation N Neutral Tones down the contrast and color saturation s Low Sharpening Records subjects with softened outlin es D Soft Skin Detail Softens the details in the skin tone area for a more complimentary appearance To obtain the best effect use this setting when recording a person in close up Note that areas similar to the...

Page 76: ...creen II Black White Records movies and photos in black and white Sepia Records movies and photos in sepia tones for an old look 1m3 Art Select this effect to add flavor to your recordings Only these digital effects are available in t il mode FUNC E Digital Effect Off E Desired fader effect C FUNC The icon of the selected digital effect appears You can preview the digital effect on the screen Appl...

Page 77: ... fade in or out When you apply an effect the sound will be recorded normally Faders cannot be used when recording video snapshot scenes or when pre recording is activated t j 3 L iW J b M k d L A4 i L f M ULLJ _ J An _ 1 Kl J l P f _rm J R leA p f 8 Ul m AE _ e _ J _ _n _L s i f Mj On Screen Displays and Data Code You can turn most on screen displays on or off I OJ 34 Repeatedly press DISP to turn...

Page 78: ... Level 1 Open the joystick guide 2 Select T I Mic Level and press The manual adjustment icon will appear to the left of the audio level indicator and the manual adjustment bar orange will appear below it Mic LevelllJllllll M jB4C 12 0 1 i illl _ Audio level indicator Manual audio level adjustment U 3 Adjust the audio level as necessary As a guideline adjust the audio recording level so that the au...

Page 79: ...e recommend using headphones IJ 79 to check the sound level while adjusting the audio recording level or when the microphone atten uator is activated p s J I _ t LI H t H ij O i n l U I i v 1 t _ _ 1 C i r iJ J i J 1 Using Headphones Use headphones for playback or to check the audio level while record ing The headphones are connected to the AV OUT O terminal which is used for both the headphones a...

Page 80: ...ng CD NOTES Use commercially available headphones with a 0 3 5 mm minijack Even if AV Headphones was set to 0 Headphones in a playback mode the function of the AV OUT O terminal will return automatically to AV output when you set the camcorder to a recording mode If AV eadphones was set to 0 Headphones in ItsllM mode the camcorder retains the terminal s setting even if you set the camcorder to tE ...

Page 81: ... be used with this camcorder Look for video accessories bearing this logo to ensure compatibility with the mini advanced shoe II Mini ADVANCED SHOE Using an External Microphone When recording in very quiet surroundings the built in microphone may pick up the sound of the camcorder1s internal machinery In such case we recommend using an external microphone Using the DM 100 Directional Stereo Microp...

Page 82: ...ower supply You can connect almost any stereo microphone with a 0 3 5 mm plug but audio recording levels may vary CD NOTES When an external microphone is connected to the camcorder r 1 E Wind Screen will automatically be set to m Off If the audio level is too high and the sound gets distorted turn on the microphone attenuator CIJ 139 or adjust the audio recording level manually CIJ 78 82 Video ...

Page 83: ...beginning end of the current scene II 11 Frame backward forward Press FUNC or 1to stop the playback and cancel the division of the scene 4 Select the icon and press to divide the scene 5 Select Yes and press The video from the division point to the end of the scene will appear as I a new scene in the index screen CDNOTES When advancing reversing frames while dividing the scenes the interval will b...

Page 84: ...to the playlist only the scene marked with the orange selection frame Selected Scenes Adds to the playlist all the scenes selected in advance marked with a checkmark Refer to Pre selecting Recordings from the Index Screen OJ 57 1 Open the original movies index screen mm You can select the original movies in the built in memory or on the memory card CD 52 You can press VIDEO SNAP to open the index ...

Page 85: ...ot enough space available in the memory mm You can copy scenes from the built in memory to the memory card IJ 87 to include in the memory card s playlist also scenes that were originally recorded in the built in memory Deleting Scenes from the Playlist Deleting scenes from the playlist will not affect your original reCOrdings_I Options All Scenes Deletes all the scenes from the playlist This Scene...

Page 86: ...ginal movies in the built in memory or on the memory card to open the playlist of the respective memory Q 52 You can press VT5Eo SNAP to open the playlist index screen for video snapshot scenes Q 66 2 Select AT the scene you want to move 3 Press FUNC select JoI Move and press 4 Move AT the orange marker to the desired position of the scene and press The original position of the scene and the curre...

Page 87: ...k selected Press to stop the playback Select Off to play back the scenes with their original sound 4 Back in the index screen select AT the scene from which to start playback 5 Press lIl or to begin the playback set to the background music selected Press 1 to stop the playback d LJ p L_ _ L _ _ _ L _ _ _ J i_ J _ _ _ X1 L J __ Ml J J o l J o n w J L 1 1 R 1 mrm Copying Scenes You can copy original...

Page 88: ...can press VIDEO SNAP to open the index screen for video snapshot scenes CD 66 2 Select JJ T the scene you want to copy to the memory card or a scene recorded on the date you want to copy This step is not necessary to copy all scenes or previously selected scenes 3 Copy the scene s FUNC C I i Copy Desired option 0 Yes C OK E FUNC I Press to interrupt the operation while it is in progress Copying th...

Page 89: ...nge the camcorder s operating mode CD NOTES If the memory card slot cover is open or the LOCK switch on the mem ory card is set to prevent writing you will not be able to copy movies to the memory card Scenes that were edited using the software on the supplied Video Tools CD ROM and were then written back to the camcorder cannot be copied to the memory card You may also not be able to copy scenes ...

Page 90: ... the recording media for photos IJ 42 3 Press PHOTOI halfway Once the focus is automatically adjusted 8 will turn green and one or more AF frames will appear 4 Press PHOTO1 fully The ACCESS indicator will flash as the photo is being recorded oIMPORTANT Observe the following precautions while the ACCESS indicator is on or flashing Failing to do so may result in permanent data loss Do not open the m...

Page 91: ...llowing table Approximate number of photos available on a memory card Default value LW 2304x1296 35 50 105 220 330 655 465 700 1 390 I L 21 00x1575 30 45 95 195 295 595 420 630 1 265 MW 1920x1 0802 50 75 150 315 470 925 670 1 000 1 970 M 1600x1200 55 80 160 340 505 995 720 1 075 2 115 SW 848x4803 260 370 740 1 585 2 245 4 490 3 360 4 760 9 525 S640x480 340 490 890 2 070 2 995 5 390 4 395 6 350 11 ...

Page 92: ...print size l 21 00x1575 To print photos up to A4 size M 1600x1200 To print photos up to L size 9 x 13 cm 3 5 x 5 in or postcard size 10 x 14 8 cm 4 x 6 in S 640x480 To send photos as e mail attachments or to post on the Web lW 2304x1296 MW 1920x1 080 SW 848x480 To print photos with a 16 9 aspect ratio Wide sized photo paper is required Deleting a Photo Right After Recording It You can delete the p...

Page 93: ...o or p will open the movie index screen 1 Open the photo index screen CD 52 mm You can select the photos in the built in memory or on the memory card You can change the number of photos displayed per index page 2 Select a photo Move the orange selection frame to the photo you want to view When you have recorded a large number of photos you can display a slidebar below the photo thumbnails and brow...

Page 94: ...ling to do so may result in permanent data loss Do not open the memory card slot cover Do not disconnect the power source or turn off the camcorder Do not change the camcorder s operating mode The following image files may not be displayed correctly Images not recorded with this camcorder Images edited on or uploaded from a computer Images whose file names have been changed Deleting Photos You can...

Page 95: ... photos selected in advance marked with a checkmark Refer to Pre selecting Recordings from the Index Screen IJ 57 1 Open the photo index screen mm You can select the photos in the built in memory or on the memory card OJ 52 2 Select the photo you want to delete This step is not necessary to delete all photos or previously selected I photos 3 Delete the photo s FUNC lID Delete Desired option Q Yes ...

Page 96: ...rd T The photo is magnified by 2 times and a frame appears indicating the position of the magnified area To further enlarge the photo move the zoom lever toward T To reduce the magnification times move it toward W 2 Move T the frame to the part of the photo you want to see enlarged To cancel the magnification move the zoom lever toward W until the frame disappears 96 Photos ...

Page 97: ...ck guide 2 Select T Flash and press Press repeatedly to cycle between the flash modes The icon of the selected flash mode appears A disappears after 4 seconds 3 Press PHOTOI first halfway to activate the autofocus and then fully to record the photo Depending on the setting selected and shooting conditions the flash will fire Using the VFL 2 Video Flash Light You can use the optional VFL 2 Video Li...

Page 98: ...r may not be able to focus even if the AF assist lamp is on The practical range of the flash is approx 1 to 2 m 3 3 to 6 6 ft The practical range with the VFL 2 attached is approx 1 to 4 m 3 3 to 13 1 ft In any case the actual range will depend on the recording con ditions The range of the flash decreases in continuous shooting mode For red eye reduction to be effective the subject needs to look a...

Page 99: ...vate the autofocus 2 Press PHOTO fully and hold it pressed down Auto Exposure Bracketing Press PHOTO first halfway to activate the autofocus and then fully to record the 3 photos CDNOTES Continuous shooting speeds are approximate and vary depending on recording conditions and subjects When the flash is used continuous shooting speed will decrease to approx 2 1 photos second Continuous shooting spe...

Page 100: ...i II I I w w CD 34 While recording or in record pause mode press PHOTO to capture the photo CD NOTES The camcorder retains the last setting used even if you set the cam corder to 1 mode Photos cannot be recorded simultaneously while the digital zoom or a digital effect is activated Photo quality will be higher when photos are recorded in jll mode or in f l mode during record pause mrm Photos will ...

Page 101: ...d t U4 _ k w s L w J JL o _ 2 J _ t _ i a llt J tZ J J34 U 4 lq 4 W Slideshow You can playa slideshow of all the photos and even set it to music IJ 34 1 Open the photo index screen mzm You can select the photos in the built in memory or on the memory card IJ 52 2 Open the list of background music tracks IFUNC E n Select Music 3 Select T a music track and press FUNC twice You can press to listen to...

Page 102: ...es clockwise to change their orienta tion 1 I I CO 34 1 In single photo view open the photo selection screen FUNC I C rnJ Rotate fJi Rotate appears on the screen 2 Select the photo you want to rotate 3 Press to rotate the photo 4 Repeat steps 2 3 to change the orientation of additional photos or press FUNC twice to close the menu Histogram Display In single photo view you can display the histogram...

Page 103: ...lect the photo capt re settings FUNC e I Menu E r 1 Photo Capture from Video 0 Single Photo or Photo Sequence Continue from the same menu Photo Capture Quality E Desired photo quality C FUNC The number displayed at the bottom indicates the approximate number of photos that can be recorded with the current quality setting To capture the photo s 1 Play back the scene containing the picture you want ...

Page 104: ...to selection screen FUNC On Protect lin Protect appears on the screen 2 Select the photo you want to protect 3 Press to protect the photo IOnI appears on the bottom bar and the photo cannot be deleted Press again to remove the protection 4 Repeat steps 2 3 to protect additional photos or press FUNC twice to close the menu Protecting Photos from the Index Screen Options Individual Photos Opens the ...

Page 105: ..._ 1 t 1 J mm Copying Photos You can copy photos only from the built in memory to the memory card OJ 34 Copying aSingle Photo 1 Select to view the photos recorded in the built in memory In the index screen select the QJ tab under the 0 icon OJ 52 and move the zoom lever toward T to return to single photo view 2 Open the photo selection screen IFUNC C Copy I J i l i Copy I l appears on the screen 3 ...

Page 106: ...3 Copy the photo s FUNC Copy l J e Desired option E Yes E OK FUNC If you selected Selected Photos or All Photos you can press to interrupt the operation while it is in progress oIMPORTANT Observe the following precautions while the ACCESS indicator is on or flashing Failing to do so may result in permanent data loss Do not open the memory card s ot cover Do not disconnect the power source or turn ...

Page 107: ...ing photos The way to set and use them was already explained in detail so we refer you to the relevant page in the Video section Zoom CD 47 Quick Start CD 48 Recording programs III 61 63 Mini video light CD 65 Self timer III 69 Manual exposure adjustment and automatic backlight correction III 70 Manual focus adjustment CD 71 Face detection IJ 72 White balance III 73 Image effects OJ 75 Digital eff...

Page 108: ...n memory or on the memory card OJ 52 Afterwards move the zoom lever toward T to return to single photo view 2 Turn on the printer 3 Connect the camcorder to the printer using the supplied USB cable Connection IJ Refer to Connection Diagrams CD 119 If the device selection screen appears select Computer Printer and press appears and changes to The prlntJshare button lights up and the current print s...

Page 109: ...oes not appear every time you connect the camcorder to a printer Connection to a PictBridge compatible printer will not work when the memory contains 2 500 photos or more For best performance we rec ommend keeping the number of photos under 100 Printing with the ltV Print Share Button You can print one copy of a photo at a time without changing the set tings simply by pressing 1tV lJ 34 1 Select t...

Page 110: ...Refer to the following sidebar 0 Date print Select On Off or Default Print effect Available only with printers compatible with the Image Optimize function Select On Off or Default Canon PIXMAISELPHY DS printers You can also select Vivid NR and Vivid NR Number of copies Select 1 99 copies Select Paper Settings and press to change all three settings consecutively CD NOTES Print setting options and D...

Page 111: ...paper Use the following table as aguideline for the recommended number of copies depending on the rn Paper Size setting Printing after Changing the Print Settings 1 Select the photo you wish to print 2 Open A the joystick guide 3 Select T the icon and press The print settings menu appears Date printing _1 Printeffect _ Number of copies Current paper settings paper I size paper type and page layout...

Page 112: ...estart printing from the beginning Other printers or if the error still persists with a Canon printer If printing does not resume automatically disconnect the USB cable and turn off the camcorder After a short while turn on the camcorder and restore the USB connection oIMPORTANT You may not be able to print correctly using a PictBridge compatible printer photos whose file names have been changed o...

Page 113: ...o the print settings menu The print area selected will be indicated by a green frame within the thumbnail To change other print settings and print the area you selected refer to steps 3 5 in Printing after Changing the Print Settings CD 111 CDNOTES The trimming settings are canceled in the following cases I When you turn off the camcorder When you disconnect the USB cable When you expand the trimm...

Page 114: ...ired and press To cancel the print order set the number of copies to O 5 Repeat steps 2 4 to mark additional photos with print orders or press FUNC twice to close the menu Setting Print Orders from the Index Screen Options Individual Photos Opens the same screen described in Marking Single Photos with Print Orders CO 114 Continue from step 3 of that procedure to set the print order Selected Photos...

Page 115: ...ere are no photos marked with print orders No print orders have been set appears Depending on the connected printer you may be able to change some print settings OJ 109 3 Select Print and press Printing starts The print menu disappears when the printing is completed CD NOTES Canceling a print job Refer to page 11 2 Restarting printing Open the print menu as explained in step 2 In the I print setti...

Page 116: ...asingle convenient cable AV OUT O Terminal Access Open the LCD panel Sound from the built in speaker will be muted while the STV 250N Stereo Video Cable is connected to the camcorder Adjust the volume on the connected TV COMPONENT OUT Terminal Access Open the rear terminal cover The component video terminal is for video only When you use connection I do not forget the audio connections using the A...

Page 117: ...tion ITJ is a I convenient aU digital connection using a single cable for both video and audio When you connect the camcorder to an HOlY equipped with an HOMI terminal you can enjoy video and aUdio playback at the highest quality The HDMt OUT terminal on the camcorder is for output only Do riot connect it to an HDMI output terminal on an t1xternat devi a tl1i may damage the camcorder Correct opera...

Page 118: ...CTC 100 S Component Cable supplied Pr Cr Red x I Pb Cb Blue Green AUDIO L AV i cmllm S 1V _ 25 O N S te re o V id e o c ab le e l supplied 118 External Connections ...

Page 119: ...USB I Ir o 0 0 I US B ca ble I I I supplied External Connections 119 I ...

Page 120: ... to the instruction manual of the connected TV 4 Turn on the camcorder and set it to iil mode CD 50 or f iill mode CD 93 Play back the movies or photos CD NOTES We recommend powering the camcorder using the compact power adapter Connection TI When you play back your 16 9 movies on standard TV sets with a 4 3 aspect ratio the TV set will switch automatically to wide screen mode if it is compatible ...

Page 121: ...ing the software refer to the software guide on the Transfer Utilities CD ROM Saving your Recordings without a Computer The following options are also available Use the optional DW 100 DVD Burner to create high definition AVCHD discs of your movies and Photo DVDs of your photos QJ 122 Connect the camcorder to an external recording device DVD or HDD recorder VCR etc to save standard definition copi...

Page 122: ...ting AVCHD discs 1 iJ mode I All Scenes Add all the scenes to the disc s Remaining Scenes Add only those scenes that have not been previously added to a disc Playlist Add only the scenes included in the playlist CD 84 If you have recorded scenes in MXP mode add to the playlist in advance only those scenes recorded in other recording modes and select this option to create the disc Select this optio...

Page 123: ... a brand new disc into the DVD Burner Use the OPEN CLOSE button on the DVD Burner to open and close the disc tray After the disc is recognized an information screen will display the type of DVD you are creating and the estimated time and number of discs it will require based on the disc you inserted If you inserted a DVD RW disc that already contains data The disc already contains data will be dis...

Page 124: ...to do so may result in permanent data loss Do not open the memory card slot cover Do not disconnect the USB cable Do not disconnect the power source or turn off the camcorder or the DVD Burner Do not change the camcorder s operating mode For important information on handling your discs refer to IOW 100 Cautions on handling CDNOTES If a scene does not fit entirely in one disc it may be divided and ...

Page 125: ...the TV Refer to Connection Diagrams OJ 117 Select connection II or 0 to enjoy high definition playback 2 Turn on the camcorder and set it to j lIJill mode IJ 50 3 Turn on the DVD Burner and set it to Disc Playback mode I IDW l00 Refer to Playing DVDs 4 Connect the camcorder to the DVD Burner using the supplied USB cable Connection Refer to Connection Diagrams CO 119 and IDW l00 Connections Jf the ...

Page 126: ...t 60x speed special playback modes CO 51 can be used also for disc playback To play back Photo DVDs Photo DVDs are created using DVD Video specifications standard def inition Play back your Photo DVDs using standard DVD players If your computer has a DVD drive you can play back the slideshow as a DVD and you can also access individual photos as PG files CD NOTES Photo DVDs cannot be played back us...

Page 127: ...o signal You can change the displays by repeatedly pressing olsP j OJ 77 5 External device Start recording when the scene you wish to copy appears stop recording when it ends 6 Camcorder Stop playback CD NOTES We recommend powering the camcorder using the compact power adapter To make high definition copies of your recordings see the instruction manual for the digital video device Transferring Pho...

Page 128: ...B cable Connection IJ Refer to Connection Diagrams CIJ 119 If the device type selection screen appears select Computer Printer and press The direct transfer menu appears on the camcorder screen and the Q IV button lights up First time connection to a computer running Windows Windows users only The first time you connect the camcorder to the computer you also need to select the CameraWindow auto la...

Page 129: ...camcorder to a computer using the supplied USB cable without having to install the supplied software If you have no intention to use the optional DW 100 DVD Burner you can set 1 1I 2J or 111 0 USB Connection Type to 9 Computer Printer CD 140 so the selection screen does not appear every time you connect the camcorder to a computer When the memory contains 2 500 photos or more you may not be able t...

Page 130: ... C Select and Transfer Select the photo s to transfer Set as Desktop Wallpaper Select a photo and set it as your computer s desktop background Automatic transfer options Select a transfer option and press NlI The camcorder returns to the transfer menu once the transfer is com pleted To cancel the transfer select Cancel and press or press FUNC Manual transfer options 1 Select a transfer option and ...

Page 131: ...INTS TO CHECK Set the transfer orders before connecting the camcorder to the computer Marking Single Photos with Transfer Orders 1 In single photo view open the photo selection screen FUNC Transfer Orders appears on the screen 2 Select the photo you want to mark with a transfer order 3 Press to set the transfer order A checkmark appears in the box next to the transfer order icon Press again to can...

Page 132: ...move All Removes all the transfer orders 1 Open the photo index screen mtm You can select the photos in the built in memory or on the memory card OJ 52 2 Select A T the photo you want to mark with a transfer order This step is not necessary to set transfer orders for previously selected photos or to remove all the transfer orders 3 Set the transfer orders FUNC E Transfer Orders Desired option C Ye...

Page 133: ... after the tables Menu options in boldface indicate default values FUNC Menu FUNC Menu Recording Modes Recording programs P Programmed AE 63 TV Shutler Priority AE AVAperture Priority AE It Cine Mode 65 tl Portrait Sports J Night 61 Snow Beach Sunset I A Spotlight Dl Fireworks Light metering mode 00 Evaluative 100 0 Center Weighted Average 0 Spot White balance AW Automatic Daylight Shade 73 Cloudy...

Page 134: ...ntinuous Shooting I 98 Hi Speed Continuous Shooting t E P i Recording mode MXP High Quality 24 Mbps i I 46 I FXP High Quality 17 Mbps I XP High Quality 12 Mbps I Sp Standard Play 7 Mbps I i LP Long Play 5 Mbps I ililisi ult e s R di gOff i 99 LW 1 J J I 1 Super Fine l Fine tI Normal i q w _ _ __ _ 0 w _ w n _ _ 1 l Photo size quality LW 2304x1296 L 21OOx1575 I 91 i M g 1 J 4 9L I Super Fine Fine t...

Page 135: ...ackground music tracks 66 86 101 Select Individual Scenes 57 Remove All Selections Individual Photos Remove All Selections CItI J All Scenes All Scenes this date 87 Copy IQJ I This Scene Selected Scenes No Yes No Yes 105 All Photos This Photo Selected Photos Add to Playlist All Scenes this date This Scene 84 Selected Scenes Divide 83 Move 86 I Protect 104 Individual Photos Selected Photos Remove A...

Page 136: ... Standard lIB PF30 mJ PF24 Y d_ y _ _ _ _ __ W __ __ _ _ _ _ mJ On M ID Off mJ On 1m Off Frame Rate Selects the frame rate to be used when recording 1Dm PF30 30 frames per second progressive Use this frame rate to easily edit your recordings for example to post them on the Web lim PF24 24 frames per second progressive Using this frame rate will give your recordings a cinematic look When combined w...

Page 137: ...1 Camera Setup 2 Digital Zoom Zoom Speed 47 98 AiAF Frames 0 Center Frame r 1D Off Focus Priority AF Mode j AF Assist Lamp I E it D White Up to 15x Dc Light Dark blue blue 15x 60x 60x 300x _ _ _ _ J mJ On mI r 1D Off Microphone Attenuator Image Stabilizer Auto Slow Shutter Wind Screen Digital Zoom Determines the operation of the digital zoom The color of the indicator indi cates the zoom When acti...

Page 138: ...OTO1 When the recording mode is set to 7lf Fireworks focus priority is auto matically set to riD Off When focus priority is activated if face detection JJ 72 is also acti vated the camcorder will focus on the face of the main subject white face detection frame when one is detected Image Stabilizer The image stabilizer compensates for camcorder shake even at full telephoto The image stabilizer is d...

Page 139: ...io Level Indicator Focus Assist Functions 1m Off E W Level White EG Level Gray lIir Grid White IIG Grid Gray j om On ami Off ami Off IB 2 sec m 4 sec OIl 6 sec 11l lll 8 sec 1I l II10 sec I Focus Assist Functions When the focus assist functions are activated the image at the center of the screen is magnified to help you focus man ually CO 71 When face detection is activated instead of the center o...

Page 140: ...list 122 All Photos Transfer Orders 1 USB Connection Type Add Recordings to Disc GIfIi Rec Media for Photos Photo Capture from Video Photo Capture Quality Data Code Data Code Displays the date and or time when the scene was recorded Camera Data Displays the aperture f stop and shutter speed used when recording the scene USB Connection Type Select the connection protocol to use when con necting the...

Page 141: ...font for the menu and other screens When the font size is set to A Large some information may be dis played in shortened form icons only etc Some screens will be dis I played using the small font size regardless of the setting Output Onscreen Displays When set to om On the camcorder s on screen displays will appear also on the screen of a TV or monitor connected to the camcorder LCD Brightness Adj...

Page 142: ...o use the 480i specification standard definition _ 1080i To use the full 1080i high definition specification TV Type In order to display the picture in full and in the correct aspect ratio select the setting according to the type of television to which you will connect the camcorder Ell Normal TV TV sets with 4 3 aspect ratio mIJ Wide TV TV sets with 16 9 aspect ratio When the TV type is set to El...

Page 143: ...camcorder to be operated with the wireless controller Notification Sounds A beep will accompany some operations like turn ing on the camcorder the self timer countdown etc Power Saving Mode In order to save power when the camcorder is powered by a battery pack it will automatically shut off if left without any operation for 5 minutes Approximately 30 seconds before the camcorder shuts off Auto pow...

Page 144: ...vies or photos I IIJ or iilrl mode only If the camcorder is connected to the TV while it is set to a recording modeI depending on the TV used turn ing off the TV will automatically turn off the camcorder even if it is recording at the time Photo Numbering Select the photo numbering method to be used on a new memory card Photos are automatically assigned consecutive num bers from 0101 to 9900 and s...

Page 145: ... DST List of world time zones 40 DatelTime 39 Date Format V M D 2009 1 1 AM 12 00 M 0 V Jan 1 2009 12 00 AM D M Y 1 Jan 2009 12 00 AM Calendar Start Day Saturday Sunday Monday Date Format Select the date format to be used for most on screen dis plays and if selected for the date printed on photos Calendar Start Day Select the day on which the week starts for the cal endar display IJ 53 I Additiona...

Page 146: ...available movie recording time and available number of photos are approximate and based on the recording mode and photo quality size settings currently in use In the Memory Card Info screen you can verify also the Speed Class of the memory card Battery Info Displays a screen where you can verify the battery charge as a percentage and the remaining recording time 11 W t 01 mode or playback time ON ...

Page 147: ...erted into the camcorder IJ 42 Does it contain any recordings Power source The camcorder will not turn on or it turns off by itself The battery pack is exhausted Replace or charge the battery pack CD 27 Remove the battery pack and reattach it correctly Cannot charge the battery pack Make sure the camcorder is off so charging can start The temperature of the battery pack is outside the charging ran...

Page 148: ...cording This is not a malfunction The camcorder will not focus Autofocus does not work on the subject Focus manually CD 71 The lens or Instant AF sensor is dirty Clean the lens or sensor with asoft lens cleaning cloth CD 167 Never use tissue paper to clean the lens When a subject flits across in front of the lens the image appears slightly bent This is aphenomenon typical of CMOS image sensors Whe...

Page 149: ...playing back video snapshot scenes or a slideshow with background music the music track is not played back correctly Save your recordings CD 121 and initialize the memory CO 43 Write back the backup files and transfer the music files again Indicators and Onscreen Displays Qllights up in red Battery pack is exhausted Replace or charge the battery pack CO 27 CIJ appears on the screen The camcorder c...

Page 150: ...ly Disconnect the power source and reconnect it after ashort time If the problem still persists disconnect the power source and press the RESET button with apointed item Pressing the RESET button resets all settings Video noise appears on screen Keep adistance between the camcorder and devices that emit strong electromagnetic fields plasma TVs cellular phones etc Horizontal bands appear on the scr...

Page 151: ... C Photo Number ing to Reset CD 144 and insert a new memory card The simultaneous recording option in the FUNC menu is set to Simultaneous Recording Off Change the setting to take photos while recording video CD 99 The wireless controller will not work Set 1 1 Q Wireless Remote Control to On Replace the battery of the wireless controller Connections with External Devices Video noise appears on the...

Page 152: ...Connect and Set IJ 140 Disconnect the USB cable and turn off the camcorder After ashort while turn it on again and restore the connection Connect the camcorder to adifferent USB port on the computer The printer is not working even though the camcorder and printer are connected correctly r l or 61 C USB Connection Type is set to DVD Burner Set it to Computer Printer or to Connect and Set IJ 140 Dis...

Page 153: ...s a problem with the built in memory Cannot communicate with the battery pack Continue using this battery pack You attached a battery pack that is not recommended by Canon for use with this camcorder mm Cannot copy The total size of the scenes you selected to copy exceeds the available space on the memory card Delete some recordings on the memory card OJ 58 94 or reduce the number of scenes to cop...

Page 154: ...d Class 4 or higher mtm Cannot record movies in the built in memory Initialize only using the camcorder The camcorder s built in memory was initialized using acomputer Initialize the built in mem ory with this camcorder OJ 43 Cannot record movies on this memory card Movies cannot be recorded on a64 MB or smaller memory card Cannot record movies on this memory card Initialize only using the camcord...

Page 155: ...able or power source while this message appears may result in permanent loss of the recordings in the camcorder Use the computer s Safely Remove Hardware function to end the connection and disconnect the USB cable before using the camcorder Error writing on the memory card Data may be recovered if the memory card has not been removed Attempt recovering the data This message will appear the next ti...

Page 156: ...essage will appear the next time you turn on the camcorder if power supply was acci dentally interrupted while the camcorder was writing on the memory card and later the posi tion of the card s LOCK switch was changed to prevent erasure Change the position of the LOCK switch CD 164 No memory card There is no memory card in the camcorder No photos There are no photos to play back No scenes There ar...

Page 157: ...list may be less than 999 Delete some scenes from the playlist Q 85 Some scenes could not be deleted Movies that were protected edited with other devices cannot be deleted with this camcorder mm Some scenes were recorded using another device and cannot be copied Scenes that were not recorded with this camcorder cannot be copied to the memory card Task in progress Do not disconnect the power source...

Page 158: ...d to the Optional DW 100 DVD Burner If an error message appears while the camcorder is connected to the optional DW 100 DVD Burner refer to the following section and also to the instruction manual of the DVD Burner Cannot read the disc Check the disc During disc recording mode this message can appear when acommercially available DVD disc a DVD disc containing movies software etc or an 8cm mini DVD...

Page 159: ...lude scenes recorded in MXP mode Add to the playlist in advance only those scenes recorded in other recording modes and select the Playlist option to create the disc Reading the disc Reading data from the disc Unable to recover data Could not recover acorrupted file _D_ire_c_t_P_rin_t_R_e_la_te_d_M_e_s_s_ag_e_s 1 Cannot print this photo You attempted to print a photo that was recorded with another...

Page 160: ...tridge low ink level The ink cartridge needs to be replaced soon Select Continue to restart printing No print orders have been set No photos have been marked with a print order No ink The ink cartridge is not inserted or is out of ink No paper Paper is not correctly inserted or there is no paper Paper error There is a problem with the paper The paper is not correctly loaded or the paper size is wr...

Page 161: ...se Check the printer status Printing error Cancel printing disconnect the USB cable and turn off the printer After a while turn the printer back on and reconnect the USB cable Check the printer status When you are printing using the IN button check the print settings Readjust trim settings The trimming settings for this photo were lost as a result of changes in the paper related set tings CD NOTES...

Page 162: ...ight or high humidity Do not use the camcorder near strong electromagnetic fields such as above TVs near plasma TVs or mobile phones Do not point the lens at strong light sources Do not leave the cam corder pointed at a bright subject Do not use or store the camcorder in dusty or sandy places The cam corder is not waterproof avoid also water mud or salt If any of the above should get into the camc...

Page 163: ...ck to temperature higher than 60 C 140 OF Do not leave it near a heater or inside a car in hot weather Do not try to disassemble or modify it Do not drop it or subject it to shocks Do not get it wet Dirty terminals may cause a poor contact between the battery pack and the camcorder Wipe the terminals with a soft cloth Long term storage I Store battery packs in a dry place at temperatures no higher...

Page 164: ...y be corrupted or lost due to memory card defects or exposure to static electricity Canon shall not be liable for lost or corrupted data Do not touch or expose the terminals to dust or dirt Do not use memory cards in places subject to strong magnetic fields Do not leave memory cards in places subject to high humidity and high temperature Do not disassemble bend drop or subject memory cards to shoc...

Page 165: ...C 212 oF or incinerate the battery Replace with a CR2025 battery made by Panasonic Hitachi Maxell Sony Sanyo or with Duracell2025 Use of other batteries may present a risk of fire or explosion Do not insert the battery into the mouth If swallowed seek medical assistance immediately The battery case may break and the battery fluids may cause internal injuries Keep the battery out of the reach of ch...

Page 166: ... precautions when you dis pose of the camcorder or memory card for example by physically damaging it to prevent the leakage of private data If giving the camcorder or memory card to another person initialize the built in memory 111m only or memory card using the Complete Ini tialization option OJ 43 Fill it up with unimportant recordings and then initialize it again using the same option This make...

Page 167: ...t lens cleaning cloth Condensation may form on the surface of the screen when the temper ature changes suddenly Wipe it with a soft dry cloth Condensation 4 _ M WA s Moving the camcorder rapidly between hot and cold temperatures may cause condensation water droplets to form on its internal surfaces Stop using the camcorder if condensation is detected Continued use I may damage the camcorder Conden...

Page 168: ...240 V AC 50 60 Hz Consult a Canon Service Center for information on plug adapters for overseas use Playback on a TV Screen You can only play back your recordings on TVs compatible with the NTSC system NTSC is used in the following regions countries Americas All of North America and Central America most Caribbean islands except in French territories like Guadeloupe and Martinique most of South Amer...

Page 169: ...y Shoe cannot be attached to this camcorder Look for the Mini ADVANCED SHOE logo to ensure compatibility with the mini advanced shoe CD SS 600 SS 650 Shoulder Strap SD SDHC memory card WS 30 Wrist Strap DTC 1 00 DTerminal Cable WL D88 Wireless Controller CTC 100 Component Cable CA 570 Compact Power Adapter CTC 100 S Component Cable j DW 1 00 DVD Burner STV 250N Stereo Video Cable IFC 400PCU USB Ca...

Page 170: ...ry pack Please note that this warranty does not apply to repairs arising out of the malfunction of non genuine Canon accessories although you may request such repairs on a chargeable basis Battery Packs When you need extra battery packs select one of the following models BP 809 BP 819 or BP 827 When you use battery packs bearing the Intelligent System mark the camcorder 9 Intelligent li ion Batter...

Page 171: ... decrease when recording in cold surroundings when using the brighter screen settings etc mm Using the built in memory Maximum 95 min 95 min 100 min 100 min 100 min recording time BP 809 Typical recording 60 min 60 min 65 min 65 min 65 min time Playback time 155 min 155 min 160 min 160 min 160 min I Maximum 195 min 195 min 200 min 205 min 205 min recording time BP 819 Typical recording 125 min 130...

Page 172: ...7 Typical recording 190 min 190 min 195 min 200 min 200 min time Playback time 460 min 475 min 485 min 485 min 485 min Approximate times for recording with repeated operations such as start stop zooming and power on off TL H37 Tele converter This Tele converter lens increases the focal length of the camcorder lens by a fador of 1 5 The image stabilizer is not as effective when the Tele converter i...

Page 173: ...ons o SC 2000 Soft Carrying Case A handy camcorder bag with padded compartments and plenty of space for accessories DM 100 Directional Stereo Microphone This highly sensitive super directional microphone attaches to the camcorder s mini advanced shoe It can be used as directional microphone monaural or stereo microphone J Mini ADVANCED SHOE I VL 5 Video Light This video light enables you to record...

Page 174: ...NCED SHOE HTC 100 HOMI Cable Use this cable to connect the camcorder to an external device using an all digital connection allowing you to enjoy play back at the highest quality This cable sends both video and audio signals This mark identifies genuine Canon video accessories When you use Canon video equipment we recommend Canon brand accessories or products bearing the same mark 174 Additional In...

Page 175: ...Wide converter FS H37U Filter Set VL 5 Video Light VFL 2 Video Flash Light OM 100 Directional Stereo Microphone HTC 100 HOMI Cable CTC 100 Component Cable SS 650 Shoulder Strap SS 600 Shoulder Strap SC 2000 Soft Carrying Case 8468A002AA 085 1832 000 083 0770 000 3067A002AA 082 0590 002 9370A001AA 081 1 530 00 2589B002AA 3185B002AA 2590B002AA 3573B001AA 3572B001AA 8837A001AA 3186B001AA 3574B001AA 2...

Page 176: ... 2304x1296 SW 848x480 pixels Capturing photos from a playback scene MW 1920x1080 pixels Television System 1080 60i Recordings made with the PF24 PF30 frame rate are converted and recorded on the memory as 60i Recording Media CJD Built in flash memory 32 GB SD or SDHC SD High Capacity memory card not included CIZlWJ SD or SDHC SD High Capacity memory card not included Maximum Recording Time approxi...

Page 177: ...al Shift Image Stabilizer Terminals AV OUTIO Terminal 2 3 5 mm minijack output only dual purpose terminal also for headphones stereo output Video 1Vp p 175 n unbalanced Audio 10 dBV 47 kn load 13 kn or less USB Terminal mini B USB 2 0 Hi Speed USB COMPONENT OUT Terminal proprietary mini D terminal Luminance Y 1Vp p 175 n Chrominance Ps PR CS CR 350 mV 175 n 108Di 03 1480i 01 compatible output only...

Page 178: ...attery Pack Battery type Rechargeable lithium ion battery compatible with Intelligent System Rated voltage 7 4 VDC Operating temperature 0 40 C 32 104 OF Battery capacity 890 mAh Dimensions 30 7 x 27 5 x 40 2 mm 1 2 x 1 1 x 1 6 in Weight 47 g 1 7 oz Weight and dimensions are approximate Errors and omissions excepted The information in this manual is verified as of January 2009 Subject to change wi...

Page 179: ...Additional Information 179 I ...

Page 180: ...uring photos from video 103 Cine Mode recording program 65 COMPONENT OUT terminal 116 118 Condensation 167 Connections to external devices 117 Continuous shooting 0 98 180 Additional Information Copying Movies 0 87 Photos 0 105 o Data code 77 140 Date and time 39 Date format 145 Daylight saving time 40 Time zone 40 Deleting Movies 58 85 Photos 92 94 Digital effects 76 Direct print 0 108 Direct tra...

Page 181: ...3 Photo numbers 144 Photo quality 91 Photo size 91 Playback Movies 50 Photos 93 Playlist 84 Portrait recording program 62 Power save 46 Pre recording 68 Pre selecting recordings 57 Print order 113 Print share button 109 129 Printing photos 108 Protecting photos 104 Q Quick Start function 48 R Recording Movies 45 Photos 90 Recording mode 46 Recording programs 61 63 65 Recording time 47 Remote senso...

Page 182: ...am 62 T Telephoto 47 Timeline 55 Transfer order 131 Transferring to a computer Movies 121 Photos 127 Tripod 162 Troubleshooting 147 Tv recording program 63 182 Additional Information U USB terminal 116 119 V Video snapshot 66 Volume 50 80 142 W White balance 73 Wide angle 47 Wind screen 139 Wireless controller 29 Z Zoom 47 Digital zoom 137 Zoom speed 47 137 ...

Page 183: ...ive Canon USA shall have no responsibility under this limited warranty for use of the Equipment in conjunction with incompatible peripheral equipment and incompatible software In order to obtain warranty service contact the authorized Canon retail dealer from whom you purchased the Equipment or call the CANON INFORMATION CENTER AT 1 800 0K CANON You will be directed to the nearest service facility...

Page 184: ...USING THE ALLEGED DAMAGE WITHOUT LIMITING THE FOREGOING YOU ASSUME ALL RISK AND LIABILITY FOR LOSS DAMAGE OR INJURY TO YOU AND YOUR PROPERTY AND TO OTHERS AND THEIR PROPERTY ARISING OUT OF USE MISUSE OR INABILITY TO USE THE EQUIPMENT NOT CAUSED DIRECTLY BY THE NEGLIGENCE OF CANON USA SOME STATES DO NOT ALLOW THE EXCLUSION OR LIMITATION OF INCIDENTAL OR CONSEQUENTIAL DAMAGES SO THE ABOVE LIMITATION...

Page 185: ...ior finish of the EQuipment media nor does it apply to Equipment purchased outside Canada If the Equipment contains a hard disk drive Canon Canada recommends that data stored on that drive be duplicated or backed up to prevent its loss in the event of afailure or other malfunction of such drive TO OBTAIN WARRANTY SERVICE Ship your Equipment in its original carton box or equivalent properly packed ...

Page 186: ......

Page 187: ......

Page 188: ...canon ...

Page 189: ......

Page 190: ......

Page 191: ...ek gel6scht ist es nicht m6glich sie auf den Camcorder zuruckzuschreiben Note importanti sull uso del software ImageMixer 3 SE Ver 5 Dopo avere importato sui computer importanti video utilizzando I opzione Salva i file sui PC nella schermata lmageMixer 3 Launcher non usate Windows Explorer 0 altri metodi per spostare i video dalla destinazione Se un file viene eliminato dalla Libreria non potra es...

Page 192: ...nder programmet ImageMixer 3SE Ver 5 Nar du har importerat videosekvenser till datorn via alternativet Spara filer till PC i fonstret Starta ImageMixer 3 ska du inte anvanda Windows Explorer eller nagon annan metod for att flytta videosekvenserna fran malmappen Om en fil har tagits bort fran Biblioteket kan den inte skrivas tillbaka till videokameran ImageMixer 3SE Ver 5 ohjelman kayttoa koskeva t...

Page 193: ...ti D i k _ 5 Cierre todos los programas y haga clic en Aceptar 1 Compruebe que la videocamara no esta conectada al ordenador 2 Coloque el disco DIGITAL VIDEO Solution Disk en la unidad de CD ROM del ordenador 3 Seleccione su pais region y idioma 4 Haga clic en Instalacion simple en Software del video digital Para especificar la carpeta de instalacion haga c1ic en Instalacion personalizada 1 Verifi...

Page 194: ...t are running and check that a camcorder is not connected to the computer 2 Set the DIGITAL VIDEO Solution Disk in the computer s CD ROM drive 3 Double click the CD ROM icon and the Canon Digital Video Installer icon 4 Select your country or region S Click Install under Digital Video Software 1 Fermez tous les programmes en cours d execution et verifiez qu aucun camescope n est connecte a I ordina...

Page 195: ......

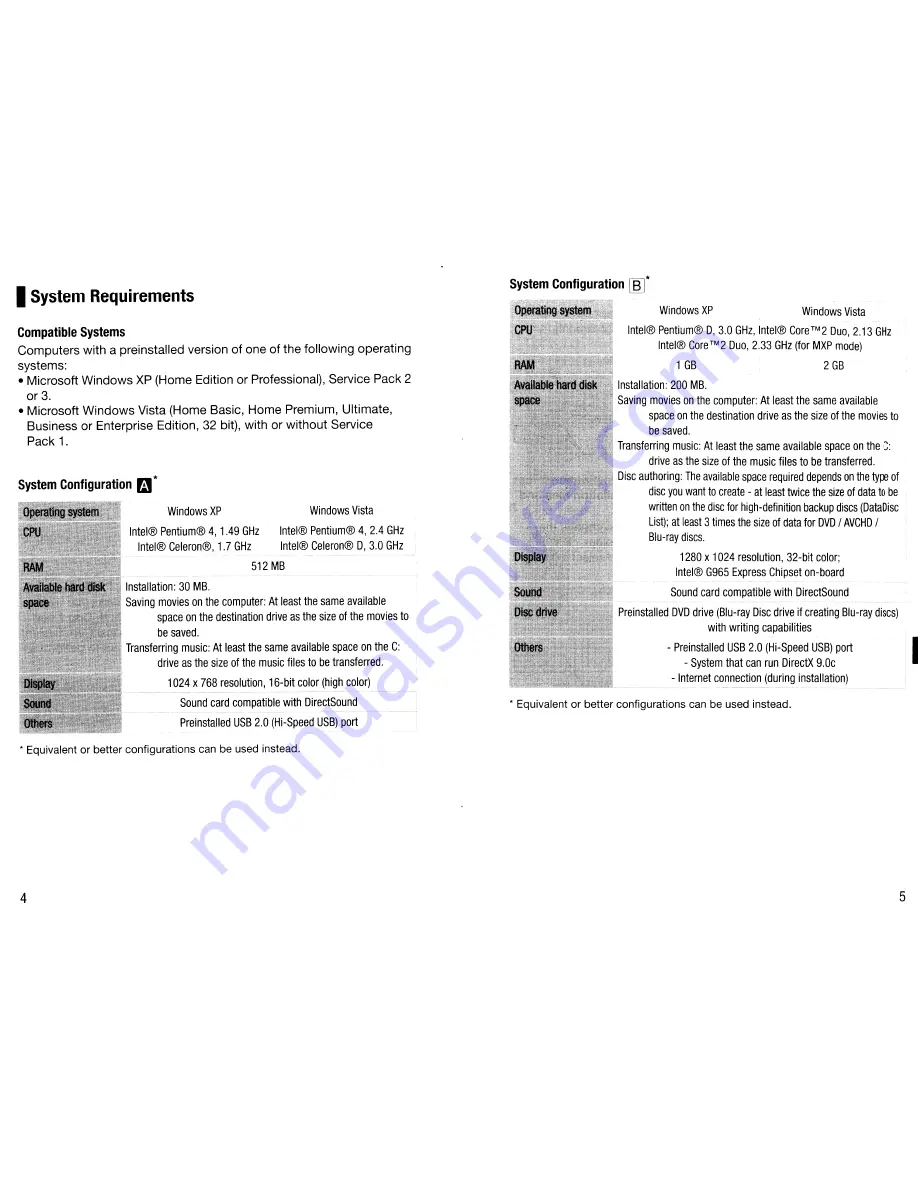
Page 196: ...des included on Disc 1 as PDF files Refer to Viewing the Software Guides OJ 10 for details on accessing the software guides Disc 1only Disc 1only Both discs Both discs Both discs Both discs Saving movies to the computer Organizing movies on the computer Playing back movies on the computer Editing movies Disc authoring Transferring video and music files to the camcorder This software is contained o...

Page 197: ...nd Preinstalled DVD drive Blu ray Disc drive if creating Blu ray discs with writing capabilities Preinstalled USB 2 0 Hi Speed USB port I System that can run DirectX g Oc Internet connection during installation System Configuration 6 Equivalent or better configurations can be used instead Windows Vista WindowsXP Installation 30 MB Saving movies on the computer At least the same available space on ...

Page 198: ...l start Jiif7J I J A i _ _ _ _ _ 8 Click Next 51 J J I L _ i __ l _ H _ _ _ _ _ _ _ _ _P _ _ _ _ _ _ l 7 _ I _ _ I _ J f_iAllIr I l I __ _ J Ii C _lQ_ _ l_ Oi _ 4 Read the license agreement and click Next Select I accept the terms of the license agreement to continue U l I il j r 4iw WW I _ ii ll otUwI___ H l Qlto lv _ i i t lo4IlIlJ H lWtItl IINrl Kli IAfRJU V l AO i MlA at i 1 oC _ _ l0f 1 I 5 C...

Page 199: ...i l 1to _ lU i i1ldotr r k _ Ji II 0 X E J l _ _ _ _ _ _ _ _ _ _ fldCi _ _ f owt_ _ _ sa I II lS _ a T _ Y1 4 __t _ lii flId 4 _ w at o 1 r J M II J C I 4 Click Next 5 Read the license agreement and click Next Select I accept the terms of the license agreement to continue 3 Select the language for the installation and click Next 1 Verify that the computer is connected to the Internet The software ...

Page 200: ...umbnails will not be created if the LOCK switch on the memory card is set to prevent writing 10 oIMPORTANT Before disconnecting the USB cable make sure to use the Safely Remove Hardware function by clicking the icon in the system tray to end the connection to the camcorder IViewing the Software Guides For details about the various features of ImageMixer 3 please refer to the PIXELA ImageMixer 3 SE...

Page 201: ...na 800 1532 4865 toll free gebOhrenfrei numero vert appel gratuit lIamada gratuita Ii English Deutsch Fran ais Espanol Other Countries in Europe 44 1489 564 764 Ii English Deutsch Fran ais Espanol Italiano Nederlands Asia Philippines 63 2 438 0090 Ii English PUB DIM 090 000 0109Ni15 0 PRINTED IN JAPAN IMPRIME AU JAPON IMPRESO EN JAP6N ...

Page 202: ...ute I MODEL I SERIAL NO Date of Purchase MODELE N2 DE SERlE Date d achat Purchaser s Name Nom d acheteur Address Adresse Dealer s Name Nom de marchand Address Adresse Model DIGITAL VIDEO CAMCORDER Modele CAMESCOPE ET LECTEUR VIDEO DIGITAL VIXIA HF20 A KIT Warranty coverage is subject to the country where the unit La garantie en vigueur dans Ie pays ou I achat a ete effectue was purchased Please re...

Page 203: ...Purcha er s AME _ ___ ADDRESS CITY STATE ZIP CODE _ 001 Ie d in C LS 1 7 po c 040 C r JAP ...

Reviews: