background image

46 

Š


AUTO Mode

AUTO Mode

This chapter covers how to easily record video and photos in 

 mode, and how to use basic shooting functions like zoom 

and Quick Start. To enjoy full access to menus and more 
advanced functions, refer to 

Recording in 

y

 (Manual) Mode


(

0

84).

Basic Recording

Shooting Video and Taking Photos in AUTO Mode

By default, movies and photos are recorded in the built-in memory 
(

 only) or on memory card 

X

 (

). You can select the 

memory that will be used to record movies and photos (

0

42).

Please read the IMPORTANT section (

0

49) before using an Eye-Fi 

card.

POINTS TO CHECK

Before you begin recording,

 make a test recording first to check that 

the camcorder is operating correctly.

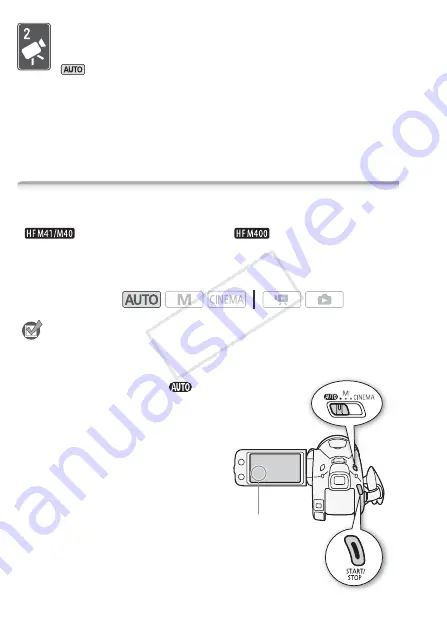
1 Set the mode switch to 

.

2 Turn on the camcorder.

To record video

Press 

g

 to begin 

recording.

• Press 

g

 again to pause 

the recording.

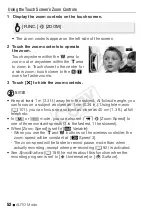
• The ACCESS indicator will flash 

from time to time while the scene 
is being recorded.

Operating modes:

j

COP

Y

Summary of Contents for VIXIA HFM41

Page 1: ...PUB DIE 0387 000A HD Camcorder Instruction Manual Y COPY ...

Page 2: ...alled and use in accordance with the instructions may cause harmful interference to radio communications However there is no guarantee that interference will not occur in a particular installation If this equipment does cause harmful interference to radio or television reception which can be determined by turning the equipment off and on the user is encouraged to try to correct the interference by...

Page 3: ...O NOT REMOVE COVER OR BACK NO USER SERVICEABLE PARTS INSIDE REFER SERVICING TO QUALIFIED SERVICE PERSONNEL CAUTION RISK OF ELECTRIC SHOCK DO NOT OPEN The lightning flash with arrowhead symbol within an equilateral triangle is intended to alert the user to the presence of uninsulated dangerous voltage within the product s enclosure that may be of sufficient magnitude to constitute a risk of electri...

Page 4: ...vicing to qualified service personnel Servicing is required when the apparatus has been damaged in any way such as power supply cord or plug is damaged liquid has been spilled or objects have fallen into the apparatus the apparatus has been exposed to rain or moisture does not operate normally or has been dropped 13 Read Instructions All the safety and operating instructions should be read before ...

Page 5: ... the antenna is grounded so as to provide some protection against voltage surges and built up static charges Section 810 of the National Electrical Code ANSI NFPA No 70 1984 provides information with respect to proper grounding of the mast and supporting structure grounding of the lead in wire to an antenna discharge unit size of grounding conductors location of antenna discharge unit connection t...

Page 6: ...placement parts are required be sure the service technician has used replacement parts that are specified by Canon or that have the same characteristics as the original part Unauthorized substitutions may result in fire electric shock or other hazards 32 Safety Check Upon completion of any service or repairs to this product ask the service technician to perform safety checks to determine that the ...

Page 7: ...f Google Inc Other names and products not mentioned above may be trademarks or registered trademarks of their respective companies This device incorporates exFAT technology licensed from Microsoft ANY USE OF THIS PRODUCT OTHER THAN CONSUMER PERSONAL USE IN ANY MANNER THAT COMPLIES WITH THE MPEG 2 STANDARD FOR ENCODING VIDEO INFORMATION FOR PACKAGED MEDIA IS EXPRESSLY PROHIBITED WITHOUT A LICENSE U...

Page 8: ...oration 0 69 Cinema Look Filters 0 67 Add flare to your movies by adding text stamps or freehand drawings directly in the camcorder Use professional cinema look filters to create unique movies with distinctive looks 1 1 Full HD 1080 refers to Canon camcorders compliant with high definition video composed of 1 080 vertical pixels scanning lines 2 Video is recorded at this resolution only when the r...

Page 9: ... your favorite background music The memory almost full Use the double memory card slot to keep on recording video without interruption Face Detection 0 93 Image Stabilization The camcorder automatically detects people s faces and adjusts the focus and other settings accordingly for beautiful results Dynamic IS 0 90 compensates for camcorder shake when you shoot video while walking Powered IS 0 91 ...

Page 10: ...y upload recordings to your computer or a video sharing Web site Save or upload to the Web Standard Definition Convert your HD movies in the camcorder itself to standard definition files 0 139 High Definition Use the supplied PIXELA s software 0 134 139 Create discs Refer to the instruction manual of the device Depending on the device used cor rect playback may not be possible even if the device i...

Page 11: ...11 COPY ...

Page 12: ...tion and Brightness of the LCD Screen 31 Using the Viewfinder 32 Basic Operation of the Camcorder 32 Using the Touch Screen 33 Operating Modes 34 Using the Menus 36 First Time Settings 36 Setting the Date and Time 37 Changing the Language 37 Changing the Time Zone 39 Using a Memory Card 39 Memory Cards Compatible for Use with the Camcorder 41 Inserting and Removing a Memory Card 42 Selecting the M...

Page 13: ...nd Cinema Look Filters 68 Video Snapshot 69 Decoration Adding a Personal Touch 74 Playing Back Stories from the Gallery 76 Rating Scenes 77 Playback with Background Music 81 Copying and Moving Scenes Within Between Stories 82 Selecting a Story s Thumbnail Image 82 Changing a Story s Title 84 Advanced Functions 84 Recording in y Manual Mode 85 Selecting the Video Quality Recording Mode 87 Selecting...

Page 14: ... Using a Zoom Remote Controller 115 Selecting the Playback Starting Point 116 Onscreen Displays and Data Code 117 Capturing Photos and Video Snapshot Scenes from a Movie 119 Dividing Scenes Photos 121 Viewing Photos 123 Deleting Photos 124 Slideshow External Connections 126 Terminals on the Camcorder 127 Connection Diagrams 130 Playback on a TV Screen 131 Saving and Sharing Your Recordings 131 Cop...

Page 15: ...161 Appendix Onscreen Icons and Displays 165 Trouble 165 Troubleshooting 172 List of Messages 179 Do s and Don ts 179 Handling Precautions 184 Maintenance Others 185 Using the Camcorder Abroad 186 General Information 186 Accessories 187 Optional Accessories 193 Product Codes 194 Specifications 198 Index COPY ...

Page 16: ...regarding the function described 0 Reference page number within this manual rReferences to sections of the Photo Application Instruction Manual included as a PDF file in the supplied Camcorder Supplemental Disc Text that applies only to the models shown in the icon The following terms are used in this manual When not specified as memory card or built in memory the term memory by itself refers to b...

Page 17: ... 8 a Brackets are used to refer to control buttons and menu options you will touch on the screen and to other onscreen messages and displays indicates that a function is available in the operating mode indicated and indicates that the function is not available For a detailed explanation refer to Operating Modes 0 33 The names of physical buttons and switches on the camcorder are indicated within a...

Page 18: ...re supplied with the camcorder XCA 570 Compact Power Adapter incl power cord BP 808 Battery PackW XWL D89 Wireless Controller incl CR2025 lithium button battery Stylus PenW XHTC 100 S HDMI Cable STV 250N Stereo Video CableW XQuick Guide IFC 300PCU S USB CableW XInstallation Guide for PIXELA s Software COPY ...

Page 19: ...Data Image Mix Data CD ROM referred in the manual as Camcorder Sup plemental Disc Contains the following components Instruction Manual The full version instruction manual of the camcorder this PDF file Photo Application Software for saving managing and printing photos Music data Music files that can be used as background music during playback These music files are for exclusive use with the suppli...

Page 20: ...terminal 0 109 7 COMPONENT OUT terminal 0 126 128 8 HDMI OUT terminal 0 126 127 9 ACCESS indicator 0 46 A q Mode switch 0 33 A a Grip belt 0 27 A s Speaker 0 57 A d Strap mount 0 27 A f Double memory card slot cover A g Memory card slot X 0 41 A h Memory card slot Y 0 41 A j MIC terminal 0 112 112 A k Stereo microphone 0 105 106 A l Instant AF sensor 0 151 A k A l Left side view 1 5 6 7 8 2 3 4 A ...

Page 21: ... lever 0 51 S s POWER button S d ON OFF CHG charge indicator Green ON Orange Standby 0 53 Red Charging 0 24 S f Remote sensor 0 26 S g LCD touch screen 0 29 32 S h POWERED IS button 0 91 WEB button 0 139 S f S h S g Top view S q S a S s S d LCD panel COPY ...

Page 22: ...6 S l DC IN terminal 0 24 D q RESET button 0 169 D a Dioptric adjustment lever 0 31 D s Viewfinder 0 31 D d VIEWFINDER button 0 31 D f BATTERY RELEASE switch 0 25 D g Tripod socket 0 180 D h Serial number only D a D s D d S j S k S l D q Back view D f D g D h Bottom view COPY ...

Page 23: ...tton 0 59 Press and hold for more than 2 seconds to switch between shooting and playback mode 3 MENU button 0 35 149 4 DISP onscreen display button 0 116 5 SET button 6 B stop button 0 55 7 PHOTO button 0 46 8 Zoom buttons 0 51 9 Navigation buttons Z O y A A q A C play pause button 0 55 COPY ...

Page 24: ...il the battery pack is com pletely exhausted Doing so will ensure that the remaining recording time will be displayed accurately For approximate charging times and recording playback times with a fully charged battery pack refer to Charging Recording and Playback Times 0 188 1 Connect the power cord to the compact power adapter 2 Plug the power cord into a power outlet 3 Connect the compact power ...

Page 25: ...ck and then pull it out IMPORTANT Turn off the camcorder before connecting or disconnecting the com pact power adapter After pressing x to turn off the camcorder important data is updated in the memory Be sure to wait until the green ON OFF CHG indicator goes out Do not connect to the camcorder s DC IN terminal or to the compact power adapter any electrical equipment that is not expressly recom me...

Page 26: ...d battery packs continue to discharge naturally Therefore charge them on the day of use or the day before to ensure a full charge We recommend that you prepare battery packs to last 2 to 3 times longer than you think you might need USA and Canada only The Lithium ion polymer battery that powers the product is recyclable Please call 1 800 8 BATTERY for information on how to recycle this battery Pre...

Page 27: ...s Fasten the grip belt Adjust the grip belt so that you can reach the zoom lever with your index finger and the g button with your thumb You can attach the supplied stylus pen to the grip belt To remove the grip belt 1 Lift the padded handgrip s flap and detach the strap from the Velcro pad 2 Pull the strap to remove it first from the front bracket on the camcorder then to unthread it from the han...

Page 28: ...der adjust the length and fasten You can also attach the wrist strap to the strap mount on the grip belt to use both for extra convenience and protection To attach an optional shoulder strap Pass the ends of the shoulder strap through the strap mount on the grip belt and adjust the length of the strap COPY ...

Page 29: ...in the picture when recording with the self timer To allow the camcorder to be operated with the wireless controller from the front NOTES About the LCD and viewfinder screens The screens are produced using extremely high precision manufacturing techniques with more than 99 99 of the pixels operating to specification Less than 0 01 of the pixels may occasionally misfire or appear as black red blue ...

Page 30: ...n bright NOTES The LCD backlight does not affect the brightness of the recordings Using the bright setting will shorten the effective usage time of the bat tery pack You can further adjust the brightness of the LCD screen with the 6 8 LCD Brightness setting or dim it with the 6 8 LCD Screen Dimmer setting to use in places where the light from the LCD screen can be a nuisance For details about how ...

Page 31: ...et the subject watch the recording Press to activate the viewfinder You can close the LCD panel or rotate it toward the subject as you prefer Adjust the viewfinder as necessary with the dioptric adjustment lever The LCD backlight setting is common to the LCD screen and the viewfinder NOTES For details about how to take care of the viewfinder refer to Handling Precautions 0 179 Cleaning 0 184 Diopt...

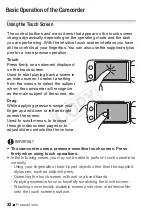
Page 32: ...order will recognize as the main subject of the scene etc Drag While applying pressure swipe your finger up and down or left and right across the screen Used to scroll menus to browse through index screen pages or to adjust slider controls like the volume IMPORTANT The camcorder uses a pressure sensitive touch screen Press firmly when using touch operations In the following cases you may not be ab...

Page 33: ...e the same currently used for recording You can also press and hold B on the wireless controller for more than 2 seconds to switch between recording and playback mode Operating mode Mode switch Operation Let the camcorder take care of all the settings while you concentrate on recording 0 46 Great for beginners or if you just prefer not to bother with detailed camcorder settings Enjoy full access t...

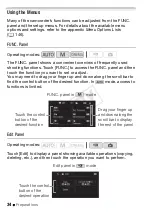
Page 34: ...on you want to set or adjust You may need to drag your finger up and down along the scroll bar to find the control button of the desired function In mode access to functions is limited Edit Panel Touch Edit to display a panel showing available operations copying deleting etc and then touch the operation you want to perform Operating modes Operating modes Touch the control button of the desired fun...

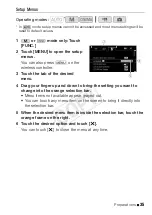
Page 35: ... of the desired menu 4 Drag your finger up and down to bring the setting you want to change into the orange selection bar Menu items not available appear grayed out You can touch any menu item on the screen to bring it directly into the selection bar 5 When the desired menu item is inside the selection bar touch the orange frame on the right 6 Touch the desired option and touch a You can touch a t...

Page 36: ...4 Touch Y M D M D Y or D M Y to select the date format you prefer In some screens the date will be displayed in short form numbers instead of month names but it will still follow the order you selected 5 Touch 24H to use 24 hour clock or leave it unselected to use 12 hour clock AM PM 6 Touch OK to start the clock and close the setup screen NOTES You can adjust the date and time later on with the 6...

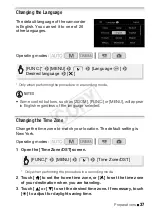
Page 37: ...ng the Time Zone Change the time zone to match your location The default setting is New York 1 Open the Time Zone DST screen Only when performing the procedure in a recording mode 2 Touch S to set the home time zone or V to set the time zone of your destination when you are traveling 3 Touch Z or O to set the desired time zone If necessary touch U to adjust for daylight saving time Operating modes...

Page 38: ...38 Preparations 4 Touch a to close the menu COPY ...

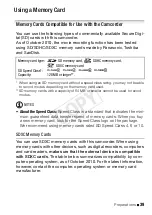
Page 39: ...eed Class is a standard that indicates the mini mum guaranteed data transfer speed of memory cards When you buy a new memory card look for the Speed Class logo on the package We recommend using memory cards rated SD Speed Class 4 6 or 10 SDXC Memory Cards You can use SDXC memory cards with this camcorder When using memory cards with other devices such as digital recorders computers and card reader...

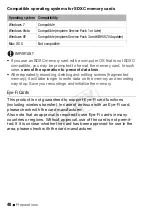
Page 40: ...ory Eye Fi Cards This product is not guaranteed to support Eye Fi card functions including wireless transfer In case of an issue with an Eye Fi card please check with the card manufacturer Also note that an approval is required to use Eye Fi cards in many countries or regions Without approval use of the card is not permit ted If it is unclear whether the card has been approved for use in the area ...

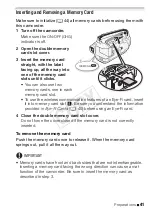
Page 41: ...ss communication features of an Eye Fi card insert it into memory card slot Y Be sure you understand the information provided in Eye Fi Cards 0 40 before using an Eye Fi card 4 Close the double memory card slot cover Do not force the cover closed if the memory card is not correctly inserted To remove the memory card Push the memory card once to release it When the memory card springs out pull it a...

Page 42: ...When selecting the memory you can check the approximate available recording time number of photos based on currently used settings NOTES Select to record movies in the built in memory or memory card X if you later want to convert the movies to standard definition in order to upload them to the Web Operating modes FUNC 8 MENU 8 8 8 Rec Media for Movies or Rec Media for Photos 8 f built in memory 4 ...

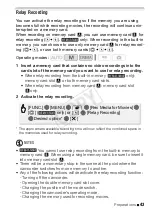
Page 43: ...ay recording from memory card X memory card slot Y only 2 Activate the relay recording The approximate available recording time will now reflect the combined space in the memories used for relay recording NOTES You cannot use relay recording from the built in memory to memory card Y When using a single memory card be sure to insert it into memory card slot X There will be a momentary stop in the s...

Page 44: ...der until the initialization is completed 2 Initialize the memory 1 Only when performing the procedure in a recording mode 2 Touch this option if you want to physically erase all the data rather than just clear the file allocation table of the memory 3 If you selected the Complete Initialization option you can touch Cancel to cancel the initialization while it is in progress All recordings will be...

Page 45: ...usic files from the supplied Camcorder Supplemental Disc to the memory card Windows users Use the supplied PIXELA s software For details refer to the Software Guide PDF file of the supplied PIXELA s software Mac OS users Use Finder to transfer music files from the MUSIC folder on the supplied Camcorder Supplemental Disc to the memory card Refer to About the music files 0 197 for the folder structu...

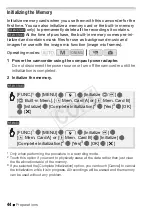
Page 46: ...rded in the built in memory only or on memory card X You can select the memory that will be used to record movies and photos 0 42 Please read the IMPORTANT section 0 49 before using an Eye Fi card POINTS TO CHECK Before you begin recording make a test recording first to check that the camcorder is operating correctly 1 Set the mode switch to 2 Turn on the camcorder To record video Press g to begin...

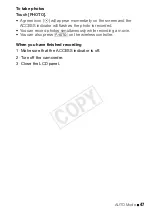
Page 47: ...d the ACCESS indicator will flash as the photo is recorded You can record photos simultaneously while recording a movie You can also press j on the wireless controller When you have finished recording 1 Make sure that the ACCESS indicator is off 2 Turn off the camcorder 3 Close the LCD panel COPY ...

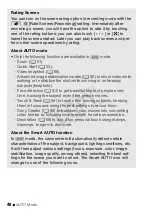
Page 48: ...to Face detection 0 93 to get beautiful shots of people every time tracking the subject even if the person moves Touch Track 0 94 to track other moving subjects keeping them in focus and using the best settings to record them Story Creator 0 65 to transform your movies into compelling video stories by following simple scripts for various scenarios Decoration 0 69 to add a fun personal touch using ...

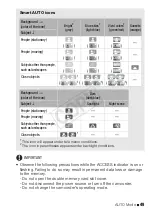
Page 49: ... mode Smart AUTO icons 1 This icon will appear under tele macro conditions 2 The icon in parentheses appears under backlight conditions Background color of the icon Bright2 grey Blue skies2 light blue Vivid colors2 green red Sunsets orange Subject People stationary People moving Subjects other than people such as landscapes Close objects 1 1 1 1 1 1 Background color of the icon Dark dark blue Subj...

Page 50: ...acklight 0 30 or adjust the brightness of the LCD screen with the 6 8 LCD Bright ness setting only You can also use the viewfinder 0 31 Under certain conditions the Smart AUTO icon that appears on the screen may not match the actual scene Especially when shooting against orange or blue backgrounds the Sunset or one of the Blue Skies icons may appear and the colors may not look natural In such case...

Page 51: ... in mode you can turn on the digital zoom 40x or 200x with the 7 8 Digital Zoom setting Using the Zoom Lever or Wireless Controller Move the zoom lever toward Q wide angle to zoom out Move it toward P telephoto to zoom in By default the zoom lever operates at a variable speed press gently for a slow zoom press harder for faster zooms You can also use the zoom buttons on the wireless controller Ope...

Page 52: ...t full wide angle you can focus on a subject as close as 1 cm 0 39 in Using tele macro 0 101 you can focus on a subject as close as 40 cm 1 3 ft at full telephoto In or mode you can also set 7 8 Zoom Speed to one of three constant speeds 3 is the fastest 1 the slowest When Zoom Speed is set to I Variable When you use the P and Q buttons on the wireless controller the zoom speed will be constant at...

Page 53: ...amcorder entered standby mode When recording using only the viewfinder with the LCD panel closed you can press to set the camcorder in standby mode 2 When you wish to resume recording open the LCD panel The ON OFF CHG indicator turns back green and the camcorder is ready to record You can also press to start recording with the LCD panel closed Press again to return the camcorder to standby mode IM...

Page 54: ...f time until shut off or turn off the Quick Start function altogether with the 68 Power Saving Mode 8 Quick Start Standby setting The usual 5 minute auto power off setting of Power Saving Mode is not applicable while the camcorder is in standby mode Changing the position of the mode switch while the camcorder is in standby mode will reactivate the camcorder in the operating mode selected COPY ...

Page 55: ...Mode 0 46 Basic Playback Playing Back Video 1 Press S You can also press and hold B on the wireless controller for more than 2 seconds to switch between shooting and playback mode 2 Open the date index screen if it is not displayed 3 Look for the scene you want to play back Move the zoom lever toward Q to show 15 scenes per page move it toward P to show 6 scenes per page Operating modes b 8 1 Date...

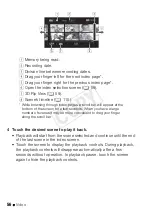
Page 56: ...e touch the screen again to hide the playback controls A Memory being read B Recording date C Division line between recording dates D Drag your finger left for the next index page E Drag your finger right for the previous index page F Open the index selection screen 0 59 G 3D Flip View 0 59 H Scene s timeline 0 115 While browsing through index pages a scroll bar will appear at the bottom of the sc...

Page 57: ...e bar instead A Jump to the beginning of the scene Double tap to jump to the previous scene B Jump to the beginning of next scene C Pause the playback D Fast playback backward forward E Display the volume 0 57 and background music mix balance 0 77 controls F Stop the playback G Decoration 0 69 Touch several times to increase the playback speed to approxi mately 5x 15x 60x the normal speed During f...

Page 58: ...lay or change the infor mation displayed with the y 8 Data Code setting Depending on the recording conditions you may notice brief stops in video or sound playback between scenes During fast slow playback you may notice some anomalies blocky video artifacts banding etc in the playback picture The speed indicated on the screen is approximate Slow reverse playback will look the same as continuous fr...

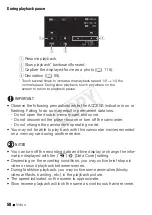
Page 59: ...back original scenes by date or by story or photos for example You can also select the memory from which you want to play back your recordings A Recording date B Drag your finger left to go to the next date with record ings C Drag your finger up and down to browse through the scenes recorded in the displayed date D Drag your finger right to go to the previous date with recordings E Return to the d...

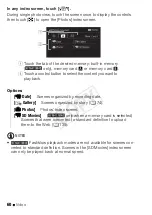
Page 60: ...e SD Movies index screen can only be played back at normal speed 1 Date Scenes organized by recording date Gallery Scenes organized by story 0 74 2 Photos Photos index screen u SD Movies only when a memory card is selected Scenes that were converted to standard definition to upload them to the Web 0 139 A Touch the tab of the desired memory built in memory only memory card X or memory card Y B Tou...

Page 61: ... index screen vs the gallery In the date index screen you can find all the movies you have recorded conveniently organized by recording date When you play back scenes from the date index screen they will be played back in chronological order In the gallery you can find your scenes grouped as video stories If you record movies using the Story Creator function 0 65 your scenes will appear in the sto...

Page 62: ...e to remove the checkmark To remove all checkmarks at once touch Remove All 8 Yes 2 After selecting all the desired scenes touch OK Options Deleting a Single Scene from a Story 1 Open the list of scenes of the story that contains the scene you want to delete 2 In the Scene List screen drag your finger up down to select the scene you want to delete 3 Touch the orange box on the right to open the Ed...

Page 63: ... no scenes in the story have been given that particular rating 4 Delete all applicable scenes Touch Stop to interrupt the operation while it is in progress Some scenes may be deleted nevertheless Deleting Stories Deleting a story permanently deletes all the scenes it contains The two preexisting stories Unsorted and Video Snapshot cannot be deleted 1 Open the gallery d 8 Yes 8 OK 8 f b 8 Gallery 8...

Page 64: ... from the date index screen and from any stories in the gallery they may have belonged to regardless of the method used to delete them Save copies of important scenes before deleting them 0 134 Observe the following precautions while the ACCESS indicator is on or flashing while scenes are being deleted Do not open the double memory card slot cover Do not disconnect the power source or turn off the...

Page 65: ...ll appear In that case touch New Story 2 Select the desired theme Drag your finger left right to browse through the themes and touch the thumbnail of the desired theme A list of the suggested categories story scenes for the selected theme will appear 3 Drag your finger up down to select a category and touch OK 4 In the confirmation screen touch Yes to create the story Initially the current date wi...

Page 66: ...t number of scenes To exit Story Creator mode Press and touch Yes NOTES When recording video snapshot scenes you can have the camcorder automatically link the length of video snapshot scenes to the recom mended length of story scenes with the 8 8 Video Snapshot Length setting Recording Additional Scenes within an Existing Story 1 Press 2 Select the story to which you want to add new scenes A Retur...

Page 67: ...s to give your recordings a cinematic look In this mode you can also use a variety of professional cinema look fil ters to create unique movies with a distinctive appearance 1 Set the mode switch to 2 Select the desired cinema look filter When you select a cinema look filter other than Cinema Standard you can change the effect level with the following procedure before touching OK The selected cine...

Page 68: ...tirely new feel The default length of a video snapshot scene is 4 seconds but you can change it to 2 or 8 seconds or to the length recommended for the selected story scene category in Story Creator with the 8 8 Video Snapshot Length setting 1 Cinema Standard 2 Vivid 3 Dream 4 Cool 5 Nostalgic 6 Sepia 7 Old Movies 8 Memory 9 Dramatic B W A Filter number will appear on the control button B Filter na...

Page 69: ...ntarily turn black as if a camera shutter had released NOTES Changing the camcorder s operating mode will deactivate the video snapshot mode Decoration Adding a Personal Touch Add a new level of enjoyment to your scenes by decorating them You can add animated graphics stamps and even your own freehand drawings The supplied stylus pen will be especially useful for decorating scenes You can decorate...

Page 70: ...ions in action B Toolbar C Pens and Stamps Select the type of pen or stamp and its color You can also save a canvas or load a previously saved canvas D Animated Stamps Select animated stamps to add to your decoration E Captions Add the date date and time story title or story theme as a caption that will be included in the recording F Image Mix Choose one of 27 different frames to add onto the canv...

Page 71: ... color from the color palette 4 Draw freely on the canvas Touch 8 Clear 8 Yes to clear the canvas and start again 5 When you finish drawing save the canvas The freehand drawings and stamps will be saved in the built in memory only or on memory card X only To load a previously saved canvas In the decoration screen The camcorder will apply the last freehand drawings and stamps that were saved in the...

Page 72: ...esired text settings and touch f Touch white text on dark background white text or black text The selected caption will appear in the center of the screen 4 Touch the caption and drag it to the desired location To use image mix 1 Open the Select Image screen 2 Touch or to select a different image mix frame You can touch one of the memory icons at the bottom of the screen to read image mix frames s...

Page 73: ... adjust the overall transparency of the image as necessary 7 Touch f to mix your image with live video Decorating Scenes during Playback 1 Play back the scene you want to decorate Operating modes Mixing Your Own Images with Live Video You can use images you make on your computer for the image mix Chroma Key function Make sure that the image you want to use has a blue or green area which will be re...

Page 74: ... not be able to select image mix fames saved on a memory card Image mix cannot be selected during playback or while converting a scene to standard definition only Select the image mix dur ing playback pause or before starting the conversion Playing Back Stories from the Gallery You can play back recordings made using Story Creator to play them back as a single compelling video story following the ...

Page 75: ...stories you want to play back 4 Touch the story s thumbnail to start the playback The complete story will be played back from the first scene to the last When playback ends the camcorder will return to the gallery Touch the screen to display the playback controls Touch to display the scene s category during playback Touch to turn the story scene display off Playback controls are the same as when p...

Page 76: ...enes of the story that contains the scenes you want to rate 2 In the Scene List screen drag your finger up down to select the scene you want to rate 3 Touch the orange box on the right to open the Edit Scene screen 4 Touch the control button of the desired rating and touch f twice to return to the gallery Rating Scenes During Playback 1 Play back from the gallery the story that contains the scenes...

Page 77: ...upplemental Disc contains 3 music tracks you can use as background music The music files come pre installed in the built in memory You can mix the original audio and the background music and adjust the background music mix balance to your preference POINTS TO CHECK To play back scenes or a slideshow of photos recorded on the memory card you will need to transfer the music tracks to the memory card...

Page 78: ...background music balance during playback 1 During playback touch the screen to display the playback controls 2 Touch drag your finger along the Music Balance bar to adjust the background music balance as desired and touch f To delete a music track In the Select Music screen touch Z or O to select the track you want to delete A Select the desired music track B Adjust the background music balance C ...

Page 79: ...player and adjust its volume according to the onscreen indications When the audio input is in the correct range stop the music playback and touch a on the camcorder Touch External Player Link to link the video playback to the start end of the music from the external player Playback with the video linked to the external audio 5 Start the music playback on the external player Playback will start fro...

Page 80: ...isc to the memory card Windows users Use the supplied PIXELA s software For details refer to the Software Guide PDF file of the supplied PIXELA s software Mac OS users Use Finder to transfer music files from the MUSIC folder on the supplied Camcorder Supplemental Disc to the memory card Refer to About the music files 0 197 for the folder structure of the memory card Transfer music files to the mem...

Page 81: ...r finger right left to select the desired story and touch its thumbnail Then drag your finger up down to select the desired category and touch the orange frame on the right number of scenes And last drag your finger up down to move the orange bar within the category to select the position of the scene 5 Copy or move the scene This step is not necessary when copying moving a scene into a story scen...

Page 82: ... story s thumbnail Playback controls will appear on the screen 0 57 Use any special playback modes fast slow playback frame reverse advance as necessary to locate the desired image 5 Touch Set to change the story s thumbnail 6 Touch f to return to the gallery Changing a Story s Title When you first create a story the current date will be used as the story s title but you can change the title later...

Page 83: ...tual keyboard to change the title 5 Touch OK 8 f 8 f to return to the gallery b 8 Gallery Story Details 8 Edit Story 8 Edit Title A Switch between letters and numbers special characters B Change the position of the cursor C Delete the character to the cursor s left backspace D Caps Lock When the numerical keyboard is displayed switches between set 1 and set 2 of special char acters COPY ...

Page 84: ...t in memory only or on memory card X You can select the memory that will be used to record movies and photos 0 42 Please read the IMPORTANT section before using an Eye Fi card 1 Set the mode switch to y 2 Turn on the camcorder 3 Record movies and photos The procedure is the same as in mode 0 46 IMPORTANT Observe the following precautions while the ACCESS indicator is on or flashing Failing to do s...

Page 85: ...TO Mode 0 46 Photos cannot be recorded while the digital zoom is activated or while fading in or fading out a scene Reviewing the Latest Scene Recorded You can review the last 4 seconds of the last scene recorded with the camcorder without switching to playback mode While reviewing the latest scene the picture will be played back without sound 1 Set the mode switch to y or 2 Review the last 4 seco...

Page 86: ...cording times Default value 1 Recorded in 1 920 x 1 080 resolution Movies recorded using other recording modes are recorded in 1 440 x 1 080 resolution 2 At the time of purchase the built in memory contains about 70 MB of music files background music and 5 MB of image files image mix frames 3 A single scene can be recorded continuously for 12 hours at that point the camcorder will stop for about 3...

Page 87: ...des C 60i Standard 60 fields per second interlaced Standard frame rate of NTSC analog TV signals o PF30 Shooting at 30 frames per second progressive Use this frame rate to easily edit your recordings for example to post them on the Web E PF24 Shooting at 24 frames per second progressive Using this frame rate will give your recordings a cinematic look Recording in mode will further enhance the effe...

Page 88: ...ports scenes such as tennis or golf q Night Scene To record nightscapes with lower noise ISnow To record in bright ski resorts without the subject being underexposed JBeach To record on a sunny beach without the subject being underexposed KSunset To record sunsets in vibrant colors p Low Light To record in low light situations LSpotlight To record spotlit scenes COPY ...

Page 89: ...der blur blur due to the camcorder moving we recommend using a tripod r Underwater s Surface Use these recording programs when making recordings while the camcorder is in the optional WP V3 Waterproof Case The r Underwater recording program is for making recordings underwater When using underwater lighting equipment or making recordings while on land we recommend using the s Surface recording prog...

Page 90: ...cus on the accessory In such case move the zoom lever toward P to focus on the subject See Specifications 0 196 for additional notes about the r Underwater and s Surface recording programs Underwater is a unique environment that is ever changing depending on factors such as the weather and water conditions In addition water absorbs red light which causes objects to appear bluer and greener Advance...

Page 91: ... setting when the camcorder is mounted on a tri pod Powered IS You can use Powered IS to make the image stabilization even more powerful Powered IS is most effective when you are stationary and zooming in on far subjects using high zoom ratios the more you approach the telephoto end Holding the LCD panel with your left hand will add to the stability of the shot Press and hold Y as long as you want...

Page 92: ... will not record the full 3 seconds prior to pressing g if the button was pressed within 3 seconds of having turned on pre recording or having finished the previous recording Any of the following actions will deactivate the pre recording function Leaving the camcorder without any operation for 5 minutes Changing the position of the mode switch Pressing S or z Opening the decoration screen Closing ...

Page 93: ...than one person in the picture the camcorder will auto matically select one person it determines is the main subject The main subject is indicated by a white face detection frame and the camcorder will optimize the settings for that person Other faces will have gray frames Touch a different face on the touch screen to optimize the camcorder s settings for that person using the Touch Track function...

Page 94: ...ays keep in focus other moving subjects such as pets or moving vehicles 1 Make sure face detection is activated 0 93 Face detection is always activated in mode 2 Point the camcorder at a moving subject and touch the subject on the touch screen A white double frame will appear around the subject and track it as it moves Touch Cancel z to remove the frame and cancel the tracking NOTES Touching somew...

Page 95: ...out Press g in record pause mode M to start recording with a fade in Press g while recording N to fade out and pause the recording NOTES When you apply a fader not only the picture but also the sound will fade in or out Faders cannot be used in the following cases While using the Old Movies cinema look filter in mode When recording scenes with decorations When recording video snapshot scenes While...

Page 96: ...dark surroundings you can obtain a brighter picture by using slow shutter speeds however image quality may not be as good and autofocus may not work well The image may flicker when recording with fast shutter speeds Recording movies under fluorescent lights If the screen starts to flicker select B Shutter Pri AE and set the shutter speed to 1 100 Operating modes A Programmed AE The camcorder autom...

Page 97: ... shutter speed you can add a nice motion blur and sense of movement With faster shutter speeds you can freeze the action for powerful images of moving subjects W XWith small aperture values only the subject is in focus and the background is softly blurred Great for portraits or to isolate a single object With large aperture values every part of the image is clearly in focus Good for landscapes and...

Page 98: ...e frame The Touch AE mark P will flash and the exposure will be adjusted automatically so the area you touched will be correctly exposed You have the option to further adjust the exposure manually as necessary You can touch y instead to adjust the exposure manually without activating the Touch AE function The manual adjustment dial appears and the adjustment value is set at 0 Touch y again to retu...

Page 99: ...ghter picture However using higher gain values may result in more noticeable video noise You can select the AGC limit to curb the amount of noise by setting the maximum gain value to be used The smaller the AGC limit the picture will be darker but will have less the noise Touch z Automatic to remove the limit for the automatic gain control You can also drag your finger along the dial The selected ...

Page 100: ...nce appear Touch 2 again to return the camcorder to autofocus 3 Touch and hold l or W to adjust the focus The center of the screen will be magnified to help you focus more easily You can also turn off this function with the 7 8 Focus Assistance setting The focusing distance displayed will change as you adjust the focus You can change the units used for the distance display with the 6 8 Distance Un...

Page 101: ...en you zoom in to full telephoto and bring the camcorder up close to the subject POINTS TO CHECK Select a recording program other than M Fireworks Touch again to turn off the tele macro function The camcorder will automatically adjust the zoom to the telephoto end NOTES Any of the following actions will deactivate the tele macro function Turning off the camcorder Pressing S Setting the camcorder t...

Page 102: ...appears The camcorder will retain the custom white balance even if you turn it off Options Default value Operating modes Y Automatic The camcorder automatically sets the white bal ance for natural looking colors a Daylight To record outdoors on a bright day b Shade To record in shaded places c Cloudy To record on a cloudy day e Fluorescent To record under warm white cool white or warm white type 3...

Page 103: ... types of fluorescent lights Depending on the type of fluorescent light optimal color balance may not be obtained with e Fluorescent or f Fluorescent H If the color looks unnatural select Y Automatic or g Custom WB Image Effects You can adjust the color depth brightness contrast and sharpness of the image POINTS TO CHECK Select a recording program other than the Special Scene recording pro grams 1...

Page 104: ... countdown appears on the screen Photos In record pause mode touch PHOTO The camcorder will record the photo after a 10 second countdown The countdown appears on the screen 2 seconds when using the wireless controller NOTES Once the countdown has begun any of the following actions will cancel the self timer Pressing g when recording movies Pressing j on the wireless controller or touching PHOTO on...

Page 105: ...udio level indicators will appear the top one for the built in microphone and the bottom one for the external audio Touch z Automatic to return the camcorder to automatic audio recording levels 2 Touch and hold y or A to adjust the audio recording level as necessary As a guideline adjust the audio recording level so that the audio level meter will go to the right of the 12 dB mark yellow area only...

Page 106: ... optional SM V1 Surround Microphone is attached to the camcorder We recommend using headphones to check the sound level while adjusting the audio recording level or when the microphone attenuator is activated Built In Microphone Directionality You can change the directionality of the built in microphone to have more control over how sound is recorded Options Default value FUNC 8 c Mic Level 8 z Au...

Page 107: ...only available when recording sound using the built in microphone Options Default value Wide Stereo recording of ambient sound over a more exten sive area that adds to the sense of presence of movies Zoom Stereo recording with the sound linked to the zoom position The larger the subject appears on the screen the louder the sound will be Operating modes Normal Appropriate for balanced sound under m...

Page 108: ...s step is not necessary after connecting an optional WM V1 wireless microphone 3 Activate the audio mix 4 Adjust the audio mix balance as necessary Touch INT more of the sound from the built in microphone or EXT more of the sound from the external audio or drag your finger along the audio mix bar to adjust the mix balance as desired 5 Touch a to set the audio mix and close the menu Boost HF LF Ran...

Page 109: ...hanged in this mode Change the setting in advance in one of the other operating modes 1 Change the function of the terminal to headphones output Only when performing the procedure in a recording mode 2 Connect the headphones to the AV OUT X terminal 3 Adjust the volume as necessary You can also drag your finger along the Headphones bar J will appear on the screen To adjust the volume during playba...

Page 110: ...tput when you turn off the camcorder Using the Mini Advanced Shoe Using the mini advanced shoe you can attach to the camcorder a range of optional accessories to expand its functionality For details about optional accessories available for use with your camcorder refer to Accessories 0 186 For details about how to attach and use the accessories refer also to the instruction manual of the accessory...

Page 111: ...crophone Using the SM V1 Surround Microphone or DM 100 Directional Stereo Microphone Using the SM V1 you can add a sense of depth and presence to your recordings with 5 1ch surround sound Using the DM 100 you can accurately record audio coming directly from the direction you are recording Attach the optional SM V1 Surround Microphone or DM 100 Directional Stereo Microphone to the mini advanced sho...

Page 112: ...al 3 If necessary activate the audio mix function 0 108 and adjust the audio mix balance 4 Attach the microphone transmitter to the subject For details about using the WM V1 refer to the instruction manual supplied with the microphone Using Commercially Available Microphones You can also use commercially available condenser microphones with their own power supply You can connect almost any stereo ...

Page 113: ...ll effect of recordings made with 5 1ch surround sound on HDTVs compatible with 5 1ch surround sound connected to the camcorder using the supplied HDMI cable Audio output from the AV OUT X terminal including headphone output will be converted to 2ch stereo The camcorder s built in speaker is monaural Using an External Video Light You can use the optional VL 5 Video Light or VFL 2 Video Flash Light...

Page 114: ...ll appear on the screen For details about using the adapter refer to the instruction manual of the RA V1 For details about using the zoom remote controller refer to the instruction manual of the ZR 2000 or ZR 1000 NOTES In mode the only available functions are turning the power on off starting stopping a recording and zoom Operating modes Functions Available with the Zoom Remote Controller Using t...

Page 115: ...irst frame of the scene Below it the timeline ruler shows frames taken from the scene at fixed intervals 3 Touch the desired frame in the timeline ruler to start playing back the scene from that point Operating modes A Touch twice to return to the index screen B Previous next scene C Drag your finger left along the ruler to display the next 5 frames D Scene s recording mode and length E Recording ...

Page 116: ...ons and displays that appear automati cally but will not remove control buttons FUNC PHOTO etc and onscreen displays that were turned on manually for example onscreen markers or the audio level meter 2 Touch the screen to display the playback controls 6 sec 8 Desired interval 8 f Operating modes About the Data Code With every scene or photo recorded the camcorder keeps a data code date time of rec...

Page 117: ... 8 seconds with the 8 8 Video Snapshot Length setting 3 Touch B to stop the playback NOTES A video snapshot scene can be captured only during playback it can not be captured during playback pause mode The captured video snapshot scene is saved to the same memory that contains the source scene Video snapshot scenes cannot be captured from any of the following types of scenes Scenes shorter than 1 s...

Page 118: ...capture 3 Touch PHOTO To capture a photo sequence keep touching PHOTO The scene will be played back frame by frame and each frame captured as a separate photo 4 Touch B to stop the playback IMPORTANT When capturing photos on an Eye Fi card in memory card slot Y pho tos will be uploaded automatically if you are within the range of a config ured network Always verify that Eye Fi cards have been appr...

Page 119: ... back the scene you want to divide 2 Pause the playback at the point where you want to divide the scene 3 Open the scene division screen 4 Bring the scene to a precise point if necessary Playback controls will appear on the screen 0 57 Use any special playback modes fast playback frame reverse advance as necessary to locate the desired point 5 Divide the scene The video from the division point to ...

Page 120: ...ice some anomalies in the picture sound at the point where the scene was cut The following scenes cannot be divided Video snapshot scenes and other scenes that are too short less than 3 seconds Scenes that were edited using the supplied software VideoBrowser and were then transferred back to the camcorder Scenes cannot be divided within 1 second from the beginning or the end of the scene COPY ...

Page 121: ...r photo related operations Viewing Photos 1 Press S 2 Open the Photos index screen if it is not displayed 3 Look for the photo you want to play back Move the zoom lever toward Q to show 15 photos per page move it toward P to show 6 photos per page Operating modes b 8 Photos COPY ...

Page 122: ...he scroll bar 1 Touch the screen to display the playback controls 2 Jump through the photos using the scroll bar A Memory being read B Drag your finger left for the next index page C Drag your finger right for the previous index page D Open the index selection screen 0 59 E Division line between recording dates While browsing through index pages a scroll bar will appear at the bottom of the screen...

Page 123: ...tly Images not recorded with this camcorder Images edited on a computer Images whose file names have been changed Deleting Photos You can delete those photos that you are not interested in keeping Deleting a Single Photo 1 In single photo view select the photo you want to delete 2 Touch the screen to display the playback controls 3 Delete the photo 4 Drag your finger left right to select another p...

Page 124: ...d photos will appear next to the o icon Touch a selected photo to remove the checkmark To remove all checkmarks at once touch Remove All 8 Yes 2 After selecting all the desired photos touch OK Options IMPORTANT Be careful when deleting photos Deleted photos cannot be recovered Photos that were protected with other devices cannot be deleted with this camcorder Slideshow You can play a slideshow of ...

Page 125: ...lay the playback controls then touch A to start the slideshow 5 Start the music playback on the external player Slideshow linked to the external audio 3 Start the music playback on the external player Playback will start from the first photo in the index screen Photos will be displayed continuously until the music stops When the external audio input stops the slideshow will stop as well During the...

Page 126: ...0N Stereo Video Cable is connected to the camcorder Adjust the volume on the connected TV 3 HDMI OUT Terminal The HDMI OUT terminal offers a high quality digital connection that combines audio and video in a single convenient cable 4 COMPONENT OUT Terminal The component video terminal is for video only When you use connection B do not forget the audio connections using the AV OUT X terminal When c...

Page 127: ...connector standard HDMI connector About the HDMITM connection The HDMI High Definition Multimedia Interface connection A is a convenient all digital connection using a single cable for both video and audio When you connect the camcorder to an HDTV equipped with an HDMI terminal you can enjoy video and audio playback at the highest quality The HDMI OUT terminal on the camcorder is for output only D...

Page 128: ... Video Type Analog Quality Standard definition Output only Connect to a standard TV or a VCR with audio video input terminals Change the following settings on the camcorder y 8 TV Type according to the TV set widescreen or 4 3 if the TV cannot automatically detect and change the aspect ratio 6 8 AV Headphones to H AV White CTC 100 Component Cable optional STV 250N Stereo Video Cable supplied Red G...

Page 129: ...s recorded with this camcorder that were previously saved on a computer To transfer music files from the supplied Camcorder Supplemental Disc to a memory card in the camcorder in order to use them as background music Connection D USB Type Digital data connection Connect to a computer to save your recordings or to a compatible digital video recorder to copy your recordings USB Cable supplied COPY ...

Page 130: ...nected the camcorder Refer to the instruction manual of the connected TV 4 Turn on the camcorder and set it to or mode Play back the movies or photos NOTES To correctly play back movies recorded with x v Color 0 155 on an HDTV compatible with this standard additional settings may be required on the connected HDTV Refer to the TV s instruction manual We recommend powering the camcorder using the co...

Page 131: ...memory card X To copy all the scenes recorded on a specific date drag your finger left right until the desired date appears in the title bar 2 Copy the scenes When you select Select perform the following procedure to select the individ ual scenes you want to copy before touching Yes Touch Stop to interrupt the operation while it is in progress To select individual scenes 1 Touch on the individual ...

Page 132: ...Single Photo 1 In single photo view select the photo you want to copy Check that you are viewing photos recorded in the built in memory only or on memory card X f or 4 appears next to the photo number 2 Touch the screen to display the playback controls date Copy all the scenes recorded on the date shown in the con trol button Select Select individual scenes to copy All Scenes Copy all the scenes O...

Page 133: ... Stop to interrupt the operation while it is in progress To select individual photos 1 Touch on the individual photos you want to copy A checkmark O will appear on the photos you touch The total number of selected photos will appear next to the o icon Touch a selected photo to remove the checkmark To remove all checkmarks at once touch Remove All 8 Yes 2 After selecting all the desired photos touc...

Page 134: ...d slot is open If the LOCK switch on memory card Y is set to prevent writing If there is no memory card in memory card slot Y Scenes that were edited using the supplied software VideoBrowser and were then transferred back to the camcorder cannot be copied to the memory card If there is not enough space on memory card Y as many photos as possible will be copied before stopping the operation Saving ...

Page 135: ...order 2 Open the date index screen 3 Connect the camcorder to the computer using the supplied USB cable Connection D Refer to Connection Diagrams 0 129 4 Camcorder Select All for PC only Camcorder When the connection is successfully established USB Connection appears on the screen 5 Computer Depending on the software you chose to install Transfer Utility or VideoBrowser will start up automatically...

Page 136: ...aunch setting r Refer to Starting CameraWindow Connecting the Camcorder to a Computer 1 Power the camcorder using the compact power adapter 2 Open the Photos index screen Select in advance the memory that contains the photos you want to save 3 Connect the camcorder to the computer using the supplied USB cable Connection D Refer to Connection Diagrams 0 129 Camcorder When the connection is successf...

Page 137: ...omputer make copies of them first Use the copied files retaining the originals NOTES Refer also to the computer s instruction manual With the supplied PIXELA s software you can also choose to save com plete stories from the gallery In such case all the scenes in the story will be merged and saved as a single video file Users of Windows 7 Windows Vista Windows XP and Mac OS X Your cam corder is equ...

Page 138: ...pen the date index screen or gallery 3 Connect the camcorder to the digital video recorder using the supplied USB cable Connection D Refer to Connection Diagrams 0 129 4 Camcorder Select the memory that contains the scenes you want to copy Select an option other than All for PC only Camcorder When the connection is successfully established USB Connection appears on the screen Recording Details wil...

Page 139: ...ssing h 0 116 5 External recorder Start recording when the scene you wish to copy appears stop recording when it ends 6 Camcorder Stop playback Uploading Movies to Video Sharing Web Sites You can convert your high definition scenes into standard definition movies in the camcorder and then use the supplied PIXELA s software in order to upload them to your favorite video sharing Web site You can eve...

Page 140: ...ate appears in the title bar 4 Press Z to convert all the scenes recorded in the selected date Alternatively touch Edit 8 Convert HD9SD f97 or Convert HD9SD 497 and select one of the options for converting multiple scenes You can convert all the scenes recorded on the date shown in the control button select individual scenes to convert or convert all the scenes When you select Select perform the p...

Page 141: ...nes step 4 1 Touch on the individual scenes you want to convert A checkmark O will appear on the scenes you touch The total number of selected scenes will appear next to the o icon Touch a selected scene to remove the checkmark To remove all checkmarks at once touch Remove All 8 Yes 2 After selecting all the desired scenes touch OK To select the bit rate step 5 Using a higher bit rate will result ...

Page 142: ...CCESS indicator is on or flashing Failing to do so may result in permanent data loss Do not open the double memory card slot cover Do not disconnect the USB cable Do not disconnect the compact power adapter or turn off the camcorder or the computer NOTES The time required to convert scenes is approximately equal to the total playback time of the converted scenes In most cases this is still faster ...

Page 143: ... smaller 10 minute long movies The maximum total playback time of the scenes to be converted is 2 hours and 30 minutes Converting Only Part of a Scene or Story 1 Play back the scene or story that you want to partially convert Check that you have selected a scene recorded in the built in memory or on memory card X 2 Pause the playback where you want the converted SD movie to begin 3 Press Z and con...

Page 144: ...eless communication is shown by the Eye Fi icon as follows g grayed out Communication not established g white flashing Connecting g white continuously on Wireless upload on standby g animated Wireless upload in progress i Eye Fi Communication is set to B Off h Wireless upload stopped by the camcorder 0 170 o Error reading from the Eye Fi card 0 168 IMPORTANT Using an Eye Fi Card This product is no...

Page 145: ...sure to insert the Eye Fi card into memory card slot Y While using an Eye Fi Card the ACCESS indicator may flash from time to time Wireless communication is available only in playback mode Any wire less transfer in progress will be stopped if you set the camcorder to recording mode Wireless communication is not available when the optional WM V1 Wireless Microphone is attached to the camcorder Any ...

Page 146: ... Underlined menu options indicate default values FUNC Panel FUNC Menu FUNC Panel Recording Modes Control Button Setting options Function AUTO y CINEMA 0 MENU Open the menus z z 35 Rec Programs A Programmed AE B Shutter Pri AE C Aperture Pri AE z z 96 F Portrait G Sports q Night Scene I Snow J Beach K Sunset p Low Light L Spotlight M Fireworks r Underwater s Surface z 87 Decoration 1 Pens and Stamp...

Page 147: ... z z 52 tele macro Toggle on or off z z 101 c Mic Level 1 z Automatic y Manual Audio Level Indicator Toggle on or off z z 105 Image Effects ON OFF When ON Color Depth Sharpness Contrast Brightness 0 2 to 2 z 103 P AGC Limit z Automatic y Manual 0 dB to 24 dB z z 99 Image Stabilizer Dynamic Standard Off z z 90 O Faders 1 N Off 0 Fade Trigger Once 6 Fade Trigger Always 1 Wipe Once 7 Wipe Always z z ...

Page 148: ...elect All Scenes 140 Delete date Select All Scenes This Scene All Scenes This Scene 61 Divide z 119 Control Button Edit Story from the Story Details screen Edit Scene from the Scene List screen Playback Pause 0 Copy 497 1 Copy f97 1 by scene rating 132 Convert HD9SD 497 1 Convert HD9SD f97 1 by scene rating 143 Delete or d by scene rating This Scene This Scene 61 Delete Story 2 z 63 Story Thumbnai...

Page 149: ...ove z 81 Divide z 119 Rating unrated others 76 Control Button Edit Story from the Story Details screen Edit Scene from the Scene List screen Playback Pause 0 Control Button Index Screen Single Photo View 0 Copy 497 Copy f97 Select All Photos z 132 133 Delete z 123 Menu item Setting options y CINEMA 0 Digital Zoom B Off G 40x H 200x z Zoom Speed I Variable J Speed 3 K Speed 2 L Speed 1 z z 51 AF Mo...

Page 150: ...screen Markers B Off e Level White f Level Gray g Grid White h Grid Gray z z Camcorder Shake Indicator A On B Off z z Wind Screen 1 O Automatic B Off Z z z Microphone Attenuator 1 O Automatic A On V z z MIC Terminal Input 1 External Audio Microphone z z 108 Audio Mix 1 B Off A On INT EXT Internal Microphone MIC Terminal Input z z 108 Built in Mic Freq Response Normal Boost LF Range Low Cut Filter ...

Page 151: ...sistance When focus assistance is activated the image at the center of the screen is magnified to help you focus manually 0 99 Using focus assistance will not affect the recordings It will be cancelled automatically after 4 seconds or when you start recording Auto Slow Shutter The camcorder automatically uses slow shutter speeds to obtain brighter recordings in places with insufficient lighting Mi...

Page 152: ...ons O Automatic The camcorder will automatically activate the micro phone attenuator as necessary for optimal audio recording levels so high audio levels will not be distorted A On V The microphone attenuator will be activated at all times to reproduce more faithfully the sound dynamics V will appear on the screen This menu option is not available when the optional SM V1 Surround Microphone is att...

Page 153: ... the supplied STV 250N Stereo Video Cable select the setting according to the type of TV in order to display the picture in full and in the correct aspect ratio F Normal TV TV sets with 4 3 aspect ratio G Wide TV TV sets with 16 9 aspect ratio When the TV type is set to F Normal TV during the playback of video originally recorded with an aspect ratio of 16 9 the picture will not be displayed fulls...

Page 154: ...f built in memory 4 memory card X 7 memory card Y Relay Recording B Off f94 f9497 497 4 memory card X 7 memory card Y Relay Recording B Off 497 z z 42 Recording Mode 1 h High Quality 24 Mbps i High Quality 17 Mbps j High Quality 12 Mbps l Standard Play 7 Mbps k Long Play 5 Mbps z z 85 Frame Rate 1 2 C 60i Standard o PF30 E PF24 z z 87 Rec Media for Photos 3 f built in memory 4 memory card X 7 memo...

Page 155: ...icates actually usable space It may be slightly smaller than the nominal built in memory capacity listed in the specifications x v Color Uses a color space with an extended gamut to achieve deeper colors closer to real life Use this function to record video only when you intend to play back your recordings on an HDTV compatible with x v Color connected to the camcorder using the supplied HDMI cabl...

Page 156: ...ample the file name of a photo numbered 101 0107 is IMG_0107 JPG stored under the folder DCIM 101CANON 6 System Setup Menu item Setting options y CINEMA 1 2 0 Output Onscreen Displays A On B Off z z z z Language a Dansk Deutsch English Español Français Italiano Magyar Melayu Nederlands Norsk Polski Português Suomi Svenska Türkçe z z z z 37 LCD Brightness z z z z LCD Screen Dimmer A On B Off z z z ...

Page 157: ...e on or off Time Zone DST S home time zone or V travel time zone New York list of world time zones U DST adjustment Toggle on or off z z z z 37 Date Time Date Time Date Format Y M D M D Y D M Y Y year M month D day 24H Toggle on 24 hour clock or off 12 hour clock z z z z 36 Battery Info z z z z Control for HDMI 1 A On B Off z z z z HDMI 1080p Output 1 A On B Off z z z z HDMI Status Video Output Au...

Page 158: ...ting Dimming the LCD screen does not affect the brightness of your record ings or the brightness of the playback image on a TV When the screen dimmer is set to B Off the LCD screen will return to the brightness level that was in use before the screen was dimmed LCD Mirror Image When set to A On you can rotate the LCD panel 180 degrees to let the subject check the image while you record While the L...

Page 159: ... a fixed position and you want to keep recording video with the LCD panel closed in order to conserve the battery s power Battery Info Displays a screen where you can verify the battery charge as a percentage and the remaining recording time mode or playback time mode Control for HDMI Activates the HDMI CEC Consumer Electronics Con trol function When you connect the camcorder to an HDTV compatible...

Page 160: ...rts the 1080p standard using the supplied HDMI cable your video recordings made in 1080i will be converted and output as 1080p HDMI Status Displays a screen where you can verify the standard of the output signal from the HDMI OUT terminal Distance Units Selects the units to use for the focusing distance display during manual focus Demo Mode The demonstration mode displays the camcorder s main feat...

Page 161: ...Face detection frame 0 93 4 Touch Track frame 0 94 5 Control button PHOTO Take a photo 0 46 84 118 6 Control button Return to the list of story scenes 0 65 7 Memory operation 0 164 8 Image stabilizer 0 90 9 Remaining battery time 0 164 A q Zoom 0 52 A a Recording mode 0 85 A s Current story scene category 0 65 A d Recommended scene length 0 65 A f Decoration 0 69 COPY ...

Page 162: ...4 7 On the memory card f In the built in memory 3 5 Relay recording 0 43 only S j Tele macro 0 101 S k Image effects 0 103 S l Microphone attenuator 0 152 D q External audio input 0 108 D a Headphone output 0 109 D s Control button Last function used ZOOM in this case D d Level marker 0 152 D f Conversion lens Tele converter shown 0 151 D g Wind screen off 0 152 D h Directionality of the optional ...

Page 163: ...ode 0 116 153 F k Volume and background music balance controls 0 57 78 Viewing Photos F l Control button MENU Open the setup menus 0 149 G q Control button Edit Open the Edit panel 0 149 G a Current photo Total number of photos G s Photo number 0 155 G d Control button g Photo jump 0 122 G f Control button A Slideshow 0 124 G g Control button Q Return to the Photos index screen 0 121 COPY ...

Page 164: ... you attach an empty battery pack the power may turn off without displaying Depending on the conditions under which the camcorder and the battery pack are used the actual battery charge may not be indicated accurately When the camcorder is off press R to display the charge status of a battery pack The Intelligent System will display the charge status as a percentage and the remaining recording tim...

Page 165: ... camcorder is off so charging can start The temperature of the battery pack is outside its operating range approximately 0 40 C 32 104 F Remove the battery pack warm it or let it cool down as necessary and try charging it again Charge the battery pack in temperatures between approximately 0 C and 40 C 32 F and 104 F Power supply Is the battery charged Is the compact power adapter correctly con nec...

Page 166: ...emory 0 44 to free some space The point where g was pressed does not match the beginning end of the recording There is a slight interval between pressing g and the actual start end of record ing This is not a malfunction The camcorder will not focus Autofocus does not work on the subject Focus manually 0 99 The lens or Instant AF sensor is dirty Clean the lens or sensor with a soft lens cleaning c...

Page 167: ... cannot capture video snapshot scenes from scenes recorded or edited using another device The memory is full Delete some recordings 0 61 123 to free some space When playing back scenes slideshow with background music the music track is not played back correctly This can occur when you transfer the music files to a memory card after repeatedly recording and deleting scenes fragmented memory Save yo...

Page 168: ...ace on the memory card Even after stopping recording the ACCESS indicator does not go off The scene is being recorded in the memory This is not a malfunction p appears on the screen The camcorder has become hot while in the Underwater or Surface recording program Turn off the camcorder and let it cool down The red ON OFF CHG indicator flashes rapidly one flash at 0 5 second intervals Charging has ...

Page 169: ...ices that emit strong electromagnetic fields plasma TVs cellular phones etc Horizontal bands appear on the screen This is a phenomenon typical of CMOS image sensors when recording under some types of fluorescent mercury or sodium lamps To reduce the symptoms set the recording program to Programmed AE or Shutter Pri AE 0 96 This is not a malfunction No picture appears on the viewfinder Press to act...

Page 170: ...rs have reached their maximum value Set 88 Photo Num bering to Reset and insert a new memory card The wireless controller will not work Set 68 Wireless Remote Control to On Replace the battery of the wireless controller Cannot upload files wirelessly using an Eye Fi card You may have inserted the Eye Fi card into memory card slot X Insert it into memory card slot Y 68 Eye Fi Communication is set t...

Page 171: ... then restore the connection or turn the camcorder off and then on again The camcorder is connected using the supplied HDMI cable but HDMI CEC does not work cannot play back using the TV s remote control Disconnect the HDMI cable and turn off the camcorder and the TV After a short while turn them on again and restore the connection 68 Control for HDMI is set to Off Set it to On HDMI CEC is not act...

Page 172: ...built in memory is full f End appears on the screen Delete some recordings 0 61 123 to free some space Alternatively save your recordings 0 134 and initialize the built in memory 0 44 Built in memory writing error Attempt recovering the data This message will appear the next time you turn on the camcorder if power supply was acci dentally interrupted while the camcorder was writing to the built in...

Page 173: ...y is corrupted Canvas data cannot be read from canvas files created using other devices Cannot play back There is a problem with the memory If this message appears often without apparent reason contact a Canon Service Center Cannot play back Cannot access the built in memory There is a problem with the built in memory Save your recordings 0 134 and initialize the built in memory using the Complete...

Page 174: ... memory card Movies cannot be recorded on a 64 MB or smaller memory card Use a recommended mem ory card 0 39 Cannot record movies on this memory card Initialize only using the camcorder The memory card in the camcorder was initialized using a computer Initialize the memory card with this camcorder 0 44 Cannot save the canvas Cannot save your Pens and Stamps drawings on the memory Save your recordi...

Page 175: ...he supplied USB cable the camcorder cannot be operated Disconnecting the USB cable or power source while this message appears may result in permanent loss of the recordings in the camcorder Use the computer s Safely Remove Hardware function to end the connection and disconnect the USB cable before using the camcorder To be able to write back scenes and to transfer music files to the camcorder powe...

Page 176: ...accidental erasure Change the posi tion of the LOCK switch Need to recover files from the memory card Change the position of the LOCK switch on the memory card This message will appear the next time you turn on the camcorder if power supply was acci dentally interrupted while the camcorder was writing on the memory card and later the posi tion of the card s LOCK switch was changed to prevent erasu...

Page 177: ...rded with another device using 24p frame rate When converting scenes to SD leave out scenes recorded using another devices Some scenes could not be deleted Movies that were protected edited with other devices cannot be deleted with this camcorder Some scenes were recorded using another device and cannot be copied Scenes that were not recorded with this camcorder cannot be copied to memory card Y T...

Page 178: ...scenes from a story the maximum total playback time of the scenes to be converted is 2 hours and 30 minutes Reduce the number of scenes to be converted to SD Unable to recognize the data You transferred data to the camcorder recorded using a video configuration that is not sup ported PAL or SECAM Play back the recordings with the device originally used to record them Unable to recover data Could n...

Page 179: ...itive layer beneath it Do not attach protective film on the touch screen The touch screen s operation is based on detecting applied pressure so you may not be able to correctly operate the touch screen with an additional protective layer Do not leave the camcorder in places subject to high temperatures like the inside of a car parked under direct sunlight or high humidity Do not use the camcorder ...

Page 180: ...cal assistance immediately Handle the supplied stylus pen with extreme care and keep it out of the reach of children If mishandled the stylus pen can present a risk of severe eye injury and even blindness Long term storage If you do not intend to use the camcorder for a long time store it in a place free of dust in low humidity and at temperatures not higher than 30 C 86 F Battery Pack Dirty termi...

Page 181: ...acks that are not genuine Canon battery packs will not be charged even if you attach them to this camcorder or to the optional CG 800 Battery Charger We recommend using genuine Canon battery packs bearing the Intelligent System mark If you attach to the camcorder battery packs that are not genuine Canon battery packs will appear and the remaining battery time will not be displayed Memory Card We r...

Page 182: ...al erasure of the card s con tent To write protect the memory card set the switch to the LOCK position Built in Rechargeable Lithium Battery The camcorder has a built in rechargeable lithium battery to keep the date time and other settings The built in lithium battery is recharged while you use the camcorder however it will discharge completely if you do not use the camcorder for about 3 months To...

Page 183: ...he built in memory only or memory card using the Complete Initialization option 0 44 Fill it up with unimportant recordings and then initialize it again using the same option This makes recovering the original recordings very difficult WARNING The battery used in this device may present a fire or chemical burn hazard if mishandled Do not disassemble modify immerse in water heat above 100 C 212 F o...

Page 184: ... Clean the LCD touch screen using a clean soft lens cleaning cloth Condensation may form on the surface of the screen when the temper ature changes suddenly Wipe it with a soft dry cloth Condensation Moving the camcorder rapidly between hot and cold temperatures may cause condensation water droplets to form on its internal surfaces Stop using the camcorder if condensation is detected Continued use...

Page 185: ...r adapter to operate the camcorder and to charge battery packs in any country with power supply between 100 and 240 V AC 50 60 Hz Consult a Canon Service Center for information on plug adapters for overseas use Playback on a TV Screen You can only play back your recordings on TVs compatible with the NTSC system NTSC is used in the following regions countries Americas All of North America and Centr...

Page 186: ...s not listed below are described in more detail in the following pages 1 SS 600 SS 650 Shoulder Strap A k ZR 1000 Zoom Remote Controller 2 WS 20 Wrist Strap A l ZR 2000 Zoom Remote Controller 3 WL D89 Wireless Controller S q HTC 100 S or HTC 100 HDMI Cable 6 CA 570 Compact Power Adapter S a DTC 100 D Terminal Cable A q Memory card S s CTC 100 Component Cable A a IFC 300PCU S or IFC 300PCU USB Cabl...

Page 187: ...xternal design of the camcorder When you use battery packs bearing the Intelligent System mark the camcorder will communicate with the battery and display the remaining usage time accurate to 1 minute You can only use and charge these battery packs with camcorders and chargers compatible with Intelligent System Use of genuine Canon accessories is recommended This product is designed to achieve exc...

Page 188: ...ngs when using the brighter screen settings etc Using the built in memory Battery pack BP 808 BP 809 BP 819 BP 827 Charging conditions Using the camcorder 150 min 260 min 385 min Using the CG 800 Battery Charger 105 min 190 min 260 min Battery pack Recording mode Recording maximum Recording typical Playback LCD Viewfinder LCD Viewfinder LCD BP 808 BP 809 MXP 120 min 120 min 75 min 80 min 185 min F...

Page 189: ...5 min FXP 120 min 120 min 75 min 80 min 185 min XP 125 min 125 min 80 min 80 min 190 min SP 125 min 125 min 80 min 80 min 195 min LP 125 min 125 min 80 min 80 min 195 min BP 819 MXP 235 min 250 min 145 min 155 min 375 min FXP 240 min 250 min 150 min 160 min 375 min XP 250 min 255 min 160 min 165 min 385 min SP 255 min 260 min 160 min 165 min 390 min LP 255 min 260 min 160 min 165 min 390 min BP 82...

Page 190: ... perspective for indoor shots or panoramic views 9 FS H43U II Filter Set Neutral density and MC protector filters help you to control difficult lighting condi tions A s WM V1 Wireless Microphone Reliably record rich sound even when shooting subjects at a distance The transmitter is conveniently equipped with a clothing clip and the receiver can be attached to the camcorder s grip belt A d SM V1 Su...

Page 191: ...h VFL 2 Video Flash Light This video flash light allows you to record photos and movies even at night or in dark places It attaches to the cam corder s mini advanced shoe for cable free operation The VFL 2 cannot be used as a flash with this camcorder A j RA V1 Remote Control Adapter Attaching this adapter to the mini advanced shoe allows you to use the optional ZR 2000 or ZR 1000 Zoom Remote Cont...

Page 192: ...g Case A handy camcorder bag with padded compartments and plenty of space for accessories This mark identifies genuine Canon video accessories When you use Canon video equipment we recommend Canon brand accessories or products bearing the same mark COPY ...

Page 193: ...3 Wide converter 2072B001AA FS H43U II Filter Set 7150A004AA VL 5 Video Light 3186B001AA VFL 2 Video Flash Light 3574B001AA WM V1 Wireless Microphone 5068B001AA SM V1 Surround Microphone 4464B001AA DM 100 Directional Stereo Microphone 2591B002AA RA V1 Remote Control Adapter 3924B001AA ZR 1000 Zoom Remote Controller 3089A002AA ZR 2000 Zoom Remote Controller 0973B002AA WP V3 Waterproof Case 5090B002...

Page 194: ... PF24 PF30 frame rate are converted and recorded on the memory as 60i Recording Media Built in memory 32 GB 16 GB SD SDHC SD High Capacity or SDXC SD eXtended Capacity memory card not included Maximum Recording Time 32 GB built in memory MXP mode 2 hr 55 min FXP mode 4 hr 10 min XP mode 5 hr 45 min SP mode 9 hr 35 min LP mode 12 hr 15 min 16 GB built in memory MXP mode 1 hr 25 min FXP mode 2 hr 5 ...

Page 195: ... Stabilizer Size of Video Recordings MXP FXP mode 1920 x 1080 pixels XP SP LP mode 1440 x 1080 pixels Size of Photos 1920 x 1080 pixels Terminals AV OUT X Terminal 3 5 mm minijack output only dual purpose terminal also for headphones stereo output Video 1 Vp p 75 Ω unbalanced Audio 10 dBV 47 kΩ load 3 kΩ or less USB Terminal mini B USB 2 0 Hi Speed USB COMPONENT OUT Terminal proprietary mini D ter...

Page 196: ...e image effects Minimum focusing distance from the waterproof case lens window In the water approx 75 cm 2 5 ft at full telephoto approx 5 cm 2 in at full wide angle In the air approx 1 m 3 3 ft at full telephoto approx 5 cm 2 in at full wide angle CA 570 Compact Power Adapter Power supply 100 240 V AC 50 60 Hz Rated output consumption 8 4 V DC 1 5 A 29 VA 100 V 39 VA 240 V Operating temperature 0...

Page 197: ...MUSIC_01 WAV to MUSIC_99 WAV About the image files for the Image Mix function The specifications of image files that can be used with the image mix function are as follows Image size 1920x1080 pixels File type Baseline JPEG Color sampling 4 2 2 or 4 2 0 Image files are saved in the memory under the following folders In the built in memory CANON MY_PICT MIX_01 JPG to MIX_99 JPG On the memory card C...

Page 198: ...rder supplemental disc 19 Capturing photos video snapshot scenes from a movie 117 Chroma key 73 CINEMA mode 67 Cinema look filters 67 COMPONENT OUT terminal 126 128 Condensation 184 Connections to external devices 127 Copying recordings to a memory card 131 D Data code 116 153 Date and time 36 Decoration 69 Deleting Movies 61 Photos 123 Dividing scenes 119 E Edit panel 34 148 Editing stories 81 82...

Page 199: ...rt 53 R Rating scenes 48 76 Recording Movies 46 67 84 Photos 46 84 Recording mode 85 Recording programs 87 96 Recording time 86 Relay recording 43 Remote sensor 26 Resetting all camcorder settings 169 Reviewing recordings 85 S Saving recordings 131 Transferring to a computer 134 Using external video recorders 138 Selecting the memory for playback 59 for recording 42 Self timer 104 Serial number 22...

Page 200: ...ogram 89 Uploading movies to video sharing Web sites 139 USB terminal 126 129 138 V Video snapshot 68 Viewfinder 31 Volume 57 W White balance 102 Wide angle 51 Wind screen 152 Wireless controller 26 Z Zoom 51 Digital zoom 151 Zoom speed 51 149 only COPY ...

Page 201: ...e Canon USA shall have no responsibility under this limited warranty for use of the Equipment in conjunction with incompatible peripheral equipment and incompatible software In order to obtain warranty service contact the authorized Canon retail dealer from whom you purchased the Equipment or call the CANON INFORMATION CENTER AT 1 800 OK CANON You will be directed to the nearest service facility f...

Page 202: ...AUSING THE ALLEGED DAMAGE WITHOUT LIMITING THE FOREGOING YOU ASSUME ALL RISK AND LIABILITY FOR LOSS DAMAGE OR INJURY TO YOU AND YOUR PROPERTY AND TO OTHERS AND THEIR PROPERTY ARISING OUT OF USE MISUSE OR INABILITY TO USE THE EQUIPMENT NOT CAUSED DIRECTLY BY THE NEGLIGENCE OF CANON USA SOME STATES DO NOT ALLOW THE EXCLUSION OR LIMITATION OF INCIDENTAL OR CONSEQUENTIAL DAMAGES SO THE ABOVE LIMITATIO...

Page 203: ...nish of the Equipment media nor does it apply to Equipment purchased outside Canada If the Equipment contains a hard disk drive Canon Canada recommends that data stored on that drive be duplicated or backed up to prevent its loss in the event of a failure or other malfunction of such drive TO OBTAIN WARRANTY SERVICE Ship your Equipment in its original carton box or equivalent properly packed fully...

Page 204: ...Si vous avez des questions veuillez téléphoner 1 800 OK CANON 1 800 652 2666 sans frais au Canada seulement MÉXICO CANON MEXICANA S DE RL DE CV Blvd Manuel Ávila Camacho No 138 Piso 17 Col Lomas de Chapultepec C P 11000 México D F México CANON U S A INC NEW JERSEY OFFICE 100 Jamesburg Road Jamesburg NJ 08831 USA CENTRO Y CANON LATIN AMERICA INC SURAMÉRICA 703 Waterford Way Suite 400 Miami FL 33126...

Reviews: