background image

Basic Video Window Functions

21

2

Wo

rking

with

Video

Windo

ws

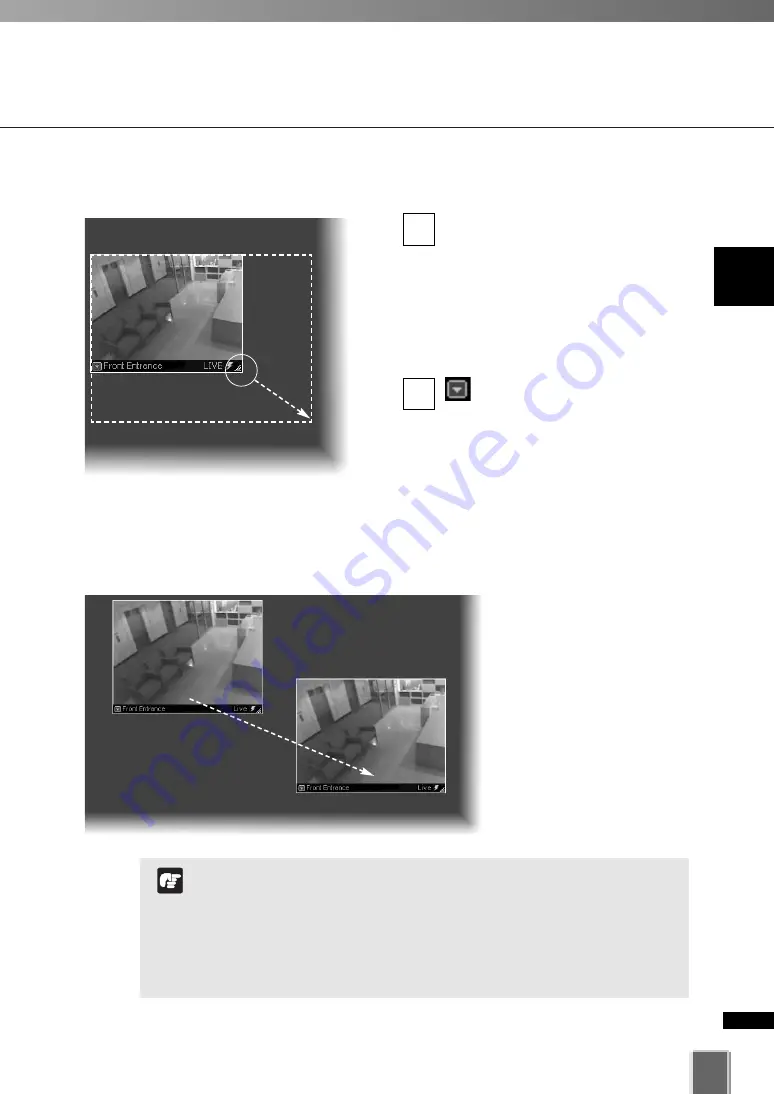
Re-size a Video Window

Click a Video Window to highlight it.
An arrow icon will appear in the
lower right corner. Click the arrow
icon and drag outwards. You can
also click on the other corners and
drag to re-size the window.
Release the mouse button when you
have reached the desired size.

Alternatively, click the Video

Window menu button and select

Video Display Size

. Select 

Small

,

Medium

Large

, or 

Default

from the

sub-menu.
A right-click action on the Video
Window will also bring up the same
menu.

Move a Video Window

Click anywhere on a Video
Window and drag it to any
position in the Viewing Area.

2

1

For best performance on the Viewer, such as to view as many
Video Windows as possible, re-size the Video Windows to a
standard resolution (for example, 160 x 120, 320 x 240, 640 x
480).

When Video Windows that are other than a standard
resolution are displayed, the load on the computer CPU will be
high and Viewer operations may take longer.

Note

Summary of Contents for VK-64

Page 1: ...1 3 Network Video Recorder VK K K 64 4 4 VK K K 16 Network Camera Recording and Monitoring System Viewer Manual In addition to Viewer Manual and Setting Manual Administrator s Manual is also availabl...

Page 2: ...ree with it before using the product Support Information For various types of information relating to support including updated product software patch installer User s Manual operating environment etc...

Page 3: ...ing Multiple Video Windows 23 Video Window States 24 Video Window Properties include 24 About Video Window states 24 Adjust Pan Tilt and Zoom 26 Viewing Live Video Adjusting Pan Tilt and Zoom 26 Other...

Page 4: ...Viewing and Searching Events 45 Displaying the Live Events Log List 46 Overview of Alert Parameters 46 Searching Events 47 Selecting Criteria for Searching 48 Viewing found events 49 Index 51 Content...

Page 5: ...ction data from multiple camera servers The Viewer can display videos from multiple camera servers in real time and play back videos recorded on the Storage Server This manual explains how to use the...

Page 6: ...6...

Page 7: ...Chapter 1 Using the Viewer Operator Login This chapter outlines how to start the Viewer and gives a brief overview of the Viewing Screen...

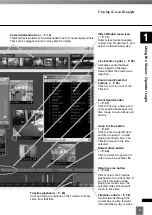
Page 8: ...f enabled Viewing Area for Video Windows P 14 The Video Windows are arranged here Video Windows can be re sized They can also be arranged into a uniform grid Playback controls P 38 Click the VCR like...

Page 9: ...ct a segment of video to save as another file Zoom In and Zoom Out buttons P 38 Click to zoom in or out of the Timeline Live Events Log list P 45 Indicates events that have been logged on Storage Serv...

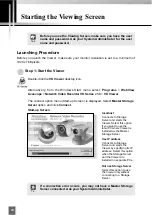
Page 10: ...erver and starts the Viewer Select this option if you want to use the local PC where Viewer is installed as the Master Storage Server The connect option menu Start up Screen is displayed Select Master...

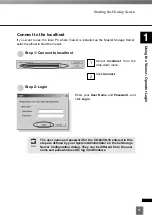
Page 11: ...nfiguration dialog They can be different from the user name and password used to log into Windows Note Connect to the localhost If you want to use the local PC where Viewer is installed as the Master...

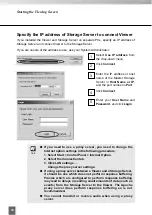
Page 12: ...ing small amounts of data such as events from the Storage Server to the Viewer The Apache proxy server does perform response buffering so is not recommended You cannot transmit or receive audio when u...

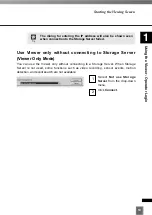
Page 13: ...rver failed Tip Use Viewer only without connecting to Storage Server Viewer Only Mode You can use the Viewer only without connecting to a Storage Server When Storage Server is not used some functions...

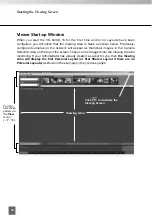
Page 14: ...pear as thumbnail images in the Camera Selection Area on the top of the screen These can be dragged onto the Viewing Area for monitoring If your Administrator has already created a Layout for you then...

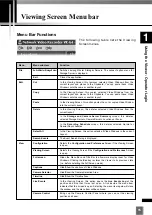
Page 15: ...In the Recording Schedule screen this deletes selected Normal or Special Day schedules Select All In the Viewing Screen this action selects all Video Windows in the current Layout Search Events The E...

Page 16: ...udio Status bar Shows or hides the captions of the status bar The status bar displays load information for the Viewer i e total frame rate CPU number of displayed events number of Video Windows Help A...

Page 17: ...Chapter 2 Working with Video Windows This chapter shows you how to create Video Windows for viewing in the Viewing Area and how to adjust camera angles...

Page 18: ...ocation will appear Depending on the number of cameras in the selected Location a scrollbar at the bottom of the Camera Selection Area can be used to scroll the display of thumbnails Thumbnail images...

Page 19: ...ernatively click the scrollbar located under the Camera Selection Area Drag it to the right until the desired Zone is displayed Selecting Locations and their Zones Selection is performed in the follow...

Page 20: ...eously Click and drag a camera thumbnail onto the Viewing Area Click the thumbnail image and while holding down the mouse button drag its boundary anywhere onto the Viewing Area Release the mouse butt...

Page 21: ...select Video Display Size Select Small Medium Large or Default from the sub menu A right click action on the Video Window will also bring up the same menu Move a Video Window Click anywhere on a Vide...

Page 22: ...o Windows in the Viewing Area Ask your System Administrator Basic Video Window Functions In the Viewer the number of Video Windows you can display simultaneously will depend on your video card the res...

Page 23: ...Windows and drag a selection box around the Video Windows you want selected as shown below Only windows contained within the area of selection are selected Dragging around part of an image will not s...

Page 24: ...ra live or recorded viewing Video display displays live or recorded information Pre recorded video indicator displays a time date stamp in the title bar for recorded footage Event indicator displays a...

Page 25: ...splay conditions For recorded video the time date indicator may not fully display if the Video Window size has been reduced Event Indicator If the option for Operator Notification has been set a color...

Page 26: ...ssage will appear You may have to wait a few moments and attempt to get control later Move the mouse cursor around the Video Window Arrows will appear in the cursor position when you have gained contr...

Page 27: ...he clicked position becomes the center of the image Alternatively you can move or zoom in out the yellow scope to perform the pan tilt and zoom operation If the digital zoom is enabled by the Camera S...

Page 28: ...disables backlight compensation Clicking this button enables low level backlight compensation Clicking this button enables mid level backlight compensation Clicking this button enables high level bac...

Page 29: ...sing the camera under a halogen or incandescent lighting Manual Drag each slide bar to adjust each gain value R or B gain To forcibly adjust the white balance capture a white object e g a piece of whi...

Page 30: ...ck a Video Window or select Get Camera Control from the Video Window menu From the Video Window menu click Preset Camera Angles Select a preset position from the sub menu 3 2 1 When you have finished...

Page 31: ...ect a video size received by the Viewer To change the size of received video via the menu Open the Video Window menu and select Video Receive Size Click the Video window menu icon or right click in th...

Page 32: ...ith Shade Correction To enable backlight compensation While Camera Control is active select Backlight Compensation Click menu bar of the Video window or right click in the Video Window to bring up a c...

Page 33: ...B C50iR or VB C50FSi Refer to your VB C300 VB C50i VB C50iR or VB C50FSi User s Manual for more information on the audio settings Click Close Window to close the Video Window that is currently selecte...

Page 34: ...rection Shade Correction compensates darker regions of images and makes them lighter Correction only applies to the displayed Video Window in the Viewer Shade Correction Off Shade Correction High Dark...

Page 35: ...ted while transmitting audio For a silent interval network load can be mitigated by reducing data to transmit Tick this option to detect silent intervals with predefined sensitivity Tick this option t...

Page 36: ...36...

Page 37: ...sing the Timeline and Viewing Events This chapter shows you how to use the Timeline for live and pre recorded viewing as well as view and search events If you are using the Viewer only you can skip th...

Page 38: ...oves the Playhead to the event and the associated Video Window is switched to playback mode Click in this area of the Playhead shaft and drag to positions on the Timeline Previous Event Rewind Nudge B...

Page 39: ...Timeline When a Video Window is created from a camera thumbnail video is seen live The Playhead shown below will be in a live position The live position represents the present time The Playhead remain...

Page 40: ...t have been selected Click in the Event Display Area of the Timeline Click in the Event Display Area of the Timeline The Playhead will move to that location and playback of recorded video commences fr...

Page 41: ...day and or time Click OK The Playhead and Timeline will move to the time selected If no Video Windows are selected only the timeline is moved Using the calendar is shown below 3 2 1 Click to scroll ba...

Page 42: ...frame rate Extended recording time will use additional disk space on the Storage Server Excessive use of this function should not be performed without first checking with an administrator The Record N...

Page 43: ...time that is skipped is displayed in the Timeline as missing When gaining time rewinding the clock back from 02 00 to 01 00 the extra time is duplicated Skipped Time Duplicated Time Where Daylight Sav...

Page 44: ...t it then click and drag a time period for it in the Timeline Click Extract Video The Extract Video dialog opens In the Date field click each segment and overwrite with desired date Alternatively clic...

Page 45: ...64 VK 16 Re sizing the window to a custom size Click the corners or edges and drag the window out to a new size Release the mouse button When you launch the Viewer again the Live Events Log will retai...

Page 46: ...st Event type that has occurred Camera name where event occurred Date and time of event Location and Zone Acknowledging and Viewing Events A new event entry will appear at the top of the Live Events L...

Page 47: ...vent Search On the Timeline click Event Search The Event Search dialog opens Select a Location and Zone Enter a keyword for particular events Enter a search end date and time Enter a search start date...

Page 48: ...ely click the down arrow next to each date panel to bring up the calendar Click off the calendar to close it again In the Event Search dialog you can also scroll through time using the up down arrows...

Page 49: ...ne to return the Video Window to live viewing Note Step 4 Select a type of Event Select a type of Event from the drop down list Step 5 Select a State Select a State for the event whether it was On or...

Page 50: ...50...

Page 51: ...Index...

Page 52: ...Selecting a Preset Camera Angle 30 Shade Correction 34 Starting Viewing 10 Connect to the localhost 11 Specify the IP address of Storage Server to connect Viewer 12 Viewer Only Mode 13 T Timeline 38...

Page 53: ...53 Index...

Page 54: ...the CANON CANADA Customer Information Centre toll free at 1 800 OK CANON 652 2666 Canada only MEXICO CANON MEXICANA S DE R L DE C V Boulevard Manuel Avila Camacho No 138 PB Pisos 15 16 y 17 Col Lomas...

Reviews: