background image

Wireless File Transmitter

WFT-E1/E1A

Network Setup Guide

E

INSTRUCTION

MANUAL

Windows

Macintosh

For customers using the WFT-E1A

Although this manual refers to the WFT-E1, the setup procedures are the same for the WFT-E1A.

Compatible with WFT-E1 Utility Ver. 2

COP

Y

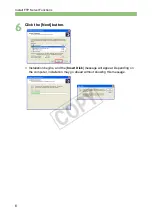
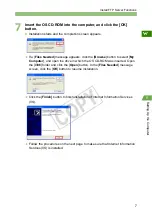
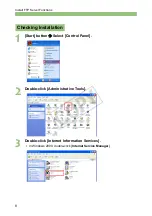
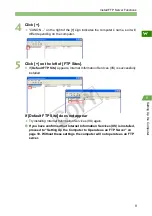
Summary of Contents for WFT-E1

Page 1: ...E1 E1A Network Setup Guide E INSTRUCTION MANUAL Windows Macintosh For customers using the WFT E1A Although this manual refers to the WFT E1 the setup procedures are the same for the WFT E1A Compatible with WFT E1 Utility Ver 2 COPY ...

Page 2: ...he FTP server by a wireless LAN or a wired LAN This manual contains explanations for Windows and Macintosh systems along with troubleshooting methods and references Click an item in the table of contents below to view the page This manual assumes that you have read the camera s instruction manual and are familiar with camera operating procedures The menu screens are based on the EOS 1Ds Mark II Ta...

Page 3: ...ng Up the Computer to Operate as an FTP Server 10 Changing Firewall Settings 12 For Windows XP users Follow the procedures below to restore the classic view in the Control Panel Click the Start button select Control Panel to open the Control Panel window and click Switch to Classic View Windows COPY ...

Page 4: ...lthough this chapter uses Windows XP screenshots the procedure is the same for Windows 2000 If IIS is already installed proceed to the next item Setting Up the Computer to Operate as an FTP Server Windows XP Home Edition is not compatible with Internet Information Services Be sure to use Windows XP Professional Do not insert the Windows XP CD ROM into the computer until step 7 1 Start button Æ Sel...

Page 5: ...d will appear 4 Double click Internet Information Services IIS X Internet Information Services IIS details will appear 5 Check File Transfer Protocol FTP Service X Check marks will also be placed in Internet Information Services Snap in and Common Files as well Click the OK button to return to the Windows Components Wizard COPY ...

Page 6: ...6 Install FTP Server Functions 6 Click the Next button X Installation begins and the Insert Disk message will appear Depending on the computer installation may go ahead without showing this message COPY ...

Page 7: ...lick the Browse button to select My Computer and open the drive in which the OS CD ROM was inserted Open the i386 folder and click the Open button In the Files Needed message screen click the OK button to resume installation Click the Finish button to finish installation of Internet Information Services IIS Follow the procedures on the next page to make sure that Internet Information Services IIS ...

Page 8: ...Server Functions 1 Start button Æ Select Control Panel 2 Double click Administrative Tools 3 Double click Internet Information Services In Windows 2000 double click Internet Service Manager Checking Installation COPY ...

Page 9: ...s X If Default FTP Site appears Internet Information Services IIS is successfully installed If Default FTP Site does not appear Try installing Internet Information Services IIS again If you have confirmed that Internet Information Services IIS is installed proceed to Setting Up the Computer to Operate as an FTP Server on page 10 Without these settings the computer will not operate as an FTP server...

Page 10: ...10 1 Start button Æ Select Control Panel 2 Double click Administrative Tools 3 Double click Services SettingUptheComputertoOperateasanFTPServer COPY ...

Page 11: ...Automatic your computer will operate as an FTP server In Windows 2000 IIS Admin appears as IIS Admin Service If the settings are not configured as above Double click Properties select Automatic for Startup type and click the Apply button Then click the Start button in Service status X A Service Control startup screen will appear Click the OK button in Properties to finish the settings c d e COPY ...

Page 12: ...ows XP Service Pack 2 images may not be transferred if the Windows firewall is on so you need to change the settings of the Windows firewall 1 Start button Æ Select Control Panel 2 Double click Windows Firewall X Windows Firewall will appear X Select On recommended Changing Firewall Settings COPY ...

Page 13: ... to the computer or Wireless Network Connection if you use a wireless connection and click the Settings button X Advanced Settings will appear 4 Check FTP Server X If Service Settings appears click the OK button without changing anything X Click the OK button in Advanced Settings and click the OK button in Windows Firewall to finish the settings COPY ...

Page 14: ...14 MEMO COPY ...

Page 15: ... Setting Up the WFT E1 24 Checking the Connection Status 26 Transferring Images to the FTP Server 27 Viewing Transferred Images on the FTP Server 28 Infrastructure Mode Overview Images are transmitted to an FTP server via a wireless LAN access point Connect a wireless LAN access point to an FTP server using a LAN cable wireless LAN card or wireless LAN adapter FTP server Wireless LAN access point ...

Page 16: ...ady connected to the FTP server by a wireless LAN or a wired LAN 1 Start button Æ Select Control Panel 2 Double click Administrative Tools 3 Double click Internet Information Services In Windows 2000 double click Internet Service Manager Setting Up the FTP Server COPY ...

Page 17: ...ON on the right of the sign indicates the computer s name so it will differ depending on the computer 5 Click on the left of FTP Sites X Default FTP Site will appear 6 Right click Default FTP Site and select Properties X Default FTP Site Properties will appear COPY ...

Page 18: ... you do not need to change it Security Accounts You do not need to change it Important Never change the Username Username in the left window is an example The characters following IUSR_ indicate the computer s name so they will differ depending on your computer Home Directory Assign a folder to transfer images to in the Local Path of the FTP Site Directory Create an EOS folder immediately under th...

Page 19: ...t is recommended not to use it Operating mode wireless mode 802 11 mode and other modes fall under this category Select 802 11b 802 11g or Automatic It is also known as the ESSID Enter a series of alphanumeric characters up to 36 characters If a string is already entered you do not need to change it Enter the same SSID in the WFT E1 Encryption and other items fall under this category Set up WEP as...

Page 20: ...and subnet mask as follows If they are already entered do not change them and write down the IP addresses configured in the wireless LAN access point and the FTP server the subnet mask and the range of IP addresses available The information will be used when setting up the WFT E1 IP address Wireless LAN access point 192 168 11 1 FTP server 192 168 11 2 Subnet mask 255 255 255 0 Setting the IP Addr...

Page 21: ...to disable the DHCP server function in Setting the IP Address on the previous page enter the IP address among the allocated IP address in a range that is not duplicated with the FTP server or other network equipment Enter the subnet mask the same way as for the wireless LAN access point If the wireless LAN access point etc is set to enable the DHCP server function in Setting the IP Address on the ...

Page 22: ...FTP server enter anonymous for the Login name and enter wft e1 canon for the password Checking the IP address of the FTP server using the Command Prompt The FTP server s Start button Æ Select All Programs Æ Accessories Æ Command Prompt Input ipconfig all and press the Enter key X Wireless Network Connection status appears Autoconfiguration IP Address or IP Address is the IP address for the FTP ser...

Page 23: ...way as the security settings for the wireless LAN access point Under the File menu select Save to save the communication settings file to the memory card Save the settings file to the root directory of the memory card without changing the file name Setting Up a Wireless LAN If the IP address is referred to as the Autoconfiguration IP Address the wireless LAN access point may automatically change t...

Page 24: ...and download the settings file to the camera 1 Select Image transfer LAN settings from the menu Image transfer LAN settings will not appear unless the WFT E1 is connected to the camera and both are turned on 2 Select LAN setting 3 Select a set number Select the set number where the settings file is downloaded for infrastructure mode Setting Up the WFT E1 Selecting the Settings File COPY ...

Page 25: ...ucture Mode 1 Select Image transfer LAN settings from the menu Image transfer LAN settings will not appear unless the WFT E1 is connected to the camera and both are turned on 2 Select LAN type 3 Select Wireless Selecting the LAN Type COPY ...

Page 26: ... or less Successful connection display The 3 lamp and the 4 lamp on the WFT E1 will light up and the LCD panel will show the link speed Mbps and B After the period of time passes with no activity as set in the Power Saving menu the 4 lamp will turn off and the link speed and B will also disappear from the LCD panel Failed connection display The LCD panel will show E and an error number The B and 3...

Page 27: ... stored in the memory card so insert a memory card with adequate available space 1 Select Image transfer LAN settings from the menu Image transfer LAN settings will not appear unless the WFT E1 is connected to the camera and both are turned on 2 Select Automatic transfer 3 Select Enable 4 Take a picture X The 4 lamp will blink and captured image will be transferred to the FTP server Transferring I...

Page 28: ... in the folder on the FTP server that was created on page 18 1 Start button Æ Select My Computer 2 Double click the Local disk C icon in Hard Disk Drives 3 Double click the EOS folder Viewing Transferred Images on the FTP Server COPY ...

Page 29: ...e A folder The A folder contains images saved in the CF card If the images saved in the SD card have been transferred a B folder is automatically created and images will be saved there 5 Double click the DCIM folder 6 Double click the CANON the EOS1D or the EOS5D folder X Transferred image data will appear COPY ...

Page 30: ...30 MEMO COPY ...

Page 31: ...hecking the Connection Status 43 Transferring Images to the FTP Server 44 Viewing Transferred Images on the FTP Server 45 Ad Hoc Mode Overview Images are directly transmitted to an FTP server equipped with a wireless LAN card or a wireless LAN adapter Install drivers for a wireless LAN card or a wireless LAN adapter on an FTP server Wireless LAN adapter commercially available FTP server Windows CO...

Page 32: ...ck Network Connections In Windows 2000 double click Network and Dial up Connections 3 Right click Wireless Network Connection and select Properties X Wireless Network Connection Properties will appear Setting Up the FTP Server Setting the IP Address COPY ...

Page 33: ...ollowing numbers for IP address and Subnet mask IP address 192 168 11 2 Subnet mask 255 255 255 0 Click the OK button to return to the Wireless Network Connection Properties screen and proceed to SSID settings Important Set IP addresses for the FTP server and the WFT E1 as follows The following IP addresses are examples Set appropriate IP addresses according to your environment FTP server 192 168 ...

Page 34: ...ble In that case disable or uninstall the software that comes with the wireless LAN adapter 1 Double click the Wireless Networks tab Check Use Windows to configure my wireless network settings 2 Click the Advanced button The Advanced screen will appear Check Computer to computer ad hoc networks only and click the Close button SSID Settings COPY ...

Page 35: ...check from The key is provided for me automatically and set the tab as follows If the settings are done click the OK button to return to Wireless Network Connection Properties Make sure that EOSD Automatic appears for Preferred networks Click the OK button to finish the SSID settings Network name SSID EOSD Network Authentication Open Data encryption WEP Network key canon Confirm network key canon ...

Page 36: ...the FTP Server 1 Start button Æ Select Control Panel 2 Double click Administrative Tools 3 Double click Internet Information Services In Windows 2000 double click Internet Service Manager Setting Up the FTP Site COPY ...

Page 37: ...n the right of the sign indicates the computer s name so it will differ depending on the computer 5 Click on the left of FTP Sites X Default FTP Site will appear 6 Right click Default FTP Site and select Properties X Default FTP Site Properties will appear COPY ...

Page 38: ... you do not need to change it Security Accounts You do not need to change it Important Never change the Username Username in the left window is an example The characters following IUSR_ indicate the computer s name so they will differ depending on your computer Home Directory Assign a folder to transfer images to in the Local Path of the FTP Site Directory Create an EOS folder immediately under th...

Page 39: ... hoc mode Start WFT E1 Utility exe and set up as follows If the WFT E1 Settings Wizard appears click the Cancel button For the User checkmark Anonymous login To login to the FTP server enter anonymous for the Login name and enter wft e1 canon for the password Creating the WFT E1 Settings File Setting Up TCP IP Setting Up FTP COPY ...

Page 40: ...d SSID the SSID and connection method and channel will be set automatically to connect to the wireless LAN terminal As for Channel it does not matter which channel if Use Windows to configure my wireless network settings is checked p 34 If it is not checked use the same channel number as set by the driver or utility that comes with the wireless LAN card or the wireless LAN adapter Under the File m...

Page 41: ...n pages 16 through 24 and download the settings file to the camera 1 Select Image transfer LAN settings from the menu Image transfer LAN settings will not appear unless the WFT E1 is connected to the camera and both are turned on 2 Select LAN setting 3 Select Set No Select the Set No in which the ad hoc settings file is loaded Setting Up the WFT E1 Selecting the Settings File COPY ...

Page 42: ...1 Select Image transfer LAN settings from the menu Image transfer LAN settings will not appear unless the WFT E1 is connected to the camera and both are turned on 2 Select LAN type 3 Select Wireless Selecting the LAN Type COPY ...

Page 43: ...pter are close to each other 3m 9 8ft or less Successful connection display The 3 lamp and the 4 lamp on the WFT E1 will light up and the LCD panel will show the link speed Mbps and B After the period of time passes with no activity as set in the Power Saving menu the 4 lamp will turn off and the link speed and B will also disappear from the LCD panel Failed connection display The LCD panel will s...

Page 44: ...he memory card so insert a memory card with adequate available space 1 Select Image transfer LAN settings from the menu Image transfer LAN settings will not appear unless the WFT E1 is connected to the camera and both are turned on 2 Select Automatic transfer 3 Select Enable 4 Take a picture X The 4 lamp will blink and captured image will be transferred to the FTP server Transferring Images to the...

Page 45: ...re saved in the folder on the FTP server that was created on page 38 1 Start button Æ Select My Computer 2 Double click the Local disk C icon in Hard Disk Drives 3 Double click the EOS folder Viewing Transferred Images on the FTP Server COPY ...

Page 46: ...he A folder contains images saved in the CF card If the images saved in the SD card have been transferred a B folder is automatically created and images will be saved there 5 Double click the DCIM folder 6 Double click the CANON the EOS1D or the EOS5D folder X Transferred image data will appear COPY ...

Page 47: ...er 58 Viewing Transferred Images on the FTP Server 59 Wired LAN Overview Connect the WFT E1 to the FTP server with a LAN cable to transfer images When connecting the WFT E1 directly to the FTP server make sure to use a cross cable If a straight cable is used error No 81 will be displayed and you will not be able to transfer images When using a straight cable connect the FTP server and the WFT E1 v...

Page 48: ...le click Network Connections In Windows 2000 double click Network and Dial up Connections 3 Right click Local Area Connection and select Properties X Local Area Connection Properties will appear Setting Up the FTP Server Setting the IP Address COPY ...

Page 49: ...ing IP address and enter the following numbers for IP address and Subnet mask IP address 192 168 11 2 Subnet mask 255 255 255 0 Click the OK button to finish IP address settings Important Set IP addresses for the FTP server and the WFT E1 as follows The following IP addresses are examples Set appropriate IP addresses according to your environment FTP server 192 168 11 2 WFT E1 192 168 11 3 COPY ...

Page 50: ...the FTP Server 1 Start button Æ Select Control Panel 2 Double click Administrative Tools 3 Double click Internet Information Services In Windows 2000 double click Internet Service Manager Setting Up the FTP Site COPY ...

Page 51: ... the right of the sign indicates the computer s name so it will differ depending on the computer 5 Click on the left of FTP Sites X Default FTP Site will appear 6 Right click Default FTP Site and select Properties X Default FTP Site Properties will appear COPY ...

Page 52: ... you do not need to change it Security Accounts You do not need to change it Important Never change the Username Username in the left window is an example The characters following IUSR_ indicate the computer s name so they will differ depending on your computer Home Directory Assign a folder to transfer images to in the Local Path of the FTP Site Directory Create an EOS folder immediately under th...

Page 53: ...ired LAN Start WFT E1 Utility exe and set up as follows If the WFT E1 Settings Wizard appears click the Cancel button For the User checkmark Anonymous login To login to the FTP server enter anonymous for the Login name and enter wft e1 canon for the password Creating the WFT E1 Settings File Setting Up TCP IP Setting Up FTP COPY ...

Page 54: ...t necessary Under the File menu select Save to save the communication settings file to the memory card Save the settings file to the root directory of the memory card without changing the file name Setting Up a Wireless LAN Saving the Settings File COPY ...

Page 55: ...pages 16 through 24 and download the settings file to the camera 1 Select Image transfer LAN settings from the menu Image transfer LAN settings will not appear unless the WFT E1 is connected to the camera and both are turned on 2 Select LAN setting 3 Select Set No Select the Set No in which the wired LAN settings file is loaded Setting Up the WFT E1 Selecting the Settings File COPY ...

Page 56: ...1 Select Image transfer LAN settings from the menu Image transfer LAN settings will not appear unless the WFT E1 is connected to the camera and both are turned on 2 Select LAN type 3 Select Ethernet Selecting the LAN Type COPY ...

Page 57: ...Connect the FTP server and the WFT E1 and turn the power on Successful connection display The 3 lamp and the 4 lamp on the WFT E1 will light up and the LCD panel will show the C After the period of time passes with no activity as set in the Power Saving menu the 4 lamp will turn off and the C will also disappear from the LCD panel Failed connection display The LCD panel will show E and an error nu...

Page 58: ...he memory card so insert a memory card with adequate available space 1 Select Image transfer LAN settings from the menu Image transfer LAN settings will not appear unless the WFT E1 is connected to the camera and both are turned on 2 Select Automatic transfer 3 Select Enable 4 Take a picture X The 4 lamp will blink and captured image will be transferred to the FTP server Transferring Images to the...

Page 59: ...e saved in the folder on the FTP server that was created on page 52 1 Start button Æ Select My Computer 2 Double click the Local disk C icon in Hard Disk Drives 3 Double click the EOS folder Viewing Transferred Images on the FTP Server COPY ...

Page 60: ...he A folder contains images saved in the CF card If the images saved in the SD card have been transferred a B folder is automatically created and images will be saved there 5 Double click the DCIM folder 6 Double click the CANON the EOS1D or the EOS5D folder X Transferred image data will appear COPY ...

Page 61: ...T E1 Settings File 69 Setting Up the WFT E1 71 Checking the Connection Status 73 Transferring Images to the FTP Server 74 Viewing Transferred Images on the FTP Server 75 Infrastructure Mode Overview Images are transmitted to an FTP server via a wireless LAN access point Connect a wireless LAN access point to an FTP server using a LAN cable wireless LAN card or wireless LAN adapter FTP server Wirel...

Page 62: ...62 1 Apple Menu Æ Select System Preferences X The System Preferences screen will appear Click Sharing 2 Click the Services tab and check FTP Access SettingUptheComputertoOperateasanFTPServer COPY ...

Page 63: ...3 Double click the item in the Name section X A password entry screen will appear Enter the password for the base station and click the OK button X The base station settings screen will appear If an error message appears and settings cannot be loaded go to Applications then Utilities to start AirPort Setup Assistant to configure subsequent settings Setting Up the AirPort COPY ...

Page 64: ... settings on the AirPort tab as follows Enter EOSD for Name for Base Station and AirPort Network Click the Change password button enter canon in both textboxes and click the OK button Click the Change Wireless Security button select 40 bit WEP enter canon in both textboxes and click the OK button Setting Up the AirPort Tab COPY ...

Page 65: ...the Network tab Then select Other from the pull down menu Configure settings as follows and click the OK button If the settings are done click the Update button on the bottom right of the screen X The update execution screen will appear and if completed the base station settings screen will disappear Setting Up the Network Tab COPY ...

Page 66: ...66 1 Click Network 2 From the Show pull down menu select Network Port Configurations Check Built in Ethernet and click Apply Now Setting Up the Network COPY ...

Page 67: ...he Show pull down menu select Built in Ethernet Configure settings on the TCP IP tab as follows If the settings are done click the Apply Now button Do not close the Network window yet 4 Set Turn AirPort On Click the AirPort icon and select Turn AirPort On COPY ...

Page 68: ... Up the Network 5 From the Show pull down menu select AirPort 6 From the By default join pull down menu select A specific network 7 From the Network pull down menu select EOSD and click the Apply Now button COPY ...

Page 69: ... Utility and set up as follows If the WFT E1 Settings Wizard appears click the Cancel button Enter Login name and Login password the same way as for the Name and Password that appear when you select Apple Menu Æ System Preferences Æ Accounts Without these settings you cannot connect to the FTP server Creating the WFT E1 Settings File Setting Up TCP IP Setting Up FTP COPY ...

Page 70: ...t automatically to connect to the wireless LAN terminal In infrastructure mode you cannot connect if the authentication method is set to Open System Set it to Shared Key or WPA PSK If you set Wireless Security to 40 bit WEP on page 64 set Encryption to WEP the same for 128 bit WEP If you set canon as the Network Password check Character strings in Key format and enter canon for Key Click the Save ...

Page 71: ... through 24 and download the settings file to the camera 1 Select Image transfer LAN settings from the menu Image transfer LAN settings will not appear unless the WFT E1 is connected to the camera and both are turned on 2 Select LAN setting 3 Select a set number Select the set number where the settings file is downloaded for infrastructure mode Setting Up the WFT E1 Selecting the Settings File COP...

Page 72: ...1 Select Image transfer LAN settings from the menu Image transfer LAN settings will not appear unless the WFT E1 is connected to the camera and both are turned on 2 Select LAN type 3 Select Wireless Selecting the LAN Type COPY ...

Page 73: ...her 3m 9 8ft or less Successful connection display The 3 lamp and the 4 lamp on the WFT E1 will light up and the LCD panel will show the link speed Mbps and B After the period of time passes with no activity as set in the Power Saving menu the 4 lamp will turn off and the link speed and B will also disappear from the LCD panel Failed connection display The LCD panel will show E and an error number...

Page 74: ...he memory card so insert a memory card with adequate available space 1 Select Image transfer LAN settings from the menu Image transfer LAN settings will not appear unless the WFT E1 is connected to the camera and both are turned on 2 Select Automatic transfer 3 Select Enable 4 Take a picture X The 4 lamp will blink and captured image will be transferred to the FTP server Transferring Images to the...

Page 75: ...he user folder you logged in to 4 For the EOS 1D series double click the A folder The A folder contains images saved on the CF card If the images saved on the SD card have been transferred a B folder is automatically created and images will be saved there Viewing Transferred Images on the FTP Server COPY ...

Page 76: ...76 Viewing Transferred Images on the FTP Server 5 Double click the DCIM folder 6 Double click the CANON the EOS1D or the EOS5D folder X Transferred image data will appear COPY ...

Page 77: ...tting Up the WFT E1 85 Checking the Connection Status 87 Transferring Images to the FTP Server 88 Viewing Transferred Images on the FTP Server 89 Ad Hoc Mode Overview Images are directly transmitted to an FTP server equipped with a wireless LAN card or a wireless LAN adapter Install drivers for a wireless LAN card or a wireless LAN adapter on an FTP server Wireless LAN adapter commercially availab...

Page 78: ...e System Preferences screen will appear Click Sharing 2 Click the Services tab and check FTP Access When the settings are done click Show All on the upper left to return to the System Preferences screen SettingUptheComputertoOperateasanFTPServer COPY ...

Page 79: ...ork 2 From the Show pull down menu select Network Port Configurations Check AirPort and drag AirPort to move it to the top Click the Apply Now button Do not close the Network window yet Setting Up a Network Setting Up a Network COPY ...

Page 80: ...Click the AirPort icon and select Turn AirPort On 4 From the Show pull down menu select AirPort X The AirPort network settings screen will appear On the next page configure the settings on the AirPort tab and the TCP IP tab COPY ...

Page 81: ...work m 2 Ad Hoc Mode Configure the settings on the AirPort tab and the TCP IP tab as follows Enter canon for Password on the AirPort tab If the settings are done click the Apply Now button to close the Network window COPY ...

Page 82: ...select Create Network 2 Configure settings in the Computer to Computer window Click the Show Options button and set up as follows Enter canon for Password and Confirm If the settings are done click the OK button to close the window Creating a Network COPY ...

Page 83: ...and set up as follows If the WFT E1 Settings Wizard appears click the Cancel button Enter the Login name and Login password the same way as in the Name and Password that appear when you select Apple Menu Æ System Preferences Æ Accounts Without these settings you cannot connect to the FTP server Creating the WFT E1 Settings File Setting Up TCP IP Setting Up FTP COPY ...

Page 84: ... 82 enter EOSD for SSID For Channel set the same Channel as on page 82 If you set canon for the password enter canon for Key Click the Save button to save the settings file to a memory card Save the settings file to the root directory of the memory card without changing the file name Setting Up a Wireless LAN Saving the Settings File COPY ...

Page 85: ...n pages 16 through 24 and download the settings file to the camera 1 Select Image transfer LAN settings from the menu Image transfer LAN settings will not appear unless the WFT E1 is connected to the camera and both are turned on 2 Select LAN setting 3 Select Set No Select the Set No in which the ad hoc settings file is loaded Setting Up the WFT E1 Selecting the Settings File COPY ...

Page 86: ...1 Select Image transfer LAN settings from the menu Image transfer LAN settings will not appear unless the WFT E1 is connected to the camera and both are turned on 2 Select LAN type 3 Select Wireless Selecting the LAN Type COPY ...

Page 87: ...pter are close to each other 3m 9 8ft or less Successful connection display The 3 lamp and the 4 lamp on the WFT E1 will light up and the LCD panel will show the link speed Mbps and B After the period of time passes with no activity as set in the Power Saving menu the 4 lamp will turn off and the link speed and B will also disappear from the LCD panel Failed connection display The LCD panel will s...

Page 88: ...he memory card so insert a memory card with adequate available space 1 Select Image transfer LAN settings from the menu Image transfer LAN settings will not appear unless the WFT E1 is connected to the camera and both are turned on 2 Select Automatic transfer 3 Select Enable 4 Take a picture X The 4 lamp will blink and captured image will be transferred to the FTP server Transferring Images to the...

Page 89: ...ck the EOSD folder 4 For the EOS 1D series double click the A folder The A folder contains images saved on the CF card If the images saved on the SD card have been transferred a B folder is automatically created and images will be saved there Viewing Transferred Images on the FTP Server COPY ...

Page 90: ...90 Viewing Transferred Images on the FTP Server 5 Double click the DCIM folder 6 Double click the CANON the EOS1D or the EOS5D folder X Transferred image data will appear COPY ...

Page 91: ... Images to the FTP Server 100 Viewing Transferred Images on the FTP Server 101 Wired LAN Overview Connect the WFT E1 to the FTP server with a LAN cable to transfer images When connecting the WFT E1 directly to the FTP server make sure to use a cross cable If a straight cable is used error No 81 will be displayed and you will not be able to transfer images When using a straight cable connect the FT...

Page 92: ...references screen will appear Click Sharing 2 Click the Services tab and check FTP Access When the settings are done click Show All on the upper left to return to the System Preferences screen SettingUptheComputertoOperateasanFTPServer Setting Up Sharing COPY ...

Page 93: ...93 m 3 Wired LAN 1 Click Network 2 From the Show pull down menu select Network Port Configurations Check Built in Ethernet Click the Apply Now button Setting Up a Network COPY ...

Page 94: ...ll down menu select Built in Ethernet Configure settings on the TCP IP tab as follows If the settings are done click the Apply Now button to close the Network window 4 Set Turn AirPort Off Click the AirPort icon and select Turn AirPort Off COPY ...

Page 95: ...nd set up as follows If the WFT E1 Settings Wizard appears click the Cancel button Enter the Login name and Login password the same way as in the Name and Password that appear when you select Apple Menu Æ System Preferences Æ Accounts Without these settings you cannot connect to the FTP server Creating the WFT E1 Settings File Setting Up TCP IP Setting Up FTP COPY ...

Page 96: ...etting are not necessary Click the Save button to save the settings file to a memory card Save the settings file to the root directory of the memory card without changing the file name Setting Up a Wireless LAN Saving the Settings File COPY ...

Page 97: ...pages 16 through 24 and download the settings file to the camera 1 Select Image transfer LAN settings from the menu Image transfer LAN settings will not appear unless the WFT E1 is connected to the camera and both are turned on 2 Select LAN setting 3 Select Set No Select the Set No in which the wired LAN settings file is loaded Setting Up the WFT E1 Selecting the Settings File COPY ...

Page 98: ...1 Select Image transfer LAN settings from the menu Image transfer LAN settings will not appear unless the WFT E1 is connected to the camera and both are turned on 2 Select LAN type 3 Select Ethernet Selecting the LAN Type COPY ...

Page 99: ...Connect the FTP server and the WFT E1 and turn the power on Successful connection display The 3 lamp and the 4 lamp on the WFT E1 will light up and the LCD panel will show the C After the period of time passes with no activity as set in the Power Saving menu the 4 lamp will turn off and the C will also disappear from the LCD panel Failed connection display The LCD panel will show E and an error nu...

Page 100: ...he memory card so insert a memory card with adequate available space 1 Select Image transfer LAN settings from the menu Image transfer LAN settings will not appear unless the WFT E1 is connected to the camera and both are turned on 2 Select Automatic transfer 3 Select Enable 4 Take a picture X The 4 lamp will blink and captured image will be transferred to the FTP server Transferring Images to the...

Page 101: ...ck the EOSD folder 4 For the EOS 1D series double click the A folder The A folder contains images saved on the CF card If the images saved on the SD card have been transferred a B folder is automatically created and images will be saved there Viewing Transferred Images on the FTP Server COPY ...

Page 102: ...102 Viewing Transferred Images on the FTP Server 5 Double click the DCIM folder 6 Double click the CANON the EOS1D or the EOS5D folder X Transferred image data will appear COPY ...

Page 103: ...sure examples in this chapter to remove the source of the error Click the error number listed below to jump to the correspondent item 01 p 104 21 p 104 22 p 104 23 p 105 24 p 106 25 p 107 41 p 107 42 p 109 43 p 109 44 p 109 45 p 110 46 p 110 47 p 111 61 p 111 62 p 112 63 p 112 64 p 113 65 p 113 81 p 113 99 p 114 COPY ...

Page 104: ...ver p 116 DHCP Server DHCP server 2 Is the DHCP server s power on X Turn the DHCP server s power on 3 Are there enough addresses assigned by the DHCP server X Increase the number of addresses assigned by the DHCP server X Remove terminals from the network to which addresses are assigned from the DHCP server to reduce the number of addresses 4 Is the DHCP server functioning normally X Check the set...

Page 105: ...available Overall network 6 Is a router or a similar device with a gateway function used on the network you are trying to connect to X If there is a network administrator ask that person for the gateway address for the network and set it in the WFT E1 p 116 Gateway X Set the correct gateway address for all network devices including the WFT E1 WFT E1 1 Is a device connected to the same network as t...

Page 106: ...e and port No are entered correctly for the proxy server to be used Proxy server 4 Is the proxy server s power on X Turn the proxy server s power on 5 Is the proxy server functioning normally X Check the settings of the proxy server to make sure if it s functioning normally as a proxy server X If there is a network administrator ask that person for the proxy server s address or server name and por...

Page 107: ...Terminal enter ifconfig a and press the Return key In inet of en0 is the IP address 2 Is the FTP server s Port No set in the WFT E1 the same as for the FTP server X The Port No is usually 21 Set the same port No for both the WFT E1 and the FTP server Set the FTP server s port No in the WFT E1 p 118 Target Server 3 If only the FTP server s Server Name is set in the WFT E1 are the DNS server s setti...

Page 108: ...ing to the FTP server via a broadband router X Depending on the broadband router a firewall may limit connections to the FTP server Change the firewall settings to allow connections to the FTP server X You may be able to connect to the FTP server by setting the WFT E1 to Use Passive Mode 9 If you are using Windows XP Service Pack 2 is it set not to connect to the FTP server in Windows Firewall X S...

Page 109: ... 1 Are you trying to connect to the FTP server using more than the set maximum number of simultaneous connections X Reduce the number of network devices connecting to the FTP server or increase the maximum number of devices that can connect to the FTP server using the following procedure X For Windows 2000 and Windows XP increase Limited To on the FTP Site tab p 18 This error appears if it fails t...

Page 110: ...E1 p 119 Login name FTP server 3 Are the FTP server s file access privileges set to allow read write log visits X For Windows 2000 and Windows XP check Read Write and Log visits in the Home Directory tab p 18 For Mac OS X click the target folder go to the menu s File Æ Get Info In Ownership Permissions in the screen that appears change the You can setting to Read Write FTP server 1 The FTP server ...

Page 111: ... WFT E1 s power and then turn them on again 1 Are there any obstacles blocking the path between the WFT E1 and the antenna of the wireless LAN access point or the wireless LAN terminal X Move the WFT E1 and the antenna of the wireless LAN access point or the wireless LAN terminal so there is a clear path between them X Use the ERA E1 Extended Range Antenna for the WFT E1 sold separately 2 After a ...

Page 112: ... Is the FTP server that is connected to or with a built in a wireless LAN terminal powered on X Turn the FTP server s power on to be able to connect via ad hoc 1 Are the WFT E1 and the wireless LAN access point set to have the same authentication method X Available authentication methods for the WFT E1 are Open System Shared key and WPA PSK p 121 Advanced settings X To use infrastructure mode for ...

Page 113: ... LAN terminal for some reason they are not able to connect again Accesses from other terminals may be concentrated on the wireless LAN access point a microwave oven may be in use nearby or the weather is poor X Turn off the camera s power and the WFT E1 s power and then turn them on again WFT E1 3 Is the WFT E1 s antenna loose X Make sure that the WFT E1 s antenna connection is secure 1 Is the LAN...

Page 114: ...with error numbers other than 01 81 has occurred X Turn the WFT E1 s power OFF remove its battery and insert it again In case of error 99 the error description will not appear even if you select Error description on the display panel 99 COPY ...

Page 115: ...ing the LAN Settings with the Camera The settings file loaded in the camera can be modified using the menu screen This chapter explains the menu structure centering on the menu options that appear on the menu screens COPY ...

Page 116: ...the number in the same way as for the Date Time Image transfer LAN settings Æ LAN setting Æ Set up Æ TCP IP Æ Subnet mask Enter the number Enter the number in the same way as for the Date Time Image transfer LAN settings Æ LAN setting Æ Set up Æ TCP IP Æ Gateway Enter the number Enter the number in the same way as for the Date Time Setting TCP IP DHCP Server IP Address Subnet Mask Gateway COPY ...

Page 117: ...r Æ DNS server Select No use or Use Image transfer LAN settings Æ LAN setting Æ Set up Æ DNS server Æ Address Enter the number Enter the number if you use a DNS server Enter the number in the same way as for the Date Time Setting the DNS Server DNS Server Address COPY ...

Page 118: ... in the entry field Press the d button and the cursor will delete the character on its left Selecting a keyboard character and entering it Hold down the b button and turn the c dial to select a character When you let go of the button the character will be entered at the cursor s position Exiting the entry screen Press the e button The entries will be registered and the previous screen will reappea...

Page 119: ...he cursor s position Exiting the entry screen Press the e button The entries will be registered and the previous screen will reappear Canceling the entry Press the i button and no changes will be made to the entry The previous screen will reappear Image transfer LAN settings Æ LAN setting Æ Set up Æ FTP server Æ Login name Enter your login name Image transfer LAN settings Æ LAN setting Æ Set up Æ ...

Page 120: ...Use Address Image transfer LAN settings Æ LAN setting Æ Set up Æ FTP server Æ Proxy Æ Address Enter the number Enter the number in the same way as for the Date Time Port No Image transfer LAN settings Æ LAN setting Æ Set up Æ FTP server Æ Proxy Æ Port No Enter a number less than 65535 Image transfer LAN settings Æ LAN setting Æ Set up Æ FTP server Æ Overwrite same file Select Yes or No Passive Mod...

Page 121: ...ss LAN Æ Advanced settings If you enter the settings for the wireless LAN access point or wireless LAN adapter the following screens will be displayed automatically The settings which can be set will vary automatically depending on the configuration Image transfer LAN settings Æ LAN setting Æ Set up Æ Wireless LAN Æ MAC address The MAC address will be displayed Setting Wireless LAN SSID Advanced s...

Page 122: ...ent the LAN settings from being modified inadvertantly Select Off if you want to change the LAN settings with the camera Image transfer LAN settings Æ LAN setting Æ Set up Æ Save settings Æ OK The settings will be saved in the memory card Protecting and Saving the Settings Protect Settings Save Settings COPY ...

Page 123: ... manual Windows XP Professional is referred to as Windows XP and Windows 2000 Professional as Windows 2000 Macintosh is a registered trademark of Apple Corporation in the United States and other countries WPA is a registered trademark of Wi Fi Alliance All other corporate names and trademarks mentioned in this manual are the property of their respective owners COPY ...

Page 124: ...no 8 I 20097 San Donato Milanese Milano Italy CANON Schweiz AG Geschäftsbereich Wiederverkauf Industriestrasse 12 CH 8305 Dietlikon Switzerland CANON GMBH Zetschegasse 11 A 1230 Wien Austria CANON España S A C Joaquín Costa 41 28002 Madrid Spain SEQUE Soc Nac de Equip Lda Praça da Alegria 58 2 1269 149 Lisboa Portugal CENTRAL CANON LATIN AMERICA INC SOUTH AMERICA 703 Waterford Way Ste 400 Miami FL...

Reviews: