background image

Wireless File Transmitter

WFT-E2 II

Instruction Manual for Use With EOS-1D Mark IV

To EOS-1D Mark III or EOS-1Ds Mark III Users

This instruction manual describes the use of the transmitter when connected to the EOS-1D Mark IV. 
When using the transmitter with the EOS-1D Mark III or EOS-1Ds Mark III, refer to the PDF 
manual in the EOS_1DIII_1DsIII folder. 

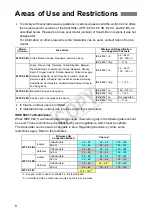
To comply with local radio wave regulations, Canon offers four region-specific versions of 
the transmitter (WFT-E2 IIA, E2 IIB, E2 IIC, and E2 IID) in various areas around the world 
(p.8). For convenience, we refer to the product in this manual simply as “the transmitter,” 
without reference to versions A, B, C, or D.

E

INSTRUCTION MANUAL

COP

Y

Summary of Contents for Wireless File Transmitter WFT-E2 II A

Page 1: ...e transmitter with the EOS 1D Mark III or EOS 1Ds Mark III refer to the PDF manual in the EOS_1DIII_1DsIII folder To comply with local radio wave regulations Canon offers four region specific versions of the transmitter WFT E2 IIA E2 IIB E2 IIC and E2 IID in various areas around the world p 8 For convenience we refer to the product in this manual simply as the transmitter without reference to vers...

Page 2: ...nabling the following operations Introduction Wireless and Wired LAN Functions FTP Transfer EOS Utility WFT Server Transfer images to an FTP server Use a web browser to capture view and download images remotely Use EOS Utility to capture view and download images remotely Linked Shooting Wirelessly trigger shooting by slave cameras linked to a master camera COPY ...

Page 3: ...en Connected via USB External Media Record or backup images onto external media Add the latitude longitude altitude date and time and other shooting information to images GPS Connected by a USB cable Connected via Bluetooth COPY ...

Page 4: ...ration in the United States and other countries Macintosh is a registered trademark of Apple Corporation in the United States and other countries Wi Fi is a registered trademark of the Wi Fi Alliance Wi Fi Certified WPA WPA2 and the Wi Fi Certified logo are trademarks of the Wi Fi Alliance WPS as used on camera settings screens and in this manual signifies Wi Fi Protected Setup UPnP is a trademark...

Page 5: ...sferring Images to an FTP Server 29 Remote Capture Using EOS Utility 43 Remote Capture Using WFT Server 49 Linked Shooting 61 Managing Settings Information 65 Using External Media 71 Using GPS Devices 83 Troubleshooting 91 Reference 109 1 2 3 4 5 6 7 8 9 10 COPY ...

Page 6: ...ings 25 2 Transferring Images to an FTP Server 29 Configuring FTP Communication Settings 30 Automatic Image Transfer After Each Shot 32 Transferring Images Individually 34 Batch Transfer 36 Checking Image Transfer History 40 Viewing Transferred Images 41 3 Remote Capture Using EOS Utility 43 Configuring EOS Utility Communication Settings 44 Using EOS Utility 47 4 Remote Capture Using WFT Server 49...

Page 7: ... Recording Media When Shooting 75 Copying Images 77 Backing Up on External Media 78 8 Using GPS Devices 83 Connecting GPS Devices with a USB Cable 84 Connecting GPS Devices via Bluetooth 87 9 Troubleshooting 91 Responding to Error Messages 92 Wireless LAN Notes 106 Checking Network Settings 107 10 Reference 109 Creating and Registering Captions 110 Specifications 111 Index 118 COPY ...

Page 8: ...ingapore and Hong Kong IEEE 802 11a 36 64 ch 149 165 ch IEEE 802 11b g 1 11 ch WFT E2 IIB Japan France Italy Germany United Kingdom Belgium the Netherlands Luxembourg Ireland Denmark Greece Spain Portugal Austria Finland Sweden Poland Hungary Romania Bulgaria Czech Republic Slovakia Slovenia Estonia Latvia Lithuania Cyprus Malta Iceland Norway Switzerland Liechtenstein Australia New Zealand Russia...

Page 9: ...ectronic devices The transmitter may interfere with operation of these devices Use the transmitter only with a compatible EOS DIGITAL camera Using it with incompatible cameras may cause malfunction accidents and other problems not covered under warranty Use the transmitter as a wireless or wired LAN device as described in this instruction manual If you use the transmitter for any other purpose Can...

Page 10: ...touched Do not cover or wrap the transmitter with a cloth This may trap heat inside posing a risk of case deformation or fire Do not use paint thinner benzene or other organic solvents to clean the transmitter This poses a risk of fire and may be hazardous to your health If the product malfunctions becomes damaged or requires repair contact your dealer or the nearest Canon Service Center The trans...

Page 11: ...amp LAN Network lamp Port cover Locking lever Attachment pin Tightening screw Terminal External Media Case 1 Waterproof Dustproof USB Cap 2 Transmitter Case 1 For storing portable hard disks or other devices 2 Attach this cap before connecting the USB cable in rainy weather or under other adverse conditions COPY ...

Page 12: ...nsmitter Align the attachment pin with the WFT E2 II IIA mounting hole on the camera Push the terminal firmly into the camera As you push the terminal into the camera turn the tightening screw until it stops rotating to attach the transmitter securely 4 Move the lever into the locked position The transmitter is now attached to the camera The transmitter will be powered by the camera Removal Turn o...

Page 13: ...nizationofThisManual 1 Basic Network Settings p 15 2 Transferring Images to an FTP Server p 29 3 Remote Capture Using EOS Utility p 43 4 Remote Capture Using WFT Server p 49 5 Linked Shooting p 61 6 Managing Settings Information p 65 7 Using External Media p 71 8 Using GPS Devices p 83 COPY ...

Page 14: ...14 COPY ...

Page 15: ...15 Basic Network Settings Complete the basic network settings by following transmitter connection instructions on the camera menu screen COPY ...

Page 16: ...settings bring the transmitter within 3 m 9 8 ft of the wireless LAN terminal To connect to a wired LAN use a LAN cable to connect the transmitter and computer Set the transmitter for connection to the wired network Wireless Transmission of Movie Individual movie files are large and wireless file transmission takes some time When setting up an environment for stable transmission to the wireless LA...

Page 17: ...on or other controls until configuration is finished On the 5 tab set Auto power off to Off If auto power off is activated the connection instructions will be closed during the configuration process 1 Turn the camera on 2 Display the transmitter menu On the camera press the 7 button On the 7 tab select WFT settings and press 0 WFT settings is added to the tab after you attach the transmitter 3 Sel...

Page 18: ...r must be set up as an FTP server in advance For instructions on setting up your computer as an FTP server refer to the computer documentation Windows Vista Home Premium and Home Basic Edition as well as Windows XP Home Edition cannot be used because FTP server functionality is not supported EOSUtility Choose this option for remote capture over a wireless or wired LAN using the EOS Utility softwar...

Page 19: ...sed if they feature a web browser However if the web browser does not support JavaScript WFT Server functions will be limited Also note that devices with limited performance may display images more slowly and downloading images to these devices may not be possible LinkedShot Choose this option for linked shooting with multiple EOS 1D Mark IV cameras attached with transmitters Up to 10 slave camera...

Page 20: ...eless LAN The Wireless LAN setup method screen is displayed Connect with wizard See p 21 WPS PBC mode See p 23 WPS PIN mode See p 24 Select WPS PBC mode or WPS PIN mode when using a wireless LAN terminal compatible with Wi Fi Protected Setup WPS Wired LAN The Network settings screen is displayed If you have selected a wired network refer to page 25 Configuring Network Settings Use a Category 5 or ...

Page 21: ...n icon is displayed if the wireless LAN terminal is encrypting communication 3 Indicates the first 9 characters of the SSID 4 Indicates the channel used Encryption by Wireless LAN Terminals If the wireless LAN terminal is encrypting communication select the corresponding method in Authentication and Encryption Authentication Open system Shared key WPA PSK or WPA2 PSK Encryption WEP TKIP or AES Ent...

Page 22: ...the access point and then press 0 Select OK and press 0 to go to the next screen 2 Turn the 5 dial to select the key format and then press 0 Select OK and press 0 to go to the next screen 3 Enter the encryption key To switch between input areas press the H button To move the cursor turn the 5 dial In the bottom input area turn the 5 dial and press 0 to enter the encryption key If you make a mistak...

Page 23: ...ay take about one minute to establish connection Connection may not be possible if stealth functions are enabled on the wireless LAN terminal Deactivate stealth functions 1 Select WPS PBC mode Turn the 5 dial to select WPS PBC mode and then press 0 Select OK and press 0 to go to the next screen 2 Establish a connection with the wireless LAN terminal Press the WPS button on the wireless LAN termina...

Page 24: ...eless LAN terminal Deactivate stealth functions 1 Select WPS PIN mode Turn the 5 dial to select WPS PIN mode and then press 0 Select OK and press 0 to go to the next screen 2 Specify the PIN code on the wireless LAN terminal On the wireless LAN terminal specify the 8 digit PIN code shown on camera LCD monitor For instructions on setting PIN codes on the wireless LAN terminal refer to the instructi...

Page 25: ...s and similar settings are automatically assigned and configured Manual setting The IP address set screen is displayed after you select Manual setting If Auto setting results in an error enter the IP address manually As the IP address enter the IP address assigned to the camera Enter the IP address Subnet mask Gateway and DNS address on each screen as they are displayed If you are not sure what to...

Page 26: ...y Chapter 3 p 43 WFTserver Chapter 4 p 49 Completing Settings for the Communication Method Windows Vista Users Before performing the operations from page 43 perform the operations below If these operations are not performed the WFT Pairing Software described on page 44 may not start Open the C Drive Program Files Canon EOS Utility WFTPairing folder in this order and then double click the WFT Firew...

Page 27: ...dial You can also move the cursor using 9 Entering text In the bottom input area turn the 5 dial to move the cursor and press 0 to enter text You can also move the cursor using 9 Deleting text If you make a mistake press the L button to erase it Confirming entries Press the 7 button to confirm what you have entered and go to the next screen Canceling entries Press the 6 button to erase the entry a...

Page 28: ...28 COPY ...

Page 29: ...29 Transferring Images to an FTP Server With FTP transfer you can automatically transfer each image to the FTP server as you shoot or transfer a set of shots together COPY ...

Page 30: ... the screen at left is displayed For instructions on screen operations refer to Virtual Keyboard Operation p 27 Enter the FTP server s server name or IP address 3 In Port number setting enter 00021 in most cases Turn the 5 dial to select OK and then press 0 to go to the next screen 4 Complete the Passive mode settings If an Error 41 Cannot connect to FTP server is displayed in step 8 setting Passi...

Page 31: ... folder exists a folder will be created automatically Turn the 5 dial to select OK and then press 0 to connect to the FTP server 8 On the confirmation screen displayed next select OK and press 0 X The LAN lamp is lit in green 9 Press 0 Turn the 5 dial to select the set number and then press 0 Turn the 5 dial to select OK and then press 0 After the connection wizard is closed the display reverts to...

Page 32: ...ie is not supported Transfer the movie after shooting as described on pages 35 39 1 In WFT settings select Set up 2 Select Automatic transfer Select Enable 3 Take the picture X The captured image is transferred to the FTP server During image transfer the LAN lamp blinks Automatic Image Transfer After Each Shot During continuous shooting images are transferred to the FTP server in the order they ar...

Page 33: ...r JPEGs on an SD card and you want to transfer the smaller JPEGs set Larger smaller JPEG to Smaller JPEG If the camera is set up to record RAW images on a CF card and JPEGs on an SD card specify which images to transfer in the RAW JPEG transfer setting Similarly complete the same setting if RAW JPEG images are recorded simultaneously on a single memory card If images of the same size are recorded ...

Page 34: ...red 1 In WFT settings select Set up 2 Select Transfer with SET Select Enable 3 Select the image On the camera body press the x button Select the image to transfer and then press 0 to transfer the image Movie cannot be transferred this way Selecting movie and pressing 0 will display the movie playback panel Transferring Images Individually Transferring the Current Image COPY ...

Page 35: ... WFT settings select Transfer with caption X The last captured image is displayed It is not possible to select other images on the Transfer with caption screen To select another image for transfer with a caption view that image before following these steps 3 Select a caption Turn the 5 dial to select the Caption frame and then press 0 Turn the 5 dial to select the content of the caption and then p...

Page 36: ...cord play You can also continue shooting even while images are being transferred 1 In WFT settings select Image sel transfer 2 Select Sel Image X An image is displayed 3 Select images to transfer Press 0 Turn the 5 dial to display X in the upper left corner of the image to transfer Press 0 to confirm your selection You can select up to 9 999 images Press the y button to display three images per sc...

Page 37: ...s screen is displayed During image transfer the LAN lamp blinks You can use the menu even during image transfer However to prevent transfer problems some menu items are unavailable during transfer including WFT settings Protect images Erase images Format and Record func media folder sel Menu Operation During Image Transfer COPY ...

Page 38: ...5 Transfer the images Select Transfer Select OK on the confirmation screen displayed next X A transfer progress screen is displayed During image transfer the LAN lamp blinks Batch Transfer of Images in a Folder Selecting Clear folder transf history will set the transfer history of images in the selected folder to unsent This enables you to resend all the images in the folder later by selecting Fol...

Page 39: ...sfer the images Select Transfer Select OK on the confirmation screen displayed next X A transfer progress screen is displayed During image transfer the LAN lamp blinks Batch Transfer of Images on memory Cards Selecting Clear card s transf history will set the transfer history of images on the memory card to unsent This enables you to resend all the images on the card later by selecting Card images...

Page 40: ...ge sel transfer screen you can check the number of images for transfer as well as the transfer history of images in the selected folder or memory card Specifically you can check the number of images classified as Images failed trans and Images transferred Checking Image Transfer History Checking the Transfer History of Individual Images Checking the Transfer History of Folders or Memory Cards COPY...

Page 41: ...user currently logged on or in a subfolder there Under the default transmitter settings transferred images will be stored in the root folder specified in the FTP server settings in a folder structure such as A DCIM 100EOS1D which is automatically created Additionally if you have selected a CF card as the media for recording and playback a folder structure such as A DCIM 100EOS1D is automatically c...

Page 42: ...42 COPY ...

Page 43: ...u can use EOS Utility to shoot remotely over a wireless or wired LAN In addition to remote capture all camera operations in EOS Utility are supported because a wireless or wired network is used with this option instead of the USB cable COPY ...

Page 44: ...er before this procedure The configuration procedure is as follows using Windows XP as an example 1 First the pairing screen is displayed Turn the 5 dial to select OK When you press 0 the following message is displayed Here represents the last six digits of the MAC address of the WFT E2 II for the connection 2 Start the pairing software Normally it is installed in the same location as EOS Utility ...

Page 45: ...ssing Confirm settings in the menu p 66 4 When the camera detects the computer on which you clicked Connect in step 3 the message at left is displayed Turn the 5 dial to select OK and then press 0 5 Press 0 Turn the 5 dial to select the set number and then press 0 After you turn the 5 dial to select OK and press 0 the connection wizard is closed and EOS Utility starts up X The LAN lamp on the tran...

Page 46: ...settings Before your next PTP session simply turn on the camera to which the transmitter is attached and start the pairing software The connection between the camera and computer will be established automatically You can add the pairing software to the software launched at startup of your computer In EOS Utility on the Preferences Basic Settings tab select Add WFT Pairing Software to the Startup f...

Page 47: ... You can take full advantage of EOS Utility via the transmitter just as via a USB connection without restrictions Using EOS Utility In Remote Live View shooting the rate of image transmission is slower than via USB The motion of moving subjects cannot be displayed smoothly COPY ...

Page 48: ...48 COPY ...

Page 49: ...erver Using a web browser you can view images on a memory card in the camera and download them to a computer Additionally you can shoot remotely over a wireless or wired LAN Note that bulb and movie shooting are not supported COPY ...

Page 50: ...n green Settings information is stored on the camera It is not stored on the transmitter Enter a logon name and password for accessing the camera from a computer The logon name and password you specify here are used on the computer when connecting to the camera 1 Turn the 5 dial to select Set up and then press 0 2 Turn the 5 dial to select WFT server settings and then press 0 Configuring WFT Serve...

Page 51: ...number With WFT Server you can connect the camera to up to three computers Here select a user number to prevent conflicts when users at other computers are connected to the transmitter simultaneously Turn the 5 dial to select User and then press 0 5 After you select Login name and Password the following input screen is displayed For instructions on input screen operations refer to Virtual Keyboard...

Page 52: ... and password as specified in the procedure on page 51 Click OK to display the WFT Server screen Web browsers that support JavaScript now display the screen on the left below step 4 Otherwise a message is displayed if JavaScript is not supported Choosing not to use JavaScript will display the screen on the right below step 4 with limited functions 4 Select the language Select a language at the bot...

Page 53: ... the external media Click the DCIM folder and select the folder containing the images 3 Select an image To view another image click the buttons or jump to other pages In JavaScript compatible web browsers you can specify how many thumbnails are shown per screen by clicking the pull down list in the upper right corner of the screen Viewing Images COPY ...

Page 54: ...ail X The image is displayed at a larger size To download the image to your computer click Click Return to return to the image viewing screen Although actual RAW images and movies are not displayed here they can be downloaded to the computer the same way as JPEGs COPY ...

Page 55: ...dvanced capture screen is displayed Shaded items cannot be configured via WFT Server and are configured on the camera itself Remote Capture Camera control Battery check Quality Drive mode Shooting mode Possible shots White balance AF mode Metering mode Release button Menu AF MF switch Live View shooting button Shutter speed Manual focus button Aperture Live View image screen ISO speed Exposure com...

Page 56: ...after manually focusing 3 Display Live View image Click the Live View shooting button X The AF MF switch is set to g and Live View image is displayed If Live View image is not displayed enable Live View shooting in the menu 4 Manually adjust the focus Click the buttons and to adjust the focus Note that autofocus is not supported during Live View image display To focus more closely click or To focu...

Page 57: ...ngs as needed 6 Take the picture Click the release button When you let go of the mouse button the camera shoots X The captured image is now displayed Captured images are stored on the memory card To download images to your computer refer to page 53 and use the Viewer function The Live View image may freeze when shooting if the camera is accessed by multiple computers COPY ...

Page 58: ...tch to f Click the buttons and to adjust the focus 3 Take the picture Click the release button When you let go of the mouse button the camera shoots X The captured image is now displayed Captured images are stored on the memory card To download images to your computer refer to page 53 and use the Viewer function Remote Capture Simple control Live View image screen Release button Manual focus butto...

Page 59: ...h to g Adjust the focus on the camera Click the release button When you let go of the mouse button the camera shoots X The captured image is now displayed Captured images are stored on the memory card 3 Download images to the computer Click the image X The image is displayed at a larger size To download the image to your computer click Click Return to return to the capture screen Although actual R...

Page 60: ...60 COPY ...

Page 61: ...n which you will release the shutter Any cameras compatible with linked shooting when they have WFT series transmitters attached can be used as slave cameras regardless of model Note that there will be a slight delay after you release the master camera shutter before the slave cameras shoot Movie shooting is not supported Master camera Slave camera COPY ...

Page 62: ...ab select WFT settings and press 0 WFT settings is added to the tab after you attach the transmitter 2 Select Connection wizard 3 Select LinkedShot 4 Set up the slave cameras Select Slave X The slave cameras are now ready with the following screen displayed When using multiple slave cameras set up all slave cameras to slave state Once the settings are complete slaves cannot be added or removed You...

Page 63: ...switch to setting up the slave cameras On the slave cameras select OK 7 Check the number of slave cameras X On the master camera LCD monitor the number of slave cameras detected is displayed 8 Establish the connection On the master camera and all slave cameras select OK X A screen is displayed as the connection is tested The information you specified is stored on the cameras It is not stored on th...

Page 64: ...fter you release the master camera shutter until the slave camera shutters are released Simultaneous capture is not possible Arranging the Slave Cameras Master camera Slave camera Slave camera Slave camera Slave camera When the master or slave camera s 8C Fn III 17 Mirror lockup is set to 1 Enable or 2 Enable Down with SET button linked shooting is not possible During linked shooting when you pres...

Page 65: ...65 Managing Settings Information COPY ...

Page 66: ...ttings as follows 1 In WFT settings select Set up 2 Select Confirm settings X The settings are displayed Checking Settings Example of FTP transfer and wired LAN settings Example of FTP transfer and wireless LAN settings COPY ...

Page 67: ...an image of the same file name as an existing file is sent to the FTP server p 68 1 In WFT settings select Set up 2 Select LAN settings 3 Select the settings number Here select the settings number that identifies the LAN settings 4 Select Change After selecting Change settings name you can rename the settings 5 Select the item to change Select the desired item from LAN type TCP IP FTP server or Wi...

Page 68: ... subfolder in the root folder by changing the Target folder setting images are saved in that folder Configured in FTP server Overwrite same file When the transmitter is configured to prevent overwriting If there is already a file of the same name in the target folder on the FTP server the new file is saved with an extension consisting of an underline and a number as in IMG_0003_1 JPG When you rese...

Page 69: ...se with other cameras 1 In WFT settings select Set up 2 Select LAN settings 3 Select the settings number Here select the settings number that identifies the LAN settings 4 Select Change 5 Select Save settings Saving and Loading Settings Saving Settings COPY ...

Page 70: ...ou can rename the file as desired by selecting Change file name Load settings files stored on a memory card as follows Also use this procedure when loading settings files created on a computer Make sure the settings file is saved in the folder shown when the memory card is opened that is the root directory 1 Select Load settings 2 Select the settings file X Select a settings file that matches your...

Page 71: ... following requirements Use media conforming to the USB Mass Storage Class Specification If an external hard disk drive is used use a self powered drive Bus powered drives do not work in some situations The main image storage area must be formatted with a FAT16 or FAT32 file system Use media with a main image storage area of less than 1 TB terabyte with 512 bytes per sector Do not use external med...

Page 72: ... at any time Follow the instructions in this section when connecting or disconnecting USB cables 1 Plug the external media into the USB port Open the port cover and connect the external media Do not connect external media via a USB hub If the external media is self powered turn it on after connecting it 2 In WFT settings select USB device connec If you will not use a wireless or wired LAN at the s...

Page 73: ...n and a message is displayed indicating that a connection has been established When the confirmation message is displayed select OK X At this point the menu option Disconnect becomes available Select this option before disconnecting the external media X After you exit the menu the rear LCD panel indicates that external media is connected External media cannot be formatted using the camera Format i...

Page 74: ...ction in some cases Power Management If you will not use a wireless or wired LAN at the same time as the external media set Communication mode to Disconnect The camera battery drains faster under settings other than Disconnect because power saving is disabled Setting Power saving to Enable enables the power supply to external media to be stopped automatically conserving the camera battery Power is...

Page 75: ...c media folder sel X The icon for external media is displayed next to icons for the CF and SD cards Complete the following settings as needed For details on using Record play with external media refer to the next page Choosing Recording Media When Shooting Although the USB lamp will blink in green briefly if the camera is restarted or recovering from auto power off shooting is still possible Any i...

Page 76: ...t directory select the default setting of To create another parent folder for the DCIM folder select Create folder A screen is displayed for entering the folder name By default the folder name comprises the current date last two digits of the year in addition to the month and day and numbers representing the order the folder was created in a range of 01 to 99 Always use 8 characters for the folder...

Page 77: ...ed next to icons for the CF and SD cards 2 Select the source media in Record play After selection press the 7 button to return to the menu screen 3 On the 3 tab select Image copy For subsequent instructions refer to the Camera Instruction Manual page 176 Operations are the same as when using a CF or SD card except that the external media icon u is displayed Copying Images COPY ...

Page 78: ...up Select Quick backup or Backup Backing Up on External Media You can also backup the MISC folder where printing and transfer instructions are stored External media cannot be backed up onto memory cards If the backup destination already has a folder of the same number containing images of the same number Skip image and continue Replace existing image and Cancel backup are displayed Select the back...

Page 79: ...mple method of backup is available as follows 1 Select Quick backup 2 Select the source memory card 3 Select Start 4 Select OK X The backup process now begins When the message indicating completion is displayed select OK Quick Backup COPY ...

Page 80: ...e example shown at left the folder displayed when the external media is opened that is the root directory is named 09103102 The DCIM folder is stored in this folder This is also the target folder name displayed when using the regular Backup option Select regular Backup to create or use a folder of your choice as the parent folder of the DCIM folder You can also name this folder as desired Other fu...

Page 81: ... Folder name Always use 8 characters for the folder name For instructions on entering the folder name refer to Virtual Keyboard Operation p 27 6 Select Start 7 Select OK X The backup process now begins When the message indicating completion is displayed select OK COPY ...

Page 82: ...82 Backing Up on External Media The provided external media case can hold portable hard disks up to 120 x 75 x 15 mm 4 72 x 2 95 x 0 59 in External Media Case COPY ...

Page 83: ...s by using GPS compatible mapping software The transmitter can be used with Garmin GPSMAP or eTrex series or Magellan eXplorist series GPS devices that produce data in the format NMEA 0183 Ver 3 0 1 as well as some devices that produce Garmin protocol data as of November 2009 For a list of specific GPS devices supported contact the Canon Service Center For GPS device instructions refer to the devi...

Page 84: ...ions in this section when connecting or disconnecting USB cables 1 Plug the GPS device into the USB port Open the port cover and connect the GPS device Do not connect GPS device via a USB hub Do not turn the GPS device on until step 5 2 In WFT settings select USB device connec If you will not use a wireless or wired LAN at the same time as the GPS device set Communication mode to Disconnect 3 Sele...

Page 85: ...e 6 Take the picture Make sure the transmitter s USB lamp is lit in green before shooting If the USB lamp is not lit in green when you shoot correct GPS data will not be added to images 7 Check the GPS data View an image Press the 6 button to display the shooting information screen with GPS data From top to bottom latitude longitude altitude and Coordinated Universal Time The date and time indicat...

Page 86: ...mera and GPS device If you unplug GPS device while the connection is still active plug the GPS device into the USB port again and follow the preceding steps to terminate the connection If you will not use a wireless or wired LAN at the same time as the GPS device set Communication mode to Disconnect The camera battery drains faster under settings other than Disconnect because power saving is disab...

Page 87: ...nsmitter The transmitter s USB port is not hot pluggable Bluetooth units cannot be connected or disconnected indiscriminately Follow the instructions in this section when attaching or detaching Bluetooth units 1 Attach the Bluetooth unit Open the port cover and attach the Bluetooth unit 2 In WFT settings select USB device connec If you will not use a wireless or wired LAN at the same time as the B...

Page 88: ...ct Bluetooth device connection X Nearby Bluetooth devices in use are listed Only GPS devices can be connected 7 Select the GPS device Press 0 to display the connection status of Bluetooth devices Pressing 0 when the status is Not conn will list nearby Bluetooth devices in use Turn the 5 dial to select GPS and then press 0 Select OK and press 0 If a Bluetooth password has been set on the GPS device...

Page 89: ...data View an image Press the 6 button to display the shooting information screen with GPS data From top to bottom latitude longitude altitude and Coordinated Universal Time If the camera is turned off and on or recovering from auto power off do not shoot until the USB lamp remains lit in green If you shoot while the lamp is blinking the correct GPS information may not be added to images The date a...

Page 90: ...ply turn off the camera If you detach a Bluetooth unit while the connection is still active attach the Bluetooth unit again and follow the preceding steps to terminate the connection If you will not use a wireless or wired LAN at the same time as the Bluetooth unit set Communication mode to Disconnect The camera battery drains faster under settings other than Disconnect because power saving is dis...

Page 91: ...91 Troubleshooting COPY ...

Page 92: ...description Click the error number in the following chart to jump to the corresponding page Responding to Error Messages 11 p 93 12 p 93 21 p 93 22 p 94 23 p 94 24 p 95 25 p 96 26 p 96 31 p 97 32 p 97 33 p 97 34 p 97 41 p 98 42 p 99 43 p 99 44 p 99 45 p 100 46 p 100 47 p 101 51 p 101 52 p 101 53 p 101 54 p 101 61 p 102 62 p 102 63 p 103 64 p 103 65 p 103 66 p 104 67 p 104 68 p 104 69 p 104 71 p 10...

Page 93: ... setting p 25 What to check on the DHCP server Is the DHCP server on X Turn the DHCP server on Are there enough addresses for assignment by the DHCP server X Increase the number of addresses assigned by the DHCP server X Remove devices assigned addresses by the DHCP server from the network to reduce the number of addresses in use Is the DHCP server working correctly X Check the DHCP server setting...

Page 94: ...ke sure the server is working correctly as a DNS server X If applicable ask your network administrator to ensure the DNS server is available What to check on the network as a whole Does your network include a router or similar device that serves as a gateway X If applicable ask your network administrator for the network gateway address and enter it on the transmitter p 25 107 X Make sure the gatew...

Page 95: ... p 25 Make sure the server name and port number for the proxy server are entered correctly p 30 What to check on the proxy server Is the proxy server on X Turn the proxy server on Is the proxy server working correctly X Check the proxy server settings to make sure the server is working correctly as a proxy server X If applicable ask your network administrator for the proxy server address or server...

Page 96: ...CP server Is the DHCP server on X Turn the DHCP server on Are the DHCP server settings for IP addresses and the corresponding names correct X On the DHCP server make sure IP addresses and the corresponding names are entered correctly Is the DHCP server working correctly X Check the DHCP server settings to make sure it is working correctly as a DHCP server X If applicable ask your network administr...

Page 97: ...not compatible Similarly USB card readers cannot be used Is the external media formatted with a FAT16 or FAT32 file system X Format the external media with a FAT16 or FAT32 file system using the computer The GPS device is incompatible with the transmitter X Among GPS devices we recommend devices for which operation has been verified by Canon There is a problem with the external media X Connect the...

Page 98: ...ured on the transmitter are the DNS server settings complete X If the FTP server s Address setting is not configured on the transmitter enable use of the DNS server on the transmitter and enter its address p 25 Make sure the FTP server name is entered correctly p 30 What to check on the FTP server Is the FTP server working correctly X Configure the computer correctly to function as an FTP server X...

Page 99: ...network gateway address and enter it on the transmitter p 25 X Make sure the gateway address setting is correctly entered on all network devices including the transmitter What to check on the FTP server Is the FTP server configured to restrict access to only some IP addresses X Change the FTP server settings to allow access from the IP address configured on the transmitter in the TCP IP settings W...

Page 100: ... the folder specified as the transfer destination on the FTP server named with ASCII characters p 27 X Use ASCII characters for the folder name What to check on the FTP server The connection was terminated by the FTP server X Restart the FTP server Do the user rights for the FTP server allow reading writing and log access X Configure the FTP server s user rights to allow reading writing and log ac...

Page 101: ...s operating on the same 2 4 GHz band used for Bluetooth communication Also note that the connection is more likely to be lost in poor weather or high humidity Is the GPS device on X Turn the GPS device on Is the GPS device ready for the Bluetooth connection X Turn the GPS device on and set it up for connection via Bluetooth Is the Bluetooth unit too far from the GPS device X Bring the GPS device c...

Page 102: ...wireless LAN terminals supporting IEEE 802 11a are the terminal settings locked on IEEE 802 11a X Configure the wireless LAN terminal to allow access via IEEE 802 11b and g If you are filtering by MAC address did you register the transmitter s MAC address on the wireless LAN terminal X Register the transmitter s MAC address p 66 on the wireless LAN terminal What to check on the transmitter Is the ...

Page 103: ...the wireless LAN terminal Are the transmitter and wireless LAN terminal configured for the same encryption method X The transmitter supports these encryption methods WEP TKIP and AES p 21 If you are filtering by MAC address did you register the transmitter s MAC address on the wireless LAN terminal X Register the transmitter s MAC address p 66 on the wireless LAN terminal Are any obstacles blockin...

Page 104: ... on the wireless LAN terminal Have you pressed the Wi Fi Protected Setup WPS button on the wireless LAN terminal for as long as indicated in the wireless LAN terminal instructions X Refer to the instruction manual for the wireless LAN terminal to determine how long to hold the WPS button Are you attempting to establish the connection near the wireless LAN terminal X Try establishing the connection...

Page 105: ...amera too far from the slave cameras X Bring the master camera closer to the slave cameras Is the LAN cable securely connected X Reconnect the LAN cable between the transmitter and server Because the cable may be severed try using another cable to connect the devices Is the hub or router on X Turn on the hub or router Is the server on X Turn the server on The server may have been turned off becaus...

Page 106: ...ate may drop if there are nearby microwave ovens cordless telephones microphones or similar devices operating on the same frequency band If a wireless LAN terminal on the same frequency band as the transmitter is used nearby the transmission rate of the wireless LAN may drop If multiple transmitters are connected to a single wireless LAN terminal be careful not to use duplicate camera IP addresses...

Page 107: ...ress assigned to the camera page 25 change the rightmost numbers here In Mac OS X open the Terminal application type ifconfig a and press the Return key The IP address assigned to the computer is indicated in the en0 item by inet in the format To avoid using the same IP address for the computer and other devices on the network when configuring the IP address assigned to the camera page 25 change t...

Page 108: ...108 COPY ...

Page 109: ...109 Reference COPY ...

Page 110: ... EOS Utility refer to the Software Instruction Manual PDF provided with the camera Note that captions cannot be created for cameras without an attached transmitter 1 Start EOS Utility and select Camera settings Remote shooting X The camera settings remote capture screen is displayed 2 On the tab select WFT Captions X The screen for caption creation is displayed To acquire caption data stored on th...

Page 111: ...2 IIA 5 180 5 320 MHz channels 36 64 central frequency 5 745 5 825 MHz channels 149 165 2 412 2 462 MHz channels 1 11 WFT E2 IIB 5 180 5 320 MHz channels 36 64 5 500 5 700 MHz channels 100 140 2 412 2 472 MHz channels 1 13 WFT E2 IIC 5 745 5 805 MHz channels 149 161 2 412 2 472 MHz channels 1 13 WFT E2 IID 2 412 2 462 MHz channels 1 11 Connection method Infrastructure or ad hoc mode Wi Fi Protecte...

Page 112: ...nd Weight Dimensions W x H x D 26 0 x 97 7 x 31 8 mm 1 0 x 3 8 x 1 3 in Weight Approx 80 g 2 8 oz Body only Operating Environment Temperature 0 C 45 C 32 F 113 F Humidity 85 or less All preceding specifications are based on Canon testing standards Transmitter specifications and appearance are subject to change without notice LAN At Normal Temperature 23 C 73 F At Low Temperature 0 C 32 F Wireless ...

Page 113: ...113 COPY ...

Page 114: ...114 COPY ...

Page 115: ...115 COPY ...

Page 116: ...s 1999 5 EB Direktyvos nuostatas Hierbij verklaart Canon Inc dat het toestel CH9 1161 in overeenstemming is met de essentiële eisen en de andere relevante bepalingen van richtlijn 1999 5 EG Hawnhekk Canon Inc jiddikjara li dan CH9 1161 jikkonforma mal ƫtiƥijiet essenzjali u ma provvedimenti oƫrajn relevanti li hemm fid Dirrettiva 1999 5 EC Alulírott Canon Inc nyilatkozom hogy a CH9 1161 megfelel a...

Page 117: ...h Class B limits in Subpart B of Part 15 of the FCC rules Do not make any changes or modifications to the equipment unless otherwise specified in the manual If such changes or modifications should be made you could be required to stop operation of the equipment This transmitter must not be co located or operated in conjunction with any other antenna or transmitter The available scientific evidence...

Page 118: ...G Gateway 25 I IEEE 802 11a 8 IEEE 802 11b g 8 Image transfer 13 29 Infrastructure 8 21 IP address 25 30 IPsec 68 J JPEG 33 K Key format 22 Keyboard 27 L LAN cable 20 Linked shooting 61 LinkedShot 19 Login 31 Logon name 50 M MAC address 44 Master camera 63 Movie 32 54 55 N Network 15 O Open system 21 P Pairing 26 44 Passive mode 68 Password 50 PBC mode 23 PIN code connection mode 24 PIN mode 24 Po...

Page 119: ... 52 V Viewing images 53 W Web 52 WEP 21 WFT Server 13 49 WFTserver 19 Wi Fi Protected Setup 23 Wired LAN 20 Wireless LAN specification 8 Wizard 17 WPA2 PSK 21 WPA PSK 21 WPS Wi Fi Protected Setup 23 24 B Backing up images 78 Backup 71 80 Bluetooth 87 Bus powered 71 C Copying images 77 E Error 92 External media 13 71 75 G GPS 83 GPS data 85 GPS device 13 H Hard disk 71 M Media 71 P Power 74 Power m...

Page 120: ...ietlikon Switzerland Canon GmbH Zetschegasse 11 A 1230 Vienna Austria CANON España S A Av De Europa 6 Alcobendas 28108 Madrid Spain CANON Portugal S A Rua Alfredo da Silva 14 Alfragide 2610 016 Amadora Portugal CENTRAL CANON LATIN AMERICA INC SOUTH AMERICA 703 Waterford Way Suite 400 Miami FL 33126 U S A ASIA CANON China Co LTD 15F Jinbao Building No 89 Jinbao Street Dongcheng District Beijing 100...

Reviews: