


52
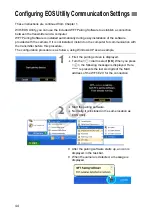
In the web browser, display WFT Server, a screen for transmitter operations. Make sure you
have already established a connection between the camera and computer.
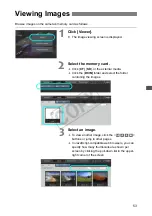
1
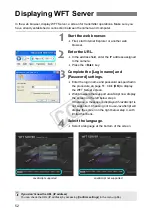
Start the web browser.
First, start Internet Explorer or another web
browser.
2
Enter the URL.
In the address field, enter the IP address assigned
to the camera.
Press the <
Enter
> key.
3
Complete the [Login name] and
[Password] settings.
Enter the login name and password as specified in
the procedure on page 51. Click [
OK
] to display
the WFT Server screen.
Web browsers that support JavaScript now display
the screen on the left below step 4.
Otherwise, a message is displayed if JavaScript is
not supported. Choosing not to use JavaScript will
display the screen on the right below step 4, with
limited functions.
4
Select the language.
Select a language at the bottom of the screen.
Displaying WFT Server
JavaScript supported
JavaScript not supported
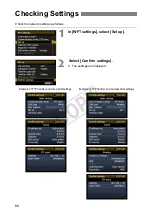
If you don’t know the URL (IP address)
You can check the URL (IP address) by accessing [
Confirm settings
] in the menu (p.66).
COP
Y
Summary of Contents for Wireless File Transmitter WFT-E2 II A
Page 14: ...14 COPY ...
Page 28: ...28 COPY ...
Page 42: ...42 COPY ...
Page 48: ...48 COPY ...
Page 60: ...60 COPY ...
Page 65: ...65 Managing Settings Information COPY ...
Page 91: ...91 Troubleshooting COPY ...
Page 108: ...108 COPY ...
Page 109: ...109 Reference COPY ...
Page 113: ...113 COPY ...
Page 114: ...114 COPY ...
Page 115: ...115 COPY ...


