background image

Digital Video Camcorder

Instruction Manual

Camescope vidéo numérique

Manuel d’instruction

Videocámara digital

Manual de Instrucciones

English

Français

Español

Mini

Digital
Video
Cassette

NTSC

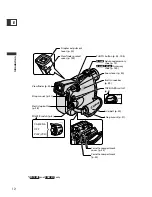
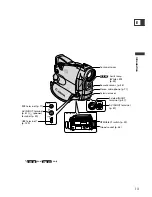
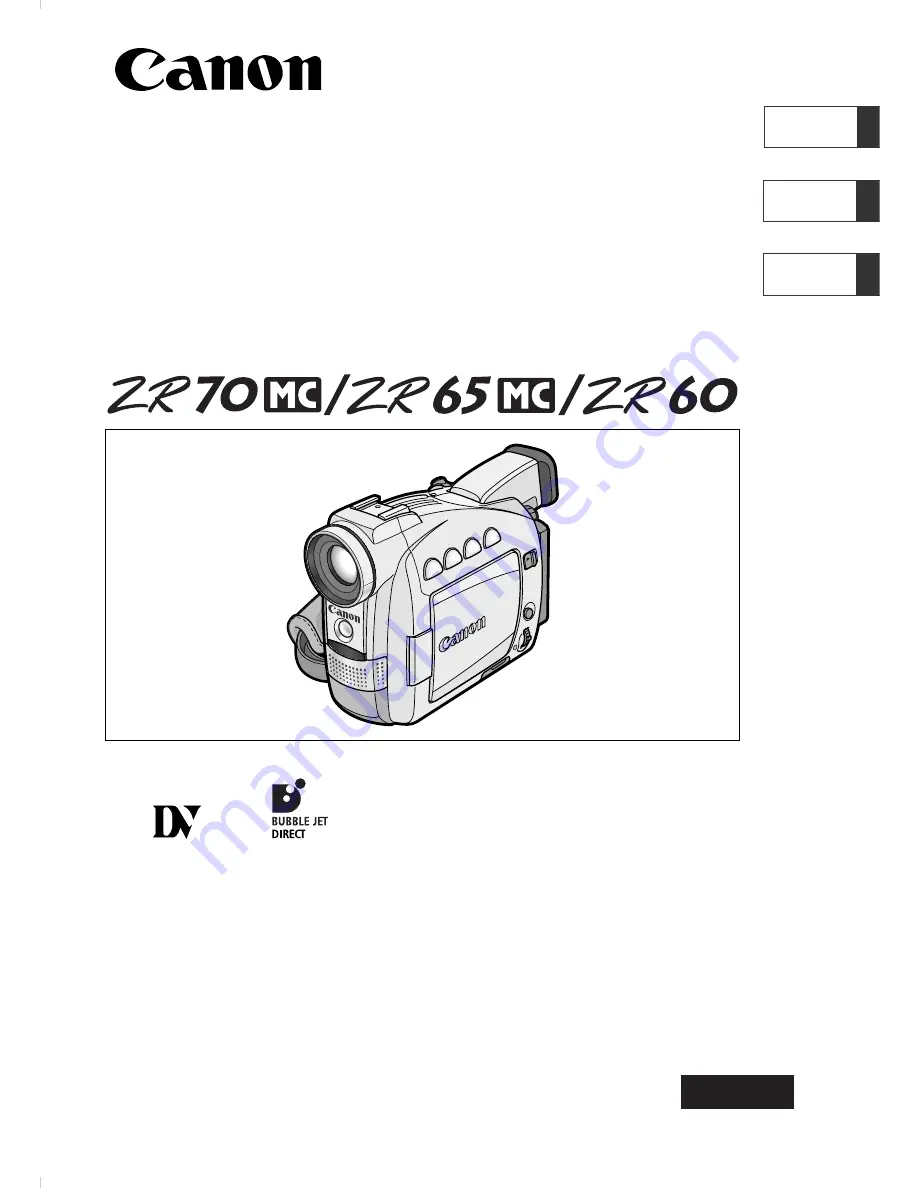
This instruction manual covers the ZR70 MC, ZR65 MC and ZR60. Please note that
illustrations and explanation in this manual are based on the ZR70 MC.

Ce manuel d’instruction traite des modèles ZR70 MC, ZR65 MC et ZR60. Veuillez
noter que les illustrations et les explications contenues dans ce manuel sont basées
sur le ZR70 MC.

Este manual de instrucciones cubre la ZR70 MC, la ZR65 MC, y la ZR60. Tenga en
cuenta que las ilustraciones y las explicaciones de este manual se basan en la 
ZR70 MC.

PUB.DIM-519

Summary of Contents for ZR60

Page 1: ...nd ZR60 Please note that illustrations and explanation in this manual are based on the ZR70 MC Ce manuel d instruction traite des modèles ZR70 MC ZR65 MC et ZR60 Veuillez noter que les illustrations et les explications contenues dans ce manuel sont basées sur le ZR70 MC Este manual de instrucciones cubre la ZR70 MC la ZR65 MC y la ZR60 Tenga en cuenta que las ilustraciones y las explicaciones de e...

Page 2: ...nto an outlet on a circuit different from that to which the receiver is connected Consult the dealer or an experienced radio TV technician for help Use of shielded cable is required to comply with class B limits in Subpart B of Part 15 of FCC Rules Do not make any changes or modifications to the equipment unless otherwise specified in the manual If such changes or modifications should be made you ...

Page 3: ...en surfaces may cause the product and cart combination to overturn 10 Power Sources The CA 570 Compact Power Adapter should be operated only from the type of power source indicated on the marking label If you are not sure of the type of power supply to your home consult your product dealer or local power company Regarding other power sources such as battery power refer to instructions in this manu...

Page 4: ... those controls that are covered by the operation instructions Improper adjustment of other controls may result in damage and will often require extensive work by a qualified technician to restore the product to its normal operation e If the product has been dropped or the cabinet has been damaged f When the product exhibits a distinct change in performance This indicates a need for service 19 Rep...

Page 5: ...camcorder model and networking environment DIGITAL VIDEO SOLUTION DISK Software Instruction Manual This manual explains how to download images from the memory card to a computer using the supplied USB cable You can add sample images for Card Mix and My Camera settings from the supplied DIGITAL VIDEO SOLUTION DISK Trademark Acknowledgements Canon is a registered trademark of Canon Inc D is a tradem...

Page 6: ...ewing when Recording 35 Tips for Making Better Videos 36 Basic Playback Playing Back a Tape 37 Playing Back on a TV Screen 41 Using the Full Range of Features General Menus and Settings 44 Changing the Remote Sensor Mode 49 Customizing the Camcorder 50 Setting the Light up Buttons 51 Other Camcorder Settings 52 Recording Changing the Recording Mode SP LP 54 Recording Still Images on a Tape 55 Usin...

Page 7: ...ory Card Inserting and Removing the Memory Card 100 Selecting the Image Quality Size 101 Recording Still Images on a Memory Card 104 Recording Panoramic Images Stitch Assist Mode 107 Recording Motion JPEG Movies on a Memory Card 109 Playing Back a Memory Card 111 Protecting Images 114 Erasing Images 115 Selecting Still Images for Printing Print Order 116 Printing with the Direct Print Function 118...

Page 8: ...re used to refer to buttons on the camcorder or the wireless controller are used to refer to menu items displayed on the screen Screen refers to the LCD and the viewfinder screen CAMERA CAMERA Shaded area E Operating Mode Position of the POWER Switch Position of the TAPE CARD Switch CAMERA CAMERA TAPE PLAY VCR PLAY VCR TAPE CARD CAMERA CAMERA CARD CARD PLAY VCR PLAY VCR CARD The serial number of t...

Page 9: ...range of features Checking Supplied Accessories WL D79 Wireless Controller WL D80 Wireless Controller ZR60 ZR65 MC ZR70 MC Two AA Batteries Lens Cap and Lens Cap Cord SS 800 Shoulder Strap WA 30 5 Wide Attachment ZR70 MC BP 512 Battery Pack BP 508 Battery Pack ZR60 ZR65 MC ZR70 MC CA 570 Compact Power Adapter incl power cord Lithium Button Battery CR1616 STV 250N Stereo Video Cable IFC 300PCU USB ...

Page 10: ...rd images on a SD Memory Card or MultiMediaCard Images recorded in Stitch Assist mode can be merged into one panoramic scene with the supplied software You can print still images by connecting to a Canon Bubble Jet Printer with Direct Print function Allows transfer of memory card data to a computer with built in USB port You can organize and edit images on your computer using the supplied software...

Page 11: ...ndex screen button p 112 P LCD panel OPEN button p 32 BATT battery release button p 16 Memory card slot p 100 Backup battery cover p 19 Battery attachment unit p 16 Serial number Selector dial p 40 44 Card access indicator p 104 CHARGE indicator p 16 LCD screen p 32 Card MIX button p 124 SLIDE SHOW button p 112 stitch assist button p 107 self timer button p 70 DATA CODE button p 83 Program selecto...

Page 12: ...r p 142 PHOTO button p 55 104 Advanced accessory shoe p 73 Accessory shoe p 150 Zoom lever p 30 Built in speaker p 39 TAPE CARD switch p 8 Grip belt p 20 Strap mount p 21 Cassette compartment cover p 22 Cassette compartment p 22 Viewfinder p 20 Strap mount p 21 Start stop button p 28 POWER switch p 8 ZR70 MC ZR65 MC ZR60 and only ZR70 MC ZR65 MC ...

Page 13: ... LED p 59 Remote sensor p 24 Stereo microphone p 71 S video IN OUT terminal p 41 DV IN OUT terminal p 87 Terminal cover OPEN EJECT switch p 22 Tripod socket p 36 USB terminal p 129 AV IN OUT terminal p 41 phones terminal p 39 MIC terminal p 71 and only ZR70 MC ZR65 MC ZR70 MC ...

Page 14: ...utton p 83 SEARCH SELECT button p 85 ZERO SET MEMORY button p 86 12bit AUDIO OUT button p 98 AUDIO DUB button p 97 REC PAUSE button p 89 REW button p 37 AV INSERT button p 95 Digital effects ON OFF button p 61 Transmitter Zoom buttons p 30 Controller buttons p 44 MENU button p 44 SET button p 44 Search buttons p 85 PLAY button p 37 FF button p 37 button p 38 STOP button p 37 2 button p 38 REMOTE S...

Page 15: ...amcorder s DC IN terminal 5 After use disconnect the power adapter from the camcorder Unplug the power cord from the power outlet and disconnect it from the adapter Turn off the camcorder before connecting or disconnecting the power adapter If the adapter is used close to a TV it may cause picture interference Move the adapter away from the TV or the antenna cable Do not connect any products that ...

Page 16: ...rging is complete disconnect the power adapter from the camcorder Unplug the power cord from the power outlet and disconnect it from the adapter 8 Remove the battery pack after use Press the BATT button to remove the battery The battery pack may be defective when the CHARGE indicator flashes rapidly The CHARGE indicator informs you about the charge status 0 50 Flashes once every second More than 5...

Page 17: ...k you might need To conserve battery charge turn off the camcorder instead of leaving it in record pause mode Playback Time E Battery Pack Charging Time BP 508 ZR65 MC ZR60 110 min BP 512 ZR70 MC optional 120 min BP 511 Optional 120 min BP 522 Optional 210 min BP 535 Optional 310 min Battery Pack Maximum Recording Time Typical Recording Time Using the Viewfinder Using the LCD Using the Viewfinder ...

Page 18: ...pack is not in use Contact to metallic objects may cause a short circuit and damage the battery pack Dirty terminals may cause a poor contact between the battery pack and the camcorder Wipe the terminals with a soft cloth Since storing a charged battery pack for a long time about 1 year can shorten its lifecycle or affect performance we recommend to discharge the battery pack fully and to store it...

Page 19: ...212 F 100 C or incinerate the battery Replace the battery with a CR1616 made by Panasonic Hitachi Maxell Sony Toshiba Varta or Renata Use of other batteries may present a risk of fire or explosion Do not pick up the battery using tweezers or other metal tools as this will cause a short circuit Wipe the battery with a clean dry cloth to ensure proper contact Keep the battery out of reach of childre...

Page 20: ...nder to prevent sunlight from entering Attaching the Lens Cap 1 Attach the cord to the lens cap 2 Pass the grip belt through the loop on the cord Press the buttons on the lens cap when attaching removing it Hook the lens cap on the grip belt while you are recording and place it over the lens when you have finished Fastening the Grip Belt Hold the camcorder with your right hand and adjust the belt ...

Page 21: ...not look directly at the sun or other strong light sources through the wide attachment It could damage your eyesight When recording in wide angle with the wide attachment the outer periphery of the image may become curved Filters cannot be used with the wide attachment If dust accumulates on the wide attachment or on the camcorder lens clean both lenses gently with a blower brush The wide attachme...

Page 22: ... the cassette compartment to retract automatically 4 Close the cassette compartment cover Do not interfere with the cassette compartment while it is opening or closing automatically or attempt to close the cover until the cassette compartment has fully retracted Be careful not to get your fingers caught in the cassette compartment cover If the camcorder is connected to a power source cassettes can...

Page 23: ...ure and sound distortion Return cassettes in the case and store them upright Do not leave the cassette in the camcorder after use Do not use cassettes with spliced tapes or nonstandard cassettes as they may damage the camcorder Do not insert anything into the small holes of the cassette or cover them with cellophane tape Handle cassettes with care Do not drop or subject them to severe impact as th...

Page 24: ...89 DV dubbing 90 AV Insert 94 Audio dubbing 96 The wireless controller may not work properly in bright places such as outdoors under direct sunlight or when used too close to the camcorder The operable range of the wireless controller may shorten when the camcorder s remote sensor is exposed to strong light When the batteries run out replace both at the same time Inserting Batteries The wireless c...

Page 25: ...ess the selector dial 3 Turn the selector dial to select T ZONE DST and press the selector dial The time zone setting appears The default setting is New York Select your time zone and daylight saving time DST setting if necessary 4 Turn the selector dial to select the setting option that represents your time zone To adjust for daylight saving time select the time zone with the U next to the area 5...

Page 26: ... 1 Press the MENU button to open the menu CARD PLAY VCR CARD CAMERA PLAY VCR CAMERA D TIME SET JAN 1 2003 12 00 PM SYSTEM MENU 1 24 1 2 3 4 5 6 7 8 9 10 11 12 13 14 15 16 17 18 19 20 21 22 23 2 3 5 6 7 9 8 10 4 12 11 13 24 19 20 18 17 21 23 22 15 14 16 Time zone LONDON PARIS CAIRO MOSCOW DUBAI KARACHI DACCA BANGKOK H KONG Hong Kong TOKYO SYDNEY SOLOMON WELLGTN Wellington SAMOA HONOLU Honolulu ANCH...

Page 27: ... at step 4 and move to the part you wish to change The date can be set to any year between 2003 and 2030 Displaying Date and Time during Recording You can display time zone date and time in the lower left corner of the screen the time zone disappears after 4 seconds The 4 second display will no longer appear when you turn the power on The date and time display will not be superimposed on your reco...

Page 28: ... not set the time zone date and time SET THE TIME ZONE DATE AND TIME appears See Setting the Time Zone Date and Time 25 3 Open the LCD panel 32 To use the viewfinder keep the LCD panel closed or rotate it so that the screen faces in the same direction of the lens 33 4 Press the start stop button to begin recording Wait until the tape counter came to a complete stop before you begin recording 5 Pre...

Page 29: ...nutes when left in record pause mode to protect tape and video heads To continue recording turn the POWER switch to OFF and then back to CAMERA For when to use the Easy Recording or Q program AE mode see Using the Recording Programs 57 When you do not remove the cassette you can record the next scene without producing any noise or blank sections between the recordings even if you turn the camcorde...

Page 30: ...or a slow zoom Press harder for a faster zoom You can also use the T and W buttons on the wireless controller However you cannot control the zoom speed Digital Zoom 1 Press the MENU button to open the menu 2 Turn the selector dial to select CAMERA SET UP and press the selector dial 3 Select D ZOOM and press the selector dial 4 Select a setting option CARD PLAY VCR CARD CAMERA PLAY VCR CAMERA T W Z...

Page 31: ...ends in light blue when the digital zoom is set to 88 80 72 and extends further in dark blue when set to 440 400 360 Digital zoom cannot be used in the Night mode and Super Night ZR70 MC mode Digital zoom cannot be used when the multi image screen is selected Because the image stabilizer cannot be used in CARD CAMERA mode we recommend mounting the camcorder on a tripod at large magnifications ZR65...

Page 32: ...panel in the vertical position before closing the LCD panel When recording outdoors or through a window do not leave the LCD screen viewfinder or lens exposed to direct sunlight as it may cause damage Do not hold the camcorder by the LCD panel or the viewfinder About the LCD Screen The LCD screen is produced with extremely high precision manufacturing techniques with more than 99 99 of the pixels ...

Page 33: ...hanging the brightness of the LCD screen does not affect that of the viewfinder or the recordings Allowing the Subject to Monitor the LCD Screen You can rotate the LCD panel so that the screen faces in the same direction as the lens The viewfinder switches on allowing you to use the viewfinder while the subject can monitor the screen When you rotate the screen so that the screen faces in the same ...

Page 34: ...ress the selector dial 3 Turn the selector dial to select LCD MIRROR and press the selector dial 4 Turn the selector dial to select OFF 5 Press the MENU button to close the menu When LCD MIRROR is set to ON most screen displays appear mirror reversed CARD PLAY VCR CARD CAMERA PLAY VCR CAMERA LCD MIRROR ON DISPLAY SET UP 44 ...

Page 35: ...d pause mode this function allows you to play back the tape forward or reverse to locate the point where you wish to begin recording Press and hold the REC SEARCH button forward or button reverse Release the button at the point you wish to begin recording The camcorder returns to record pause mode Noise may appear on the screen when you play back the tape in reverse There will be no sound during R...

Page 36: ...uch the microphone or lens For More Stability Lighting When recording outdoors we recommend recording with the sun at your back When using a tripod do not leave the viewfinder exposed to direct sunlight as it may melt due to concentration of the light by the lens Do not use tripods with fastening screws longer than 0 2 inch 5 5 mm as it may damage the camcorder Low angle Recording High angle Recor...

Page 37: ...utward 3 Press the button to rewind the tape To fast forward the tape press the 1 button To stop playback press the 3 button 4 Press the e a button to begin playback 5 Press the 3 button to stop playback If the playback picture is distorted clean the video heads using a Canon Head Cleaning Cassette or a commercially available digital video head cleaning cassette To use the viewfinder close the LCD...

Page 38: ...ce frame reverse SLOW I Slow Forward Slow Reverse Plays back at about 1 3 normal speed For slow forward playback press the SLOW M button For slow reverse playback press the 4a button followed by the SLOW M button Press the e play button to return to normal playback 4a Reverse Playback Plays back in reverse at normal speed Press the button during normal playback Press the e play button return to no...

Page 39: ...3 Turn the selector dial to select AV PHONES and press the selector dial 4 Turn the selector dial to select AV or PHONES H 5 Press the MENU button to close the menu The built in speaker does not sound when H is displayed Do not connect headphones unless H is displayed as it produces noise The built in speaker is monaural Use headphones for stereo sound The built in speaker turns off when the camco...

Page 40: ...the volume completely by turning the selector dial down until OFF appears Turn the selector dial up to increase the volume again Sound may become distorted when the volume is turned up too high The headphone volume can be adjusted in all operating modes The camcorder retains the setting even if you turn it off separately for headphones and built in speaker CARD PLAY VCR CARD CAMERA PLAY VCR CAMERA...

Page 41: ...ck may be produced if sound from the TV speakers is picked up by the microphone For high picture quality we recommend using a TV with an S S1 terminal TVs with S1 terminal or Video ID 1 system Recordings made in the 16 9 mode 52 will be automatically played back in wide screen mode TVs with S S1 Video Input Terminal Refer also to the TV or VCR instruction manual 1 Turn off all devices before start...

Page 42: ...Vs with Audio Video Terminals Refer also to the TV or VCR instruction manual 1 Turn off all devices before starting the connections 2 Connect the STV 250N Stereo Video Cable to the camcorder s AV terminal and the audio video terminals on the TV VCR Connect the white plug to the white audio terminal L left the red plug to the red audio terminal R right and the yellow plug to the yellow video termin...

Page 43: ...s the selector dial 3 Turn the selector dial to select OUTPUT CH and press the selector dial 4 Turn the selector dial to select a setting option L R Stereo L R channels Bilingual Main Sub L L Stereo L channel Bilingual Main R R Stereo R channel Bilingual Sub 5 Press the MENU button to close the menu The setting resets to the L R setting when you turn the camcorder off CARD PLAY VCR CARD CAMERA PLA...

Page 44: ...o select a setting option 6 Press the MENU button to close the menu When setting the white balance or shutter speed press the selector dial first before pressing the MENU button Pressing the MENU button at any time closes the menu Selecting RETURN takes you back one level Items that are not available appear in purple You may find it more convenient to use the wireless controller to operate the men...

Page 45: ...AL AUTO SET W INDOOR T OUTDOOR U 80 VCR SET UP REC MODE SP LP 54 AV PHONES AV PHONES H 39 AUDIO SET UP WIND SCREEN ON OFF 71 AUDIO MODE 16bit 12bit 71 DISPLAY SET UP BRIGHTNESS 33 LCD MIRROR ON OFF 34 TV SCREEN ON OFF 134 D T DISPLAY ON OFF 27 DEMO MODE ON OFF 53 SYSTEM BUTTONLIGHT 1 ON PUSH ON OFF 51 LIGHT COLOR 1 GREEN ORANGE BLUE YELLOW 51 TURQUOISE PURPLE WL REMOTE A1 A2 OFF B 49 BEEP ON OFF 5...

Page 46: ...0 120 102 FILE NOS RESET CONTINUOUS 103 CARD COPY CANCEL EXECUTE 126 OPERATIONS 2 DISPLAY SET UP BRIGHTNESS 33 DISPLAYS ON OFF PLAYBK 134 6SEC DATE ON OFF 84 DATA CODE DATE TIME CAMERA DATA CAM D T 84 D TIME SEL DATE TIME DATE TIME 84 SYSTEM BUTTONLIGHT 1 ON PUSH ON OFF 51 LIGHT COLOR 1 GREEN ORANGE BLUE YELLOW 51 TURQUOISE PURPLE WL REMOTE A1 A2 OFF B 49 BEEP ON OFF 52 T ZONE DST See list of time...

Page 47: ...CONTINUOUS 103 VCR SET UP AV PHONES AV PHONES H 39 AUDIO SET UP 1 WIND SCREEN ON OFF 71 DISPLAY SET UP BRIGHTNESS 33 LCD MIRROR ON OFF 34 TV SCREEN ON OFF 134 D T DISPLAY ON OFF 27 DEMO MODE ON OFF 53 SYSTEM BUTTONLIGHT 1 ON PUSH ON OFF 51 LIGHT COLOR 1 GREEN ORANGE BLUE YELLOW 51 TURQUOISE PURPLE WL REMOTE A1 A2 OFF B 49 BEEP ON OFF 52 T ZONE DST See list of time zones 25 D TIME SET 26 MY CAMERA ...

Page 48: ...V PHONES H 39 DISPLAY SET UP BRIGHTNESS 33 DISPLAYS ON OFF 134 D TIME SEL DATE TIME DATE TIME 84 SYSTEM BUTTONLIGHT 1 ON PUSH ON OFF 51 LIGHT COLOR 1 GREEN ORANGE BLUE YELLOW 51 TURQUOISE PURPLE WL REMOTE A1 A2 OFF A 49 BEEP ON OFF 52 T ZONE DST See list of time zones 25 D TIME SET 26 MY CAMERA CREATE START UP IMAGE 130 SEL S UP IMG NO IMAGE CANON LOGO MY IMAGE 50 SHTR SOUND PATTERN1 PATTERN2 PATT...

Page 49: ...M T button for mode 2 Keep the button pressed for over 2 seconds If you have set the camcorder to mode 1 press the ZOOM W button for mode 1 The wireless controller returns to mode 1 when you replace the batteries Change the mode if necessary Make sure that camcorder and wireless controller are set to the same mode Display the camcorder s mode by pressing any button on the wireless controller excep...

Page 50: ...art up Image 130 Changing the My Camera Settings 1 Open the menu and select MY CAMERA 2 Select the menu item you wish to change When selecting a start up image only in CARD PLAY VCR mode NO IMAGE CANON LOGO and MY IMAGE appears When selecting a start up image OFF and ON appears When selecting a sound PATTERN1 PATTERN2 and PATTERN3 appear 3 Select a setting option and close the menu ZR60 ZR65 MC ZR...

Page 51: ...ose the menu ON The buttons light up while the camcorder is turned on The color changes when you press a button and turns back when you release the button PUSH ON The buttons light up when you press a button and turn off when you release the button OFF Buttons do not light up Selecting the Color of the Buttons Open the menu and select SYSTEM Select LIGHT COLOR set it to the desired color and close...

Page 52: ...ing You can record in the 16 9 format for playback on wide screen TVs To switch 16 9 on open the menu and select CAMERA SET UP Select 16 9 set it to ON and close the menu 16 9 appears The 16 9 mode cannot be selected in the Easy Recording mode The multi image screen cannot be used when the 16 9 format is selected If you play back a 16 9 recording on a normal TV the image appears vertically squashe...

Page 53: ...ing a memory card for more than 5 minutes You can also start the demonstration mode through the menu With no cassette ZR70 MC ZR65 MC and memory card inserted open the menu and select DISPLAY SET UP Select DEMO MODE set it to OFF and close the menu To cancel the demo mode press any button turn off the camcorder load a cassette ZR70 MC ZR65 MC or insert a memory card CARD PLAY VCR CARD CAMERA PLAY ...

Page 54: ...de for important recordings We recommend recording in SP mode if you plan to transfer the images to a computer If you record in both SP and LP modes on the same tape the playback picture may become distorted and the time code may not be written correctly If you play back a tape that has been recorded in LP mode with another digital device on this camcorder or vice versa picture and sound may becom...

Page 55: ...cked When you press the PHOTO button on the wireless controller recording starts immediately 2 Press the PHOTO button fully F disappears The camcorder records the still image for approx 6 seconds During this time the camcorder displays the still image and keeps recording the sound The camcorder returns to record pause mode During Recording 1 Press the PHOTO button fully The camcorder records the s...

Page 56: ...till image it will not turn off until recording is complete Record still images under sufficient lighting condition in which you can identify the subject on the screen If a subject is unsuitable for autofocus F continues to flash Keep the PHOTO button pressed halfway and adjust the focus with the selector dial E ...

Page 57: ...AMERA mode 3 ZR70 MC and ZR65 MC only 4 Available effects depend upon the program AE mode Easy Recording Program The camcorder adjusts focus exposure and other settings automatically allowing you to just point and shoot Program AE Modes Auto The camcorder adjusts focus exposure and other settings automatically However you have the option of adjusting the settings manually Position of the Program S...

Page 58: ...lephoto This mode is set at a higher shutter speed The picture may not appear smooth when played back Spotlight Use this mode to record spotlit scenes such as shows recitals or fireworks Sand Snow Use this mode in bright places such as a sunny beach or ski resort It prevents the subject from being underexposed The subject may become overexposed in dark surroundings Check the image on the screen Th...

Page 59: ...justed automatically The White LED lights up automatically illuminating the subject in the center of the screen allowing you to record brightly in color Low Light Plus CARD CAMERA mode In CARD CAMERA mode use this mode to record in dark places The shutter is fixed at a slow shutter speed The White LED lights up illuminating the subject in the center of the screen allowing you to record brightly in...

Page 60: ...r dial The symbol of the mode appears on the upper left corner of the screen Auto disappears after 4 seconds Do not change the mode during recording as the brightness of the image may change abruptly The setting resets to the Auto mode when you switch the program selector to Bright light in a dark scene may cause a vertical light bar to appear This is not a malfunction CARD PLAY VCR CARD CAMERA PL...

Page 61: ...on to open the menu Select D EFFECTS and press the ON OFF button The camcorder retains the setting even if you turn it off or change the program AE mode The digital effect turns off if you switch the program selector to Digital effects can be selected but not activated on a blank blue screen appears in PLAY VCR mode Digital effects activated during playback do not change the recording Digital effe...

Page 62: ... sideways until it fills the whole screen The image is wiped off from the sides of the screen The image appears from the corners until it fills the whole screen The image is wiped off from the corners A small image appears from the left jumps into the center and enlarges until it fills the whole screen The image shrinks jumps from the center to the left and disappears The image flips into the scre...

Page 63: ...nd disappear The image appears in zigzag from the top of the screen Black stripes appear in zigzag from the bottom of the screen until they cover the whole image The screen turns yellow forms a beam that becomes thinner and the image appears A yellow beam appears in the center of the screen and expands until it covers the whole image The image appears from both sides like tides The image disappear...

Page 64: ...op button Fade out During recording press the ON OFF button and pause recording by pressing the start stop button The fader can be activated deactivated by pressing the ON OFF button PLAY VCR mode 6 Fade in In playback pause mode press the ON OFF button and begin playback by pressing the e a button Fade out During playback press the ON OFF button and pause playback by pressing the e a button The f...

Page 65: ...ed through enlarging the size of some pixels Ball BALL The image becomes like a ball Cube CUBE The image becomes a cube and rotates Wave WAVE Both ends of the image sway in waves Color Masking COLOR M The image becomes a rhombus surrounded by a masking frame that changes the colors Mirror MIRROR Creates a symmetrical image as if there would be a mirror in the center of the screen Only Black and Wh...

Page 66: ...e of the selected effect stops flashing The effect can be activated deactivated by pressing the ON OFF button Selecting an Effect in CARD CAMERA Mode 1 Press the DIGITAL EFFECTS button BLK WHT flashes 2 Press the ON OFF button BLK WHT stops flashing The effect can be activated deactivated by pressing the ON OFF button CARD PLAY VCR CARD CAMERA PLAY VCR CAMERA ZR65 MC ZR70 MC CARD PLAY VCR CARD CAM...

Page 67: ...ery 6 frames or slow every 8 frames In Low Light mode moderate every 8 frames slow every 12 frames Selecting the Multi Image Screen 1 Set the program selector to Q 2 Press the DIGITAL EFFECTS button D EFFECTS FADER EFFECT and MULTI S appear 3 Select MULTI S S SPEED and S SPLIT appears 4 Select S SPEED MANUAL FAST MOD and SLOW appear 5 Select the transition speed 6 Select MULTI S again S SPEED and ...

Page 68: ...F button 11 Press the start stop button begin recording The multi image screen is recorded on the tape The multi image screen cannot be operated in Night and Super Night ZR70 MC mode You can operate the multi image screen only in the following playback modes When S SPEED is set to MANUAL Playback pause slow forward reverse playback When S SPEED is set to FAST MOD or SLOW Playback pause The multi i...

Page 69: ...zer cannot be turned off when the program selector is set to Open the menu and select CAMERA SET UP Select IMAGE S i set it to OFF and close the menu i disappears We recommend turning off the image stabilizer when you mount the camcorder on a tripod The image stabilizer is designed to compensate a normal degree of camcorder shake The image stabilizer cannot be used in CARD CAMERA mode The image st...

Page 70: ...s 2 seconds before recording begins F flashes in white and turns green when focus and exposure are adjusted The camcorder records the still image for approx 6 seconds and returns to record pause mode ZR70 MC ZR65 MC In CARD CAMERA mode it displays the still image when recording is complete To cancel the self timer press the self timer button start stop button when recording movies or PHOTO button ...

Page 71: ... microphone for recording Almost all stereo microphones with a plug diameter of 0 14 inch 3 5 mm can be connected to the MIC terminal Use a microphone with a built in power supply condenser microphone The audio level differs from that of the built in microphone Be careful with long microphones as they may appear in the picture See also Using the DM 50 Microphone 74 Wind Screen You can reduce the w...

Page 72: ...d screen function cannot be turned on off during recording The wind screen function can also be used for audio dubbing when AUDIO DUB is set to MIC IN in the AUDIO SET UP submenu The wind screen function cannot be used when an external microphone is connected to the MIC terminal ZR70 MC or when the DM 50 Microphone is attached to the advanced accessory shoe E ...

Page 73: ...al or plastic close to the lamp or the surrounding parts during or immediately after use they become very hot Do not look directly at the lamp while the video light is on Do not carry the camcorder by the video light 1 Slide the video light into the accessory shoe until it clicks 2 Tighten the fastening screw Be careful that the video light does not come off when tightening the screw 3 Set the cam...

Page 74: ...phone to the MIC terminal when the DM 50 Microphone is connected Do not carry the camcorder by the microphone 1 Slide the microphone into the accessory shoe until it clicks 2 Tighten the fastening screw Be careful that the microphone does not come off when tightening the screw 3 Set the camcorder to CAMERA or CARD CAMERA mode Connection appears 4 Set the microphone s directivity switch SHOTGUN For...

Page 75: ...s Adjust the zoom before the focus 3 Press the FOCUS button MF appears in light blue 4 Turn the selector dial to adjust the focus Turn the selector dial up or down until the image appears focused If AE 0 appears in light blue focus cannot be adjusted Press the FOCUS button again to display MF in light blue CARD PLAY VCR CARD CAMERA PLAY VCR CAMERA FOCUS Subjects with Reflective surfaces low contra...

Page 76: ...program selector to Infinity Focus Use this function when you wish to focus on faraway subjects such as mountains or fireworks Press the focus button more than 3 seconds in step 3 MF appears When you operate the zoom or turn the selector dial when MF is displayed in light blue disappears and the camcorder changes to manual focus E FOCUS ...

Page 77: ... or Low Light Plus ZR70 MC mode 3 Press the AE SHIFT button AE 0 appears in light blue 4 Turn the selector dial to adjust the AE shift level Turn the selector dial up to lighten the image and down to darken the image If MF is displayed in light blue AE shift cannot be adjusted Press the AE SHIFT button again to display AE 0 in light blue The camcorder retains the setting even if you turn it off or...

Page 78: ...ng when you switch the program selector to or change the program AE mode If the shutter speed is set to 1 500 or higher in CAMERA mode and you switch to CARD CAMERA mode it automatically changes to 1 250 Recording under fluorescent lights When the camcorder is set to Easy Recording or when the program AE mode is set to Auto Night or Super Night ZR70 MC mode it automatically detects the flicker of ...

Page 79: ...ange of Features Guidelines for Recording with High Shutter Speeds Outdoor sports such as golf or tennis 1 2000 Moving objects such as cars or roller coasters 1 1000 1 500 or 1 250 Indoor sports such as basketball 1 100 E ...

Page 80: ...f you turn it off When you have set the custom white balance Reset the white balance when the lighting condition changes Turn off the digital zoom Setting the white balance manually may provide better results in the following cases Changing lighting conditions Close ups Subjects in a single color sky sea or forest Under mercury lamps or certain types of fluorescent lights Use the T Indoor or U Out...

Page 81: ... program selector to Q 2 Open the menu and select CAMERA SET UP 3 Select WHITE BAL 4 Point the camcorder at a white object such as a sheet of paper zoom in until it fills the whole screen and select SET W W flashes and stops flashing when settings is complete Depending on the light source W may keep flashing The result will still be better than with the auto setting 5 Close the menu CARD PLAY VCR ...

Page 82: ...rame appears indicating the position of the enlarged part 2 Move the image Turn the selector dial to move the image to the right and left or up and down Pressing the selector dial switches between the directions To cancel the magnification move the zoom lever toward W Movies played back from a memory card cannot be magnified ZR70 MC CARD PLAY VCR CARD CAMERA PLAY VCR CAMERA ...

Page 83: ...ata code cannot be displayed in frame advance reverse playback Camera data may not appear in some special playback modes When the TV screen displays are hidden 134 the displays still appear on the LCD screen If you turn on the data code displays other than the data code will disappear from the LCD screen Available Data Code Combinations in PLAY VCR mode Date Time Camera data Date Time Camera data ...

Page 84: ...ress the DATA CODE button Only date and time appear in CARD PLAY VCR mode Six Second Auto Date Date and time appear for 6 seconds when you begin playback or to indicate that date or time zone has changed Open the menu and select DISPLAY SET UP Select 6SEC DATE set it to ON and close the menu CARD PLAY VCR CARD CAMERA PLAY VCR CAMERA CARD PLAY VCR CARD CAMERA PLAY VCR CAMERA CARD PLAY VCR CARD CAME...

Page 85: ... or date changes up to 10 times Press the or button to change the search direction Press the 3 stop button stop searching Photo search A still image recorded very close to the point you start the search may not be detected Date search A recording of longer than a minute per date area is required Date search Playback may start slightly before or after the date change Date search may not function if...

Page 86: ...finished playback fast forward or rewind the tape RTN 1 or RTN appears The tape stops automatically at 0 00 00 The tape counter changes to time code Time code and tape counter display may not match accurately The zero set memory may not function correctly when blank sections exist on the tape If you remove the tape the zero set memory is canceled and the counter display shows the time code CARD PL...

Page 87: ... only one device to the camcorder with the DV cable Blank sections may be recorded as anomalous picture If the picture does not appear reconnect the DV cable or turn the camcorder off and back on again Example Recording to a VCR 1 Connect the camcorder to the VCR See Playing Back on a TV Screen 41 2 Set the camcorder to PLAY VCR mode and load a recorded cassette 3 Connected device Load a blank cas...

Page 88: ...88 Editing Connecting a Digital Video Device Refer also to the instruction manual of the digital video device E Side with an arrow Commercially available DV cable Signal flow ...

Page 89: ...d load a blank cassette 3 Connected device Load the recorded cassette 4 Press the REC PAUSE button on the wireless controller In record pause mode and during recording you can check the picture on the screen 5 Connected device Play back the tape 6 Press the PAUSE a button on the wireless controller when the scene you wish to record appears 7 Press the STOP 3 button on the wireless controller to st...

Page 90: ...e DV cable 1 Connect the camcorder to the digital video device See Connecting a Digital Video Device 88 2 Set the camcorder to PLAY VCR mode and load a blank cassette DV IN appears 3 Connected device Load the recorded cassette 4 Press the REC PAUSE button on the wireless controller In record pause mode and during recording you can check the picture on the screen 5 Connected Device Play back the ta...

Page 91: ...lay back such tape COPYRIGHT PROTECTED PLAYBACK IS RESTRICTED appears and you will not be able to view the contents of the tape If you attempt to record from such tape via the DV terminal COPYRIGHT PROTECTED DUBBING RESTRICTED appears and you will not be able to record the contents of the tape E ...

Page 92: ...l sent from the connected device the conversion from analog to digital signals might not work properly e g signals that include copyright protective signals or anomalous signals such as ghost signals etc We recommend powering the camcorder from a household power source Connecting the Devices This illustration shows how to connect using a S video cable You can also connect the yellow plug of the st...

Page 93: ...e the menu For normal use set AV DV OUT to OFF so that AV DV does not appear on the screen If it is set to ON digital signals cannot be input via the camcorder s DV terminal Depending on the software and the specifications of your computer you may not be able to transfer converted signals via the DV terminal CARD CAMERA CARD CAMERA PLAY VCR CAMERA E AV DV OUT OFF VCR SET UP 44 ...

Page 94: ...s recorded in SP mode AV insert will stop if the camcorder detects a blank section or a section not recorded in SP mode on the tape Connected device Use only tapes without blank sections AV insert may not work correctly if the tape has a blank section or changes in the recording mode AV insert cannot be performed when the quality of the recording is poor or during special playback such as fast for...

Page 95: ...on the wireless controller AV INSERT and 2a appear 6 VCR Play back the tape 7 Press the PAUSE a button on the wireless controller when the scene you wish to insert appears 8 Press the STOP 3 button on the wireless controller to stop inserting Press the PAUSE a button on the wireless controller to pause inserting 9 VCR Stop playback Set the zero set memory at the end of the scene you wish to replac...

Page 96: ...function Do not connect disconnect any cable to from the camcorder while dubbing You cannot use the DV terminal for audio dubbing If you add sound to a tape not recorded with this camcorder sound quality may decrease Sound quality may decrease when you add sound to the same scene for more than 3 times Connecting an Audio Device Make sure that H is not displayed on the screen If H is displayed chan...

Page 97: ...to PLAY VCR mode and load a recorded cassette 2 Open the menu and select AUDIO SET UP Select AUDIO DUB set it to AUDIO IN or MIC IN and close the menu 3 Locate the scene you wish audio dubbing to start 4 Press the PAUSE a button on the wireless controller 5 Press the AUDIO DUB button on the wireless controller AUDIO DUB and appear If the optional DM 50 microphone is attached Connection appears 6 P...

Page 98: ...ys back stereo 1 and stereo 2 The mix balance can be adjusted 2 If you have selected MIX VARI adjust the mix level Open the menu and select AUDIO SET UP Select MIX BALANCE adjust the balance with the selector dial and close the menu Turn the selector dial down to increase the volume of Stereo 1 and up to increase the volume of Stereo 2 The camcorder resets to STEREO 1 when you turn the camcorder o...

Page 99: ...ndows XP users can use the software on the supplied DV NETWORK SOLUTION DISK to perform videoconference and file transfer over the Internet or upload files from the computer to the memory card and use the camcorder as card reader writer The available functions depend upon the camcorder model and the networking environment For details refer to the DV NETWORK SOLUTION DISK Software Instruction Manua...

Page 100: ...ot touch the memory card terminals If you use memory cards other than the supplied one make sure to format them with the camcorder 128 For instructions on how to connect the camcorder to the computer see Connecting to a Computer using a USB Cable 129 Inserting the Card 1 Turn off the camcorder 2 Open the cover 3 Insert the memory card all the way into the memory card slot 4 Close the cover Do not ...

Page 101: ...n subject and recording condition changing the image quality may not show a significant difference Estimated Capacity of a 8 MB Memory Card and File Size per Image These figures are approximate They vary according to the recording condition and the subject Sample images already recorded on the supplied SD Memory Card are to be included in the total number Remaining Image Capacity flashing in red N...

Page 102: ...in the 100canon folder You can choose to use consecutive file numbers CONTINUOUS or to reset the file number each time a different memory card is inserted RESET We recommend setting the file numbers to CONTINUOUS CONTINUOUS The camcorder memorizes the file number of the last image and assigns the consecutive file number to the next image even when a new memory card is inserted If a higher file num...

Page 103: ...lect FILE NOS set it to RESET and close the menu CARD PLAY VCR CARD CAMERA PLAY VCR CAMERA FILE NOS CONTINUOUS CARD SET UP 101 0101 101 101 0102 101 0104 101 101 0101 101 101 0103 CONTINUOUS RESET When you record 3 images on the supplied memory card When you replace the memory card and record an image 44 ...

Page 104: ...emory card with enough remaining capacity Recording with the Camcorder 1 Set the camcorder to CARD CAMERA mode The remaining image capacity and other information appear 2 Press the PHOTO button halfway F flashes in white and turns green when focus is adjusted Exposure is locked When you press the PHOTO button on the wireless controller recording starts immediately 3 Press the PHOTO button fully Yo...

Page 105: ...r recording starts immediately 4 Press the PHOTO button fully The card access indicator flashes The still image shown on the screen will be recorded on the memory card You can also record a still image by pressing the PHOTO button fully when the tape is in playback pause mode A still image recorded from an image in 16 9 format will be vertically compressed The data code of the still image will ref...

Page 106: ...e is loaded make sure the tape is stopped 3 Connected device Load a recorded cassette and play back the tape 4 Press the PHOTO button halfway when the scene you wish to record appears The still image remaining image capacity and other information appear When you press the PHOTO button on the wireless controller recording starts immediately 5 Press the PHOTO button fully The card access indicator f...

Page 107: ...he program AE mode and zoom on the subject Adjust focus and AE shift manually as necessary Once the sequence has started you cannot change the program AE mode AE shift zoom or focus 5 Press the PHOTO button to record the first image Direction and number of recorded images appear 6 Record the second image so that it overlaps a portion of the first image Minor discrepancies in the overlapped area ca...

Page 108: ... that it overlaps 30 to 50 of the adjoining image Try to keep the vertical misalignment within 10 Do not include moving subject in the overlapping portion Do not try to stitch images that include both distant and close subjects They may appear warped or doubled up ...

Page 109: ...mory Card make sure that the protect switch is set to allow recording Do not load unload a cassette during recording Make sure to insert a memory card with enough remaining capacity The sound of a movie recorded on a memory card will be monaural Recording with the Camcorder 1 Set the camcorder to CARD CAMERA mode 2 Press the start stop button to begin recording You can record up to 10 seconds in 3...

Page 110: ...video terminal or AV terminal analog line in function or via the DV terminal on a memory card 1 Connect the camcorder to the video device S video AV terminal See Playing Back on a TV Screen 41 DV terminal See Connecting a Digital Video Device 88 2 Set the camcorder to PLAY VCR mode If a cassette is loaded make sure the tape is stopped 3 Connected device Load a recorded cassette and play back the t...

Page 111: ...ct print function Do not turn off the camcorder disconnect the power source or remove the memory card while the card access display in the upper right corner of the screen or the card access indicator is flashing Doing so could result in data damage Make sure to insert a memory card that contains images Only date and time will be displayed when pressing the DATA CODE button You can enlarge still i...

Page 112: ...he previous image Turning the selector dial up on the last image displays the next index screen Turning the selector dial down on the first image displays the previous index screen 4 Press the index screen button The index screen is canceled and the selected image appears in single image display Slide Show 1 In single image display press the SLIDE SHOW button Images are played back one after anoth...

Page 113: ...of the screen indicates the image number of the current image by the total number of images In single image display press and hold the CARD or CARD button Press the CARD button to jump forward and the CARD button to jump backward When you release the button the still image movie of the displayed image number appears CARD PLAY VCR CARD CAMERA PLAY VCR CAMERA E ...

Page 114: ...ct 2 Press the selector dial to open the FILE OPERATION menu 3 Select PROTECT appears and now the image cannot be erased To cancel the protection press the selector dial 4 Select b RETURN to close the menu Protecting during Index Screen Display 1 In single image display press the index screen button Up to 6 images appear 2 Open the menu and select CARD OPERATIONS 3 Select PROTECT 4 Select the imag...

Page 115: ...e 4 Select YES The image is erased and the previous image appears 5 Select b RETURN to close the menu Erasing a Single Image All Images 1 Open the menu and select CARD OPERATIONS 2 Select IMAGE ERASE 3 Select SINGLE or ALL When erasing a single image ERASE THIS IMAGE NO and YES appears If an image is protected YES appears in purple When erasing all images ERASE ALL IMAGES EXCEPT FOR IMAGES NO and ...

Page 116: ...RINT ORDER 4 Select the number of copies appears on the image To cancel the print order set the number of copies to 0 5 Select b RETURN to close the menu Selecting in Index Screen Display 1 In single image display press the index screen button Up to 6 images appear 2 Open the menu and select CARD OPERATIONS 3 Select PRINT ORDER 4 Select the still image you wish to print and press the selector dial...

Page 117: ... image display open the menu and select CARD OPERATIONS 2 Select PRINT ORDERS ALL ERASE ERASE ALL PRINT ORDERS NO and YES appears 3 Select YES All disappear 4 Select b RETURN to close the menu CARD PLAY VCR CARD CAMERA PLAY VCR CAMERA E PRINT ORDERS ALL ERASE CARD OPERATIONS 44 ...

Page 118: ...nction as of January 2003 S830D S820D S530D We recommend powering the camcorder from a household power source Refer also to the instruction manual of the respective printer Connecting the Printer to the Camcorder 1 Turn off the camcorder and insert a memory card that contains images 2 Connect a power source to the printer and turn on the printer 3 Set the camcorder to CARD PLAY VCR mode Wait until...

Page 119: ...see Printing Errors 121 and Direct Print Related Messages 140 Selecting the Number of Copies A maximum of 9 copies can be selected for one still image 1 In the print setting menu turn the selector dial so that appears next to Copies and press the selector dial 2 Turn the selector dial to select the number of copies and press the selector dial Setting the Print Style CARD PLAY VCR CARD CAMERA PLAY ...

Page 120: ...n to the print setting menu Selecting the Borders 1 In the print setting menu turn the selector dial to select Style and press the selector dial 2 Select and press the selector dial 3 Select a setting option and press the selector dial 4 Press the MENU button You return to the print setting menu Bordered The image area remains relatively unchanged from the recorded image when it is printed Borderl...

Page 121: ...cel Printing Press the selector dial while Now Printing is displayed A confirmation dialog appears Select OK and press the selector dial Printing stops even if it is incomplete and the paper is fed through Restarting Printing with print order only Open the CARD PLAY VCR menu and select PRINT Select Restart in the print setting menu and press the selector dial The remaining images will be printed P...

Page 122: ...re provided on the supplied DIGITAL VIDEO SOLUTION DISK For instructions on how to upload them to the memory card refer to Adding Still Images from Your Computer to the Memory Card in the DIGITAL VIDEO SOLUTION DISK Software Instruction Manual Reselect the card mix image when you have turned off the camcorder or changed the position of the program selector Card Mix Effects You can select from the ...

Page 123: ... front of a blue curtain and the subject not blue will be superimposed on the card mix image Mix level adjustment blue area of the live video recording Card Animation C ANIMATION Combines animations with your recordings You can choose from 3 types of card animation effects Corner Animation appears on the upper left and the lower right corner of the screen Straight Animation appears on the top and ...

Page 124: ...cted 132 The screen shows the combined image When you have selected C ANIMATION select ANIMAT TYPE and select between CORNER STRAIGHT and RANDOM 6 To adjust the mix level select MIX LEVEL and adjust it with the selector dial 7 Close the menu CARD MIX flashes Activating the Card Mix Effect 1 Press the CARD MIX button CARD MIX stops flashing The combined image appears You can activate and deactivate...

Page 125: ...n to end recording Still Image 1 Press the PHOTO button halfway F flashes in white and turns green when focus is adjusted 2 Press the PHOTO button fully The camcorder records the still image on the tape for approx 6 seconds During this time the camcorder displays the still image and keeps recording the sound The camcorder returns to record pause mode E P H O T O P H O T O OFF OFF VCR VCR PLAY CAME...

Page 126: ...city and load a recorded cassette 1 Locate the still image you wish to copy on the tape and stop the tape shortly before the still image You can also use the photo search function to easily locate the still image To copy all still images from the tape rewind the tape to the beginning 2 Open the menu and select CARD OPERATIONS 3 Select COPY b CANCEL and EXECUTE appears 4 Select EXECUTE NOW COPYING ...

Page 127: ... copy with the CARD buttons To copy all still images from the memory card select the first still image 2 Open the menu and select CARD OPERATIONS 3 Select COPY b CANCEL and EXECUTE appears 4 Select EXECUTE NOW COPYING appears It takes about 6 seconds per still image to be copied to the tape Copying stops when all still images are copied or the tape is full 5 Press the 3 stop button to end copying ...

Page 128: ...a including protected images Images erased by formatting cannot be recovered If you use a memory card other than the supplied one format it with the camcorder Makes sure to insert the memory card you wish to format into the camcorder 1 Open the menu and select CARD OPERATIONS 2 Select FORMAT CANCEL and EXECUTE appears 3 Select EXECUTE FORMAT THIS CARD NO and YES appears 4 Select YES and close the ...

Page 129: ...ch or turn off the camcorder and computer while data is being transferred to the computer while the camcorder s card access indicator is flashing Doing so may damage the memory card s data Operation may not work correctly depending on the software and the specifications settings of your computer The image file on your memory card and the image files saved on the hard disk drive of your computer ar...

Page 130: ...mory card OR Upload a still image from your computer to the memory card using the software in the DIGITAL VIDEO SOLUTION DISK For instruction on how to upload a still image to the memory card refer to Adding Still Images from Your Computer to the Memory Card in the DIGITAL VIDEO SOLUTION DISK Software Instruction Manual Setting the Still Image as Start up Image 1 Open the menu 2 Select MY CAMERA 3...

Page 131: ...rive or other external memory device Image data may be corrupted or lost due to memory card defects or exposure to static electricity Canon Inc makes no warranties for corrupted or lost data Do not turn off the camcorder disconnect the power source or remove the memory card while the card access indicator is flashing Do not use memory cards in places subject to strong magnetic fields Do not leave ...

Page 132: ...mages 27 sample images are pre recorded on the supplied SD Memory Card 8 card chroma key images 5 card luminance key images 2 camera chroma key images and 12 card animation images Card Chroma Key Card Luminance Key Camera Chroma Key Card Animation E ...

Page 133: ...mory card refer to Adding Still Images from Your Computer to the Memory Card in the DIGITAL VIDEO SOLUTION DISK Software Instruction Manual If you cannot use the USB cable to connect the camcorder to a computer you will need a PC Card Adapter to upload the images to a memory card PhotoEssentials Royalty Free Stock Photography The PhotoEssentials suite of royalty free images on CD ROM features prem...

Page 134: ... is set to CAMERA The displays disappear from the TV screen and appear when you press the button again When the POWER switch is set to PLAY VCR The displays appear on the connected TV screen and disappear when you press the button again The setting resets to the OFF setting when you turn the camcorder off When the TV screen displays are hidden the displays still appear on the LCD screen If you tur...

Page 135: ...battery charge 18 Remote sensor mode 49 Audio mode 71 Fast forward playback rewind playback 38 2 playback forward and reverse 38 1 playback forward and reverse 38 Slow playback forward and reverse 38 Frame advance playback frame reverse playback 38 Playback pause forward and reverse 38 Date search photo search 85 Zero set memory forward and reverse 86 AV insert editing 94 Audio dubbing 96 END STER...

Page 136: ...io mode 71 Recording reminder Self timer countdown 70 Photo recording timer 55 Image stabilizer 69 AE shift 77 Program AE 57 Manual focus 75 Shutter speed 78 White balance 80 Card mix 122 Digital effects 61 Date and time 83 AF AE locked in Photo mode 55 PLAY VCR Mode PHOTO SEARCH 1 1000 DV IN F1 8 MIX VARI 1 1 10 1 10 12bit 12 00 PM JAN 1 2003 12bit audio out 98 Photo search Date search 85 Volume ...

Page 137: ...ch assist 107 Remaining card capacity 101 Stitch assist 107 Zoom 30 Program AE 57 AE shift 77 Manual focus 75 Shutter speed 78 White balance 80 Date and time 83 AF AE locked in Photo mode 104 Recording on a memory card 104 CARD PLAY VCR Mode ZR65 MC ZR70 MC SLIDE SHOW 101 0143 43 50 640 480 12 00 PM JAN 1 2003 Print order 116 Protect mark 114 Folder number File number 102 Current still image Total...

Page 138: ...nsert on a tape recorded in a mode other than the SP mode You attempted to perform audio dubbing on a tape recorded in 16 bit or 12 bit 4 channel sound You attempted to perform audio dubbing or AV insert on a tape with a blank section You attempted to play back a copyright protected tape You attempted to dub a copyright protected tape May also appear when an anomalous signal is received during ana...

Page 139: ...you can continue recording playback No remaining capacity on the memory card Replace with another card or erase images File or folder number has reached the maximum value Image is recorded in a not compatible JPEG format or another format not compatible with the camcorder or the image file is corrupted You attempted to set more than 200 still images in the print order Some analog images cannot be ...

Page 140: ...nting when it is ready No print head is installed in the printer Printer cover is open Close the printer cover securely Wrong paper Cancel printing and set the paper you chose in the print settings menu Paper lever error occurred Adjust the paper selection lever to the proper position The ink tank needs to be replaced soon Prepare a new ink tank If you select Continue in the error screen you can r...

Page 141: ...quipment Do not disassemble the camcorder If the camcorder does not function properly consult qualified service personnel Handle the camcorder with care Do not subject the camcorder to shocks or vibration as this may cause damage Avoid sudden changes in temperature Moving the camcorder rapidly between hot and cold temperatures may cause condensation to form on its internal surfaces 143 Storage If ...

Page 142: ...otton swab Reattach the protect cover when finished Be careful not to scratch the glass when cleaning Video Heads When the playback picture becomes distorted the video heads need to be cleaned To maintain the best picture quality we recommend cleaning the video heads frequently with the Canon DVM CL Digital Video Head Cleaning Cassette or a commercially available dry cleaning cassette Do not use w...

Page 143: ...warning message CONDENSATION HAS BEEN DETECTED appears for approx 4 seconds and h starts flashing If a cassette is loaded the warning message REMOVE THE CASSETTE appears and v starts flashing Remove the cassette immediately and leave the cassette compartment open Leaving the cassette in the camcorder may damage the tape A cassette cannot be loaded when condensation is detected Resuming use It take...

Page 144: ...k on a TV Screen You can only play back your recordings on TVs with NTSC system The NTSC system is used in the following countries areas American Samoa Antigua Aruba Bahamas Barbados Bermuda Bolivia Canada Chile Columbia Costa Rica Cuba Ecuador El Salvador Guam Guatemala Greenland Haiti Honduras Jamaica Japan Korea Mexico Micronesia Myanmar Nicaragua Panama Peru Philippines Puerto Rico Saint Kitts...

Page 145: ...or charge the battery pack Consult a Canon Service Center Replace or charge the battery pack Camcorder will not turn on The camcorder switches off by itself Cassette compartment will not open Cassette compartment stopped during loading unloading LCD viewfinder switches on and off 16 16 16 28 16 22 16 16 Camcorder is not turned on Cassette is not loaded Battery pack is exhausted Condensation is det...

Page 146: ...st the viewfinder with the diopter adjustment lever Clean the lens Adjust the viewfinder with the diopter adjustment lever Image will not appear on the screen Set the time zone date and time appears on the screen Pressing the start stop button will not start recording Camcorder will not focus A vertical light bar appears on the screen Sound is distorted or recorded in a lower volume than the actua...

Page 147: ... the memory card over and reinsert it Replace the memory card or erase images Format the memory card Insert a memory card Set FILE NUMBERS to RESET and insert a new memory card Change the position of the protect switch Set the camcorder to CARD PLAY VCR mode Insert a memory card Cancel the protection Change the position of the protect switch Turn off the camcorder Remove and reinsert the memory ca...

Page 148: ...act Power Adapter TV VCR SC 1000 Soft Carrying Case S 150 S video Cable Digital Device BP 500 Series Battery Pack CB 570 Car Battery Cable Computer SC A50 Soft Carrying Case Commercially available DV Cable BP 500 Series Battery Pack STV 250N Stereo Video Cable WD 30 5 Wide converter WA 30 5 Wide Attachment FS 30 5U Filter Set TL 30 5 Tele converter SD Memory Card VL 3 Video Light DM 50 Directional...

Page 149: ...70 Car Battery Cable Use the car battery cable with the CG 570 Battery Charger to charge battery packs on the move The car battery cable plugs into your car s cigarette lighter and runs off a 12 24 V DC negative ground battery TL 30 5 Tele converter This tele converter lens increases the focal length of the camcorder lens by a factor of 1 9 The image stabilizer is not as effective when the tele co...

Page 150: ...ttery packs Approximate usage time BP 915 60 min BP 930 120 min BP 945 170 min BP 900 series battery packs are charged with the CA 920 Compact Power Adapter optional VL 3 Video Light This video light enables you to record brightly in color even in dark places It attaches to the camcorder s advanced accessory shoe for cable free operation DM 50 Directional Stereo Microphone This highly sensitive su...

Page 151: ...R70 MC 6760A002AA BP 508 Battery Pack ZR65 MC ZR60 D85 1360 000 STV 250N Stereo Video Cable 3067A002AA D82 0590 201 IFC 300PCU USB Cable ZR70 MC ZR65 MC 6906A001AA WA 30 5 Wide Attachment D55 0170 000 Optional Accessories BP 511 Battery Pack 3055A002AA D85 1112 201 BP 522 Battery Pack 3174A002AA D85 1122 201 BP 535 Battery Pack 6741A002AA SC 1000 Soft Carrying Case 3083A002AA D81 1200 201 SC A50 S...

Page 152: ...30 sec 15 frames sec The figures in brackets represent the maximum length of one movie clip 1024 x 768 Superfine 14 images Fine 20 images Normal 39 images 640 x 480 Superfine 35 images Fine 52 images Normal 86 images The actual number varies according to the images Sample images recorded on the supplied SD Memory Card are to be included in the total number Design rule for Camera File system DCF Ex...

Page 153: ...r more ø3 5 mm stereo minijack 32 104 F 0 40 C 4 1 2 3 5 8 in 103 58 147 mm ZR70 MC 1 2 lb 525 g ZR65 MC ZR60 1 2 lb 520 g USB terminal 1 DV terminal input output AV terminal input output S video terminal input output MIC terminal input Headphone terminal Operating temperatures Dimensions Weight CA 570 Compact Power Adapter 100 240 V AC 50 60 Hz 17 W 8 4 V DC 1 5 A 32 104 F 0 40 C 2 1 3 5 1 1 in 5...

Page 154: ...ections TV 41 Connections VCR 41 Copyright signals 91 Copying still images 2 126 Data code 83 Date and time 25 Date search 85 Demo mode 53 Digital effects 61 Digital zoom 30 Direct print function 2 118 DV dubbing 90 DV terminal 88 99 Easy recording 57 Effects 65 Erasing still images 2 115 Exposure 77 Faders 62 Fast forward 37 File numbers 2 103 Focusing 75 Formatting 2 128 Grip belt 20 Headphones ...

Page 155: ...rograms 57 Remote sensor 24 Rewind 37 S1 video terminal 41 Sample images 2 132 Sand Snow mode 58 Screen displays 134 SD Memory Card 2 101 Search select 85 Self timer 70 Shutter sound 2 105 Shutter speed 78 Slide show 2 112 SP mode 54 Speaker 39 Sports mode 58 Spotlight mode 58 Still image quality 2 101 Still image size 2 101 Stitch Assist mode 2 107 Super Night mode 1 59 S video S1 video 41 Tape p...

Page 156: ...ed warranty covers all defects encountered in normal use of the DV Camcorder and does not apply in the following cases a Loss of or damage to the DV Camcorder due to abuse mishandling improper packaging by you alteration accident leaking batteries exterior nicks scratches or dents electrical current fluctuations failure to follow operating instructions maintenance and environmental instructions pr...

Page 157: ...digital video equipment is used for commercial professional or industrial purposes This limited warranty does not cover the cabinet exterior finish of the digital video equipment video cassette tapes head cleanings nor does it apply to digital video equipment purchased outside Canada TO OBTAIN WARRANTY SERVICE Ship your Canon digital video equipment in its original carton box or equivalent properl...

Page 158: ...CANADA INC MONTREAL 5990 Côte de Liesse Quebec H4T 1V7 If you have any questions call the Canon Canada Information Center toll free at 1 800 828 4040 Canada only Si vous avez des questions veuillez téléphoner sans frais au Canada 1 800 828 4040 Canada seulement MEXICO CANON MEXICANA S DE R L DE C V Periferico Sur No 4124 Col Ex Rancho de Anzaldo C P 01900 México D F México CENTRO Y SURAMÉRICA CANO...

Reviews: