background image

8

9

PRODUCT NO. 088-1718-0

A

SS

E

M

B

LY

A

SS

E

M

B

LY

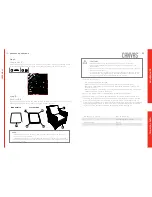
Step 5

Requires 

1, 2, 4

Tilt the assembled panel. Align holes located on the right arm frame (2) with the 

corresponding holes on the front of the seat panel (4). Repeat the same procedure 

for the left arm frame (1).

Step 7

Requires 

3, 4

Align holes located at the rear portion of the seat panel (4) with the corresponding 

holes of the back panel (3).

1

2

2

4

4

4

3

4

3

G

H

E

A

C

A

E

C

G

H

C

A

E

G

H

C

A

E

G

H

NOTE:

Do not tighten the screws completely until all four screws are installed.

NOTE:

Do not tighten the screws completely until all four screws are installed.

Step 6

Requires 

A, C, E, G, H

Insert the screw (A) with one washer (C) into the aligned hole. Tighten the screw 

using another washer and a screw nut (E). Use the hex key (G) to firmly tighten 

the screw. Use the wrench (H) to secure the nut from moving. Follow the same 

procedure for the second screw. Repeat the same procedure for the left arm 

frame.

Step 8

Requires 

A, C, E, G, H

Insert the screw (A) with one washer (C) into the aligned hole. Tighten the screw 

using another washer and a screw nut (E). Use the hex key (G) to firmly tighten 

the screw. Use the wrench (H) to secure the nut from moving. Follow the same 

procedure for the second screw. Repeat the same procedure for the left arm 

frame.

Summary of Contents for 088-1718-0

Page 1: ...LLECTION ARMCHAIR PRODUCT N0 088 1718 0 ASSEMBLY INSTRUCTIONS Toll free 1 888 670 6684 IMPORTANT Please read this manual carefully before beginning assembly of this product Keep this manual for future...

Page 2: ...technician Do not use the product in heavy wind conditions it could tip over and cause injuries to the user or passersby Do not use the product if it is in inverted position or if its legs do not res...

Page 3: ...ly of the product make sure there are no missing parts Compare the parts with packaging contents list If any part is missing or if you have any questions contact the service center at 1 888 670 6684 t...

Page 4: ...procedure for the left arm frame 1 Step 2 Requires 1 2 Lock the head of the screws B into the respective slots located on the left arm frame 1 and the right arm frame 2 G 3 B 2 1 B G B 1 3 2 3 2 Step...

Page 5: ...ighten the screws completely until all four screws are installed Step 6 Requires A C E G H Insert the screw A with one washer C into the aligned hole Tighten the screw using another washer and a screw...

Page 6: ...ollow the assembly steps in the reverse order Fabric colour may fade after prolonged exposure to light Keep the cushions indoors when not in use If surface oxidation rusting occurs and no measures are...

Page 7: ...defects in workmanship and materials Trileaf Distribution agrees to replace the defective product free of charge within the stated warranty period when returned by the original purchaser with proof of...

Reviews: