background image


4


7


15

TABLE OF CONTENTS

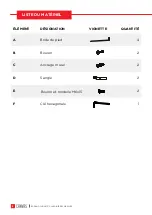
Liste des pièces


Directives détaillées 

Garantie  

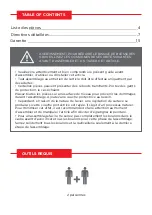
OUTILS REQUIS

• Veuillez lire attentivement et bien comprendre le présent guide avant 
d’assembler, d’utiliser ou d’installer cet article.
• Tout assemblage ou entretien de l’article doit être effectué uniquement par 
des adultes.
• Certaines pièces peuvent présenter des rebords tranchants. Portez des gants 
de protection, le cas échéant.
Placez toutes les pièces sur une surface de niveau pour prévenir les dommages 
durant l’assemblage. Ajoutez une couche protectrice au besoin.
• Cependant, en raison de la nature de l’acier, une oxydation de surface se 
produira si cette couche protectrice est rayée. Il s’agit d’un processus naturel. 
Pour minimiser cet effet, il est recommandé de faire attention au moment 
d’assembler et de manipuler l’article afin d’éviter d’égratigner la peinture.
• Pour un assemblage facile, ne serrez pas complètement les boulons dans le 
cadre avant d’avoir inséré tous les boulons pour cette phase de l’assemblage. 
Serrez solidement tous les boulons et la quincaillerie seulement à la dernière 
étape de l’assemblage.

AVERTISSEMENT! POUR RÉDUIRE LE RISQUE DE BLESSURES 
GRAVES, LISEZ LES CONSIGNES DE SÉCURITÉ SUIVANTES 
AVANT D’ASSEMBLER ET D’UTILISER CET ARTICLE.

2 personnes

Summary of Contents for 088-2294-0

Page 1: ...NS HAVING TROUBLE TOLL FREE 1 888 670 6684 IMPORTANT Please read this manual carefully before beginning assembly of this product Keep this manual for future reference MERCIER PRIVACY SCREEN PLANTER PR...

Page 2: ...day d cor and all your outdoor living essentials CANVAS makes it easy to refresh your space to reflect your unique style and the way you live every day We would love to hear from you and welcome your...

Page 3: ...eeded Due to the nature of steel surface oxidation rusting will occur if this protective coating is scratched This is a natural process To minimize this condition it is recommended that care be taken...

Page 4: ...MERCIER PRIVACY SCREEN PLANTER 4 ITEM DESCRIPTION THUMBNAIL QUANTITY 1 Underframe 1 3 Big Planter 1 2 Upperframe 1 4 Small Planter 2 PARTS LIST...

Page 5: ...MERCIER PRIVACY SCREEN PLANTER 5 EXPLODED PARTS 2 1 4 4 3...

Page 6: ...MERCIER PRIVACY SCREEN PLANTER 6 HARDWARE LIST ITEM DESCRIPTION THUMBNAIL QUANTITY A Foot Flange 4 B Bolt 2 C Wall Anchor 2 E 2 D Strap 2 F Hex Key 1 M6x15 Combination Bolt and Washer...

Page 7: ...1 E F X1 X2 STEP 1 Attach the upperframe 2 to underframe 1 by lining up the bolt holes on the upperframe 2 with the corresponding bolt holes on the underframe 1 Using M6x15 combination bolt and washe...

Page 8: ...MERCIER PRIVACY SCREEN PLANTER 8 3 STEP 2 Place small planter 4 on the underframe 1 or upperframe 2 and place big planter 3 on the underframe 1 as shown 4 X2 X1 2 4 4 3 1 2 X1 1 X1...

Page 9: ...MERCIER PRIVACY SCREEN PLANTER 9 CONDITION 1 WHEN THERE ARE NO WALLS OR HANDRAIL Secure the privacy screen to the ground by using the foot flange A as shown A X4 A...

Page 10: ...MERCIER PRIVACY SCREEN PLANTER 10 CONDITION 2 IF YOU WANT TO SECURE ON THE HANDRAIL Use strap D to secure privacy screen 1 to the handrail as shown D X2 D 1 X1...

Page 11: ...IF YOU WANT TO ATTACH PRIVACY SCREEN TO BRICK WALL STEP 1 REQUIRES PART B C D Drill holes in the wall then insert wall anchors C into the holes Secure the strap D to the wall using the bolt B B D C X...

Page 12: ...MERCIER PRIVACY SCREEN PLANTER 12 STEP 2 REQUIRES PART D Use strap D to secure the privacy screen as shown D X2 D...

Page 13: ...PLANTER 13 CONDITION 4 IF YOU WANT TO SECURE THE PRIVACY SCREEN TO A STUD WALL OR WOODEN WALLS Secure the strap D to the wall using the bolt B at marked stud or wood locations B D X2 X2 NOTE Do not c...

Page 14: ...MERCIER PRIVACY SCREEN PLANTER 14 STEP 2 Use strap D to secure the privacy screen as shown D X2 D...

Page 15: ...leaf Distribution agrees to replace the defective product free of charge within the stated warranty period when returned by the original purchaser with proof of purchase This product is not guaranteed...

Page 16: ...MIT JARDINI RES MERCIER NO D ARTICLE 088 2294 0 DES DIFFICULT S NUM RO SANS FRAIS 1 888 670 6684 IMPORTANT Veuillez lire attentivement le pr sent guide avant de commencer l assemblage de cet article C...

Page 17: ...e Vie au jardin CANVASMD vous permet de rafra chir facilement votre espace afin qu il re te votre style unique et votre fa on de vivre au quotidien Nous serions ravis de conna tre votre opinion et nou...

Page 18: ...ectrice au besoin Cependant en raison de la nature de l acier une oxydation de surface se produira si cette couche protectrice est ray e Il s agit d un processus naturel Pour minimiser cet effet il es...

Page 19: ...CRAN D INTIMIT JARDINI RES MERCIER 4 1 Cadre inf rieur 1 3 Grande jardini re 1 2 Cadre sup rieur 1 4 Petite jardini re 2 L MENT D SIGNATION VIGNETTE QUANTIT LISTE DES PI CES...

Page 20: ...5 VUE CLAT E 2 1 4 4 3 CRAN D INTIMIT JARDINI RES MERCIER...

Page 21: ...6 LISTE DU MAT RIEL A Bride de pied 4 B Boulon 2 C Ancrage mural 2 E 2 D Sangle 2 F Cl hexagonale 1 Boulon et rondelle M6x15 L MENT D SIGNATION VIGNETTE QUANTIT CRAN D INTIMIT JARDINI RES MERCIER...

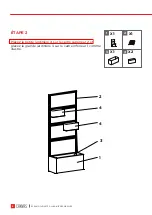
Page 22: ...cadre inf rieur 1 en alignant les trous de boulon du cadre sup rieur 2 avec les trous de boulon correspondants du cadre inf rieur 1 l aide des boulons et rondelles M6x15 E serrez l g rement les boulo...

Page 23: ...8 3 TAPE 2 Placez la petite jardini re 4 sur le cadre sup rieur 2 et placez la grande jardini re 3 sur le cadre inf rieur 1 comme illustr 4 X2 X1 2 4 4 3 1 2 X1 1 X1 CRAN D INTIMIT JARDINI RES MERCIER...

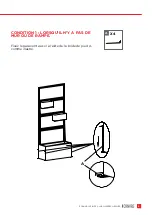
Page 24: ...9 CONDITION 1 LORSQU IL N Y A PAS DE MUR OU DE RAMPE Fixez le paravent au sol l aide de la bride de pied A comme illustr A X4 A CRAN D INTIMIT JARDINI RES MERCIER...

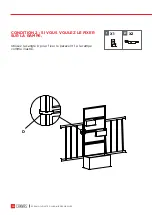
Page 25: ...10 CONDITION 2 SI VOUS VOULEZ LE FIXER SUR LA RAMPE Utilisez la sangle D pour fixer le paravent 1 la rampe comme illustr D X2 D 1 X1 CRAN D INTIMIT JARDINI RES MERCIER...

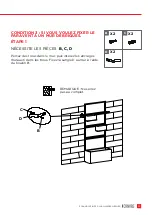
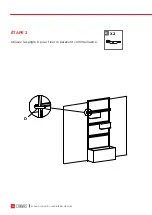
Page 26: ...E BRIQUES TAPE 1 N CESSITE LES PI CES B C D Percez des trous dans le mur puis ins rez les ancrages muraux C dans les trous Fixez la sangle D au mur l aide du boulon B B D C X2 X2 X2 REMARQUE Ne serrez...

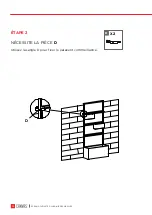
Page 27: ...12 TAPE 2 N CESSITE LA PI CE D Utilisez la sangle D pour fixer le paravent comme illustr D X2 D CRAN D INTIMIT JARDINI RES MERCIER...

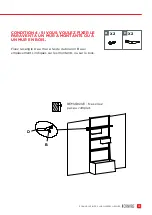
Page 28: ...ER LE PARAVENT UN MUR MONTANTS OU UN MUR EN BOIS Fixez la sangle D au mur l aide du boulon B aux emplacements indiqu s sur les montants ou sur le bois B D X2 X2 D B REMARQUE Ne serrez pas au complet C...

Page 29: ...14 TAPE 2 Utilisez la sangle D pour fixer le paravent comme illustr D X2 D CRAN D INTIMIT JARDINI RES MERCIER...

Page 30: ...il consent remplacer l article d fectueux sans frais lorsqu il est retourn accompagn de la preuve d achat par l acqu reur initial au cours de la p riode de garantie convenue Cet article n est pas gara...

Page 31: ......

Reviews: