background image

To obtain the best performance from your fire table, you must perform the following 
storage and maintenance activities on a regular basis: 


Allow at least 35 minutes for the fire table to cool down after 

use, before disconnecting and removing the gas cylinder.  


Store the gas cylinder in a dry, well-ventilated and 

sheltered area protected from inclement weather and dust, 
out of the reach of children, and not in a building, garage or 
any other closed area.  


The fire table may be stored indoors only if the cylinder is 

disconnected and removed.   


Keep the fireplace area clear and free from combustible materials, 

gasoline and other flammable vapours and liquids. 


Installation and repair should be done by a qualified service person. The fire table 

should be inspected before use and at least annually by a qualified service person. 
More frequent cleaning may be required as necessary. It is imperative that the control 
compartment, burner, and circulating air passageways of the fire table be kept clean.


If you disassemble the burner when cleaning the fire table, please reassemble it 

according to the picture on the right to make sure the burner induction tunnel is on 
and exactly covers the orifice base. It is imperative that the control compartment, 
burner, and circulating air passageways of the fire table be kept clean. It is recommended 
not to disassemble the burner. 


Permanent installation and repair should be done by a qualified service person. The 

fire table should be inspected annually by a qualified service person. 

STORAGE AND MAINTENANCE

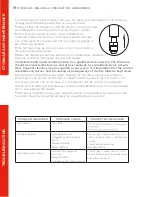
TROUBLESHOOTING

PROBLEM OBSERVED

POSSIBLE CAUSE

CORRECTIVE MEASURES

G as odour

Delayed ignition

Incorrect burner flame

G as l

Low gas pressure 
Clogged or dirty burner 
ports 
Blocked orifice 
Spent battery

Incorrect gas supply or 
pressure 
Blocked orifice 
Clogged or dirty burner ports

eak

.

Clean burner ports—see manual

Check  gas  supply  pressure.

page  2

section.
Check orifice opening.
Replace battery.

Check and clean orifice opening.

Check  gas  supply  pressure.

Clean burner ports.

19 

MODEL NO. 088-2230-2 | PRODUCT NO. A208009600

Summary of Contents for ALBION 088-2230-2

Page 1: ...ET MODEL NO 088 2230 2 PRODUCT NO A211046500 Toll free 1 888 670 6684 IMPORTANT Please read this manual carefully before beginning assembly of this product Keep this manual for future reference Produc...

Page 2: ...IMPORTED BY TRILEAF DISTRIBUTION TRIFEUIL TORONTO CANADA M4S 2B8 MADE IN CHINA...

Page 3: ...placed on flat horizontal ground Any assembly or maintenance of the product must be carried out by adults only Some parts may contain sharp edges Wear protective gloves if necessary Keep children and...

Page 4: ...sembled Pre assembled Pre assembled Pre assembled Pre assembled eel 1 E F 1 G Seat Cushion 1 H Back Cushion 1 M M6 6 BB M M6 6 CC DD EE FF 1 GG 1 HH 2 PRODUCT NO A211046500 P001400155 H010030030 P0040...

Page 5: ...ean floor Remove all packing materials and place them back into the box Do not dispose of the packing materials until assembly is complete Read each step carefully before beginning any assembly and ma...

Page 6: ...STEP 1 Connecting the Back and Handrail 088 2230 2 PRODUCT NO A211046500 1x 1x 4x 1x...

Page 7: ...7 STEP 2 Assembly of the Seat ASSEMBLY 1x 6x 6x 6x...

Page 8: ...STEP 3 Assembly of the Wheel and Seat 088 2230 2 PRODUCT NO A211046500 4x 1x 8x 8x 4x...

Page 9: ...9 STEP 4 Assembly of the and the Fixed Frame ASSEMBLY 4x 1x 4x 4x 4x...

Page 10: ...STEP 5 Assembly of the Leg and the 10 088 2230 2 PRODUCT NO A211046500 12x 12x 12x...

Page 11: ...11 STEP 6 Assembly of the Seat Cushion and the Back Cushion ASSEMBLY 1x 1x...

Page 12: ...screws and nuts periodically for tightness tightening them again as required Clean the chair with mild soap and water Rinse thoroughly and wait until the product is dry before reassembling it Do not u...

Page 13: ...manship and materials Trileaf Distribution agrees to replace a defective product free of charge within the stated warranty period when returned by the original purchaser with proof of purchase This pr...

Page 14: ...NSTRUCTIONS Toll free 1 888 670 6684 IMPORTANT Please read this manual carefully before beginning assembly of this product Keep this manual for future reference 7 PIECE MARBLE TOP FIRE DINING SET MODE...

Page 15: ...pane cylinder required not included 1 AA 1 5V battery required not included CAUTION Rechargeable batteries contain nickel metal hydride and must be recycled or disposed of properly Do not mix old and...

Page 16: ...ion Leak test Lighting Storage and maintenance Troubleshooting Limited warranty 3 4 4 6 7 18 19 18 19 20 17 9 17 17 IMPORTANT Please take time to read these instructions thoroughly and follow each ste...

Page 17: ...for Cylinders Spheres and Tubes for ransportation of Dangerous Goods and Commission CAN CSA B339 as applicable 2 Provided with a listed overfilling prevention device 3 Provided with a cylinder connec...

Page 18: ...r water Immediately call a service technician to inspect the appliance and to replace any part of the control system which has been under water The LP Gas supply cylinder to be used must be constructe...

Page 19: ...6 EXPANDED VIEW EXPANDED VIEW...

Page 20: ...A208009600 Parts List Label Part Number Description Qty Part Image A P003100068 Lid Fire bowl Table Top Foot Back panel Side panel 1 B 3 9 0 0 0 5 2 0 0 P 1 C P002100226 1 D 0 7 2 0 0 4 5 0 0 P 2 E 3...

Page 21: ...older Lava rock 1 kg Bolt M6 30 Bolt M6 20 Bolt M4 20 Wrench M6 Bolt M6 15 Flat washer M6 1 G1 P005100109 1 H P006700048 1 I P006600020 Hardware Pack Label Part Number Description Qty Add Part Image A...

Page 22: ...8x 8x 1x 2x 9 MODEL NO 088 2230 2 PRODUCT NO A208009600 ASSEMBLY 2x...

Page 23: ...1x 4x 4x ASSEMBLY...

Page 24: ...3 4x 4x 1x ASSEMBLY 11 MODEL NO 088 2230 2 PRODUCT NO A208009600...

Page 25: ...4 8x 1x 8x 1 ASSEMBLY...

Page 26: ...5 1x 1x 13 MODEL NO 088 2230 2 PRODUCT NO A208009600 ASSEMBLY...

Page 27: ...6 1x 14 ASSEMBLY 2x...

Page 28: ...7 3x 15 MODEL NO 088 2230 2 PRODUCT NO A208009600 ASSEMBLY...

Page 29: ...8 1x 16 ASSEMBLY...

Page 30: ...er safety venting 2 Open the gas door and put the cylinder inside LOCATION SETUP Gas Connection Your gas appliance comes assembled ready for a gas connection 3 Unscrew the battery box as shown in Fig...

Page 31: ...ice Centre for assistance at 1 888 670 6684 5 If the connection does not leak continue to the next step 1 Push in and turn control knob to LOW 2 If the burner is not lit turn the knob back to OFF Wait...

Page 32: ...and circulating air passageways of the fire table be kept clean If you disassemble the burner when cleaning the fire table please reassemble it according to the picture on the right to make sure the b...

Page 33: ...one 1 year warranty against defects in workmanship and materials Trileaf Distribution agrees to replace the defective product free of charge within the stated warranty period when returned by the ori...

Reviews: