background image


Do not use an open flame to check for leaks.  


Do not smoke during testing.  


Do not test indoors.  

   A leak test must be performed whenever the gas cylinder is replaced.

WARNING!!!

NOTE: 

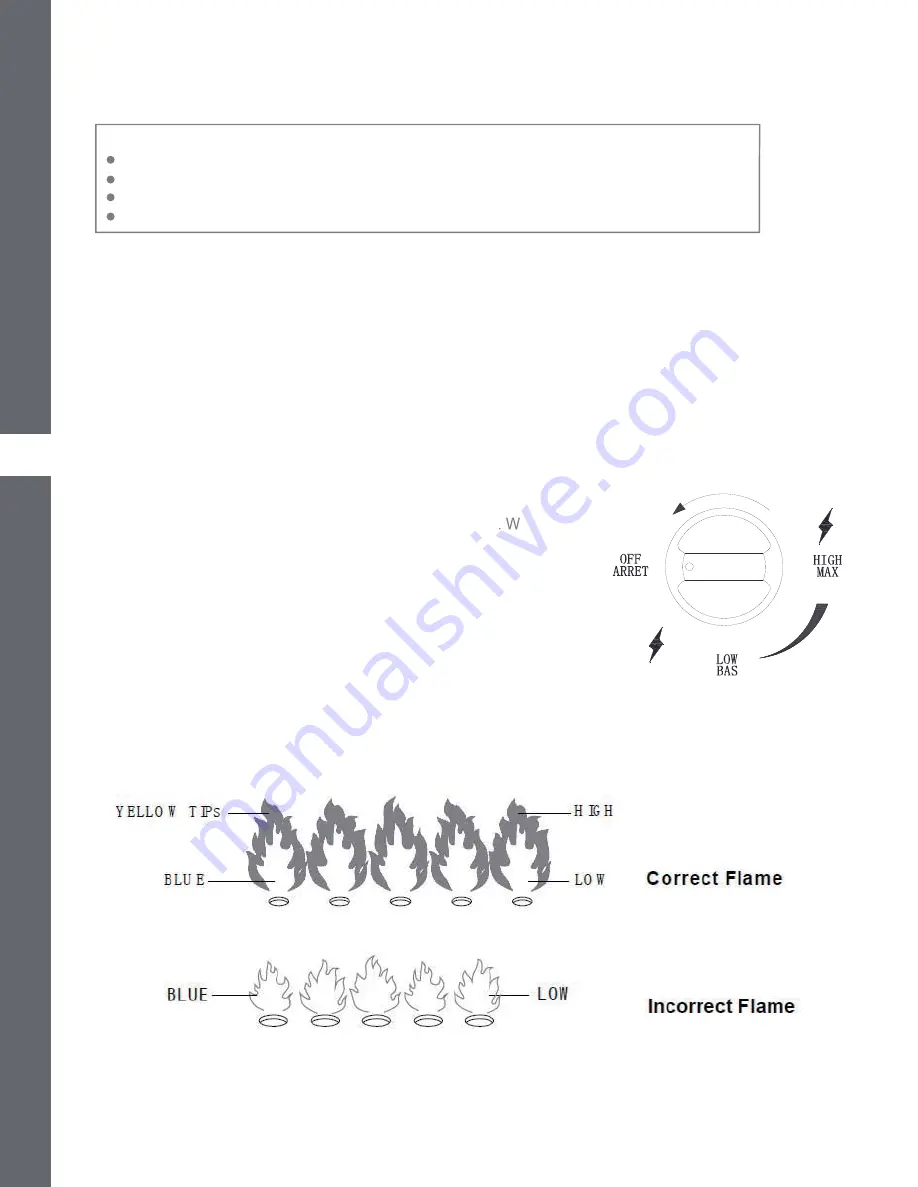
While in use, the burner flame should be mainly blue in appearance with a small 

amount of yellow. The flame can be identified by the following figure.

1. Make sure the control knob is in the “OFF” position.
2. Make sure the gas cylinder is correctly and securely connected to the pressure regulator,
without over-tightening.
3. Turn on the gas cylinder valve. Apply 50% soap and 50% water solution to the gas hose
and connections between the control knob and gas cylinder. 
4. If something is leaking, you will see bubbles form. In case of leaks, turn off the gas supply,
undo the leaking connection, re-connect it and try again. If the leak persists, consult 
Customer Service Centre for assistance at 1-888-670-6684. 
5. If the connection does not leak, continue to the next step.

1. Push in and turn control knob to LOW.
2. If the burner is not lit, turn the knob back to "OFF"    ait 5 minutes

3. If burner is lit, continue to depress control knob for 1-2 minutes
until the thermocouple is hot.


4. Release control knob and the burner should stay lit.
5. Turn control knob to desired heat setting: LOW – HIGH.
6.

(

L-FT1346PST-A

)


LEAK TEST

11


MODEL N0.085-1569-0

LIGHTING 

 LEAK TEST

Turn control knob to OFF to shut down. Turn off gas supply at

cylinder. Allow a 5-minute complete shut off period before relighting 

the appliance.

and repeat step 1.

Press and turn the control valve knob clockwise to OFF to shut down the fire pit.

Close the gas cylinder valve when the fire pit is not in use.
(

CAUTION: 

Do not kink flexible gas hose. If it is kinked, a gas leak could occur.)

7.

Warning: Lighting the fire table improperly could lead to an unsafe condition.

Summary of Contents for BLACKCOMB 085-1569-0

Page 1: ...xxxxxxx ASSEMBLY INSTRUCTIONS Toll free 1 888 670 6684 IMPORTANT Please read this manual carefully before beginning assembly of this product Keep this manual for future reference 085 1569 0 BLACKCOMB...

Page 2: ...Outdoor Use Only DANGER If you smell gas 1 Shut off gas to the appliance 2 Extinguish any open flame odour property flammable vapours odour 3 Propane tank not included WARNING DANGER BLACKCOMB OUTDOOR...

Page 3: ...nnection Leak test Lighting Storage and maintenance Troubleshooting Limited warranty 3 4 4 6 7 11 12 11 12 13 10 8 10 10 IMPORTANT Please take time to read these instructions thoroughly and follow eac...

Page 4: ...rovided with a cylinder connection device compatible with the connection for the appliance Always place the appliance on a firm and level surface Solid fuels must not be burned in this gas appliance W...

Page 5: ...iance if any part has been under water Immediately call a service technician to inspect the appliance and to replace any part of the control system which has been under water LP Gas supply cylinder to...

Page 6: ...6 EXPANDED VIEW EXPANDED VIEW...

Page 7: ...art Image AA H02015C11 Bolt M6 15 8 1 BB H19001C11 Flat washer M6 8 1 CC H00001C12 Wrench M6 1 0 If you want to replace the parts listed please contact Customer Service Centre 1 888 670 6684 Parts Lis...

Page 8: ...ASSEMBLY 8x 8x 1x 3x 1x...

Page 9: ...ASSEMBLY MODEL N0 1x 1x 1x 085 1569 0 L FT1346PST A...

Page 10: ...ut the cylinder inside 1 Clean the valve and ensure the tank holder is situated in an appropriate location Fig 1 2 Loosen the tank holder retainer bolt by turning counter clockwise Fig 2 Place the pro...

Page 11: ...the leak persists consult Customer Service Centre for assistance at 1 888 670 6684 5 If the connection does not leak continue to the next step 1 Push in and turn control knob to LOW 2 If the burner i...

Page 12: ...e table be kept clean If you disassemble the burner when cleaning the fire table please reassemble it according to the picture on the right to make sure the burner induction tunnel is on and exactly c...

Page 13: ...led or operated according to the instructions or subjected to abuse improperly treated neglected rusted by exposure to the elements misused and or if any repairs maintenance or service has been done b...

Reviews: