background image

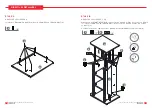
NÉCESSITE LES PIÈCES A, K

BANC RANGE-CHAUSSURES LESLIE

BANC RANGE-CHAUSSURES LESLIE

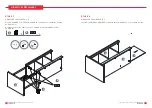
16

17

DIRECTIVES DÉTAILLÉES

ÉTAPE 11

Placez le COUSSIN (K) sur le DESSUS (A).

N.B. : Tenez le coussin avec les bandes autoadhésives faisant face vers le 

bas et placez-le sur les bandes autoadhésives sur le banc.

K

GARANTIE

352 lb 12 oz (160 kg)

13 lb 3 oz (5,98 kg)

14 lb 9 1/2 oz (6,62 kg)

13 lb 3 oz (5,98 kg)

A

ENTRETIEN DE VOTRE ARTICLE

Nettoyer avec un chiffon humide. 

Ne pas utiliser d’agent nettoyant 

contenant du solvant. Ne pas 

utiliser de javellisant, d’acide ou 

tout autre nettoyant abrasif.

1

GARANTIE LIMITÉE DE 1 AN

Cet article CANVAS    est couvert par une garantie d’un (1) an contre les défauts de 

matériaux et de fabrication.

Cet article n’est pas garanti contre l’usure ou le bris en raison d’un usage abusif ou 

inapproprié.

Distribution Trifeuil consent à remplacer l’article défectueux sans frais lorsqu’il est 

retourné, accompagné de la preuve d’achat, par l’acquéreur initial au cours de la 

période de garantie convenue.

Fabriqué en Chine
Importé par : Trileaf Distribution Trifeuil Toronto, Canada  M4S 2B8

NO DE MODÈLE : 168-0078-8

MC

Summary of Contents for LESLIE 168-0078-8

Page 1: ...MODEL NO 168 0078 8 ASSEMBLY INSTRUCTIONS HAVING TROUBLE TOLL FREE 1 888 670 6684 LESLIE SHOE BENCH...

Page 2: ...HE SHOE BENCH LESLIE SHOE BENCH 3 We believe the power of decor and how it makes up the fabric of your home That s why the CANVAS assortment gets its inspiration from Canadians and the way they live F...

Page 3: ...1 H Right Side Panel 1 I Bottom Support 1 J Back Panel 1 K Cushion 1 1 Screws 5 x 50 mm 7 2 Screws 4 x 35 mm 3 3 Cam Bolts 28 4 Cams 19 5 Coated Paper Stickers 19 Glue 7 2 6 Wood Dowels 7 8 x 30 mm 8...

Page 4: ...into the holes of the panel REQUIRES D E 3 4 5 Attach the BACK RAIL B and TOP RAIL C to TOP A using WOOD DOWELS 7 8 x 30 MM 3 SCREWS 4 X 35 MM 2 and SCREWS 5 x 50 MM 1 STEP 2 Attach the BOTTOM RAIL E...

Page 5: ...ANEL F to TOP A using WOOD DOWELS 7 8 x 30 MM 3 CAMS 5 and CAM BOLTS 4 Cover the cam holes with the COATED PAPER STICKERS 6 STEP 4 Attach BOTTOM D to DIVIDER PANEL F using WOOD DOWELS 7 8 x 30 MM 3 an...

Page 6: ...REQUIRES G I 3 4 REQUIRES A D 3 Insert CAM BOLTS 4 to the LEFT SIDE PANEL G Insert WOOD DOWELS 7 8 x 30 MM 3 to the BOTTOM SUPPORT I STEP 6 Insert WOOD DOWELS 7 8 x 30 MM 3 to TOP A and BOTTOM D STEP...

Page 7: ...OE BENCH 12 1 3 STEP 7 Attach LEFT SIDE PANEL G to the body using CAMS 5 Cover the cam holes with the COATED PAPER STICKERS 6 STEP 8 Insert the BACK PANEL J to the groove on the TOP A and BOTTOM D STE...

Page 8: ...4 15 STEP 9 Insert CAM BOLTS 4 to RIGHT SIDE PANEL H STEP 10 Attach BOTTOM SUPPORT I to the body using CAMS 5 Attach RIGHT SIDE PANEL H to the body using CAMS 5 Cover the cam holes with the COATED PAP...

Page 9: ...1 YEAR LIMITED WARRANTY Made in China Imported by Trileaf Distribution Trifeuil Toronto Canada M4S 2B8 Wipe clean with a damp cloth Do not use solvent type cleaning agents Do not use bleach acid or o...

Page 10: ...Exclusively at Canadian Tire...

Page 11: ...NO DE MOD LE 168 0078 8 INSTRUCTIONS D ASSEMBLAGE DES DIFFICULT S NUM RO SANS FRAIS 1 888 670 6684 BANC RANGE CHAUSSURES LESLIE...

Page 12: ...UTILS REQUIS Serrez les vis la main pour viter tout dommage N UTILISEZ PAS D OUTILS LECTRIQUES POUR ASSEMBLER CET ARTICLE Tournevis 2 personnes Nous croyons au pouvoir de la d coration et la fa on don...

Page 13: ...che 1 H Panneau lat ral droit 1 I Support inf rieur 1 J Panneau arri re 1 K Coussin 1 1 Vis de 5 x 50 mm 7 2 Vis de 4 x 35 mm 3 3 Boulons came 28 4 Cames 19 5 Cache vis autoadh sifs en papier 19 Colle...

Page 14: ...PI CES A B C 1 2 3 N CESSITE LES PI CES D E 3 4 5 Fixez le RAIL ARRI RE B et le RAIL SUP RIEUR C au DESSUS A l aide de GOUJONS EN BOIS DE 7 8 X 30 MM 3 et de VIS DE 4 X 35 MM 2 de VIS DE 5 X 50 MM 1...

Page 15: ...N F au DESSUS A l aide de GOUJONS EN BOIS DE 7 8 X 30 MM 3 de CAMES 5 et de BOULONS CAME 4 Couvrez les trous de came avec des CACHE VIS AUTOADH SIFS EN PAPIER 6 TAPE 4 Fixez le BAS D aux PANNEAUX DE S...

Page 16: ...I 3 4 N CESSITE LES PI CES A D 3 Ins rez des BOULONS CAME 4 dans le PANNEAU LAT RAL GAUCHE G Ins rez des GOUJONS EN BOIS DE 7 8 X 30 MM 3 dans le SUPPORT INF RIEUR I TAPE 6 Ins rez des GOUJONS EN BOIS...

Page 17: ...RANGE CHAUSSURES LESLIE 12 1 3 TAPE 7 Fixez le PANNEAU LAT RAL GAUCHE G aux pi ces assembl es l aide de CAMES 5 Couvrez les trous de came avec des CACHE VIS AUTOADH SIFS EN PAPIER 6 TAPE 8 Ins rez le...

Page 18: ...es BOULONS CAME 4 dans le PANNEAU LAT RAL DROIT H TAPE 10 Attachez le SUPPORT INF RIEUR I au corps du meuble l aide des crous ou CAMS 5 Fixez le PANNEAU LAT RAL DROIT H au corps du meuble l aide des c...

Page 19: ...iser d agent nettoyant contenant du solvant Ne pas utiliser de javellisant d acide ou tout autre nettoyant abrasif 1 GARANTIE LIMIT E DE 1 AN Cet article CANVAS est couvert par une garantie d un 1 an...

Page 20: ...Une exclusivit Canadian Tire...

Reviews: