background image

Operation

-22-

4

安全に関する


注意事項

製品概要

各部の名称と


働き

製品仕様

Operation

保守・


お手入れ

不具合発生時


の処置

本製品の移送

小型特殊自動車


登録申請の手引き

 • Do not allow bystanders to come near machine when driving.

 • Set handlebar in a proper position for the operator. Setting them in 

an improper position may hinder safe operation.

 • Always make certain of the safety of your surroundings before 

driving; start slow. Adjust speed according to the condition and 
gradient of the surface on which you are traveling.

 • Do not a make sudden start, acceleration, change of speed, change 

of direction, or stop. Do not turn at high speed. Avoid sudden 
maneuvers; this may cause the operator to be dragged or to be 
thrown, or machine to tip over.

 • Shift auxiliary transmission to [Low] position and drive slowly 

when traveling on a slope. Operator can be dragged or thrown, or 
machine can tip over.

 • Do not drive machine across a slope. Machine can slip or tip over.

 • Do not turn on a slope. Machine can turn the opposite direction, slip 

or tip over.

Driving

Summary of Contents for BP35

Page 1: ...ailure to follow safety precautions could result in serious injury or death Keep this manual for future reference by you and by all those who operate and maintain this machine Original Instructions in English Off road Rubber Track Carrier BP35 Operator s Manual 3588 6155 000 ...

Page 2: ......

Page 3: ... followed Read and understand this manual and safety labels on machine thoroughly before using this machine Always follow the instructions and safety precautions or serious injury or death could result This machine should only be used for its intended purpose hauling and dumping Any other use could be dangerous This machine may not be operated on public road or what is considered to be public road...

Page 4: ... easy reference Notice to Owner Be sure that everyone who uses this machine including those who rent or lease this machine receives a copy of this Operator s Manual and understands the importance of reading and following the information in this manual ...

Page 5: ...situation which will result in death or serious injury if the user does not follow the procedures or the instructions Indicates a potentially hazardous situation which could result in death or serious injury if the user does not follow the procedures or the instructions Indicates a potentially hazardous situation which could result in minor to moderate injury or damage to the machine if the user d...

Page 6: ...aler or our company s sales department regarding service orders or any questions or problems that may arise when using this machine Please make sure to have the product name serial number and the make and type of engine handy at the time of contact The model and serial number can be found on the model label as shown below and the make and type of engine can be found in Chapter 3 Specifications of ...

Page 7: ...The replacement or repair parts for this product shall remain available for seven years after the production of this type of machine is discontinued Availability of Spare Parts ...

Page 8: ...bels 1 Safety Mechanisms 2 Safety Precautions 3 Training 3 Preparation 4 Operation 5 Servicing 10 2 Controls and Components 11 Name and Function of Controls 11 3 Specifications 13 Product Specifications 13 Contents of the Tool Bag 15 4 Operation 16 Preparation 16 Pre start up Inspection 16 Checking and Filling Fuel 16 Adjusting Handlebar Angle 17 Contents ...

Page 9: ...9 Working 31 Dumping 31 Using Slide Frame Slide Frame Model 32 Using Side Gate Three way Folding Gate Model 34 5 Maintenance 36 Maintenance Schedule 36 Engine 36 Chassis 37 List of Fluids and Lubricants 39 Lubrication Points 40 List of Consumables and Spares 41 Removing and Installing Body Panels 41 Transmission Cover 42 Belt Cover 42 Engine 43 Engine Oil 43 Air Cleaner 46 Spark Plug 47 Fuel Filte...

Page 10: ... 申 請 の 手 引 き Drivetrain 49 Track 49 Transmission Oil 51 Drive Clutch and Parking Brake 52 Side Clutch 55 Bed 56 Adjusting Slide Frame Slide Frame Model 56 After Use Care 57 After Normal Use 57 After Cold Weather Use 57 Storage 58 6 Troubleshooting 59 Troubleshooting 59 7 Transporting 64 Hauling 64 Loading and Unloading 64 ...

Page 11: ...ts Warranty Warranty Certificate is attached at the end of this manual Have the warranty certificate signed and sealed after you have received and fully understood the instructions for handling this machine and received the receipt Operator s Manual for the Engine Be sure to read and understand it together with this manual Appendix ...

Page 12: ......

Page 13: ...next page for the content of each label on the machine Locate all the warning labels attached to this machine Read and follow the instructions and precautions in them Failure to do so could result in serious injury or death to the operator or bystanders Keep the labels clean and legible Do not use solvents or gasoline to clean the labels Replace these labels immediately if they have been removed h...

Page 14: ... 請 の 手 引 き 1 3588 6061 000 2 3588 6055 000 3588M 6155 0101 020E This product is equipped with the following safety mechanisms Engine can be started only when drive clutch lever is in STOP disengaged position This is to prevent unintended movement of machine when starting engine Start Interlock Mechanism Safety Mechanisms ...

Page 15: ... The operator is responsible for the accidents or hazards caused to other people or their property Always keep in mind that care and concentration is required when working with a load carrying machine This section contains safety precautions to follow when operating and maintaining machine Read and understand the precautions in this section as well as throughout this manual and follow them when op...

Page 16: ...mize the chance of injury Do not operate machine if you have long hair loose clothing or jewelry all of which can get tangled in moving parts Do not operate machine barefoot or with open sandals Prepare beforehand the working rules and procedures such as signaling and traffic control for the work place Following such rules will reduce the risk of accidents Perform daily pre startup inspection see ...

Page 17: ...nd make sure all persons and other vehicles are a safe distance away from machine Never operate on terrain that you are not comfortable with Avoid terrain that is so rough slippery or loose that you feel like you could tip over Always check for obstacles before operating on new terrain Always travel slowly and use extra caution when operating on unfamiliar terrain Be alert when traveling on changi...

Page 18: ...kidding or sliding out of control Never operate on ice Always make certain that there is no obstacle or person behind machine when backing up Make certain that it is safe to back up then move slowly and avoid sharp turns To reduce the risk of tipping over pay special attention when encountering an obstacle or a slope or when braking on a slope or during a turn See Driving on a slope on the next pa...

Page 19: ...can cause a loss of control or a vehicle tip over Check terrain carefully before attempting to drive on a slope Never drive on a slope that you are not comfortable with Avoid a slope that is so rough slippery or loose that you feel like you could tip over When driving down a slope stop and shift to one of the first three gears auxiliary transmission in Low Go down at a reduced speed Use engine spe...

Page 20: ... field of view When carrying a load drive at a reduced speed Allow greater distance for braking Before crossing a bridge or an overpass make certain that the total combined weight of machine load and operator is within the stated weight limit of the bridge or the overpass Then proceed carefully and at a constant speed When going over the top of a slope go slow an obstacle a sharp drop or another v...

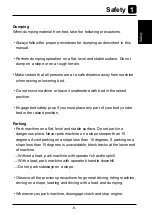
Page 21: ...e raised position Engage bed safety prop if you must place any part of your body under bed in the raised position Parking Park machine on a flat level and stable surface Do not park in a dangerous place Never park machine on a slope steeper than 15 degrees Avoid parking on a slope less than 15 degrees If parking on a slope less than 15 degrees is unavoidable block tracks at the lower end of machin...

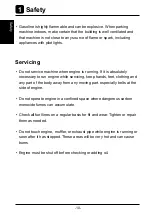
Page 22: ...d space where dangerous carbon monoxide fumes can accumulate Check all fuel lines on a regular basis for fit and wear Tighten or repair them as needed Do not touch engine muffler or exhaust pipe while engine is running or soon after it has stopped These areas will be very hot and can cause burns Engine must be shut off before checking or adding oil Servicing Gasoline is highly flammable and can be...

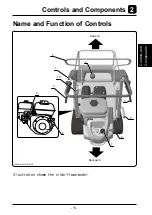
Page 23: ... 品 概 要 製 品 仕 様 運 転 と 操 作 保 守 お 手 入 れ 不 具 合 発 生 時 の 処 置 本 製 品 の 移 送 小 型 特 殊 自 動 車 登 録 申 請 の 手 引 き Controls and Components 8 9 10 7 6 5 2 3 3 1 4 3588M 6155 0201 010E Forward Backward Illustration shows the slide frame model Name and Function of Controls ...

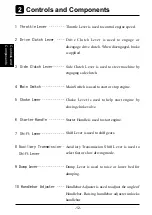
Page 24: ...used to steer machine by engaging side clutch 4 Main Switch Main Switch is used to start or stop engine 5 Choke Lever Choke Lever is used to help start engine by closing choke valve 6 Starter Handle Starter Handle is used to start engine 7 Shift Lever Shift Lever is used to shift gears 8 Auxiliary Transmission Auxiliary Transmission Shift Lever is used to select fast or slow driving mode 9 Dump Le...

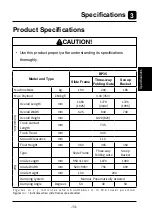
Page 25: ...mm 1020 820 Track Contact Length mm 735 Track Tread mm 440 Ground Clearance mm 110 Floor Height mm 360 365 360 Bed Type Slide Frame Three way Folding Gate Scoop Bucket Inside Length mm 950 1110 1070 1080 Inside Width mm 520 900 750 690 Inside Height mm 150 200 Dumping system Manual Pneumatically Assisted Dumping Angle Degrees 54 40 54 F i g u r e s i n i n d i c a t e s w h e n h a n d l e b a r i...

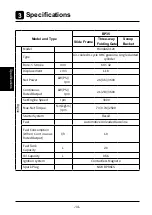
Page 26: ...Air cooled 4 cycle OHC gasoline single slanted cylinder Bore Stroke mm 60 42 Displacement cm3 118 Net Power kW PS rpm 2 6 3 5 3600 Continuous Rated Output kW PS rpm 2 1 2 8 3600 Set Engine Speed rpm 3000 Max Net Torque N m kgf m rpm 7 3 0 74 2500 Starter System Recoil Fuel Automotive Unleaded Gasoline Fuel Consumption When Continuous Rated Output l h 1 0 Fuel Tank Capacity L 2 0 Oil Capacity L 0 5...

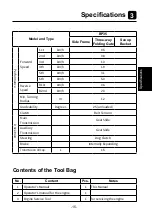
Page 27: ...d km h 1 3 4th km h 1 9 5th km h 3 1 6th km h 5 0 Reverse Speed R1st km h 0 6 R2nd km h 2 3 Min Turning Radius m 1 2 Gradeability Degrees 25 unloaded Drivetrain Clutch Belt Tension Main Transmission Gear Slide Auxiliary Transmission Gear Slide Steering Dog Clutch Brake Internally Expanding Transmission Oil Cap L 1 5 No Content Pcs Notes 1 Operator s Manual 1 This Manual 2 Operator s manual for the...

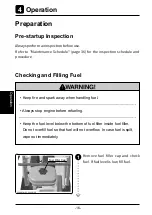
Page 28: ...l level below the bottom of fuel filter inside fuel filler Do not overfill fuel so that fuel will not overflow In case fuel is spilt wipe out immediately Preparation Pre startup Inspection Checking and Filling Fuel Remove fuel filler cap and check fuel If fuel level is low fill fuel 1 Fuel Filler Cap 3588M 6155 0401 010E Always perform an inspection before use Refer to Maintenance Schedule page 36...

Page 29: ...ing handlebar Make certain handlebar is securely locked after adjustment Move handlebar back and forth to see if it is locked 3588M 0401 040E Handlebar Adjuster Pull up handlebar adjuster and adjust handlebar to a desired height Release handlebar adjuster to lock Make sure handlebar is securely locked 1 2 Fuel Filler Cap 3588M 6155 0401 010E Recommended Fuel and Capacity Unleaded Automotive Gasoli...

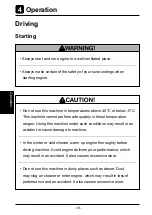
Page 30: ...C This machine cannot perform adequately in these temperature ranges Using this machine under such conditions may result in an accident or cause damage to machine In the winter or cold climate warm up engine thoroughly before driving machine A cold engine delivers poor performance which may result in an accident It also causes excessive wear Do not use this machine in dusty places such as desert D...

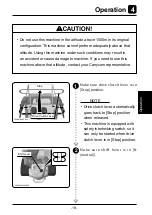
Page 31: ...h conditions may result in an accident or cause damage to machine If you need to use this machine above that altitude contact your Canycom representative Drive Clutch Lever Stop 3588M 0402 010 Make sure drive clutch lever is in Stop position 1 Drive clutch lever automatically goes back to Stop position when released This machine is equipped with safety interlocking switch so it can only be started...

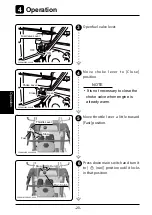
Page 32: ...uel valve lever 3 Fast Slow Throttle Lever 3588M 6155 0402 050E Move choke lever to Close position Move throttle lever a little toward Fast position 4 5 Choke Lever Open Close 3526M 0402 040US It is not necessary to close the choke valve when engine is already warm NOTE Stop 3588M 6155 0402 060E Run Main Switch Press down main switch and turn it to run position until it locks in that position 6 ...

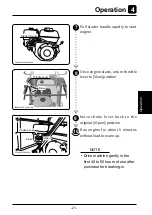
Page 33: ...ngine 7 3588M 6155 0402 080E Starter Handle Once engine starts return throttle lever to Slow position 8 Move choke lever back to the original Open position 9 Run engine for about 5 minutes without load to warm up 10 3526M 0402 080US Choke Lever Open Close Slow Throttle Lever 3588M 6155 0402 110E Drive machine gently in the first 40 to 50 hours of use after purchase for breaking in NOTE ...

Page 34: ...djust speed according to the condition and gradient of the surface on which you are traveling Do not a make sudden start acceleration change of speed change of direction or stop Do not turn at high speed Avoid sudden maneuvers this may cause the operator to be dragged or to be thrown or machine to tip over Shift auxiliary transmission to Low position and drive slowly when traveling on a slope Oper...

Page 35: ...e surroundings and should give pre arranged signals to direct the operator Do not turn main switch to stop position while driving When parking machine always turn brake lever to P parking position Avoid parking on slopes When operating brake and drive clutch levers operate the designate areas of the levers as described in this manual in order to avoid pinching fingers Pinch hazard when engaging dr...

Page 36: ...lever into a desired position 3 Drive Clutch Lever Stop 3588M 0402 010 H 2 5 3 6 R1 R2 1 4 L Shift Lever Aux Shift Lever 3588M 0402 100E Refer to Product Specifications Page 15 for speed in each gear Shift lever positions and speeds are as follows shift 1 aux L 1st shift 2 aux L 2nd shift 3 aux L 3rd shift 1 aux H 4th shift 2 aux H 5th shift 3 aux H 6th When it is difficult to shift gears move dri...

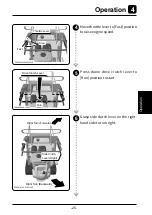
Page 37: ... Press down drive clutch lever to Run position to start 5 Move throttle lever to Fast position to raise engine speed 4 Slow Fast Throttle Lever 3588M 6155 0402 120E 3588M 0402 130E Drive Clutch Lever Run Grasp side clutch lever on the right hand side to turn right 6 Side Clutch Lever Right Right Turn Forward Right Turn Backward 3588M 6155 0402 140E ...

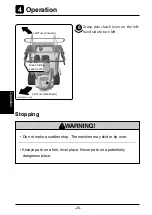
Page 38: ...移 送 小 型 特 殊 自 動 車 登 録 申 請 の 手 引 き Grasp side clutch lever on the left hand side to turn left 6 Side Clutch Lever Left Left Turn Forward Left Turn Backward 3588M 0402 150E Do not make a sudden stop The machine may skid or tip over Always park on a firm level place Never park on a potentially dangerous place Stopping ...

Page 39: ...具 合 発 生 時 の 処 置 本 製 品 の 移 送 小 型 特 殊 自 動 車 登 録 申 請 の 手 引 き Operation Move throttle lever toward Slow position to slow down 1 Slow Throttle Lever 3588M 6155 0402 160E Release drive clutch lever so that it returns Stop position and machine stops 2 Drive Clutch Lever Stop 3588M 0402 010 ...

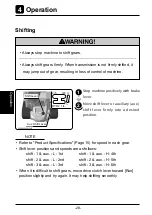
Page 40: ...ne positively with brake lever 1 Move shift lever or auxiliary aux shift lever firmly into a desired position 2 H 2 5 3 6 R1 R2 1 4 L Shift Lever Aux Shift Lever 3588M 0402 100E Refer to Product Specifications Page 15 for speed in each gear Shift lever positions and speeds are as follows shift 1 aux L 1st shift 1 aux H 4th shift 2 aux L 2nd shift 2 aux H 5th shift 3 aux L 3rd shift 3 aux H 6th Whe...

Page 41: ...ngerous place Avoid parking on a slope Never park on a slope with an incline of 15 degrees or steeper If it is absolutely necessary to park machine on a slope less than 15 degrees make certain to apply parking brake firmly and block tracks with chocks Stop machine 1 Move throttle lever toward Slow position to decrease 2 Slow Throttle Lever 3588M 6155 0402 160E Move shift lever to N neutral 3 Shift...

Page 42: ... u r n s t o stop position and engine stops 4 3588M 6155 0402 170E Main Switch Stop Close fuel valve lever 5 3588M 6155 0402 180E Fuel Valve Lever ON OFF Carbon deposit tends to accumulate on spark plug when running engine at low engine speed When engine has been run at low engine speed for an extended period run engine at high engine speed for a while before stopping engine to burn off carbon dep...

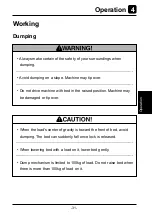
Page 43: ...en dumping Avoid dumping on a slope Machine may tip over Do not drive machine with bed in the raised position Machine may be damaged or tip over When the load s center of gravity is toward the front of bed avoid dumping The bed can suddenly fall once lock is released When lowering bed with a load on it lower bed gently Dump mechanism is limited to 100kg of load Do not raise bed when there is more ...

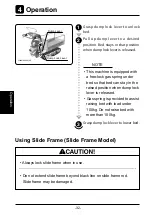
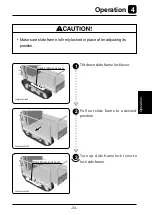
Page 44: ...osition when dump lock lever is released 2 This machine is equipped with a free lock gas spring under bed so that bed can stay in the raised position when dump lock lever is released Gas spring is provided to assist raising bed with load under 100kg Do not raise bed with more than 100kg NOTE Grasp dump lock lever to lower bed 3 Using Slide Frame Slide Frame Model Always lock slide frame when in us...

Page 45: ...録 申 請 の 手 引 き Operation Make sure slide frame is firmly locked in place after adjusting its position Tilt down slide frame lock lever 1 Slide Frame Lock Lever 3588M 0403 020E 3588M 0403 030E Pull out slide frame to a desired position 2 Turn up slide frame lock lever to lock side frame 3 Slide Frame Lock Lever 3588M 0403 040E ...

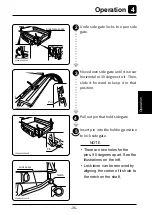
Page 46: ...ng Gate Model Lock front gate in vertical position or remove front gate when using machine with side gate in open position Always remove tubular frame on side gate when using machine with side gate in open position When carrying load with side gates open carry it so that side gates do not carry the entire weight of the load Undo front gate locks 1 Front Gate Locks 3588M 0403 070E ...

Page 47: ...o keep it in that position 3 4 Insert pin into the holding position to lock side gate 5 3588M 0403 090E Pin 3588M 0403 100E Pin 3588M 0403 110E Lock Lever Notch Pull out pin that hold side gate There are two holes for the pins 90 degrees apart See the illustrations on the left Lock lever can be removed by aligning the corner of its hole to the notch on the shaft NOTE 3588M 0403 080E Side Gate Lock...

Page 48: ... engine Maintenance Schedule Perform the pre startup inspection PSI before each use the monthly inspection once a month and the yearly inspection once a year Some maintenance procedures described below may require special knowledge or tools and instruments Contact your Canycom representative to perform such procedures Engine Engine Oil to be clean and at the correct level Air Cleaner Element to be...

Page 49: ...verheating shall not be observed There shall not be oil leaks in or around transmission Drive Belt Belt shall be free of damage excessive wear or dirt shall be free of oil or grease Inspecting Page52 Belt tension shall be properly adjusted Inspecting Adjusting Page52 Clutch Clutch shall not make noise and shall disengage completely when operated at idle Clutch shall not slip and shall engage smoot...

Page 50: ...t joints or rust on pins W h e e l s S p r o c k e t s Idlers Shall be free of cracks deformation or excessive wear There shall not be excessive play in axle Irregular noise or overheating shall not be observed when traveling Mounting bolt or nut shall not be loose or missing There shall be no oil leak in or around axle Linkage Rods links and wires in linkage shall be free of deformation or damage...

Page 51: ...ission Oil Change Initially 50 hours Every 500 hours afterwards Gear oil API rating GL 4 or 5 SAE index 80 1 5L Item Description Schedule Note PSI Monthly Yearly Body Chassis Bed Safety Devices Bed Bed shall raise and lower smoothly Frames shall slide smoothly and can be locked in place securely Shall be free of cracks deformation or corrosion Fastening bolts or nuts shall not be loose or missing ...

Page 52: ... 動 車 登 録 申 請 の 手 引 き Lubrication Points Lubricate regularly Insufficient lubrication may result in seizure or rusting affecting smooth operation of machine Point Schedule Method Recommended 1 Center of drive clutch lever shaft E v e r y 6 m o n t h s Not necessary for 6 months after purchase Oil Gear oil GL 4 or 5 3588M 0503 010E ...

Page 53: ...6ES 98079 56876 Replace if defective 1 Drivetrain V Belt 0852 1300 032 Replace if defective 1 Track 3514 2013 000 Replace if defective 2 Brake Shoe Set 7306 9901 000 Replace if defective 1 Wire Drive Clutch 3587 3127 000 Replace if defective 1 Wire Brake 3587 3129 000 Replace if defective 1 Wire side Clutch 3587 3021 000 Replace if defective 2 Removing and Installing Body Panels Cut or pinch hazar...

Page 54: ... 合 発 生 時 の 処 置 本 製 品 の 移 送 小 型 特 殊 自 動 車 登 録 申 請 の 手 引 き Transmission Cover 3588M 0405 010E U n d o t w o b o l t s t h a t h o l d transmission cover below Remove transmission cover 1 3588M 0505 020E Belt Cover Bolt Undo a bolt in front Pull belt cover to the front and up to remove 1 Belt Cover ...

Page 55: ...away when handling fuel Make certain to fill engine with correct grade of oil to the specified level Insufficient amount or wrong grade of oil reduces performance and may cause permanent damage to engine Dispose of drained oil properly Engine Engine Oil To obtain correct reading check oil level before starting or wait about 10 minutes after stopping engine to allow oil to drain back to oil pan Cir...

Page 56: ...ing Park machine on a level ground Lift bed and make sure it is securely held by free lock gas spring Remove oil filler plug 1 2 F o l l o w t h e i n s t r u c t i o n s i n Operator s Manual for the Engine to check oil 3 6 Screw oil filler cap firmly back in place 4 5 Lower bed Recommended Oil and Quantity see List of Fluids and Lubricants page 39 NOTE Filling Remove oil filler cap 1 ...

Page 57: ...opriate oil drain pan Raise bed and make sure it is held securely with free lock gas spring 1 2 Remove oil drain plug and drain oil Put drain plug back in place 3 4 5 6 Screw oil filler cap firmly back in place 4 Fill oil Lower bed Oil is drained through built in trough NOTE F o l l o w t h e i n s t r u c t i o n s i n Operator s Manual for the Engine to fill oil 2 Check oil level 3 Filler Plug 3...

Page 58: ... 殊 自 動 車 登 録 申 請 の 手 引 き F o l l o w t h e i n s t r u c t i o n s i n Operator s Manual for the Engine to clean or replace air cleaner element 1 3588M 6155 0506 030E Air Cleaner Clean air cleaner element regularly Dirty air cleaner element reduces engine performance and life Replace air cleaner element if damaged Air Cleaner ...

Page 59: ... free lock gas spring Remove spark plug cap and spark plug 1 2 F o l l o w t h e i n s t r u c t i o n s i n Operator s Manual for the Engine to inspect clean or replace spark plug Reinstall spark plug and spark plug cap Lower bed 3 4 3588M 6155 0506 050E Spark Plug Cap When removing spark plug cap do not pull cable pull plug cap Pulling cable can damage the conductor or the joint of cable Replace...

Page 60: ...w t h e i n s t r u c t i o n s i n Operator s Manual for the Engine to clean fuel filter Start engine and visually inspect fuel filter cup so that there is no leak 1 2 Dispose of waste fuel properly 3588M 6155 0506 060E Fuel Filter Fuel is highly flammable Keep fire and spark away when servicing fuel filter If fuel is spilt wipe it off immediately Fuel Filter ...

Page 61: ...nload machine before jacking up Make certain to adjust track tension properly Improperly tensioned tracks may wear or come off resulting in property damage serious injury or death Always stop engine before servicing Allow engine to cool off before servicing Engine is very hot after operation and may pose a burn hazard Keep fire and spark away when handling fuel Drivetrain Track Track stretches dur...

Page 62: ...earance between track and center roller clearance A to be between 10 and 15mm Adjust tracks if the clearance is not within this range 1 2 Lower machine 3 Adjusting Jack up machine so that it is parallel to the ground Loosen lock nut 1 2 Adjust track tension bolt so that the clearance between track and center roller clearance A at the furthest is between 10 and 15mm 3 Illustration shows the right h...

Page 63: ... and remove transmission cover Have an appropriate drain pan 1 2 Remove drain plug to drain oil 3 4 Drain Plug 3588M 0507 030E Install drain plug Lower machine 5 Transmission Oil Dispose of waste fuel properly Recommended Oil and Quantity see List of Fluids and Lubricants page 39 NOTE Filler Plug 3588M 0507 040E 5 Remove filler plug and fill specified oil into filler with funnel ...

Page 64: ...your dealer to have it replaced 1 2 Inspecting Drive Belt 3588M 0507 050E Drive Clutch and Parking Brake Adjust drive belt tension properly Inproperly tensioned belt may reduce performance and its service life Always keep brake adjusted for maximum performance Improperly adjusted brakes may result in property damage serious injury or death Move drive clutch lever to Run position and hold it there ...

Page 65: ...cover 8 Install transmission cover Shift to neutral and move drive clutch lever to Stop position to make sure brake is firmly applied and machine does not move If brake is not firmly applied and machine moves adjust With shift lever in neutral move drive clutch lever again to Run position and make sure brake is not applied or dragging If it is adjust 6 With shift lever in neutral and drive clutch ...

Page 66: ...utch lever to Run and hold it there Adjust with adjust nut so that spring stretches by 3 5 to 4 5mm hook to hook length between 65 5 and 66 5mm Tighten lock nut and install transmission cover Tighten lock nut Lock Nut Adjust Nut Brake Wire 3588M 0507 070E Clutch wire can also be adjusted on the left column of handlebar NOTE Shift to neutral and make sure brake is not applied or dragging If it is l...

Page 67: ...spring 1 Side Clutch 8 Move drive clutch lever to Stop position with shift lever in neutral Make sure brake is firmly applied If it is not adjust with adjust nut 3588M 0507 170E Stopper Lever resting on the stopper 15 25mm Brake wire can also be adjusted on the right column of handlebar NOTE 9 With drive clutch lever in Stop position inspect the play at the loop of clutch lever is between 15 and 2...

Page 68: ...g Slide Frame Slide Frame Model Bed 3588M 0508 010E U Nut Do not apply oil or grease on slide frame rod Slide frame will not lock Remove slide frame from bed 1 Adjust U nut at the end of slide frame rod If slide frame is too tight loosen U nut If slide frame is too loose tighten U nut 2 3 Install slide frame back on bed 3 Lower bed Adjust Nut 3588M 0507 080E ...

Page 69: ...cts may cause damage Do not attempt to move machine when it becomes inoperable due to freezing 1 Clean machine wash off dirt mud and other foreign matter after use 2 If machine is to be left outside cover machine with a protective water proof covering after machine cools off 1 Clean machine wash off dirt mud and other foreign matter after use 2 Park machine on a paved or firm dry surface 3 If mach...

Page 70: ... Do not store machine in a humid dusty or hot place 1 Follow the instructions in Parking page 29 to park machine 2 Clean dirt off of machine 3 Follow the instructions in Operator s Manual for the Engine to prepare engine for storage 4 Cover machine with a protective water proof covering after machine cools off Storage Battery discharges even when it is not in use A battery may hold charge for a fe...

Page 71: ... the engine Wait and restart Fuel cock is closed Open fuel cock Page 20 Poor ignition due to a problem with spark plug Clean or replace spark plug Page 47 Other other than the above F o l l o w t h e i n s t r u c t i o n s i n Starting to restart If problem persists please contact your CANYCOM representative Page 18 Troubleshooting If any malfunction or abnormal condition is found immediately sto...

Page 72: ...ngine is flooded too much fuel fed into the engine P l e a s e c o n t a c t y o u r C A N Y C O M representative Irregular Idling Air cleaner element is clogged Clean or replace air cleaner element Page 46 Other other than the above P l e a s e c o n t a c t y o u r C A N Y C O M representative P o o r p o w e r o r acceleration Bad fuel Change fuel Insufficient intake air clogged air cleaner Cle...

Page 73: ...onsumption Insufficient intake air clogged air cleaner Clean or replace air cleaner element Page 46 Other other than the above P l e a s e c o n t a c t y o u r C A N Y C O M representative Black smoke comes out of exhaust Choke lever is in Close position Move choke lever to Open position Page 21 Air cleaner is clogged Clean or replace air cleaner element Page 46 Other other than the above P l e a...

Page 74: ... o e s n o t disengage positively Improperly adjusted drive belt Adjust drive belt Page 52 Other other than the above P l e a s e c o n t a c t y o u r C A N Y C O M representative Drive belt slips Drive belt slips Adjust drive belt Page 52 Other other than the above P l e a s e c o n t a c t y o u r C A N Y C O M representative Machine does not run straight Side clutch is not properly adjusted Ad...

Page 75: ...resentative Irregular noise or abnormal heat from roller sprocket or idler Transmission is not positively in the gear P l e a s e c o n t a c t y o u r C A N Y C O M representative Brake Brake does not work well Improperly adjusted brake Adjust brake Page 53 Brake is wet with water Apply brake a few times to dry Excessive load Reduce load Excessive load P l e a s e c o n t a c t y o u r C A N Y C ...

Page 76: ...thstand the combined weight of machine and operator width more than 2 times the width of track and length more than 4 times the height of bed of transporter and have anti slip ramp surfaces Secure hooks of loading ramps firmly and flush with bed of transporter Move slowly forward when loading onto and move slowly backward when unloading off of transporter Pay special care when going over the joint...

Page 77: ...10E More than 4 times the Height Height Park transporter on level ground Secure wheels with chocks Place loading ramps Secure hooks of ramps firmly and flush with bed of transporter Drive machine slowly forward onto bed 1 2 3 Park machine according to the instructions in Parking page 29 Secure machine firmly to bed of transporter with tie down belts rope or wire 4 ...

Page 78: ......

Page 79: ...nda GX120 3000 rpm 101 dB A NOISE LEVEL evaluated based on factory standard NOISE LEVEL Model Engine Rated revolution Vibration Handlebar Left Handlebar Left BP35 3000 rpm 3 3 m s2 4 9 m s2 VIBRATION evaluated based on factory standard VIBRATION ...

Page 80: ......

Page 81: ......

Page 82: ...rized Dealer 90 1 Fukumasu Yoshii machi Ukiha shi Fukuoka Japan 839 1396 Sales Headquarters International TEL 81 0 943 75 2195 FAX 81 0 943 75 4396 All rights reserved Unauthorized use or reproduction of this material is prohibited ...

Reviews: