


Curvation & Siesta Series Manual - V2.2
© Capital Fireplaces 2017
20
4. Servicing
Turn the appliance OFF and isolate the gas supply. Ensure the appliance is fully cold before attempting
to start servicing the appliance. No liability can be accepted by Capital Fireplaces for injury caused by
burning or scolding by a hot appliance.
A suggested procedure for servicing is listed below.
A.
Lay out dust sheet on flooring, mask off any special fireplace materials.
B.
Open Outer Firebox Door.
C.
Carefully remove the Ceramic components (including Embers) or Gravels.
D.
Use a Vacuum cleaner to clean the top of the burners and grate.
E.
Remove Grate.
F.
Use the vacuum cleaner and a soft brush to clean the pilot assembly and both Injectors. It
may be easier to access the Injector by removing the Throttle. Never modify or bend the
Thermocouple.
G.
Clean the Window Panel.
H.
Turn on the gas supply and check for leaks, check the burners and Pilot for good condition
and operation.
I.
Replace Grate.
J.
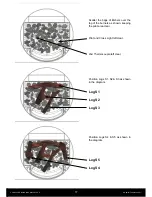
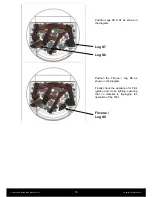
Replace the Firebed arrangements.
K.
Close doors.
L.
Check the flue system and terminal, making sure that the terminal vent is fully clear.
M.
Light the appliance and test setting pressures.
N.
Check the safe operation of the appliance.
4.1 Cleaning the Ceramics
Remove the ceramics as detailed in A - E above.
Gently clean the ceramics in the open air, using a soft brush and a vacuum cleaner. Where necessary
replace damaged components only with genuine Capital Fireplaces specified parts. Seal any scrap
ceramics in plastic bags and dispose at proper refuse sites. When using a vacuum cleaner, it is
recommended that one with a HEPA filtering system is used.
Re-fit the Firebed arrangement, re-seal the appliance and check the safe operation of the appliance.
4.2 Servicing the Burner
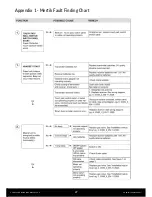
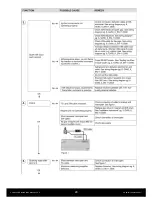
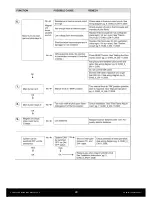
A fault finding chart is included in the appendix for the Mertik control system fitted to this appliance.
Access the Burner as detailed in A - F above.
The pilot is now clearly visible, the pilot, including the Thermocouple, can be replaced/serviced by
removing raising the pilot assembly from its mounting. This is done by removing the two screws on the
surface of the pilot. The fittings on the under-side of the pilot can be un-done using a 10mm spanner
where appropriate.
The Main Burner Injectors can be accessed from the underside of the appliance. If the burner requires
to be removed, this may be done by removing the 4 M6 fixings inside the firebox (10mm Spanner), the
burner will lift out through the Firebox.
When replacing any parts use only original Capital Fireplaces specified parts.
Summary of Contents for Curvation:Siesta
Page 7: ...Curvation Siesta Series Manual V2 2 Capital Fireplaces 2017 7 ...
Page 8: ...Curvation Siesta Series Manual V2 2 Capital Fireplaces 2017 8 ...
Page 9: ...Curvation Siesta Series Manual V2 2 Capital Fireplaces 2017 9 ...
Page 10: ...Curvation Siesta Series Manual V2 2 Capital Fireplaces 2017 10 ...
Page 28: ...Curvation Siesta Series Manual V2 2 Capital Fireplaces 2017 28 ...
Page 29: ...Curvation Siesta Series Manual V2 2 Capital Fireplaces 2017 29 ...


