


This appliance becomes extremely hot and can produce poisonous gases. A fire guard should be used if children or the infirm are present. The installer is
required to exactly follow these instructions and to completely comply with all relevant local, national and international standards.
Installing a stove is a ‘controlled service’, the law expects that it is either supervised by a qualified installer or that the building inspector is informed. Check with
your local authority.
Asbestos: Your stove does not contain asbestos, but take care to avoid asbestos in an old installation.
Weight: Your stove is heavy – take great care when moving it and ensure that the intended fireplace can support the weight – consider fitting a load distributing
plate.
Your Chimney
Once warm, your chimney makes the gas inside it rise, pulling fresh air into the stove to make it work. Your chimney must:
•
Generate a draught in use of at least 12 Pa (0.05ins wg) and not in excess of 25 Pa.
•
Be capable of withstanding the temperatures generated.
•
Be absolutely incapable of leaking fumes into the dwelling – this will commonly be achieved by it:
•
Being at least 5m high.
•
Terminating at least 1m above any roof ridge.
•
Having an internal cross-‐section not less than 0.018m² (e.g.: 150mm dia) and never more than 0.14m² (e.g.: 375 x 375mm).
•
Being free from even the slightest crack or source of leakage.
•
Having no bends sharper than 45°.
•
Being entirely free of obstructions and swept by a qualified chimney sweep.
•
Being connected to only this stove.
•
Being of thick masonry or otherwise adequately insulated.
•
Conforming to local building regulations.
Special rules apply where the flue passes through timber, thatch or other vulnerable materials – take specialist advice.
Although it is possible to access the chimney through the fire with the throat plate removed, fit hatches for cleaning access if needed.
Your Fireplace
Stoves become very hot, the setting must be made entirely of durable fireproof materials. Thin (<50mm) stone slabs risk cracking unless cut into sections to
allow for expansion and backed with a heat resistant concrete. Even beyond the safety clearance , items can become very hot -‐ take great care in siting
vulnerable materials like wax, textiles, paper etc.
Air Supply
Your stove needs air to breathe – there must be a permanent fresh air supply into the space in which it is installed equal to the size given on page 1. This can
often be provided by air leaking around door frames etc. (it is commonly accepted that this alone may suffice for appliances <c5kW) but in case of any doubt, fit
a purpose made air vent. An extractor fan, or another fuel using appliance in the same building, can remove this air.
Fit a Carbon Monoxide alarm near to the stove.
Regarding installations in rooms with extractor fans:
For solid fuel appliances: avoid installing extract ventilation in the same room. If mechanical extraction is unavoidable then seek specialist advice to ensure the
installation is tested for the safe operation of the appliance.
A suitable test would be to check for spillage when appliances are subjected to the greatest possible depressurisation. A prerequisite for this condition is that all
external doors, windows and other adjustable ventilators to outside are closed. The depressurisation at the appliance will depend on the particular combination
of fans in operation (fans in the room containing the appliance and fans elsewhere in the building) and the pattern of open internal doors, hatches etc. which is
established at the time of the test (when fans should be on their maximum useable setting), and the specific combination causing the greatest depressurisation
at the appliance depends upon the circumstances in each case. Several tests (which should include a test with the door leading into the room of installation
closed and all fans in that room switched on) may therefore be necessary to demonstrate the safe operation of the appliance with reasonable certainty. The
effect of ceiling fans should be checked during the tests. Extra ventilation should be supplied if tests show that this is necessary.
Fitting
Fasten the flue outlet and blanking plate to the top or back flue outlet opening, on a thin bead of fire cement. Do not over tighten.
Place the stove on a non-‐combustible hearth conforming to building regulations, noting the distances to combustible materials
given in the table on the front of this document.
Fix the stove securely to the earth by drilling through the fixing holes inside the stove, into the hearth, with a 6mm masonry drill.
Screw down with the bolts and washers provided. If you chose to secure the stove using an alternative method you should seal
the two holes in the base of the stove to prevent air being drawn in when the bottom valve is closed.
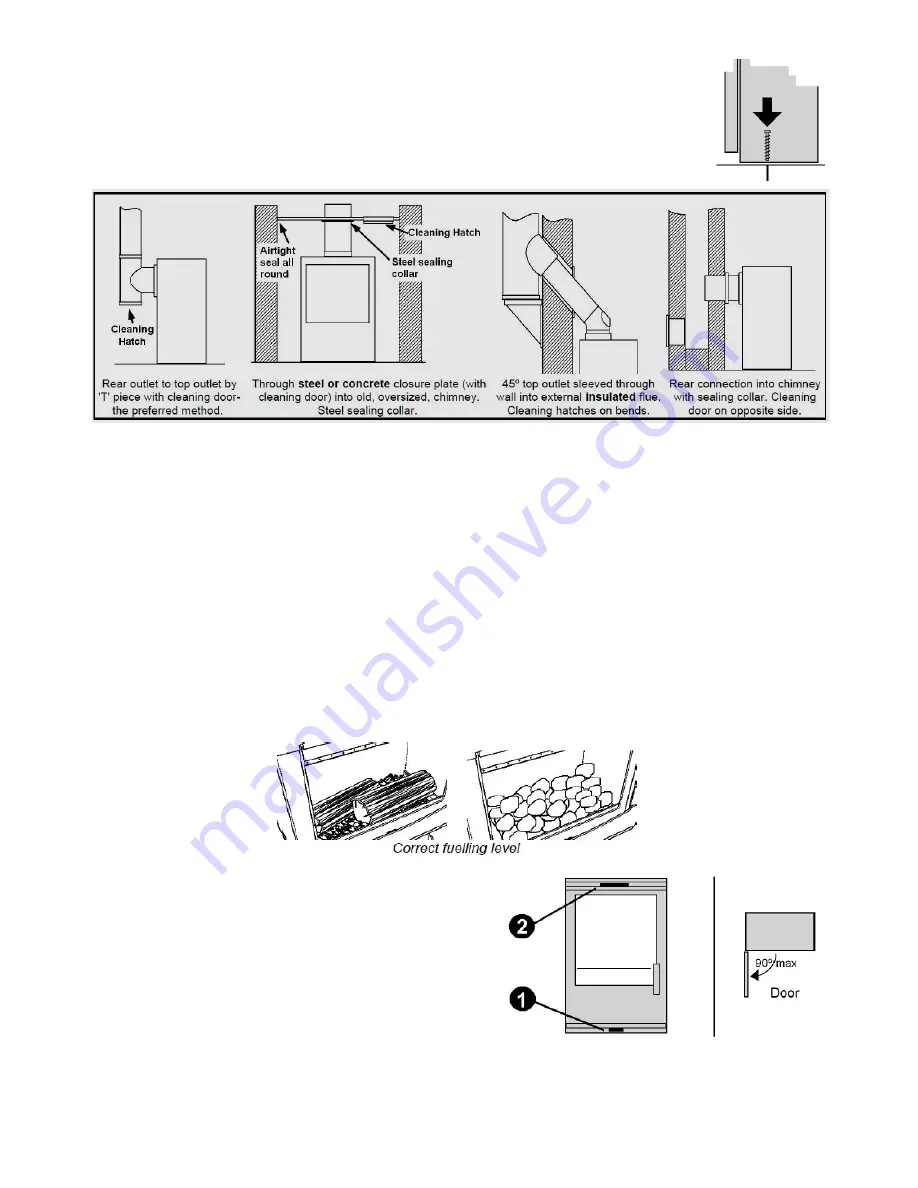
Your stove can be sealed to the chimney using a short (up to about 500mm) length of uninsulated pipe in several ways, four of
which are shown below.
Living with your stove
Every fuel, chimney and condition of use is different. Only experience will show which are the best settings for you.
Lighting
If lighting after a period of non-‐use, do check that the flueways and chimney are completely clear Place two or three firelighters close together, or screwed-‐up
paper covered with dry sticks, at the back of the grate and light them. When they are burning well gently cover them with very dry fuel, close the door and set
the air controls to the ‘high’ position (see ‘Control’). When the fire is burning well, move the controls to the lowest practical setting.
Filling
These are very efficient stoves, you don’t have to pile them up with huge amounts of fuel. Just one or two logs of about 1kg each, or mineral fuel mounded up
in the centre is all that is needed. Don’t fill above the level shown in the diagram below.
Control
How fast the fire burns depends on how much air reaches the fuel. The stove has two
air controls, one below the window (‘primary’ ❶) and one above (‘airwash control’
❷). Move the slides right for ‘high’ and left for ‘low’ on the Contemporary model.
They can get very hot so move them with the poker tool supplied or use a glove.
To open the door, fully lift the door handle and pull. To close the door, fully lift the
handle, push the door closed and then push the handle forwards to lock. Open the
door (never past 90°!) only for refuelling and de-‐ashing. Keep it tightly closed in use.
When using wood it is usually best to have the primary control ❶ completely closed
and adjust the burning rate using the airwash ❷ control. Hard fuels like anthracite
work best with the airwash closed and the primary open.
Whichever method is used it is imperative that:
1)
The route for gases from the stove to the chimney terminal is
completely air-‐tight; even the tiniest gap or crack can spoil the
updraught. Seal all joins with fireproof cement and/or heatproof
rope.
2)
It is possible to sweep the entire length – access doors may be
required.
3)
The entire construction is of durable fireproof materials.
Check the Installation
Once installed, light the fire, demonstrate it to the householder and
check that:
1)
It burns controllably and does not emit fumes to the room.
2)
The route for gases from the stove to the chimney terminal
is completely airtight, unobstructed and able to be swept.
3)
The entire construction is of durable fireproof materials.
4)
The flue presents a draught in use of at least 12Pa and not
in excess of 25 Pa.


