background image

11

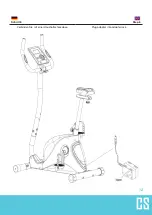
Schritt 5

Step 5

• 

Verbinden Sie die Pedale (9 + 10) mit den Kurbelar-

men am Hauptrahmen. 

Bitte beachten Sie: das linke Pedal muss gegen 

den Uhrzeigersinn eingeschraubt werden

The pedals (9 & 10) are marked „L“ and „R“ - Left and 
Right. Connect them to their appropriate crank arms 
on the main frame. The crank right arm is on the right- 
hand side of the cycle as you sit on it. Note : the right 
pedal should be threaded on clockwise and the left pe-

dal anticlockwise

Summary of Contents for 10030429

Page 1: ...10030429 10030430 Cozzil ...

Page 2: ...schränkungen die einen sicheren und effizienten Umgang mit diesem Trainingsgerät verhin dern könnten untersuchen lassen Falls Sie Medikamente mit Auswirkungen auf Blutdruck Herzschlag oder Cho lesterinspiegel einnehmen ist die Konsultation eines Arztes vor dem Training dringed notwendig Achten Sie auf die Signale Ihres Körpers Falsches oder übermäßiges Training kann gesundheitsschädlich sein Beend...

Page 3: ...instructions Special safety advice for the use of sports equipment Check all the bolts nuts and other connections before using the machine for the first time to ensure the machine is in the safe condition Place a suitable base e g rubber mat wooden board etc beneath the machine in the area of assembly to avoid dirt Before beginning the training remove all objects within a radius of 2 meters from t...

Page 4: ...den Aufbau bereit Beschreibung Description Anzahl QTY 1 Hauptteil Main frame 1 4 Säule Front support 1 7 Sattelstütze Seat post 1 9 Pedal L Pedal L 1 10 Pedal R Pedal R 1 37 Abdeckung Clamp cover 1 8 Sattel Seat 1 2 Fuß vorn Front stabilizer 1 3 Fuß hinten Rear stabilizer 1 6 Trainingscomputer Meter 1 5 Griffstange Handlebar 1 ...

Page 5: ...scheibe Curved washer 4 15 Schlossschraube Carriage bolt 4 16 Bogenscheibe Curved washer 4 17 Hutmutter Domed nut 4 18 Sechskantschraube Allen bolt 4 21 T Knauf T type knob 1 37 Abdeckung Clamp cover 1 Schraubenschlüssel Box wrench 1 Inbusschlüssel 6er Allen key L6 1 ...

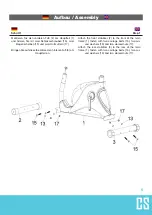
Page 6: ...Hutmuttern 17 Bringen Sie auf die selbe Weise den hinteren Fuß 3 am Hauptteil an Attach the front stabilizer 2 to the front of the main frame 1 fasten with two carriage bolts 15 two cur ved washers 13 and two domed nuts 17 Attach the rear stabilizer 3 to the rear of the main frame 1 fasten with two carriage bolts 15 two cur ved washers 13 and two domed nuts 17 ...

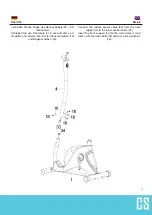
Page 7: ...säule 4 in die Aufnahme am Hauptteil und fixieren Sie mit vier Inbusschrauben 18 und Bogenscheiben 16 Connect the middle sensor cable 33 from the front support 4 to the lower sensor cable 34 Insert the front support 4 into the main frame 1 and fasten with four allen bolts 18 and four curved washers 16 ...

Page 8: ...e mit dem unteren Ende des Pulskabels 36 20 Bringen Sie den Trainingscomputer nun wieder an der Halterung an Take off the four screws 27 which are pre assem bled on the meter 6 Attach the handlebar 5 to the front support 4 and fasten with one clamp 25 one allen bolt 22 one clamp cover 37 and one T type knob 21 Connect the upper sensor cable 35 to the middle sensor cable 33 Put the Lower pulse wire...

Page 9: ...9 ...

Page 10: ... die Sattelstütze in die Aufnahme am Haupt teil ein und fixieren Sie mit dem Pin um später die Höhe variabel einstellen zu können Attach the seat 8 to the seat post 7 and fasten with one carriage bolt 47 one square washer 48 one sleeve 49 and one club knob 69 Insert the seat post 7 into the main frame 1 and fas ten with a quick release knob 11 which could adjust the height to your desired position...

Page 11: ...uss gegen den Uhrzeigersinn eingeschraubt werden The pedals 9 10 are marked L and R Left and Right Connect them to their appropriate crank arms on the main frame The crank right arm is on the right hand side of the cycle as you sit on it Note the right pedal should be threaded on clockwise and the left pe dal anticlockwise ...

Page 12: ...12 Schritt 6 Step 6 Verbinden Sie mit einer Haushaltssteckdose Plug adapter into adapter jack ...

Page 13: ...l Nur manueller Modus Die Zeit wird automatisch von 00 00 aufwärts gemessen b Drücken Sie in allen Modi zum Starten Stoppen des Trainings UP DOWN a Einstellen des Widerstands b in Menüs Einstellen der Werte Zeit Distanz Calories Age Gender und zum Auswäh len des gewünschten Programms ENTER a Geänderten Wert bestätigen und fortfahren b Im Stop Modus Gedrückt halten um alle Werte auf Null zurückzuse...

Page 14: ...n gewünschten Ziel Kalorienverbrauch mit UP DOWN ein und bestätigen Sie mit ENTER PULSE blinkt Stellen Sie die gewünschte Ziel Herzfrequenz mit UP DOWN ein und bestätigen Sie mit ENTER Drücken Sie START STOP um das Training zu beginnen Preset Programme Steps Hill Rolling Valley Fat Burn Ramp Mountain Intervals Random Plateau Fartlek Precipice Program Die Preset Programme 2 bis 13 folgen einer jewe...

Page 15: ... Drücken Sie START STOP um das Workout zu beginnen Body Fat Programm Programm23istfürdieBerechnungdesKörperfettanteilsentwickelt Drei Typen desKörperfettanteilswerdenermittelt Typ1 Körperfettanteil 27 Typ2 Körperfettanteil zwischen 20 und 27 Typ3 Körperfettanteil 20 Das Messresultat wird in KÖRPERFETT IN als BMI sowie als BMR angezeigt Wählen Sie das Programm 23 mit UP DOWN und drücken Sie ENTER z...

Page 16: ...zur getrennten Sammlung elektrischer und elektronischer Gerätschaften Richten Sie sich nach den örtlichen Regelungen und entsorgen Sie Altge räte nicht über den Hausmüll Durch die regelkonforme Entsorgung der Altgeräte werden Umwelt und die Gesundheit ihrer Mitmenschen vor möglichen negativen Konsequenzen geschützt Materialrecycling hilft den Verbrauch von Rohstoffen zu verringern Das Produkt enth...

Page 17: ...exercise UP DOWN a Press the key to increase decrease the resistance during exercise mode b During the setting mode press the key to increase decrease the value of Time Dis tance Calories Age and select Gender and Program ENTER a During the setting mode press the key to accept the current data entry b At the stop mode by holding this key for over two seconds the user can reset all values to zero o...

Page 18: ...Manual Program Manual P1 is a manual program User can start exercise by pressing START STOP key The default resistance level is 5 Users may exercise in any desirous of resistance level Adjusting by UP DOWN keys during the workout with a period of time or a number of calories or a certain distance Operation Use UP DOWN keys to select the MANUAL P1 program Press the ENTER key to enter MANUAL program...

Page 19: ...ER to confirm your second column of exercise profile Follow the above description 5 and 6 to finish your personal exercise profiles Press ENTER to confirm your desired exercise profile The TIME will flash and you can press UP or DOWN keys to setting your exercise TIME Press ENTER key to con firm your desired TIME The DISTANCE will flash and you can press UP or DOWN keys to setting your target DIST...

Page 20: ...HEIGHT is 170cm or 5 07 5feet 7 inches The WEIGHT will flash and you can press UP or DOWN keys to set your WEIGHT Press ENTER key to confirm your WEIGHT The default WEIGHT is 70kgs or 155lbs The GENDER will flash and you can press UP or DOWN keys to select your sex Number 1 means man and number 0 means female Press ENTER key to confirm your Gender The default sex is 1 MAN The AGE will flash and yo...

Page 21: ... 96 EC this symbol on the product or on its packaging indicates that this product may not be treated as household waste Instead it should be taken to the appropriate collection point for the recycling of electrical and electronic equipment By ensuring this pro duct is disposed of correctly you will help prevent potential negative consequences for the environment and human health which could otherw...

Page 22: ...22 Anhang Appendix ...

Page 23: ...23 ...

Page 24: ...24 ...

Reviews: