background image

24

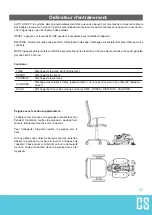
Réglage des pédales 

Étape 5

Les supports de pédales contiennent trois filetages,  
vous pouvez ainsi choisir parmi trois hauteurs de 
pédales différentes. Un montage sur le premier niveau 
permet d‘utiliser l‘appareil debout.

Les deux autres positions sont prévues pour travailler 
assis.

Choisissez le réglage qui convient le  mieux à votre 
situation.

Utilisez la molette (6) pour régler les pédales selon 
votre choix.

Summary of Contents for 10030754

Page 1: ...10030754 10030755 Minioval ...

Page 2: ... einen sicheren und effizienten Umgang mit diesem Trainingsgerät verhindern könnten untersuchen lassen Falls Sie Medikamente mit Auswirkungen auf Blutdruck Herzschlag oder Cholesterinspiegel einnehmen ist die Konsultation eines Arztes vor dem Training dringed notwendig Achten Sie auf die Signale Ihres Körpers Falsches oder übermäßiges Training kann gesundheitsschädlich sein Be enden Sie umgehend d...

Page 3: ...g instructions Save these instructions Special safety advice for the sports equipment Check all the bolts nuts and other connections before using the machine for the first time to ensure the machine is in the safe condition Place a suitable base e g rubber mat wooden board etc beneath the machine in the area of assembly to avoid dirt Before beginning the training remove all objects within a radius...

Page 4: ...en kommt der Minioval in vormontiertem Zustand Packen Sie alle Teile aus und halten Sie sie für den Aufbau bereit For shipping reasotns the Minioval comes pre mounted Please unpack all parts carefully and keep them within range for assembly ...

Page 5: ... 1 6 Knauf knob M8 2 7 Kappen Foot tube plug 2 8 Schraube screw M10 x 125 1 9 Unterlegscheibe Flat washer Ø20 x Ø10 5 x 1 5 2 10 Mutter nut M10 1 11 Schraube screw M8 x 15 4 12 Unterlegscheibe Flat washer Ø16 x Ø8 5 x 1 5 4 13 Schraube screw M6 x 15 4 14 Federscheibe Spring washer M6 4 15 Unterlegscheibe Flat washer Ø20 x Ø8 5 x 1 5 2 16 Mutter nut M8 2 Werkzeug und Montagematerial Tools and mount...

Page 6: ...1 Step 1 Montieren Sie das Fuß Rohr 3 am Hauptteil Verschrauben Sie mit Unterlegscheiben 15 und Muttern 16 Take off all the accessories in the carton assemble the foot tube 3 to the main body 1 with flat washer 15 and nut M8 16 ...

Page 7: ...t 2 Step 2 Montieren Sie die Bodenplatte 2 am Hauptteil Fixieren Sie mit M6x15 Schrauben und passenden Unterlegscheiben 13 14 Assemble the base plate 2 to the main body with flat washers 14 and screws M6X15 13 ...

Page 8: ...rch die Griff Ösen 4 und die Öffnung in der Bodenplatte 2 Fixieren Sie mit einer Unterlegscheibe 9 und einer M10 Mutter 10 Run through the screw M10X15 8 to the hold of handle 4 and the hole in the base plate 2 Tighten it with flat washer 9 and nut M10 10 ...

Page 9: ...ie die Pedale 5 1 5 2 an den Pedal Halterungen Verschrauben Sie mit M8x15 Schrauben 11 und passenden Unterlegscheiben 12 Align the hole of the pedal 5 1 5 2 to the pedal bracket use flat washer 12 screw M8X15 11 to tighten the pedal ...

Page 10: ... Situation am besten geeignet ist Nutzen Sie den Knauf 6 um die Pedale nach Ihren Wünschen einzustellen There are three holes in the pedal bracket you can ad just the pedals to three different heights The 1st hole allows the pedal to lie flat for stand up elliptical mode The second and third holes are used for sit down mode You can select the height adjustment that feels the most comfortable for y...

Page 11: ...ellung der Pedale Pedal Adjustment Flach eingestellt stehen Mittlere Einstellung sitzen Hohe Einstellung sitzen Low height only fit to stand use Middle height fit for sit use Highest height only fit for sit use ...

Page 12: ...he des Displays 2 Schrauben Danach lassen sich die Seiten etwas auseinander schieben und der Computer nach oben entfernen Auf der Unterseite befindet sich dann die Batterie Nehmen Sie die Batterie heraus und setzen Sie neue LR44 Knopf zelle ein Achten Sie auf die richtige Polarität ...

Page 13: ...must be opened on the side at display level 2 screws Then the sides can be pushed apart slightly und the computer can be taken off The batteries are on the bottom Remove them and replace them by LR44 button cells Mind the correct polarity ...

Page 14: ... dem Display angezeigt Funktionen TIME Anzeige der Workout Zeit SPEED Anzeige des Workout Tempos DISTANCE Anzeige der Workout Strecke CALORIES Anzeige der verbrannten Kalorien Näherungswert Nicht für den therapeutischen Einsatz geeig net SCAN Automatischer Wechsel der verschiedenen Kategorien in der Folge TIME SPEED DIS TANCE CALORIES Handgriff mit Extra Funktion Der Minioval kommt mit einem Handg...

Page 15: ...ey until the pointer advance to DISTANCE The distance of each Workout will be displayed CALORIES Press the MODE key until the pointer advance to CALORIES The calories burned will be dis played SCAN Automatic display of all functions in the order TIME SPEED DISTANCE CALORIES repeat Dual purpose handle Your Minioval comes with a dual handle The handle should be stored in the forward position Laying ...

Page 16: ...e 16 10179 Berlin Deutschland Dieses Produkt entspricht den folgenden Europäischen Richtlinien 2014 30 EU EMV 2011 65 EU RoHS Disposal Considerations According to the European waste regulation 2002 96 EC this symbol on the product or on its packa ging indicates that this product may not be treated as household waste Instead it should be taken to the appropriate collection point for the recycling o...

Page 17: ...reil consultez un médecin pour faire vérifier que vous ne souffrez pas de limitation physique ou de santé qui vous empêcheraient d utiliser cet appareil d entraînement de façon sûre et efficace Si vous prenez des médicaments ayant des effets sur la tension le rythme cardiaque ou le taux de cholestérol il est nécessaire et urgent de consulter un médecin avant de commencer vos séan ces Soyez attenti...

Page 18: ...ransport le Minioval est livré en kit à monter Déballez tous les éléments et préparez vous à l assemblage For shipping reasotns the Minioval comes pre mounted Please unpack all parts carefully and keep them within range for assembly ...

Page 19: ... L 385 x 140 x 72 1 5 2 Pédale R 385 x 140 x 72 1 6 Molette M8 2 7 Embout 2 8 Vis M10 x 125 1 9 Rondelle Ø20 x Ø10 5 x 1 5 2 10 Ecrou M10 1 11 Vis M8 x 15 4 12 Rondelle Ø16 x Ø8 5 x 1 5 4 13 Vis M6 x 15 4 14 Rondelle de blocage M6 4 15 Rondelle Ø20 x Ø8 5 x 1 5 2 16 Ecrou M8 2 Outils et matériel de montage ...

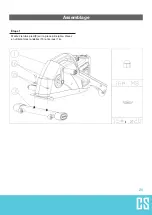
Page 20: ...20 Assemblage Étape 1 Montez le tube pied 3 sur la pièce principale Vissez en utilisant des rondelles 15 et écrous 16 ...

Page 21: ...21 Étape 2 Montez la plaque support 2 sur la pièce principale Fixez la avec des vis M6x15 et les rondelles adaptées 13 14 ...

Page 22: ...22 Étape 3 Faites passer les vis M10x15 8 par les trous de la poignée 4 et ceux de la plaque de base 2 Fixez en utilisant une rondelle 9 et un écrou M10 10 ...

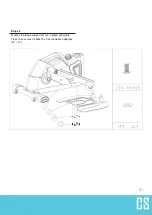
Page 23: ...23 Étape 4 Montieren Sie die Pedale 5 1 5 2 an den Pedal Halterungen Verschrauben Sie mit M8x15 Schrauben 11 und passenden Unterlegscheiben 12 ...

Page 24: ...oisir parmi trois hauteurs de pédales différentes Un montage sur le premier niveau permet d utiliser l appareil debout Les deux autres positions sont prévues pour travailler assis Choisissez le réglage qui convient le mieux à votre situation Utilisez la molette 6 pour régler les pédales selon votre choix ...

Page 25: ...25 Réglage des pédales Avec le réglage bas utilisation debout Réglage intermédiaire position assise Réglage haut position assise ...

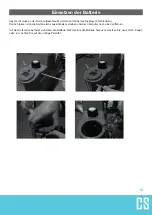
Page 26: ...e côté à la hauteur de l écran 2 vis Ensuite vous pouvez écarter légèrement les côtés et retirer l ordinateur par le haut La pile se trouve ensuite sur la face inférieure Retirez la pile et installez la nouvelle pile bouton LR44 Veillez à respecter la polarité ...

Page 27: ...par une flèche à l écran Fonctions TIME Affichage de la durée de l entraînement SPEED Affichage de la vitesse DISTANCE Affichage de la distance CALORIES Affichage des calories brûlées approximation ne convient pas pour une utilisation thérapeu tique SCAN Affichage tour à tour des valeurs suivantes TIME SPEED DISTANCE CALORIES Poignée avec fonction supplémentaire Le Minioval est livré avec une poig...

Page 28: ...l environnement et de la santé de votre entourage contre les conséquences néga tives possibles Le recyclage des matériaux aide à réduire l utilisation des matières premières Le produit contient des piles qui sont soumises à la directive européenne 2006 66 CE et ne doivent pas être jetées dans les poubelles à ordures ménagères Veuillez vous informer sur les réglementations locales en vigueur pour l...

Reviews: