Page
6
C185F C175L user manual.doc
•
Dry the walls and/or wire cooling shelves
•
Plug in the appliance, turn the thermostat as required (Refer to the paragraph entitled
"Getting to know the appliance").
MAINTENANCE AND CLEANING
Unplug the appliance before commencing any kind of maintenance.
To clean the inside of the appliance and accessories we suggest you use a water and
vinegar solution; never use abrasives, detergents or soap.
The shelves are attached to the sides of the door frame.
Clean periodically the water drain hole, located on the rear wall with a ramrod or a blunt
stick.
Clean the door gasket with water and dry carefully.
What to do when the appliance is idle:
If the appliance must be idle in the long term, unplug and empty it, clean the inside and
leave the door open (to prevent bad stenches).
ENCLOSING CABINET INSTRUCTIONS
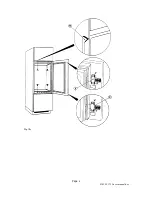
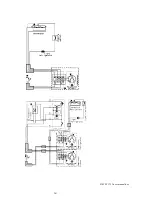
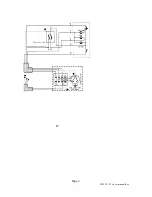
Fitting the appliance into the enclosing cabinet: Fig. 1-Fig 2a-Fig 2b
•
Check that the dimensions of the enclosing cabinet and appliance are compatible.
•
If necessary, mount plastic beam B on the upper frame C made of sheet steel.
•
Position the appliance by aligning the upper frame C (or the plastic beam B) with the
corner of the enclosing cabinet. Shorten strip D to height of the notch and mount it with
its adhesive side glued to the wall of the appliance.
•
Push the appliance against the cabinet wall to press in strip D and tighten the top and
bottom fastening screws.
•
Mount the brackets for runner E on the outside of the appliance door (using the existing
holes) and with the doors fully open, fit the door runner F on the cabinet door.
•
Adjust the coupling between the appliance door and cabinet door and cover the runner
screws with special adhesive caps.
REVERSIBLE DOOR
•
Remove the caps of pin R from the top and bottom left hinge
•
Remove the caps of the top and bottom door heads and replace them with the sleeves
supplied.
•
Close the appliance door, loosen side screws S used to lock pins T Then slide the lock
pins into their hinges. Then remember to fasten them.
•
Move the plastic adjusting washers, making sure you do not reverse the numbers
between the top and bottom hinges.
•
Loosen the side screws used to support the left hinge pins. Then slide the hinge pins
into the previously fitted door head sleeves and remember to insert the adjusting
washers and fit the pins.
NB: The material supplied is contained in the bag placed in the vegetable drawers.

