4.
PRELIMINARY OPERATIONS
26
Romantica
UK
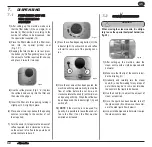
• Partially remove the machine from its seat-
ing.
• Take the appliance out very slowly and in
order to guarantee maximum safety, make
sure that no people or things are below it.
• Pull the water tank up and especially the
first time, wash it with soapy water; then
rinse it carefully, taking care to remove all
soap residues.
• Fill the tank with water (this does not apply
to the version connected to the water mains)
• In the same way, open the coffee bean con-
tainer and pour in the coffee without reach-
ing the maximum level; then refit the coffee
container lid.
4.1
FILLING THE APPLIANCE
Fig. 11
Fig. 12
CAUTION
RISK OF POLLUTION
Do not dispose of packaging in the environ-
ment.
Before carrying out any installation and
adjustment operations you must read and
fully understand the SAFETY INSTRUC-
TIONS of this handbook.
The company cannot be held responsible
for damage to things or injury to persons
caused by failure to comply with the safety
instructions and installation and mainte-
nance instructions contained in this hand-
book.
CAUTION
RISK OF SHORT CIRCUITS
Before connecting the machine to the mains
power supply, please check that the supply
voltage corresponds to the machine volt-
age.
Fig. 10
CAUTION
Switch off the machine before filling or
removing the water tank.
The water hardness must be less then
4° - 6° fr (french degree).
The chlorine contents is max 100 mg per
litre (0.00000361 lb/cu in).
Otherwise the conditions of guarantee of
the machine will expire.
WARNING
4.2
MACHINEINSTALLATION
VERSION FORDIRECT
CONNECTION
• Remove all parts from the box of acces-
sories (Teflon tubes Ø 4 mm (Ø 0.16 in), 1
pressure reducing valve, 3 snap-on connec-
tors, 1 pressure gauge, 1 fastening bracket,
2 threaded connectors and two gaskets). Fit
the pressure gauge and 2 connectors to the
pressure reducing valve, as illustrated in the
drawing here below.
• Use the relevant bracket to fit the previous-
ly assembled pressure reducing valve to the
nearest point to the water mains (see draw-
ing below).
Fig. 13
Summary of Contents for CM300SA
Page 1: ......


