background image

22

Attention: the oven door becomes
very hot during operation.
Keep children away.

6 - How To Use the Bottom Main oven

General features

Fan cooking is more economical and
quicker than cooking in a conventional
oven.
The moving hot air surrounds the food
and penetrates it more quickly than in a
conventional oven.

The oven is equipped with a circular ele-
ment (2200 W) and a fan.

Note:

Upon first use, it is advisable to operate
the oven at the maximum temperature
(thermostat knob on position 250) for 60
minutes to eliminate any traces of grease
from the electrical resistance. 

Operating principles

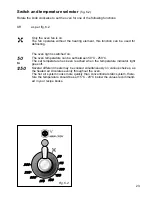
Heating and cooking in this oven are
obtained by forced convection.

A  fan sucks in the air contained in the
oven muffle, which sends it through the
circular heating element and then sends
it back through the muffle. Before the hot
air is sucked back again by the fan to
repeat the described cycle, it envelops
the food in the oven, provoking a com-
plete and rapid cooking.
It is possible to cook several dishes
simultaneously.

Attention: the oven door becomes
very hot during operation.
Keep children away.

IMPORTANT 
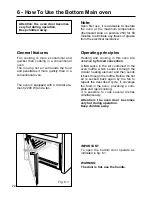
To open the bottom door operate as
indicated in fig. 6.1.

WARNING:
The door is hot, use the handle.

Fig. 6.1

Summary of Contents for CR 7200

Page 1: ...Cooker Model CR 7200 GB Instruction Manual I n s t r u c t i o n f o r t h e u s e I n s t a l l a t i o n a d v i c e ...

Page 2: ... designed and manufactured solely for the cooking of domestic household food and is not suitable for any non domestic application and therefore should not be used in a commercial environment This appliance guarantee will be void if the appliance is used within a non domestic environment i e a semi commercial commercial or communal environment IMPORTANT INFORMATION FOR CORRECT DISPOSAL OF THE PRODU...

Page 3: ...nd it could also damage the interior surfaces Do not place baking trays or the drip tray on the base of the oven chamber DO NOT place flammable materials in the ovens Faults Do not continue to use this appliance if it appears to be faulty After Use After use ensure that the hob knobs are in position off and close the main gas delivery valve or the gas cylinder valve Switch the oven controls off Al...

Page 4: ... must be positioned so that it does not exceed 75 C at any point Once the cooker has been installed the switch must always be accessible N B For connection to the mains do not use adapters reducers or branching devices as they can cause overheating and burning If the installation requires alterations to the domestic electrical system call an expert He should also check that the socket cable sectio...

Page 5: ... connect the feeder cable to the cook er it is necessary to Remove the 2 screws that hold shield A behind the cooker Open completely the cable clamp D Insert the feeder cable into the cable save P The supply cable must be of a suitable size for the current require ments of the appliance see the section Feeder cable section Connect the phase and earth cables to terminal B according to figures 1 2 a...

Page 6: ...gluing or deformations If the cooker is installed adjacent to furniture which is higher than the gas hob cooktop a gap of at least 200 mm must be left between the side of the cooker and the furniture The cooker may be located in a kitchen a kitchen diner or bed sitting room but not in a room containing a bath or shower Curtains must not be fitted immediatly behind appliance or within 500 mm of the...

Page 7: ... Assemble the backguard as shown in figure 2 3 and fix it by screwing the central screw B and the spacers A It is mandatory to install the backguard A B C Adjustable feet Before installing the cooker level the appliance by screwing or unscrewing the six adjustable feet fitted below WARNING For safety reasons unscrew the feet from screwed posi tion to the maximum extent of 5 mm fig 2 2 Fig 2 2 Fig ...

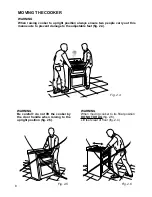
Page 8: ... 2 4 WARNING When raising cooker to upright position always ensure two people carry out this manoeuvre to prevent damage to the adjustable feet fig 2 4 MOVING THE COOKER WARNING Be carefull do not lift the cooker by the door handle when raising to the upright position fig 2 5 Fig 2 4 Fig 2 5 Fig 2 6 ...

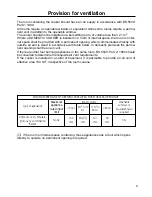
Page 9: ...shall be an air vent If there are other fuel burning appliances in the same room BS 5540 Part 2 1989 should be consulted to determine the requisite air vent requirements If the cooker is installed in a cellar or basement it is advisable to provide an air vent of effective area 100 cm2 irrespective of the room volume If the room or internal space containing these appliances has a door which opens d...

Page 10: ...stallation and Use Amendment Regulation 1990 and the relevant building l E E Regulations The following British Standards should be used as reference when installing this appliance BS6172 1990 BS5440 part 2 1989 and BS6891 1988 Failure to install the appliance correctly could invalidate any manufacturers warranty and lead to prosecution under the above quoted regulation In the UK C O R G I register...

Page 11: ... 30 mbar is required When using Propane gas a supply pressure of 37 mbar is required The installation must conform to the relevant British Standards Warning Only a qualified gas engineer also with technical knowledge of electricity should install the cooker He should observe the Regulations and Codes of Practice gov erning such installation of gas cookers Note It is recommended that the gas connec...

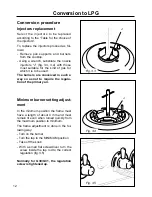
Page 12: ... it is to be used The burners are conceived in such a way so as not to require the regula tion of the primary air Minimum burner setting adjust ment In the minimum position the flame must have a length of about 4 mm and must remain lit even when turned quickly from the maximum position to minimum The flame adjustment is done in the fol lowing way Turn on the burner Turn the tap to the MINIMUM posi...

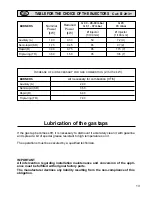
Page 13: ...ecessary for combustion m3 h Auxiliary A 2 00 Semi rapid SR 3 50 Rapid R 6 00 Triple ring TR 7 00 BURNERS Auxiliary A 1 00 0 30 50 72 X Semi rapid SR 1 75 0 45 65 97 Z Rapid R 3 00 0 75 85 115 Y Triple ring TR 3 50 1 50 95 135 T Nominal Power kW Reduced Power kW Ø injector 1 100 mm Ø injector 1 100 mm G 20 20 mbar G 30 28 30 mbar G 31 37 mbar IMPORTANT All intervention regarding installation maint...

Page 14: ...l Data Cooking hob 1 Auxiliary burner A 1 00 kW 2 Semi rapid burner SR 1 75 kW 3 Rapid burner R 3 00 kW 4 Triple ring burner TC 3 50 kW 2 4 2 3 1 Fig 4 1 Note The electric ignition is incorporated in the knobs Cooker Cat II 2H3 ...

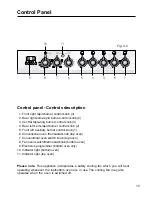
Page 15: ...1 6 Conventional oven thermostat knob top oven 7 Conventional oven switch knob top oven 8 Fan oven switch thermostat knob bottom oven 9 Electronic programmer bottom oven only 10 Indicator light bottom oven 11 Indicator light top oven Control Panel Please note This appliance incorporates a safety cooling fan which you will hear operating whenever the top bottom oven are in use The cooling fan may a...

Page 16: ... knob to operate the electric ignition or in case of power cut approach a flame to the burner 3 Adjust the burner according to the power required To turn the burner off fully rotate the knob clockwise to the off position The maximum setting of the control tap is for boiling the minimum setting is for slow cooking and simmering All working positions must be chosen between the maximum and minimum se...

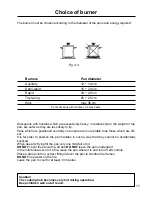
Page 17: ...ally knocked When deep fat frying fill the pan only one third full of oil DO NOT cover the pan with a lid and DO NOT leave the pan unattended In the infortunate event of a fire leave the pan where it is and turn off all controls Place a damp cloth or correct fitting lid over the pan to smother the flames DO NOT use water on the fire Leave the pan to cool for at least 30 minutes Burners Pan diamete...

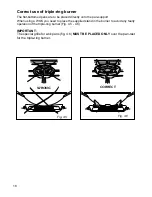
Page 18: ...e pan support When using a WOK you need to place the supplied stand in the burner to avoid any faulty operation of the triple ring burner Fig 4 5 4 6 IMPORTANT The special grille for wok pans fig 4 6 MUST BE PLACED ONLY over the pan rest for the triple ring burner Fig 4 5 Fig 4 6 WRONG CORRECT ...

Page 19: ...er element 1000 W Grill element 2000 W NOTE Upon first use it is advisable to operate the oven at the maximum temperature thermostat knob on position MAX for 60 minutes in the position and for another 15 minutes in the mode in order to eliminate any traces of grease from the electrical resistances Operating principles Heating and cooking in the CONVEN TIONAL oven are obtained in the follow ing way...

Page 20: ...re higher tem perature at the bottom Upper heating element In this position only the upper element is switched on Heat is distributed by natural con vection The thermostat can be set between 50 and 150 C higher temperatures are not available Recommended for This mode is particularly suitable to complete cooking of dishes that require higher tem perature at the top Thermostat knob Fig 5 2 This only...

Page 21: ...operation Keep children away Use of the grill Leave to warm up for approximately 5 minutes with the door closed Place the food inside positioning the rack as near as possible to the grill Insert the drip pan under the rack to collect the cooking juices Grilling with the oven door closed Do not grill for longer than 30 minutes at any one time Attention the oven door becomes very hot during operatio...

Page 22: ...es to eliminate any traces of grease from the electrical resistance Operating principles Heating and cooking in this oven are obtained by forced convection A fan sucks in the air contained in the oven muffle which sends it through the circular heating element and then sends it back through the muffle Before the hot air is sucked back again by the fan to repeat the described cycle it envelops the f...

Page 23: ...is switched on The oven temperature can be set between 50 C 250 C The set temperature has been reached when the temperature indicator light goes off Several different meals may be cooked simultaneously on various shelves as the heated air circulates evenly throughout the oven The hot air system cooks more quickly than conventional static system there fore the temperature should be set 15 C 20 C be...

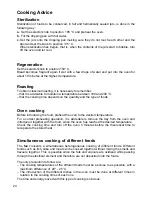
Page 24: ...g Before introducing the food preheat the oven to the desired temperature For a correct preheating operation it is advisable to remove the tray from the oven and introduce it together with the food when the oven has reached the desired temperature Check the cooking time and turn off the oven 5 minutes before the theoretical time to recuperate the stored heat Simultaneous cooking of different foods...

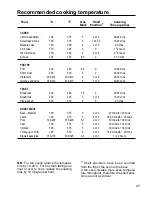
Page 25: ...Fruit cake 170 325 3 3 13 4 hours Rich fruit cake 150 300 2 3 or 4 21 2 hours Scones 225 425 8 9 2 8 10 mins PASTRY Puff 225 425 8 9 2 10 20 mins Short crust 200 400 6 2 20 30 mins Plate tarts 200 210 400 410 6 1 or 2 30 35 mins Quiches and flans 200 210 400 410 6 1 or 2 40 45 mins YEAST Bread loaf 225 425 7 8 2 35 55 mins Bread rolls 220 425 7 1 or 2 15 20 mins Pizza dough 230 450 8 2 20 mins ROA...

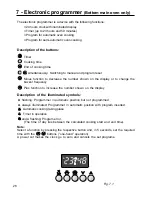
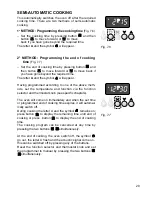
Page 26: ...own on the display or to change the buzzer frequency Plus function to increase the number shown on the display Description of the illuminated symbols A flashing Programmer in automatic position but not programmed A always illuminated Programmer in automatic position with program inserted Automatic cooking taking place Timer in operation and A flashing Program error The time of day lies between the...

Page 27: ... the correct time is set Setting speed automatically increases if you keep the setting buttons pressed MANUAL OPERATION To use the oven manually i e without the programmer you must cancel the flashing A by pressing the two but tons simultaneously the letter A will go out and the symbol will come on CANCELLING A PROGRAMME If the letter A is not flashing which means that a cooking program has alread...

Page 28: ...at any time by simply pressing button When the time expires the symbol will go out and an intermittent acoustic signal will come on which can be switched off by pressing any of the buttons AUDIBLE SIGNAL The audible signal sounds at the end of a minute minder cycle or of a cooking programme for a period of 7 minute The signal can be cancelled by pressing any function button Pressing the button wit...

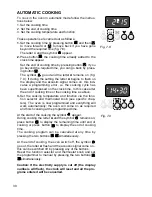
Page 29: ...e of the above meth ods set the temperature and function via the function selector and thermostat knob see specific chapters The oven will come on immediately and when the set time or programmed end of cooking time expires it will automat ically switch off During cooking the letter A and the symbol remains on press button to display the remaining time until end of cooking or press button to displa...

Page 30: ...d of cooking time or the cooking time as above 3 Set the cooking temperature and function via the func tion selector and thermostat knob see specific chap ters The oven is now programmed and everything will work automatically the oven will come on as required and finish cooking at the programmed time At the start of the cooking the symbol appear During cooking the letter A and the symbol remains o...

Page 31: ...gas cylinder to the appliance is in perfect condition and eventually substitute it if it shows signs of wearing or damage The periodical lubrication of the gas taps must be done only by specialized personnel If a tap becomes stiff do not force contact your local Service Centre Attention The appliance gets very hot mainly around the cooking areas It is very important that children are not left alon...

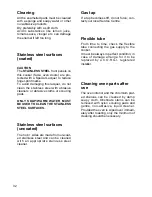
Page 32: ...INLESS STEEL SURFACES Stainless steel surfaces uncoated The hob sides are made from un coat ed stainless steel and can be cleaned with an appropriate stainless steel cleaner Gas tap If a tap becomes stiff do not force con tact your local Service Centre Flexible tube From time to time check the flexible tube connecting the gas supply to the cooker It must be always in perfect condition in case of d...

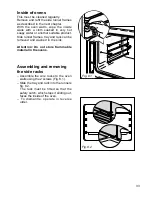
Page 33: ...de runner frames tray and rack can be removed and washed in the sink Attention Do not store flammable material in the ovens Assembling and removing the side racks Assemble the wire racks to the oven walls using the 2 screws Fig 8 1 Slide the tray and rack into the runners fig 8 2 The rack must be fitted so that the safety catch which stops it sliding out faces the inside of the oven To dismantle o...

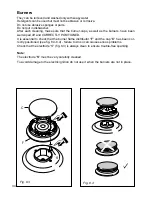
Page 34: ...have been well wiped off and CORRECTLY POSITIONED It is essential to check that the burner flame distributor F and the cap C has been cor rectly positioned see fig 8 3 8 4 failure to do so can cause serious problems Check that the electrode S fig 8 3 is always clean to ensure trouble free sparking Note The electrode S must be very carefully cleaned To avoid damage to the electric ignition do not u...

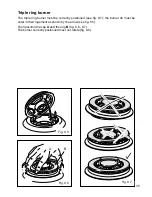
Page 35: ...be correctly positioned see fig 8 7 the burner rib must be enter in their logement as shown by the arrow see fig 8 5 Then position the cap A and the ring B fig 8 6 8 7 The burner correctly positioned must not rotate fig 8 6 Fig 8 7 Fig 8 5 Fig 8 6 A B ...

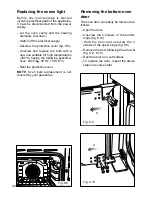
Page 36: ...erse order c c 1 2 Replacing the ovens light Before any maintenance is started involving electrical parts of the appliance it must be disconnected from the power supply Let the oven cavity and the heating elements cool down Switch off the electrical supply Unscrew the protective cover fig 8 8 Unscrew and replace the bulb with a new one suitable for high temperatures 300 C having the following spec...

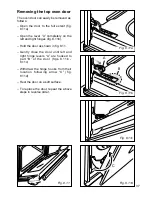
Page 37: ... Open the lever A completely on the left and right hinges fig 8 11b Hold the door as shown in fig 8 11 Gently close the door until left and right hinge levers A are hooked to part B of the door figs 8 11b 8 11c Withdraw the hinge hooks from their location following arrow C fig 8 11d Rest the door on a soft surface To replace the door repeat the above steps in reverse order ...

Page 38: ...ed items as soon as they are ready and continue cooking the under cooked items until they are completely finished Changing the Oven Cavity Light Bulb If the oven light falls 1 Turn off the cooker by switching the oven selector knob to the OFF position switch off at the cooker point 2 When the oven is cool reach back and upwards inside the oven the bulb is in the top right corner 3 Unscrew the ligh...

Page 39: ... intact 2 Make sure the timer control is set to the manual position and that the oven has not been set inadvertently for an automatic or timed programme bottom main oven only If you are in any doubt about carrying out these checks call the CAPLE Helpline on 0870 241 1142 A charge will be made if the appliance is found to be in working order or if it has not been installed in accordance with these ...

Page 40: ...y for benefits under the guarantee you must be able to provide proof of date of purchase and the appliance must have been supplied installed and used for domestic purposes only in accordance with CAPLE instructions Consequential losses and accidental damage to the product are not covered by the guarantee This guarantee does not affect your statutory or common law rights CAPLE cannot be responsible...

Reviews: