background image

26

Cooking Advice 

STERILIZATION

Sterilization of foods to be conserved, in
full and hermetically sealed jars, is done
in the following way:

a. Set the switch to position 

b. Set the thermostat knob to position

185 °C and preheat the oven. 

c. Fill the dripping pan with hot water. 

d. Set the jars onto the dripping pan mak-

ing sure they do not touch each other
and the door and set the thermostat
knob to position 135 °C.

When sterilization has begun, that is,
when the contents of the jars start to bub-
ble, turn off the oven and let cool.

Regeneration

Set the switch to position 

and the

thermostat knob to position 150° C. 
Bread becomes fragrant again if wet with
a few drops of water and put into the
oven for about 10 minutes at the highest
temperature.

Convection cooking 
with ventilation

The upper and lower heating elements
and the fan turn on. 
The heat coming from the top and bot-
tom is diffused by forced convection. 
The temperature must be regulated
between  50° and  250 °C with the ther-
mostat knob.

Recommended for:
For foods of large volume and quantity
which require the same internal and
external degree of cooking; for ie: rolled
roasts, turkey, legs, cakes, etc.

Maintaining temperature
after cooking or slowly 
heating foods

The upper element and the circular ele-
ment connected in series, are switched on;
also the fan is on. 
The heat is diffused by forced convection
with the most heat being produced by the
upper element.
The temperature must be regulated
between 50° and 140 °C with the thermo-
stat knob.

Recommended for:
To keep foods hot after cooking. To slowly
heat already cooked foods. 

Roasting

To obtain classical roasting, it is neces-
sary to remember:
– that it is advisable to maintain a tem-

perature between 180 and 200 °C. 

– that the cooking time depends on the

quantity and the type of foods.

Summary of Contents for CR 903 SS

Page 1: ...Instruction Manual Twin Oven Dual Fuel Cooker Model CR 903 SS GB ...

Page 2: ... CAPLE cooker To ensure that you get the best results from your new CAPLE cooker we strongly suggest that you read this instruc tion manual thoroughly before use This manual contains installation advice cleaning tips and a cooking guide as well as other important facts about your CAPLE cooker If treated with care your CAPLE appliance should give you years of trouble free cooking For Spare Parts Te...

Page 3: ...ed so take great care when placing food in the oven or removing it Use the grill pan handles or gloves DO NOT line the oven grids trays etc with aluminium foil as this could adverse ly affect the heating elements and it could also damage the interior surfaces DO NOT place flammable materials in the oven or in the storage compartment Faults Do not continue to use this appliance if it appears to be ...

Page 4: ...e value indicated on the specifications plate and that the cables section of the electrical plant can bear the load which is also indicated on the plate The cooker must be connected directly to the mains placing an omnipolar switch with minimum opening between the contacts of 3 mm between the appliance and the mains The power supply cable must not touch the hot parts and must be positioned so that...

Page 5: ...arked E Earth or coloured Green IMPORTANT These connections must be carried out by a qualified electrical engineer CONNECTING FEEDER CABLE To connect the feeder cable to the cook er it is necessary to Remove the screw that hold shield A behind the cooker fig 1 2 Insert the feeder cable of the suitable section as described in the next chap ter into the cable clamp D Connect the phase and earth cabl...

Page 6: ...e veneered syntetical material and the glue used must be resistant to a temperature of 90 C in order to avoid ungluing or deformations The cooker may be located in a kitchen a kitchen diner or bed sitting room but not in a room containing a bath or shower Curtains must not be fitted immediatly behind appliance or within 500 mm of the sides It is essential that the cooker is positioned as stated be...

Page 7: ...m the rear of the cooktop 4 Assemble the backguard as shown in figure 2 2 and fix it by screwing the central screw B and the spacers A Fig 2 3 Fitting the adjustable feet The adjustable feet must be fitted to the base of the cooker before use Rest the rear of the cooker an a piece of the polystyrene packaging exposing the base for the fitting of the feet Fit the 4 legs by screwing them tight into ...

Page 8: ... age to the adjustable feet fig 2 5 WARNING Be carefull do not lift the cooker by the door handle when raising to the upright position fig 2 6 WARNING When moving cooker to its final position DO NOT DRAG fig 2 7 Lift feet clear of floor fig 2 5 Levellig the cooker The cooker may be levelled by screwing the lower ends of the feet IN or OUT fig 2 8 ...

Page 9: ...all be an air vent If there are other fuel burning appliances in the same room BS 5540 Part 2 1989 should be consulted to determine the requisite air vent requirements If the cooker is installed in a cellar or basement it is advisable to provide an air vent of effective area 100 cm2 irrespective of the room volume If the room or internal space containing these appliances has a door which opens dir...

Page 10: ...o Natural Gas or LP Gas must be carried out by a qualified gas engineer Installers shall take due account of the provisions of the relevant British Standards Code of Practice the Gas Safety Regulations and the Building Standards Scotland Consolidation Regulations issued by the Scottish Development Department INSTALLATION TO NATURAL GAS Installation to Natural Gas must conform to the Code of Practi...

Page 11: ...pliance fig 3 1 The pipe does not cross the cooker When screwing the connecting tube operate with two spanners fig 3 2 The unused end inlet pipe must be closed with the plug interposing the gasket After connecting to the mains check that the coupling are correctly sealed using soapy solution but never a flame Fig 3 2 Plug Fig 3 1 ...

Page 12: ...ors page 14 To replace the injectors proceed as follows Remove pan supports and burners from the cooktop Using a wrench substitute the nozzle injectors J fig 3 3 3 4 with those most suitable for the kind of gas for which it is to be used The burners are conceived in such a way so as not to require the regulation of the primary air J J Fig 3 3 Fig 3 4 ...

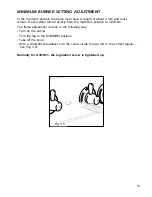
Page 13: ...rned quickly from the maximum position to minimum The flame adjustment is done in the following way Turn on the burner Tum the tap to the MINIMUM position Take off the knob With a small flat screwdriver turn the screw inside the tap rod to the correct regula tion fig 3 5 Normally for G30 G31 the regulation screw is tightened up Fig 3 5 ...

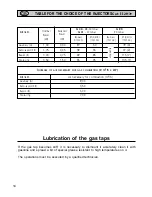
Page 14: ...tion of the gas taps INCREASE OF AIR NECESSARY FOR GAS COMBUSTION 2 m3 h x kW BURNERS Air necessary for combustion m3 h Auxiliary A 2 00 Semi rapid SR 3 50 Rapid R 6 00 Triple ring 7 00 G 30 28 30 mbar G 20 BURNERS G 31 37 mbar 20 mbar Auxiliary A 1 00 0 30 27 50 72 X Semi rapid SR 1 75 0 45 32 65 97 Z Rapid R 3 00 0 75 42 85 115 Y Triple ring 3 50 1 50 65 95 135 T Nominal Power kW Reduced Power k...

Page 15: ... Data Fig 4 1 2 3 4 5 6 1 Cooking hob Fig 4 1 1 Triple ring burner PB 3 50 kW 2 Semi rapid burner SR 1 75 kW 3 Rapid burner R 3 00 kW 4 Auxiliary burner A 1 00 kW 5 Semi rapid burner SR 1 75 kW 6 Auxiliary burner A 1 00 kW 15 ...

Page 16: ...oven thermostat knob 9 Electronic programmer main oven only 10 Conventional oven thermostat knob 11 Conventional oven switch knob Pilot lamps 12 Main oven thermostat indicator light 13 Conventional oven thermostat indicator light Fig 4 2 A U T O 9 8 6 5 3 2 1 11 10 13 7 12 4 Please note This appliance incorporates a safety cooling fan which you will hear oper ating whenever the oven or grill are i...

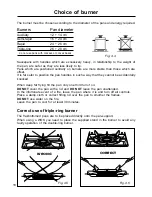
Page 17: ...s the knob to operate the electric ignition or in case of power cut approach a flame to the burner 3 Adjust the burner according to the power required To turn the burner off fully rotate the knob clockwise to the off position The maximum setting of the control tap is for boiling the minimum setting is for slow cooking and simmering All working positions must be chosen between the maximum and minim...

Page 18: ...ip Pans which are positioned centrally on burners are more stable than those which are offset It is far safer to position the pan handles in such a way that they cannot be accidentally knocked When deep fat frying fill the pan only one third full of oil DO NOT cover the pan with a lid and DO NOT leave the pan unattended In the infortunate event of a fire leave the pan where it is and turn off all ...

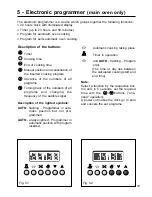
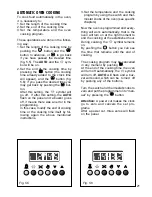
Page 19: ... inserted Automatic cooking taking place Timer in operation and AUTO flashing Program error The time of day lies between the calculated cooking start and end time Note Select a function by the respective but ton and in 5 seconds set the required time with the buttons one hand operation A power cut makes the clock go to zero and cancels the set programs The electronic programmer is a device which g...

Page 20: ...fig 5 4 Having finished the setting the clock hour will appear on the panel and the symbol will be lighted The countdown will start immediately and may be seen at any moment on the panel by simply pressing the button At the end of the time the symbol will be switched off and an intermittent buzzer will go off this can be stopped by pressing one of any of the buttons SETTING THE FREQUENCY OF THE AU...

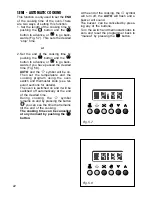
Page 21: ... this case modify the end of cooking time or the cooking time itself by fol lowing again the above mentioned instructions 3 Set the temperature and the cooking program by using the switch and ther mostat knobs of the oven see specific chapters Now the oven is programmed and every thing will work automatically that is the oven will turn on at the right moment to end the cooking at the established h...

Page 22: ...ure and the cooking program using the oven switch and thermostat knob see rel evant sections for details The oven is switched on and it will be switched off automatically at the end of the desired time During cooking the symbol remains on and by pressing the button you can see the time that remains till the end of the cooking The cooking time can be cancelled at any moment by pushing the button At...

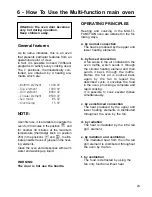
Page 23: ...er and washing up liquid WARNING The door is hot use the handle OPERATING PRINCIPLES Heating and cooking in the MULTI FUNCTION oven are obtained in the fol lowing ways a by normal convection The heat is produced by the upper and lower heating elements b by forced convection A fan sucks in the air contained in the oven muffle which sends it through the circular heating element and then sends it bac...

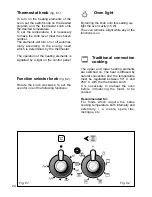
Page 24: ...unction selector knob fig 6 2 Rotate the knob clockwise to set the oven for one of the following functions Traditional convection cooking The upper and lower heating elements are switched on The heat is diffused by natural convection and the temperature must be regulated between 50 C and 250 C with the thermostat knob It is necessary to preheat the oven before introducing the foods to be cooked Re...

Page 25: ...ion and the fan then distributes it throughout the oven The temperature must be reg ulated between 50 and 175 C for max 30 minutes with the thermostat knob It is necessary to preheat the oven for about 5 minutes Use with the oven door closed Attention the oven door becomes very hot during operation Keep children away For correct use see chapter GRILLING AND AU GRATIN Recommended for For grill cook...

Page 26: ... lower heating elements and the fan turn on The heat coming from the top and bot tom is diffused by forced convection The temperature must be regulated between 50 and 250 C with the ther mostat knob Recommended for For foods of large volume and quantity which require the same internal and external degree of cooking for ie rolled roasts turkey legs cakes etc Maintaining temperature after cooking or...

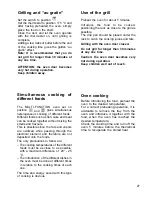
Page 27: ...ble with a maximum difference of 20 25 C The introduction of the different dishes in the oven must be done at different times in relation to the cooking times of each one The time and energy saved with this type of cooking is obvious Grilling and au gratin Set the switch to position Set the thermostat to position 175 C and after having preheated the oven simply place the food on the shelf Close th...

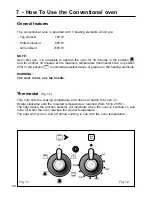
Page 28: ... off during cooking in line with the oven temperature Fig 7 1 Fig 7 2 General features The conventional oven is provided with 3 heating elements which are Top element 700 W Bottom element 800 W Grill element 1600 W NOTE Upon first use it is advisable to operate the oven for 30 minutes in the position and for another 30 minutes at the maximum temperature thermostat knob on position 250 in the posit...

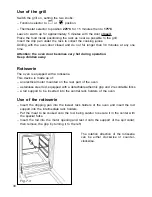
Page 29: ...ut for example roasts spare pork ribs meringues etc Traditional grilling The infrared electrical resistance comes on The heat is diffused by radiation Use with the oven door closed and the thermostat knob to position 225 C for 15 minutes then to 175 C In the position the rotisserie motor come on for cooking with the rotisserie For cooking hints see the chapter USE OF THE GRILL Recommended for Inte...

Page 30: ...5 C Leave to warm up for approximately 5 minutes with the door closed Place the food inside positioning the rack as near as possible to the grill Insert the drip pan under the rack to collect the cooking juices Grilling with the oven door closed and do not for longer than 30 minutes at any one time Attention the oven door becomes very hot during operation Keep children away Rotisserie The oven is ...

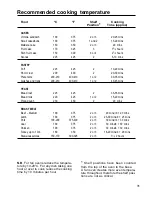
Page 31: ...5 3 13 4 hours Rich fruit cake 150 300 3 or 4 21 2 hours Scones 225 425 2 8 10 mins PASTRY Puff 225 425 2 10 20 mins Short crust 200 400 2 20 30 mins Plate tarts 200 210 400 410 1 or 2 30 35 mins Quiches and flans 200 210 400 410 1 or 2 40 45 mins YEAST Bread loaf 225 425 2 35 55 mins Bread rolls 220 425 1 or 2 15 20 mins Pizza dough 230 450 2 20 mins ROAST MEAT Beef Medium 190 375 2 or 3 20 mins ...

Page 32: ...ubrication of the gas taps must be done only by specialized personnel If a tap becomes stiff do not force contact your local Service Centre Important Before any operation of cleaning and maintenance disconnect the appliance from the electrical network Attention The appliance gets very hot mainly around the cooking areas It is very important that children are not left alone in the kitchen when you ...

Page 33: ...s or scouring pads ONLY SOAP WARM WATER MUST BE USED TO CLEAN THE STAINLESS STEEL SURFACES Gas tap If a tap becomes stiff do not force contact your local Service Centre Flexible tube From time to time check the flexible tube connecting the gas supply to the cooker It must be always in perfect condition in case of damage arrange for it to be replaced by a C O R G I registered installer Cleaning ove...

Page 34: ...correctly positioned see fig 8 1 failure to do so can cause serious prob lems Check that the electrode S fig 8 1 is always clean to ensure trouble free sparking Note The electrode S must be very carefully cleaned To avoid damage to the electric ignition do not use it when the burners are not in place F S C Fig 8 1 A Fig 8 2 Fig 8 3 B Triple ring burners The triple ring burner must be correctly pos...

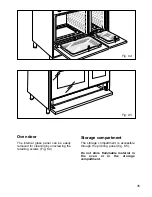
Page 35: ...s accessible through the pivoting panel fig 8 5 Do not store flammable material in the oven or in the storage compartment Fig 8 5 Fig 8 4 Oven door The internal glass panel can be easily removed for cleaning by unscrewing the retaining screws Fig 8 4 ...

Page 36: ...t the mains When the oven is cool unscrew and replace the bulb with another one resistant to high temperatures 300 C voltage 230 V 50 Hz 15 W E14 Note Oven bulb replacement is not covered by your guarantee Inside of oven This must be cleaned regularly Remove and refit the side runner frames as described on the next chapter With the oven warm wipe the inside walls with a cloth soaked in very hot so...

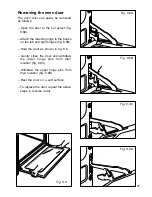
Page 37: ...g 8 8A Attach the retaining rings to the hooks on the left and right hinges fig 8 8B Hold the door as shown in fig 8 8 Gently close the door and withdraw the lower hinge pins from their location fig 8 8C Withdraw the upper hinge pins from their location fig 8 8D Rest the door on a soft surface To replace the door repeat the above steps in reverse order ...

Page 38: ... as they are ready and continue cooking the under cooked items until they are completely finished Changing the Oven Cavity Light Bulb If the oven light falls 1 Turn off the oven by switching the oven selector to 0 switch off at the cooker point 2 When the oven is cool reach back and upwards inside the oven the bulb is in the top corner 3 Unscrew the light glass cover replace the bulb with a new on...

Page 39: ... is intact 2 Make sure the timer control main oven only is set to the manual position and that the oven has not been set inadvertently for an automatic or timed programme If you are in any doubt about carrying out these checks call the CAPLE Helpline on 0870 241 1142 A charge will be made if the appliance is found to be in working order or if it has not been installed in accordance with these inst...

Page 40: ...y for benefits under the guarantee you must be able to provide proof of date of purchase and the appliance must have been supplied installed and used for domestic purposes only in accordance with CAPLE instructions Consequential losses and accidental damage to the product are not covered by the guarantee This guarantee does not affect your statutory or common law rights CAPLE cannot be responsible...

Reviews: