background image

27

Simultaneous cooking of different foods 

The 

  consents a simultaneous heterogeneous cooking of different foods. Different 

foods such as fish, cake and meat can be cooked together without mixing the smells 

and flavours together. This is possible since the fats and vapours are oxidized while 

passing through the electrical element and therefore are not deposited onto the foods.

The only precaution to follow are:
– The cooking temperatures of the different foods must be as close to as possible, with 

a maximum difference of  20° - 25 °C.

– The introduction of the different dishes in the oven must be done at different times in 

relation to the cooking times of each one.

The time and energy saved with this type of cooking is obvious.

Use of the grill

Preheat the oven for about 5 minutes. 
Introduce the food to be cooked, positioning the rack as close to the grill as possible.

The drip pan should be placed under the rack to catch the cooking juices and fats.

Grilling with the oven door closed.
Do not grill for longer than 30 minutes at any one time.
Caution: the oven door becomes very hot during operation. 

Keep children well out of reach.

Oven cooking

Before introducing the food, preheat the oven to the desired temperature. 

For a correct preheating operation, it is advisable to remove the tray from the oven and 

introduce it together with the food, when the oven has reached the desired temperature.

Check the cooking time and turn off the oven 5 minutes before the theoretical time to 

recuperate the stored heat.

Summary of Contents for CR 9108

Page 1: ...Contact Caple on 0844 800 3830 or for spare parts www 4caple co uk Instruction manual for range cooker Model code CR 9208 ...

Page 2: ...ntiated waste collection centre or to a dealer providing this service Disposing of a household appliance separately avoids possible negative consequences for the environment and health deriving from inappropriate disposal and enables the constituent materials to be recovered to obtain significant savings in energy and resources As a reminder of the need to dispose of household appliances separatel...

Page 3: ...sy reach of children as these may cause serious injuries Some appliances are supplied with a protective film on steel and aluminium parts This film must be removed before using the ap pliance IMPORTANT The use of suitable protective clothing gloves is re commended when handling or cleaning of this appliance Do not attempt to modify the technical characteristics of the applian ce as this may become...

Page 4: ...ical sensory or mental capabilities or lack of experience and knowledge if they have been given super vision or instruction concerning use of the appliance in a safe way and understand the hazards involved Children shall not play with the appliance Cleaning and user maintenance shall not be made by children without supervision The manufacturer declines all liability for injury to persons or damage...

Page 5: ...the oven door glass since they can scratch the surface which may result in shattering of the glass Do not line the oven walls with aluminium foil Do not place baking trays or the drip tray on the base of the oven chamber FIRE RISK Do not store flammable material in the oven or in the storage compartment Always use oven gloves when removing the shelves and food trays from the oven whilst hot Do not...

Page 6: ...ion of the electrical plant can bear the load which is also indicated on the plate The cooker must be connected directly to the mains placing an omnipolar switch with minimum opening between the contacts of 3 mm between the appliance and the mains The power supply cable must not touch the hot parts and must be positioned so that it does not exceed 75 C at any point Once the cooker has been install...

Page 7: ...trical Installation Wall box connection FEEDER CABLE SECTION type H05RR F 230 V 3 x 2 5 mm2 Connection with wall box connection This appliance must be connected to a double pole isolating switch fig 1 1 and to the terminal block in the cooker figs 1 2 1 3 using the following guide FUSE DOUBLE POLE SWITCHED FUSED SPUR OUTLET USE A 20 AMP FUSE ON Fig 1 1 1 The wire which is coloured brown must be co...

Page 8: ...eed if installed in any of the above environments and could affect any third party or public liability insurances you may have If the cooker is installed adjacent to furniture which is higher than the gas hob cooktop a gap of at least 200 mm must be left between the side of the cooker and the furniture The furniture walls adjacent to the cooker must be made of material resistant to heat The veneer...

Page 9: ...ar of the cooker on a piece of the polystyrene packaging exposing the base for the fitting of the feet Fit the 4 legs by screwing them tight into the support base as shown in picture 2 3 Levelling the cooker The cooker may be levelled by screwing the lower ends of the feet IN or OUT fig 2 4 Fig 2 2 Fig 2 3 Fig 2 4 ...

Page 10: ...wo people carry out this manoeuvre to prevent dam age to the adjustable feet fig 2 5 WARNING Be carefull do not lift the cooker by the door handle when raising to the upright position fig 2 6 WARNING When moving cooker to its final position DO NOT DRAG fig 2 7 Lift feet clear of floor fig 2 5 ...

Page 11: ... 8 2 Drill two 8 mm diameter holes in the wall and insert the plastic plugs supplied Important Before drilling the holes check that you will not damage any pipes or electrical wires 3 Loosely attach the anti tilt bracket with the two screws supplied 4 Move the cooker to the wall and adjust the height of the anti tilt bracket so that it can engage in the slot on the cooker s back as shown in fig 2 ...

Page 12: ...tside air in which case no permanent ventilation is required For rooms with a volume greater than 10 m3 no permanent ventilation is required NB Regardless of room size all rooms containing the appliance must have direct access to the outside air via an openable window or equivalent Where there are other fuel burning appliances in the same room BS 5440 2 2000 should be consulted to determine the co...

Page 13: ...ces are Installed Serviced by a competent person in accordance with the current editions of the following Standards Regulations or those regulations appropriate to the geographical region in which they are to be installed Gas Safety Installation Use Regulations Building Regulations British Standards Regulations for Electrical Installation Installation and service of any gas product must be made by...

Page 14: ...of electricity should install the appliance He should observe the Regulations and Codes of Practice governing such installation of gas appliances Note It is recommended that the gas connection to the appliance is installed with a flexible connecting tube made to BS5386 Notes Flexible hoses can be used where the sited ambient temperature of the hose does not exceed 70 C These hoses must be manufact...

Page 15: ... also be connected in such away that it does not touch the floor To screw the connecting tube operate with two spanners fig 3 2 The unused end inlet pipe must be closed with the plug interposing the gasket After connecting to the mains check that the coupling are correctly sealed using soapy solution but never a flame Fig 3 2 Fig 3 1 Left gas inlet pipe Right gas inlet pipe 1 2 BSP male Plug ...

Page 16: ...16 Important prescriptions for gas connection 700 mm Rear wall Suggested area for gas mains connection 200 mm Fig 3 3 ...

Page 17: ...ith those most suitable for the kind of gas for which it is to be used see Table for the choice of the injectors The burners are constructed in such a way so as not to require the regula tion of the primary air J Fig 3 5 J Fig 3 4 Auxiliary rapid and Semi rapid burner Triple ring burner F Fig 3 6 Adjusting of the minimum of the top burners In the minimum position the flame must have a length of ab...

Page 18: ... conversion of the appli ance must be fulfilled with original factory parts The manufacturer declines any liability resulting from the non compliance of this obligation Lubrication of the gas taps TABLE FOR THE CHOICE OF THE INJECTORS GB Cat II 2H 3 G30 28 30 mbar G31 37 mbar G 20 20 mbar BURNERS Nominal Power Hs kW Reduced Power Hs kW Ø injector 1 100 mm Ø injector 1 100 mm Auxiliary A 1 00 0 30 ...

Page 19: ...apid burner SR 1 75 kW 3 Rapid burner R 3 00 kW 4 Triple ring burner TR 3 50 kW Important Note The electric ignition is incorporated in the knobs The appliance has a safety valve system fitted the flow of gas will be stopped if and when the flame should accidentally go out Fig 4 1 2 4 2 1 3 ...

Page 20: ...l Controls description Fig 4 2 1 Minute counter 60 minutes 2 Fan main oven thermostat knob left oven 3 Fan main oven switch knob left oven 4 Front left burner control knob 5 Rear left burner control knob 6 Central burner control knob 7 Rear right burner control knob 8 Front right burner control knob 9 Conventional oven switch knob right oven 10 Conventional oven thermostat knob right oven Pilot la...

Page 21: ...posi tions and also close the cock valve on the gas bottle or the main gas supply line Lighting of the hob burners To ignite the burner the following instructions are to be followed 1 Press in the corresponding knob and turn counter clockwise to the full flame position marked by the symbol fig 4 3 and hold the knob in until the flame has been lit In the case of a mains failure light the burner wit...

Page 22: ...cidentally knocked When deep fat frying fill the pan only one third full of oil DO NOT cover the pan with a lid and DO NOT leave the pan unattended In the infortunate event of a fire leave the pan where it is and turn off all controls Place a damp cloth or correct fitting lid over the pan to smother the flames DO NOT use water on the fire Leave the pan to cool for at least 30 minutes Caution The c...

Page 23: ...can be set for a maximum of 60 minutes The knob Fig 5 1 must be rotated clockwise as far as the 60 minute posi tion and then set to the required time by rotating it anticlockwise IMPORTANT WARNING This is only a mechanical timer Remember to turn off the oven grill man ually Fig 5 1 ...

Page 24: ...ectrical resistances Operating principles Heating and cooking in the FAN oven are obtained in the following ways a by forced convection A fan sucks in the air contained in the oven muffle which sends it through the circular heating element and then sends it back through the muffle Before the hot air is sucked back again by the fan to repeat the described cycle it envelops the food in the oven prov...

Page 25: ...emains on in all the cooking modes Defrosting frozen foods Only the oven fan is on To be used with the thermostat knob on because the other positions have no effect The defrosting is done by simple ventilation without heat Recommended for To rapidly defrost frozen foods 1 kilogram requires about one hour The defrosting times vary according to the quantity and type of foods to be defrosted Hot air ...

Page 26: ...Set the switch to position b Set the thermostat knob to position 185 C and preheat the oven c Fill the dripping pan with hot water d Set the jars onto the dripping pan making sure they do not touch each other and the door and set the thermostat knob to position 135 C When sterilization has begun that is when the contents of the jars start to bubble turn off the oven and let cool Regeneration Set t...

Page 27: ...f each one The time and energy saved with this type of cooking is obvious Use of the grill Preheat the oven for about 5 minutes Introduce the food to be cooked positioning the rack as close to the grill as possible The drip pan should be placed under the rack to catch the cooking juices and fats Grilling with the oven door closed Do not grill for longer than 30 minutes at any one time Caution the ...

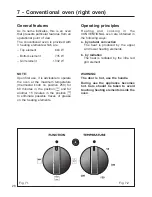
Page 28: ...at knob on position 250 for 60 minutes in the position and for another 15 minutes in the position to eliminate possible traces of grease on the heating elements Operating principles Heating and cooking in the CONVENTIONAL oven are obtained in the following ways a by natural convection The heat is produced by the upper and lower heating elements b by radiation The heat is radiated by the infra red ...

Page 29: ...ion can also be used for traditional convection cooking the temperature knob must be regulated between 50 and 250 C It is necessary to preheat the oven before introducing the foods to be cooked Traditional convection cooking recommended use For foods which require the same cooking temperature both internally and externally i e roasts spare ribs meringue etc Traditional Grilling The infrared grill ...

Page 30: ...es at any one time on full heat 200 C Caution the oven door becomes very hot during operation Keep children well out of reach Oven cooking Before introducing the food preheat the oven to the desired temperature For a correct preheating operation it is advisable to remove the tray from the oven and introduce it together with the food when the oven has reached the desired temperature Check the cooki...

Page 31: ...s Rich fruit cake 150 300 2 3 or 4 2 hours Scones 225 425 8 9 2 8 10 mins PASTRY Puff 225 425 8 9 2 10 20 mins Short crust 200 400 6 2 20 30 mins Plate tarts 200 210 400 410 6 1 or 2 30 35 mins Quiches and flans 200 210 400 410 6 1 or 2 40 45 mins YEAST Bread loaf 225 425 7 8 2 35 55 mins Bread rolls 220 425 7 1 or 2 15 20 mins Pizza dough 230 450 8 2 20 mins ROAST MEAT Beef Medium 190 375 5 2 or ...

Page 32: ...table protective clothing gloves is recommended when handling or cleaning of this appliance IMPORTANT Before any operation of cleaning and maintenance disconnect the appliance from the electrical network Attention The appliance gets very hot mainly around the cooking areas It is very important that children are not left alone in the kitchen when you are cooking Do not use a steam cleaner because t...

Page 33: ...mage the enamel if left too long Stainless steel aluminium parts and silk screen printed surfaces Clean using an appropriate product Always dry thoroughly IMPORTANT these parts must be cleaned very carefully to avoid scratching and abra sion You are advised to use a soft cloth and neutral soap CAUTION Do not use abrasive substances or non neutral detergents as these will irreparably damage the sur...

Page 34: ...e burners It is very important to check that the burner flame distributor F and the cap C has been correctly positioned see fig 8 1 8 2 failure to do so can cause a poor burner flame and or damage to the burner and hob Check that the electrode S figs 8 1 8 3 is always clean to ensure trouble free sparking Check that the probe T figs 8 1 8 3 next to each burner is always clean to ensure correct ope...

Page 35: ...rs The triple ring burner must be correctly positioned see fig 8 5 the burner rib must be enter in their logement as shown by the arrow see fig 8 3 Then position the cap A and the ring B fig 8 4 8 5 The burner correctly positioned must not rotate fig 8 4 ...

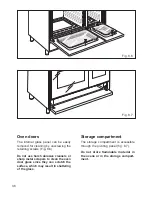
Page 36: ...e ovens or in the storage compart ment Fig 8 7 Fig 8 6 Oven doors The internal glass panel can be easily removed for cleaning by unscrewing the retaining screws Fig 8 6 Do not use harsh abrasive cleaners or sharp metal scrapers to clean the oven door glass since they can scratch the surface which may result in shattering of the glass ...

Page 37: ...n it has cooled down The cavity should be cleaned using a mild detergent solution and warm water Suitable proprietary chemical cleaners may be used after first consulting with the manufacturers recommendations and testing a small sample of the oven cavity Abrasive cleaning agents or scouring pads cloths should not be used on the cavity surface NOTE The manufacturers of this appliance will accept n...

Page 38: ...fig 8 10b Hold the door as shown in fig 8 10 Gently close the door fig 8 10c until left and right hinge levers A are hooked to part B of the door fig 8 10b Withdraw the hinge hooks from their location following arrow C fig 8 10d Rest the door on a soft surface To replace the door repeat the above steps in reverse order Fig 8 10 B A C Fig 8 10c Fig 8 10b Fig 8 10a Fig 8 10d ...

Page 39: ...ht glass cover replace the bulb with a new one of the same specification and screw the cover back until it is hand tight NOTE Oven bulb replacement is not covered by your guarantee Other bulbs cannot be changed by yourself and should be replaced by an authorised Caple Service Engineer Bulbs other than the oven bulb are covered by the guarantee Helpful Advice IMPORTANT Cooker get hot Keep children ...

Page 40: ...r benefits under the guarantee you must be able to provide proof of date of purchase and the appliance must have been supplied installed and used for domestic purposes only in accordance with Caple instructions Consequential losses and accidental damage to the product are not covered by the guarantee This guarantee does not affect your statutory or common law rights Caple cannot be responsible for...

Reviews: