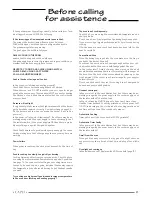
If the appliance is not operating correctly, before calling our Tech-
nical Support service, CHECK the following:
If the incoming gas flow seems abnormal, ensure that:
The holes of the burner flame diffusers are not blocked.
With bottled gas, check that there is still gas in the bottle.
The pressure regulator is operating.
The gas tap on the bottle is fully open.
SMELL OF GAS IN THE ROOM
ensure that the tap has not been left open;
the gas supply hose is correctly in place and in good condition; re-
member to abide by the expiry date for use.
NEVER TRY TO FIND A GAS LEAK USING A MATCH.
CHECK SEALS USING SOAPY WATER.
CALL A QUALIFIED ENGINEER
Control knobs or facia panel too hot
Is the oven door latching and sealing properly?
Check that the cooker vents and grills are not blocked.
When the oven is on DO NOT leave the oven door open for longer
periods than necessary. The oven should NOT be used for heating
the kitchen, not only does this waste fuel but the control knobs
may over heat.
Burners will not light
If only the hotplate burners will not light make sure that the burner
parts have been replaced correctly. See instructions on page 24.
Do the burners spark when you press the knobs? If not is the
power on?
Is the power on? Is the clock illuminated? - If not there may be so-
mething wrong with the power supply. Is the cooker supply on at
the isolator switch. If the power supply is OK then there is proba-
bly something wrong with the ignition system.
Check that there is not a problem with your gas supply. You can do
this by making sure that other gas appliances you may have are
working.
Power failure
When power is restored the clock must be reset to the time of
day.
Food is cooking too slowly, too quickly or burning.
Cooking time may differ from your previous oven. Check that you
are using the recommended temperatures and shelf positions.
See page 12. The oven control settings and cooking times are in-
tended to be used only as a guide. Individual tastes may require
the temperature to be altered either way, to get the best results
you want.
Try cooking at a higher shelf position and/or higher temperature.
Is the oven door latching and sealing properly?
The oven is not cooking evenly.
Check that you are using the recommended temperatures and
shelf positions.
Do not use a tin or tray larger than the baking tray we supplied.
If you are cooking a large item be prepared to turn it round during
cooking.
If two shelves are used, check that space has been left for the
heat to circulate.
Conventional Oven
When the baking tray is put into the oven make sure the tray is
pushed to the back of the shelf.
Check that the door seal is not damaged and that the door cat-
ch adjusted so that the door is held firmly against the seal.
Is the cooker level? A dish of water when placed on the shelf
should have the same depth all over. (For example, if it is deeper at
the back, then the back of the cooker should be raised up or the
front lowered). If the cooker is not level arrange for your supplier
to level it for you.
Do not use the base of the oven for cooking, it is not designed to
be used as an extra shelf position.
Oven not coming on:
Is the power on? Is the clock illuminated - if not there may be so-
mething wrong with the power supply. Is the cooker supply on at
the isolator switch? Check the fuse.
Is the clock flashing 0.00? If so set to the correct time of day.
Has the Timer been set to auto by mistake, or after a power cut?
If AUTO is showing on the clock press the cooking duration and
end time buttons to set the oven back to manual.
Automatic Cooking
Timer set correctly but oven knob left OFF by mistake?
Automatic Timer faulty
Is the power on? Is the clock illuminated - if not there may be so-
mething wrong with the power supply. Is the cooker supply on at
the isolator switch?
Smell from the oven
When you first use your cooker it may give off a slight odour as
any protective oils are burnt off but this will stop after a little
use.
Oven light not coming on
Is the bulb burned out? Replace with 25 W oven bulb (page 15).
21
Before calling
for assistence
Summary of Contents for CR1001SS
Page 2: ......


