background image

Instruction manual CAFF60

Instruction manual CAFF60

28

29

Please keep this instruction manual for future reference 

Please keep this instruction manual for future reference 

C A R E   A N D   M A I N T E N A N C E

C L E A N I N G

Interior surfaces and removable parts can be cleaned using a mild solution of soap and 
lukewarm water. Do not use abrasive products or detergents. After washing, rinse with 
clean water and dry carefully. While cleaning, avoid getting water on lights and display 
panel.
For cleaning stainless steel exterior, you can use a soft, non abrasive stainless steel cleaner. 
By using a dry polishing chamois with a water–dampened microfibre cloth, you can bring 
out the natural lustre of the stainless steel. Better results are obtained by keeping the cloth 
in continuous contact with the stainless steel.

I M P O RTA N T:

Before you start cleaning, be sure to disconnect unit from the power supply.

I M P O RTA N T:

Do not submerge or pour hot water over cold glass shelves.

L I G H T I N G   I N F O R M AT I O N

In both the freezer and refrigerator compartments, LED lights are used for illumination. In 
the upper refrigerator and freezer compartment, the locations of the led lights are on the 
ceiling and side walls. For drawers, their positions are only on the ceiling.
When the door is closed, the refrigerator lights remain on, which provides improved 
visibility and easy access. The interior light can be turned on/off via the control panel.

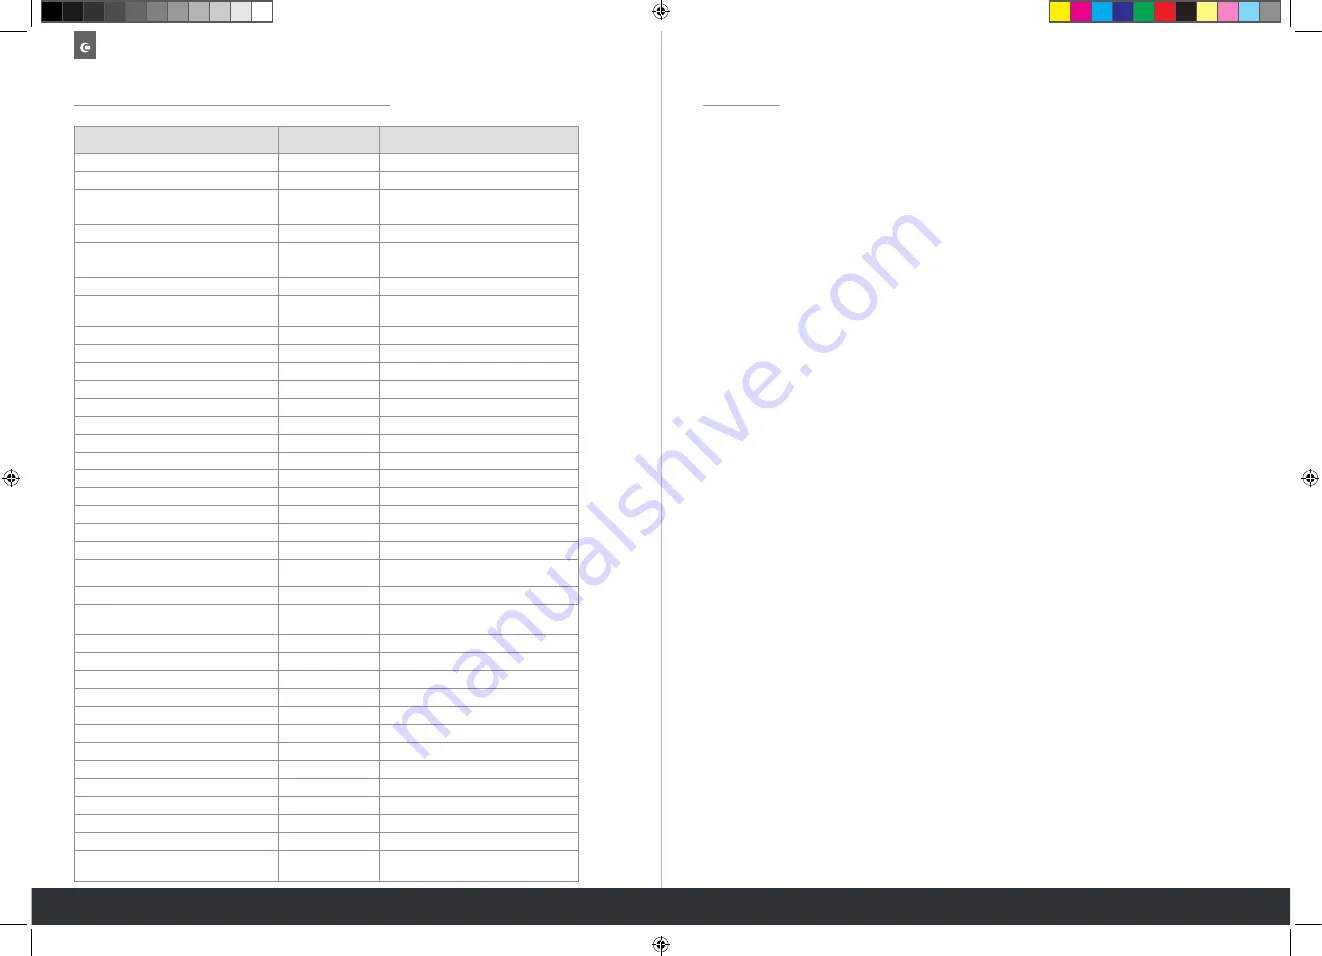
T E C H N I C A L   F I C H E

S P E C I F I C AT I O N S

U N I T

C A F F 6 0

Climate class

T/SN (10˚C - 43˚C)

Number of doors

pcs

6

Volume total (net)

It

713

Volume refrigerator (net)

It

466

Volume Freezer (net)

It

247

Number of compressors

pcs

2

Performance (star rating)

216 lt 4 stars (****) 

31 It 2 stars (**)

Energy consumption

kWh / year

1,192

Energy consumption

435

Energy class

KG / 24h

A++

Freezing capacity

13

Defrost system type Fridge/Freezer

Automatic

Refrigerating gas

R600a

Refrigerating gas quantity

gr

75 / 45

Power

W

430

Defrost heat power

W

380

Current

A

2,8

Refrigeration system

No - Frost

Built under

No 

Built in

Yes

Electronic control

Yes

Condenser type

Air forced wire tube condensers

Blowing agent for insulation

C-Pentane

Air flow type Fridge / Freezer

Forced / Forced

Temperature rise time (18oC to -9oC)

mins

820

Thermostat

7 sensors

Freezer

Left

Cooling

No frost

Control

Digital inverter

Chiller

No 

Waste dispenser

No

Split

Yes

Condenser

Top

Ice Tray

Yes

Hygiene features

Water filter

Dimensions 

cm

H212 x W121 x D71 

(66 without handle)

CAFF60 Instruction Manual.indd   28-29

09/07/2019   11:57

Summary of Contents for FF60

Page 1: ...Fridge Freezer Instruction Manual CAFF60 Contact Caple on 0117 938 7420 for spare parts or www caple co uk CAFF60 Instruction Manual indd 1 09 07 2019 11 57 ...

Page 2: ...ner 18 Storage Drawers 19 Fresh Bin 19 Storage Draw Divider 20 Ice Maker 21 Water Filtration System 22 Water Filtration Bypass Mode 23 FOOD STORAGE Fridge Compartment 23 Freezer Compartment 23 TECHNICAL FICHE 28 CARE AND MAINTENANCE Cleaning 29 Lighting Information 29 INSTALLATION GUIDE Before Starting Installation 31 Prerequisites For Installation 32 Electrical Requirements 34 Plumbing Requiremen...

Page 3: ...frosting process other than those recommended by the manufacturer W A R N I N G Do not use electrical appliances in the freezer compartment of the appliance unless they are of the type recommended by the manufacturer W A R N I N G Do not damage the refrigerant circuits G ENERA L FEATURES OF CAFF60 Can be installed built in or freestanding 304 grade high hygienic stainless steel construction Dual r...

Page 4: ...ly cord is damaged it must be replaced by Caple an approved engineer or similar qualified persons in order to avoid a hazard C A U T I O N Do not store explosive substances such as aerosol cans with a flammable propellant in this appliance C A U T I O N If the power socket does not match the refrigerator plug it must be replaced by Caple an approved engineer or similar qualified persons in order t...

Page 5: ... and 50 Hz Before making the connection to the power supply ensure that the voltage on the rating label corresponds to the voltage of electrical system in your home Insert the plug into a socket with an efficient ground connection If the socket has no ground contact or the plug does not match contact Caple or an authorised electrician for assistance The plug should be accessible after the applianc...

Page 6: ...ng on the appliance Before making the connection to the power supply ensure that the voltage on the name plate corresponds to the voltage of electrical system in your home Insert the plug into a socket with an efficient ground connection If the socket has no ground contact or the plug does not match we suggest you to call an authorised electrician for assistance The plug should be accessible after...

Page 7: ... Press MENU button minimum 1 5 secon is seen Choose Sabbath by using UP or DOWN Press NEXT SELECT button then choos automatically after pressing buttons To return the Main Screen you can wait 1 button 4 2 6 Fridge Zone Mode This mode helps to operate fridge zone W this compartment will not be cooled Settings Press MENU button minimum 1 5 secon is seen Choose Fridge Zone by using UP or DOW Press NE...

Page 8: ...ngs are saved automatically after pressing buttons To return the Main Screen you can wait 15 seconds or press the MENU button VEGETA BLE Z ON E MODE This mode helps to operate vegetable zone When the Vegetable Zone Mode is set as crisp the temperature of the vegetable compartment will be 12 C and the vegetables in that compartment will be kept fresh longer SETTINGS Hold the MENU button approx 2 3 ...

Page 9: ... note While removing and replacing the glass shelves use care to prevent breaking the glass and starching the interior surface Important note Since the upper shelf dimensions are different than the others use care to select accurate shelf which is the shorter one Important note While loading shelves pay attention not to exceed the glass alignment Important note Please do not place your foods in fr...

Page 10: ...ert a tray it is advised to align the tray with the rails and insert slowly till the end To remove the tray slowly pull it until derailed IMPORTANT NOTE While removing and replacing the oven tray use care to prevent breaking the glass and scratching the interior surface IMPORTANT NOTE If the tray is hot Wait until it cools down before replacing IMPORTANT NOTE The steam of the hot food in tray can ...

Page 11: ...located in the fridge compartment Designed to unload the ice into the ice bucket located in the lower freezer drawer The ice maker can be controlled from the control panel The ice maker automatically stops producing ice when the bucket is full There is a plumbing connection and water filter system for the ice maker which is explained in the installation guide IMPORTANT NOTE The ice maker will not ...

Page 12: ...ilter slowly approximately one quarter turn clockwise until it stops DO NOT over tighten To clean the water system and the air from the line the first full bucked of ice produced should be discarded after the new cartridge is installed Replacement water filters FILTER CAFF60 can be purchased directly from www caple co uk WATER FI LT RAT I ON BYPAS S MODE If you choose not to use the water filtrati...

Page 13: ...or of freezer open for a long time frosting will appear on the lower stage of freezer Thus air circulation will be obstructed In order to avoid this first unplug the cord and wait until thawed After ice melts you should clean the freezer It is strongly suggested that you place your foods 1 cm away from drawer the rear and side walls When ice bucket is removed this drawer could be used as 2 star fr...

Page 14: ...g 10 12 Separate them from one another Corn Clean pack with its stem or as sweet corn 12 1 2 Carrot Clean cut to slices 12 Until it is defrosted Pepper Cut the stem cut into 2 pieces remove the core 8 10 10 12 Spinach Washed 6 9 10 Apple pear Peel slice 8 10 10 12 Apricot peach Cut into 2 pieces remove the stone 4 6 Until it is thawed completely Strawberry blackberry Wash 8 12 Until it is thawed c...

Page 15: ...s of the led lights are on the ceiling and side walls For drawers their positions are only on the ceiling When the door is closed the refrigerator lights remain on which provides improved visibility and easy access The interior light can be turned on off via the control panel TECHNICA L FICHE SPECIFICATIONS UNIT CAFF60 Climate class T SN 10 C 43 C Number of doors pcs 6 Volume total net It 713 Volu...

Page 16: ...ntity plate Product identity plate is located on the left wall of the top cooler drawer compartment To access it please open the top cooler drawer and remove the basket See the illustration below 2 1 Before Starting Installation GT 850 could be installed as two different types As Built in or Freestanding Some parts are optional according to installation type Before the installation process of GT 8...

Page 17: ...2 Prerequisites For Installation Opening Dimensions STANDARD AND FLUSH BUILT IN INSTALLATIONS Overall Dimensions 2 2 1 Elect The power o When install codes and re Caution To qualified ele Warning Do Warning In the mains 2 7 Water Line Connection mm plastic tubing is connected to the ice maker with a preassembled 2 8 Installing Kickplate Before the installing the kickplate make sure to put the drai...

Page 18: ...ollers so it can be moved easier t Important note Make sure the rear levellers are in settling the refrigerator to its place Levelling should is in desired position 2 5 Levelling the Unit After positioning has been done levelling should be the unit is properly levelled door and drawer adjustm changed from the factory default settings 2 9 Door Handle Installation 2 10 Drawer Adjustment 2 11 Optiona...

Page 19: ...ion Do not tilt the refrigerator in any direction This action can cause malfunc tion GT 850 has own rollers so it can be moved easier than moving on pallet Important note Make sure the rear levellers are in their lowest position while settling the refrigerator to its place Levelling should not be completed until the unit is in desired position 2 5 Levelling the Unit After positioning has been done...

Page 20: ...ixing pins to the furniture with using D4X20 Screws Important note Be sure the levelling is correct done before screwing e Information ol and data logging system is integrated in GT 850 In any e to contact the service or dealership The information kept in used to find and analyze the cause of the malfunction in order to tion to fix the unit uire the product information such as serial number etc Th...

Page 21: ...the installing the kickplate make sure to put the drain pan back to its original position The slots on the kickplate should be aligned with the poles Push the kickplate firmly onto the poles until hearing a click sound or until the surface of the kickplate and the main frame are aligned Please see the illustration below The clips must be placed one by one for an easier and convenient installation ...

Page 22: ...oles on the doors are shifted to meet to align only one slot at a time Please see the illustration below door setscrew pin handle DRAWER ADJUS T ME N T After installation is completed if the drawers are not aligned they can be adjusted horizontally or vertically with the help of adjustment area The adjustment area is behind the basket This area is accessible by removing the basket To shift horizon...

Page 23: ... the top cover After installation is completed please insert the cartridge to filter housing then turn it to clockwise If water filtration in not necessary the water filter cartridge can be removed or not be installed in the first place Thus the system can be operated in bypass mode In this mode water will be supplied to ice maker without a filtration Lift the top cover to access the water filter ...

Page 24: ...the following checklist should be completed by the installer to ensure that no part of the installation has been overlooked Have all packing materials been removed I s the water supply line connected and not leaking Is the water supply turned on and ice maker control on Have the anti tip brackets been installed securely and properly engaging the unit Is the unit levelled properly on a solid level ...

Page 25: ...Caple Service Fourth Way Avonmouth Bristol BS11 8DW T 0117 938 1900 E service caple co uk www caple co uk CAFF60 Instruction Manual indd 48 09 07 2019 11 57 ...

Reviews: