background image


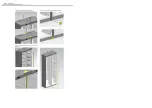
Changing the door handing 

Changing the door handing 

4. Reassemble the 

4. Reassemble the 

4. Reassemble the 

4. Reassemble the bottom hinge

bottom hinge

bottom hinge

bottom hinge    shaft: remove the original shaft of the hinge and relocated it as shown in the 

shaft: remove the original shaft of the hinge and relocated it as shown in the 

shaft: remove the original shaft of the hinge and relocated it as shown in the 

shaft: remove the original shaft of the hinge and relocated it as shown in the figure.

figure.

figure.

figure.    


5. Reassemble the 

5. Reassemble the 

5. Reassemble the 

5. Reassemble the top hinge

top hinge

top hinge

top hinge    shaft: first remove the hinge shaft and screw this shaft from the other end of the screw hole.

shaft: first remove the hinge shaft and screw this shaft from the other end of the screw hole.

shaft: first remove the hinge shaft and screw this shaft from the other end of the screw hole.

shaft: first remove the hinge shaft and screw this shaft from the other end of the screw hole.    


6. Mount the left 

6. Mount the left 

6. Mount the left 

6. Mount the left top hinge

top hinge

top hinge

top hinge    fixation column on the right.

fixation column on the right.

fixation column on the right.

fixation column on the right.    


7. Mount the 

7. Mount the 

7. Mount the 

7. Mount the bottom hinge

bottom hinge

bottom hinge

bottom hinge    on the right side of the cabinet.

on the right side of the cabinet.

on the right side of the cabinet.

on the right side of the cabinet.    


8. First mount the 

8. First mount the 

8. First mount the 

8. First mount the top hinge

top hinge

top hinge

top hinge    iiiin

n

n

n    tttth

h

h

he

ee

e    cccco

o

o

orrrrrrrre

ee

essssp

p

p

po

o

o

on

n

n

nd

d

d

diiiin

n

n

ng

g

g

g    ssssh

h

h

ha

aa

afffftttt    h

h

h

ho

o

o

olllle

ee

e    o

o

o

on

n

n

n    tttth

h

h

he

ee

e    rrrriiiig

g

g

gh

h

h

htttt    ssssiiiid

d

d

de

ee

e    o

o

o

offff    tttth

h

h

he

ee

e    d

d

d

do

o

o

oo

o

o

orrrr    u

u

u

up

p

p

pp

p

p

pe

ee

errrr    cccco

o

o

ovvvve

ee

errrr,,,,    p

p

p

plllla

aa

acccce

ee

e    tttth

h

h

he

ee

e    d

d

d

do

o

o

oo

o

o

orrrr    b

b

b

bo

o

o

od

d

d

dyyyy    o

o

o

on

n

n

n    

the 

the 

the 

the bottom hinge

bottom hinge

bottom hinge

bottom hinge, and press the 

, and press the 

, and press the 

, and press the top hinge

top hinge

top hinge

top hinge    into the hinge fixation column to fix the hinge.

into the hinge fixation column to fix the hinge.

into the hinge fixation column to fix the hinge.

into the hinge fixation column to fix the hinge.    


9. Mount the roof decoration, th

9. Mount the roof decoration, th

9. Mount the roof decoration, th

9. Mount the roof decoration, the screw caps and the hinge end

e screw caps and the hinge end

e screw caps and the hinge end

e screw caps and the hinge end    cap.

cap.

cap.

cap.    


Bottom hinge 

Summary of Contents for RFZ70

Page 1: ...ruction manual for fr Instruction manual for fr Instruction manual for fr Instruction manual for freezer eezer eezer eezer Model code RFZ70 Contact Caple on 0844 800 3830 or for spare parts www 4caple co uk ...

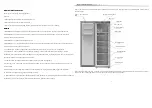
Page 2: ...ilities or lack of experience and knowledge unless they have been given supervision or instruction concerning use of the appliance by a person responsible for their safety 7 Children should be supervised to ensure that they do not play with the appliance 8 If the supply cord is damaged it must be replaced by Caple its service agent or similarly qualified persons in order to avoid a hazard 9 Please...

Page 3: ...rigerator is correctly and steadily placed Make sure the refrigerator is correctly and steadily placed Make sure the refrigerator is correctly and steadily placed Make sure the refrigerator is correctly and steadily placed on stable flooring on stable flooring on stable flooring on stable flooring a a a an n n nd d d d t t t th h h ha a a at t t t a a a al l l ll l l l s s s sa a a af f f fe e e e...

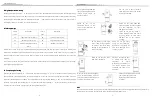
Page 4: ...Super FRZ key A key for manual confirmation to show 24 and the refrigerator will be working in the Super Freeze mode Note The refrigerating capacity marked in the nameplate is the test result when the above Note The refrigerating capacity marked in the nameplate is the test result when the above Note The refrigerating capacity marked in the nameplate is the test result when the above Note The refr...

Page 5: ... at the top but there is no display at the bottom After the compulsory defrosting mode is enabled the compressor and fan will stop immediately in time of compulsory defrosting operation press the temperature adjusting key and the temperature adjusting key for consecutive 3 seconds or the conditions for exit is satisfied it will quit the compulsory defrosting mode Do not dismantle or attempt a repa...

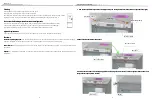
Page 6: ...reduce the number of times the door is opened it is not appropriate to add fresh food Disposal Disposal Disposal Disposal If a refrigerator is discarded its door seal must be removed to prevent any child entering and being sealed in the refrigerator 1 1 1 1 Remove the two screw caps and the two hinge end Remove the two screw caps and the two hinge end Remove the two screw caps and the two hinge en...

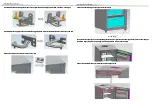
Page 7: ...ge bottom hinge bottom hinge bottom hinge on the right side of the cabinet on the right side of the cabinet on the right side of the cabinet on the right side of the cabinet 8 First mount the 8 First mount the 8 First mount the 8 First mount the top hinge top hinge top hinge top hinge i ii in n n n t t t th h h he e e e c c c co o o or r r rr r r re e e es s s sp p p po o o on n n nd d d di ii in ...

Page 8: ...R F connecting ...

Page 9: ...e replaced by the servicemen designated by this Caple to avoid potential dangers Non Non Non Non fault Phenomenon fault Phenomenon fault Phenomenon fault Phenomenon The refrigerant liquid in the capillary tubes of the refrigerator flows at a high speed and sometimes there may be a few air bubbles inside Therefore some irregular noises will be produced at the exit When the refrigerator is in rapid ...

Page 10: ...is product Correct Disposal of this product This marking indicates that this product should not be disposed with other household wastes throughout the EU To prevent possible harm to the environment or human health from uncontrolled waste disposal recycle it responsibly to promote the sustainable reuse of material resources To return your used device please use the return and collection systems or ...

Reviews: