Instruction manual Ri5500
Please keep this instruction manual for future reference
22
DEFROSTING THE FREEZER COMPARTMENT
- Frost covering the shelves of the freezer compartment should be removed
regularly.
- Do not use sharp metal objects for this operation. They could puncture the
refrigerator circuit and cause irreparable damage to the unit. Use the plastic
scraper provided.
- When there is more than 5 mm of frost on the shelves, defrosting must be carried
out.
- Before defrosting, place frozen food in a cool place. We recommend wrapping
your frozen food in sheets of newspaper as this will help the food to maintain it’s
tempertaure for longer.
- To accelerate the defrosting process, place one or more bowls of warm water in
the freezer compartment.
- Dry the inside of the compartment with a
sponge or a clean cloth.
- Once the unit has been defrosted, place
the food into the freezer and remember to
consume it within a short period of time.
REPLACING THE LIGHT BULB
NOTE:
Unplug the unit from the power supply before start the process..
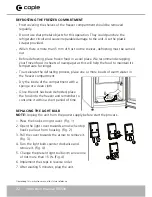
1. Press the hooks on light cover. (Fig. 1)
2. Open the light cover towards arrow when top
hooks pull out from housing. (Fig. 2)
3. Pull the cover towards the arrow to remove it.
(Fig. 3)
4. Turn the light bulb counter clockwise and
remove it. (Fig. 4)
5. Change the present light bulb with a new one
of not more than 15 W. (Fig. 4)
6. Implement the steps in reverse order.
7. After waiting 5 minutes, plug the unit.
EN - 19
• Before defrosting, place frozen food
in a cool place. We recommend
wrapping your frozen food in sheets of
newspaper as this will help the food to
maintain it's tempertaure for longer.
• To accelerate the defrosting process,
place one or more bowls of warm
water in the freezer compartment.
• Dry the inside of the compartment with
a sponge or a clean cloth.
• Once the unit has been defrosted,
place the food into the freezer and
remember to consume it within a short
period of time.
6.3. Replacing the Light Bulb
Important note:
Unplug the unit from
the power supply before start the
process.
1
2
3
4
1. Press the hooks on light cover. (Fig. 1)
2. Open the light cover towards arrow when
top hooks pull out from housing. (Fig. 2)
3.
4.
Pull the cover towards the arrow to
remove it. (Fig. 3)
Turn the light bulb counter clockwise and
remove it. (Fig. 4)
5. Change the present light bulb with a new
one of not more than 15 W. (Fig. 4)
6. Implement the steps in reverse order.
7. After waiting 5 minutes, plug the unit.
7. TRANSPORT AND
REPOSITIONING
7.1. Transportation and Changing
Positioning
• The original packaging and foam may
be kept for re-transportation
(optional).
• Fasten your appliance with thick
packaging, bands or strong cords and
follow the instructions for transportation
on the packaging.
• Remove all movable parts (shelves,
accessories, vegetable bins, and
so on) or fix them into the appliance
against shocks using bands/tape when
re-positioning or transporting.
Always carry your appliance in the
upright position.
8. TROUBLESHOOTING
If your refrigerator is not working properly,
there may be a minor problem. Check the
following.
The appliance does not operate
Check if:
• There is power
• The mains is connected
• The thermostat setting is on the “•”
position
• The socket is defective. To check this,
plug another working appliance into
the same socket.
The appliance performs poorly
Check if:


