background image

8

GB

INSTRUCTION FOR THE INSTALLER

The operations indicated below must be followed by qualified personnel exclusively, in conformity

with the regulations in force.

The manufacturing firm refuses all responsibility for damages to people, animal or things,

resulting fron the failure to comply with such provisions.

INSTALLATION

The appliance is designed to be embedded into
heat-resistant pieces of forniture.
Make a hole in the top of the piece of forniture
with the dimension indicated in fig. 4at a distance
of at east 50 mm from the appliance border to the
adjacent walls.
Adhesive washer “S” slong the border of the top
bottom (fig.5)
Block it with the fastening hooks “C” (fig.6)

ELECTRICAL CONNECTIONS ( fig.7)

Before carryng out electrical connection be sure
that the characteristics of the electrical system
meet the specifications of the located at the
bottom of the work-top and the electrical system
is provided with effective ground in compliance
with the regulations and provision of the law in
force.
The ground is binding according to the law.
If the appliance is not provided with cable and/or
relative plug, apply a standardized plug to the
power supply cable.
If you wish a direct connection to the line , it is
necessary to interpose a single-pole switch, whit a
minimum opening between the contactsof 3 mm. ,
suitable for the indicated in the plate and in
conformity with the rules in force ( the
yellow/green ground cable should not be
interrupted by the swich).

ATTENTION

Should a built-in oven or any other appliance
producing heat be fitted directly under a glass
ceramic cook-top with Touch Control, it is
necessary isolate the hob whith a separator. The
bottom temperature must be low 60°C.
Disregard of this precaution could cause the
wrong working of the Touch Control system.

Summary of Contents for VITROCERAMIC HOB

Page 1: ...i sull installazione l uso e la manutenzione oltre a dare utili consigli IL COSTRUTTORE Dear Customer we thank you and congratulate you on granting us your preference by purchasing one of our products We are sure that this new appliance manufactured with quality materials will meet your requirements in the best possible way The use of this new equipment is easy However we invite you to read this b...

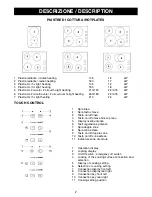
Page 2: ...ing 210 2 2 kW 1 Spia linea 2 Spia tasto chiave 3 Tasto on off linea 4 Tasto on off chiave blocco piano 5 Display livello potenza 6 Tasti regolazione potenza 7 Spia doppia zona 8 Spia zona estesa 9 Tasto on off doppia zona 10 Tasto on off zona estesa 11 Indicatore zona di cottura 1 Operation display 2 Locking display 3 On Off switch emergency off switch 4 Locking of the cooking surface connection ...

Page 3: ...nsione per ragioni di sicurezza tenere premuto il tasto On Off per 2 secondi azionamento ritardato Quando il piano di cottura viene spento invece il sistema di comando si disattiva non appena viene premuto il tasto On Off Dopo l accensione il display di funzionamento si accende Nel caso in cui dopo l accensione non venga selezionata nessun altra funzione il sistema di comando si disattiva automati...

Page 4: ...essione del tasto del fuoco corrispondente Se non viene premuto nessuno dei tasti sopra indicati entro questo lasso di tempo il fuoco corrispondente si spegne automaticamente una volta trascorso il tempo massimo d esercizio ammesso Spegnimento di sicurezza nei singoli casi Impostazioni da 1 a 3 dopo 5 ore Impostazione 4 dopo 4 ore Impostazione 5 dopo 3 ore Impostazione 6 dopo 2 ore Impostazione 7 ...

Page 5: ...zione posta sotto l apparecchio e che l impianto sia dotato di un efficace collegamento di terra secondo le norme vigenti La messa a terra è obbligatoria Se l apparecchio è sprovvisto di cavo e o della relativa spina utilizzare cavi adatti all assorbimento indicati nella targhetta di identificazione E possibile effettuare il collegamento direttamente alla rete elettrica interponendo un interruttor...

Page 6: ...lights up If no further functions are selected after switching on the control system switches off automatically 30 seconds later Each pressing of a key is accompanied by a beeping sound After switching on the individual hobs can be switched on and off and the different cooking settings select 6 If the cooking surfacs is switched on by means of the key 6 setting n 4 is switched on further pressing ...

Page 7: ...s is pressed within this period of time the relevant cooking surface il automatically switched off at the end of the maximum permitted operating time Safety switching off in Setting 1 to 3 after 5 hours Setting 4 after 4 hours Setting 5 after 3 hours Setting 6 after 2 hours Setting 7 after 1 hours If only the On Off switch is pressed the control system switches off automatically after 30 seconds i...

Page 8: ...trical system meet the specifications of the located at the bottom of the work top and the electrical system is provided with effective ground in compliance with the regulations and provision of the law in force The ground is binding according to the law If the appliance is not provided with cable and or relative plug apply a standardized plug to the power supply cable If you wish a direct connect...

Page 9: ...9 1 3 5 7 2 4 6 FIGURE FIGURES ...

Page 10: ......

Page 11: ......

Page 12: ...12 ...

Reviews: