background image

Instruction manual WDU060, WDU080 & WDU125

16

Please keep this instruction manual for future reference 

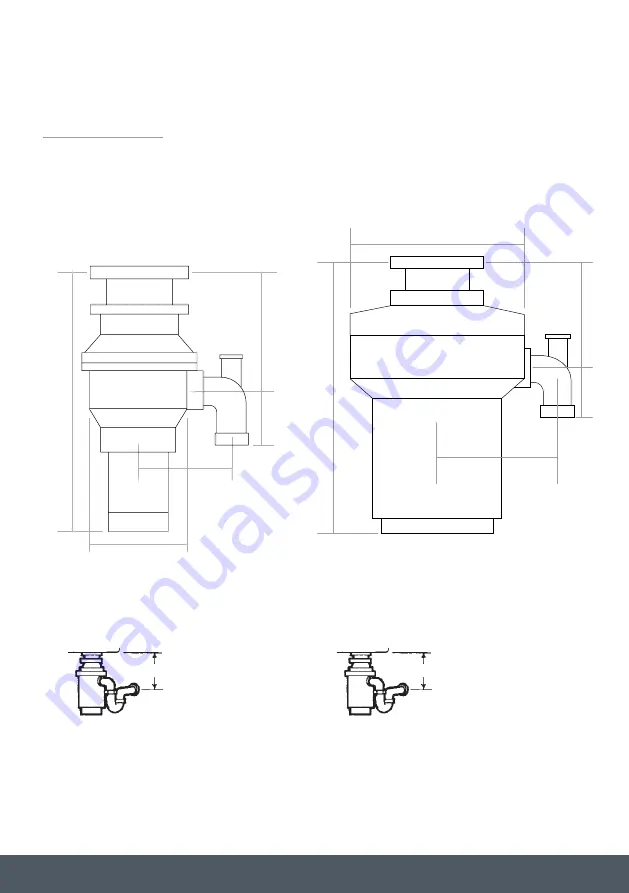
I N S T A L L A T I O N S   D I M E N S I O N S

404mm

185mm

70mm

219mm

140mm

161mm

354mm

70mm

137mm

132mm

S I N G L E   B OW L

231mm aprox.

S I N G L E   B OW L

255mm aprox.

W D U 0 8 0

W D U 0 6 0

Summary of Contents for WDU060

Page 1: ...Waste Disposal Unit Instruction Manual WDU060 WDU080 WDU125 Contact Caple on 0117 938 7420 for spare parts or www caple co uk WDU125 Shown ...

Page 2: ...3 Safety Instructions 4 Environmental Protection 6 Dishwasher Connection 7 Installation Of Mounting Assembly 8 Electrical Connections 10 Attaching Discharge Elbow 13 Operating Instructions 14 Cleaning And Maintenance 15 Installation Dimensions 16 Troubleshooting 18 Air Switch Assembly Instructions 20 Caple Contact Details 22 ...

Page 3: ... Disposal Unit has been designed to operate at 220 240V 50 60 Hz household current exclusively Using any other voltage or Hz adversely affects performance and invalidates the warranty CAUTION Be sure to review the Safety Instructions Warning and Electrical Connection section before using disposer N O T E Model information and serial number appears on the rating label affixed to bottom of the dispo...

Page 4: ...the waste disposal unit To reduce the risk of injury close supervision is necessary when an appliance is used near children Do not put fingers or hands into a waste disposer Turn the power switch to the off position before attempting to clear a jam or remove an object from the disposer When attempting to loosen a jam in a waste disposer use a long wooden object such as a wooden spoon or the wooden...

Page 5: ...r Do not operate disposer unless splash guard is in place For proper grounding instructions see the electrical connection section of this manual Installation of this appliance must be done in accordance to local plumbing codes and laws If the supply cord is damaged it must be replaced by the manufacturer its service agent or authorized person in order to avoid hazard This appliance is not intended...

Page 6: ... recycling of electrical and electronic equipment Disposal must be carried out in accordance with local environmental regulations for waste disposal For more detailed information about treatment recovery and recycling of this product please contact your local council your household waste disposal service or the retailer where you purchased the product CE DECLARATIONS OF CONFORMITY This appliance h...

Page 7: ...mplete the following procedure If a dishwasher is not to be connected go on to Installation of mounting assembly Using a drill drill out the entire plug see 2A When knock out plug falls into disposer you may remove it or grind it up when the disposer is used This will not damage the disposer in any way but may take some time to grind Connect dishwasher hose see 2B using hose clamp Make sure all pl...

Page 8: ...remove Raise mount ring toward top of sink flange Remove cushion mount Remove mount ring You may want to practice installing the cushion mount at this point before you are under the sink See the Important Notice Cushion Mount Detail Unscrew support ring from sink flange and remove fibre gasket You are now left with sink flange and rubber gasket The rubber gasket is used instead of plumbers putty o...

Page 9: ...nstalling cushion mount large side down so the groove on the inside of cushion mount fits over lip on sink flange similar to putting the lid on a plastic container see 3E 3F 3G Please read important notice below The disposer must be installed so that the reset button is readily accessible TOP OF SINK FLANGE FIBER GASKET RUBBER GASKET SUPPORT RING SINK FLANGE SINK BOTTOM BEAD OF CUSHION MOUNT OPEN ...

Page 10: ...uded within the molded plug and lead attached to the Disposer The 13 amp double pole switched spur switch should be positioned higher than the sink worktop and at a minimum of one meter from the side of the sink away from water splashes and out of the reach of children This spur switch must be a double pole with at least 3mm contact separation In each pole 20Amp DP switches BS 3676 meet this condi...

Page 11: ...pare the tips of the wires of the electrical lead and attach to the junction Box Disconnect the junction box from the electrical supply before making the following connections The green and yellow wire must be connected to the terminal marked in one of the following ways With the letter E By the earth symbol Coloured green or green and yellow The brown wire must be connected to the terminal that i...

Page 12: ...wer cord This appliance must be grounded In the event of a malfunction or breakdown grounding provides a path of least resistance for electric current to reduce the risk of electric shock This appliance is equipped with a cord having an equipment grounding conductor and a grounding plug The plug must be plugged into an appropriate outlet that is properly installed and grounded in accordance with a...

Page 13: ...CTION ELBOW TRAP HOPPER PROJECTION IN SUPPORTED POSITION HOPPER PROJECTION IN LOCK POSITION MOUNT RING 5A 6A 5B 6B 6C 6D LOCKING DETAIL CO NNECT ING DISPOSER TO MOUNT ASSEMBLY Line up disposer under mounting assembly Guide hopper projections into mount ring slots Turn mount ring about 1 4 to right so that disposer is temporarily supported see 6A Turn mount ring and disposer until disposer elbow li...

Page 14: ...ctually increasing torque grinding power and is operating under normal conditions Before turning disposer off let water and disposer run for approximately 15 seconds after shredding or grinding stops This assures that all waste is thoroughly flushed through trap and drain It is not recommended to use hot water while running disposer Cold water will keep waste and fats solid so disposer can flush a...

Page 15: ... scours its internal parts with each use WARNING Never put bleach or chemical drain cleaners into the disposer as they cause serious corrosion of metal parts If used resulting damage can be easily detected and all warranties are void Mineral deposits from your water can form on the stainless steel turntable giving the appearance of rust Do not be alarmed the stainless steel turntables used will no...

Page 16: ...060 WDU080 WDU125 16 Please keep this instruction manual for future reference IN STALLAT IONS DIMENSIONS 404mm 185mm 70mm 219mm 140mm 161mm 354mm 70mm 137mm 132mm SINGLE BOWL 231mm aprox SINGLE BOWL 255mm aprox WDU080 WDU060 ...

Page 17: ...Instruction manual WDU060 WDU080 WDU125 17 Please keep this instruction manual for future reference 439mm 185mm 70mm 220mm 140mm 1 1 2 B P S SINGLE BOWL 255mm aprox WDU125 ELBOW DETAILS ALL MODELS ...

Page 18: ...n Remove stopper and or splash guard Check to see if turntable will rotate freely using a wooden spoon handle If turntable rotates freely replace splash guard and check reset button to see if it has been tripped Reset button is red and located on the front of the disposer Push button in until it clicks and remains depressed Reset Button should be pressed only once If reset button has not been trip...

Page 19: ...y be due to Improper seating of sink flange gasket centering putty or tightening Support ring not tightened properly Defective or improperly installed cushion mount If unit leaks at the waste elbow leak may be due to improper tightening of elbow flange screws DO NOT PRESS THE RED RESET BUTTON UNLESS POWER IS SWITCHED OFF AT THE POWER POINT ...

Page 20: ...d Outlet 3 the ord 1 2 3 4 5 6 WDU125 The Actuator which consists of 1 Actuator Button 2 Actuator Nut 3 Actuator Outlet Black Threaded portion The Air Switch is installed into the base of the disposer Only the air tube connection nozzle 5 is visible from the outside of the disposer Air Tube Assembly which consists of 4 Air Tube Clear or black 5 Sensor Inlet nozzle to connect air tube Actuator Imag...

Page 21: ...tor Outlet 3 and one end to Sensor Inlet 5 4 Plug Disposer Power Cord 6 into main electrical service 5 The Air Switch is supplied in the off position To turn on the disposer press Actuator Button 1 To turn off press Actuator Button again 6 For use with the wall switch first plug the disposer power cord into the outlet controlled by the wall switch Then install the tube and actuator button on the d...

Page 22: ...Caple Service Fourth Way Avonmouth Bristol BS11 8DW T 0117 938 1900 E service caple co uk www caple co uk ...

Reviews: