12
13
Instruction manual Wi3125 Wi3125GM Wi3126
Instruction manual Wi3125 Wi3125GM Wi3126
Please keep this instruction manual for future reference
Please keep this instruction manual for future reference
I N T E R N A L L I G H T
In order to reduce energy consumption, the LED light within this wine cabinet will automatically
switch off after 10 minutes. If you would prefer the LED light to remain on continuously, this is
possible. Please press and hold the
4
4
key for 5 seconds, the display will show “LP”. After
4 seconds the display will revert back to normal and the light will remain on until manually
switched off.
If you would like to revert back and conserve energy (recommended), press and hold the
4
4
key for 5 seconds, the display will show “LF”. After 4 seconds the display will revert back to
normal, and the light will automatically switch off after 10 minutes.
U S I N G T H E S H E LV E S
To prevent damaging the door gasket, make sure to have the door opened fully when pulling
shelves out of the rail compartment.
For easy access to the storage content, you must pull the shelves approximately 1/3 out of
the rail compartment, however this unit was designed with a notch on each sides of the shelf
tracks to prevent bottles from falling.
R E M OV I N G O R I N S TA L L I N G S H E LV E S
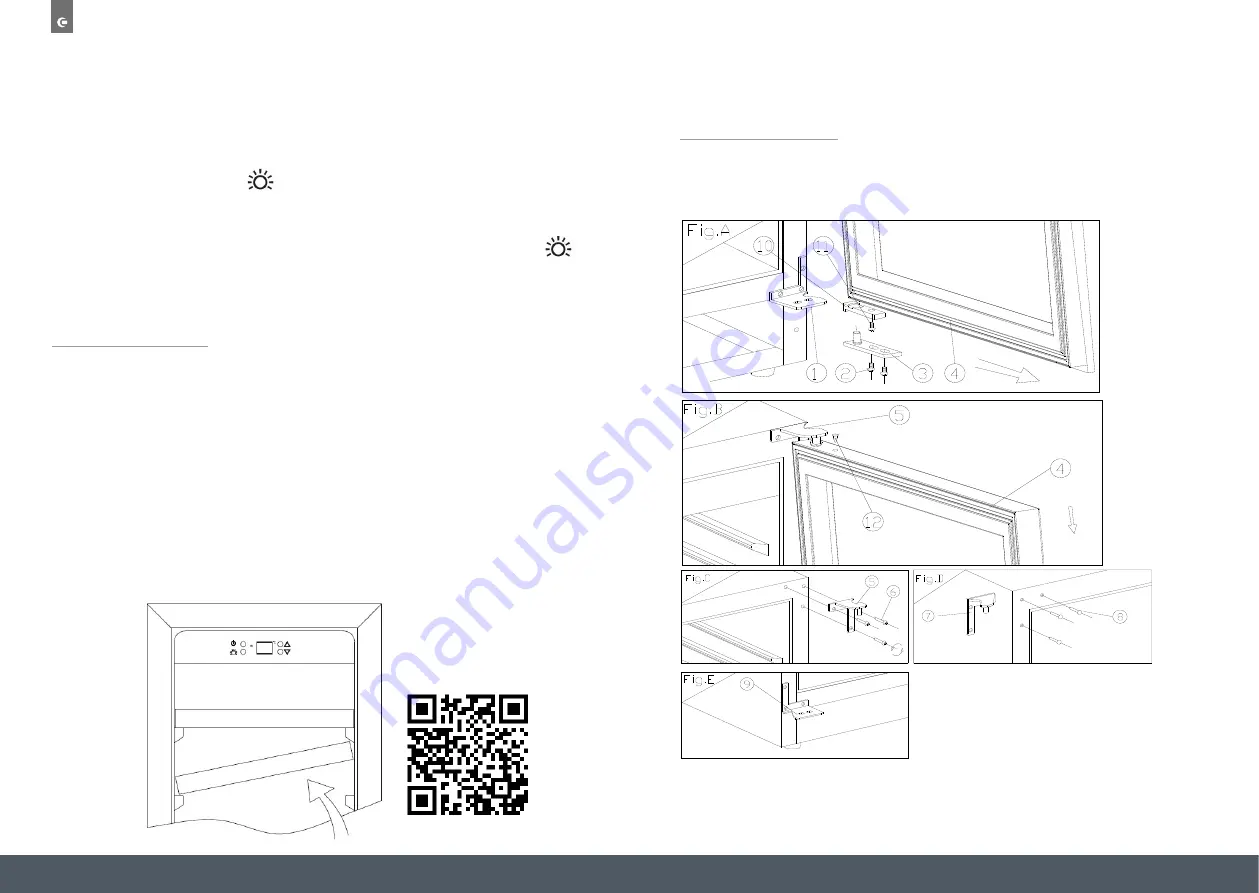
To install or remove a shelf, tilt the shelf as per the diagram and simply pull out, or push in the
shelf until it sits on the support brackets securely.
Visit our Caple website to view a ‘How to video’ on this.
www.caple.co.uk
H O W TO C H A N G E T H E D O O R O P E N I N G
This appliance has reversible doors but is delivered with a right hinged door. The left hand
hinge kit comes with the unit (in the box), should you wish to reverse the hinge on your unit
follow the directions below:
Internal light
In order to reduce energy consumption, the LED light within this wine cabinet will automatically
switch off after 10 minutes. If you would prefer the LED light to remain on continuously, this is
possible. Please press and hold the "LIGHT" button for 5 seconds, the display will show "LP". After
4 seconds the display will revert back to normal and the light will remain on until manually switched
off.
If you would like to revert back and conserve energy (recommended), press and hold the "LIGHT"
button for 5 seconds, the display will show "LF". After 4 seconds the display will revert back to
normal, and the light will automatically switch off after 10 minutes.
Using the shelves
•
To prevent damaging the door gasket, make sure to have the door opened fully when pulling
shelves out of the rail compartment.
•
For easy access to the storage content, you must pull the shelves approximately 1/3 out of the rail
compartment, however this unit was designed with a notch on each sides of the shelf tracks to
prevent bottles from falling.
Removing or installing shelves
•
To install or remove a shelf, tilt the shelf as per the diagram and simply pull out, or push in
the shelf until it sits on the support brackets securely.
•
Visit our Caple website to view a 'How to video' on this. www.caple.co.uk
6
How to change the door opening
This appliance has reversible doors but is delivered with a right hinged door. The left hand
hinge kit comes with the unit (in the box), should you wish to reverse the hinge on your unit
follow the directions below:
1. Lower hinge (Right)
2 . Screws
3 .Door axis
4. Door
5. Top hinge (Right)
6. Hinge Screws
7. Top hinge (Left)
8. Decorative plugs
9. Lower hinge (Left)
10. Door limit device
11. Screw
12. Plug
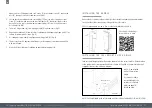
1. Open the door to 90 degrees, take out 2 screws (2) from lower door axis (3), remove the door (4),
then pull out the door and door axis (Fig. A).
2. Put the door down safely and take out the plug (12) from top of door frame, unscrew 1 screw
(11) at bottom and remove the door limit device (10), then install the door limit device (10) at top
of door frame, please use spare plug (12) to block the hole at top of door frame. (Fig. A/B)
3. Take out 3 hinge screws (6) from top hinge (right) (5) and remove it. (Fig. C)
4. Remove decorative nail (8) from left top of cabinet and install spare top hinge (Left) (7) at left top
of cabinet with 3 screws. (Fig. D)
5. According above procedure, install spare lower hinge (left) (9). (Fig. E)
6. The door revolves 180 degrees, install the door with same way it was removed and fix it with door
aligned.
7. Block the hole at right top of cabinet with spare decorative plugs (8).
7
1. Lower hinge (Right)
4. Door
7. Top hinge (Left)
10. Door limit device
2 . Screws
5. Top hinge (Right)
8. Decorative plugs
11. Screw
3 .Door axis
6. Hinge Screws
9. Lower hinge (Left)
12. Plug
How to change the door opening
This appliance has reversible doors but is delivered with a right hinged door. The left hand
hinge kit comes with the unit (in the box), should you wish to reverse the hinge on your unit
follow the directions below:
1. Lower hinge (Right)
2 . Screws
3 .Door axis
4. Door
5. Top hinge (Right)
6. Hinge Screws
7. Top hinge (Left)
8. Decorative plugs
9. Lower hinge (Left)
10. Door limit device
11. Screw
12. Plug
1. Open the door to 90 degrees, take out 2 screws (2) from lower door axis (3), remove the door (4),
then pull out the door and door axis (Fig. A).
2. Put the door down safely and take out the plug (12) from top of door frame, unscrew 1 screw
(11) at bottom and remove the door limit device (10), then install the door limit device (10) at top
of door frame, please use spare plug (12) to block the hole at top of door frame. (Fig. A/B)
3. Take out 3 hinge screws (6) from top hinge (right) (5) and remove it. (Fig. C)
4. Remove decorative nail (8) from left top of cabinet and install spare top hinge (Left) (7) at left top
of cabinet with 3 screws. (Fig. D)
5. According above procedure, install spare lower hinge (left) (9). (Fig. E)
6. The door revolves 180 degrees, install the door with same way it was removed and fix it with door
aligned.
7. Block the hole at right top of cabinet with spare decorative plugs (8).
7
Scan the QR code below to
access the ‘How to video’


