background image

c) To change the Auto-On Time

• Push and hold the AUTO button for 2-3 seconds until the display illuminates 

  with the clock icon and the clock icon starts blinking.

• Push and hold the HOUR and then the MINUTES button to set a new

  Auto-On time.

• Select the number of cups you would like to brew automatically by pressing

  the CUPS button or choose GROUND COFFEE. See b) Setting the Auto-On 
  Time above.

• Once desired Auto-On time is programmed, press the AUTO button again. 

   The display reverts to the actual time and the clock icon will remain illuminated.

• To turn off the Auto-On feature press the AUTO button again until the clock

  icon disappears.  

d) Activating the Auto-On Time

• Push the AUTO button briefly. The display illuminates the clock icon,

  indicating the Auto-On setting is active. The machine will show the actual 
  time. At the preprogrammed time the machine starts grinding and brewing (or
  brewing only). For details see chapter 8.2.

e) Grind Volume Setting: the "2-10" button

The CoffeeTEAM PRO lets you set two different grinder settings: one for immediate
use and one for Auto-On use.

For immediate use:

Push the "2-10" button repeatedly to select from 2, 4, 6,

8, 10.

For Auto-On use:

Push and hold the AUTO button until the clock icon is 

illuminated and starts blinking. Push the CUPS button to select from 2, 4, 6, 8, 10.
The grinder will automatically adjust the time to grind the right volume for the
cups programmed. 

f) Oily Bean Setting

The machine features a special OILY button which adds extra time to the grinding
process for slow moving, oily coffee beans. To activate this setting, press the
OILY button on the display prior to brewing. The oily bean icon will illuminate
and the grinder will automatically add extra time to the grinding cycle.

IMPORTANT:

Do not engage the OILY setting when using non-oily beans. This

could cause the filter to overflow with ground coffee and damage the machine.

CAUTION: 

Do not use the FINE grinder setting when using the OILY setting.

Oily beans should be ground using the COARSE grinder setting. 

7.2 ADJUSTING THE COFFEE STRENGTH

To increase the strength of the coffee we recommend programming a higher
cup amount such as 10 cups then reducing the amount of water you add to
the water tank. For example, select 10 in the CUPS setting but only fill the
water tank to the 6 cup marking. This will add extra ground coffee to the filter
and increase the strength of the brew.   

7.3 POWER INTERRUPTION

• If the machine is unplugged or power is interrupted all settings described in 

  chapters 7.1 and 7.2 must be reset.

9

Summary of Contents for CoffeTEAM PRO Therm 478

Page 1: ...p Digital Coffee Maker Conical Burr Grinder Combination Operating Instructions Warranty Model 478 Therm 1000W 120V 60Hz Read this manual thoroughly before using and save it for future reference Coffee...

Page 2: ...on or near a hot gas or electric burner or in a heated oven 11 Risk of Fire or Electric Shock Do not remove this cover No user serviceable parts inside Repair should be done by authorized service pers...

Page 3: ...only Keep your hands and the cord away from hot parts of the appliance during operation Never clean with scouring powders or hard implements Always ensure the upper burr and bean container are locked...

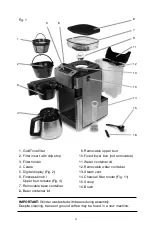
Page 4: ...drip stop 3 Filter holder 4 Carafe 5 Digital display Fig 2 6 Fineness knob Upper burr release Fig 4 7 Removable bean container 8 Bean container lid 9 Removable upper burr 10 Fixed lower burr not remo...

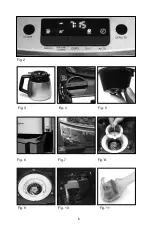
Page 5: ...5 Fig 2 Fig 3 Fig 4 Fig 5 Fig 6 Fig 7 Fig 8 Fig 9 Fig 10 Fig 11...

Page 6: ...rinding more than 8 cups as this could cause the filter basket to overflow during brewing c Dark Beans versus Light Beans Your CoffeeTEAM PRO burr grinder is calibrated to work with all different kind...

Page 7: ...on always lock the upper burr Fig 1 9 and bean container Fig 1 7 into place as described in chapters 7 4 7 5 Never block the steam vent Fig 1 13 on the side of the machine Always leave 2 inches of spa...

Page 8: ...you can operate the coffee maker a Setting the Actual Time Push and hold the HOUR button until the actual hour is displayed The display will also show AM or PM Push and hold the MINUTE button until th...

Page 9: ...use Push and hold the AUTO button until the clock icon is illuminated and starts blinking Push the CUPS button to select from 2 4 6 8 10 The grinder will automatically adjust the time to grind the rig...

Page 10: ...the small metal handle attached to the upper burr Fig 8 IMPORTANT Never try to remove the lower burr NOTE Clean the upper burr regularly as described in chapter 10 6 To reassemble place the upper bur...

Page 11: ...water filter cartridge removes up to 82 of the chlorine found in your tap water Initial Preparation Open the water container lid and remove the charcoal filter holder Remove the charcoal filter from...

Page 12: ...ight position If you turn the carafe on its side or upside down with its lid closed hot coffee may escape IMPORTANT Do not try to remove the stainless steel bottom Do not place the carafe on any hot s...

Page 13: ...rip stop Fig 5 8 2 GRINDING AND BREWING LATER AUTO Coffee maker is plugged in and the time and auto on time are set Beans are in the bean container and bean container lid is on and pushed down securel...

Page 14: ...ntainer or ground coffee outlet so no moisture enters the grinder Special Cleaning Tips 10 1 Thermal Carafe Never immerse carafe completely in hot water or any other liquid Wipe outside with a non abr...

Page 15: ...amber IMPORTANT Never try to remove the lower burr 11 DECALCIFYING To keep your coffee maker operating efficiently it is important to decalcify at least every 2 4 months depending on local water hardn...

Page 16: ...acing the upper burr back into the machine as described in chapter 9 Follow location of upper burr handle as shown in Fig 8 Fig 9 The machine beeps when I press the BREW button Check the following Bea...

Page 17: ...the machine Damage caused by accident abuse negligence misuse improper operation or failure to follow instructions contained in this manual Any service or alteration performed by an unauthorized perso...

Page 18: ...767 3554 Mon Thu 8AM 9PM Fri 8AM 8PM Sat 9AM 5PM Eastern Time Zone contact capresso com JURA Inc 81 Ruckman Road Closter NJ 07624 201 767 3999 Fax 201 767 9684 Website www capresso com Customer Servi...

Reviews: