SIMPLE™ KEY USER GUIDE
SIMPLE™ KEY USER GUIDE
4
5
STEP 1 (OF 2) KEY ACTIVATION
Follow the steps below to ACTIVATE your new key. Once you have
activated your key, follow STEP 2 (of 2) KEY PAIRING to pair the key to
your vehicle.
1.
First, simultaneously press the LOCK and PANIC buttons on the
remote. The light under the PANIC button will illuminate and stay on.
2.
Using your ACTIVATION CODE found in the chart on page 3, enter the
first digit using the LOCK button, the second digit using the PANIC
button, and the third digit using the UNLOCK button.
For example, KEY CODE 314 is entered by pressing the LOCK
button three (3) times, the PANIC button one (1) time, and then the
UNLOCK button four (4) times.
3.
Now, simultaneously press the LOCK and PANIC buttons on the remote.
a. The light will now blink back the ACTIVATION CODE you originally
entered. If this does not match, go back to Step 1 to start over.
For example, the indicator light for KEY CODE 314 will blink (3) times,
pause, blink one (1) time, pause, and finally blink four (4) times.
b. If the light blinks rapidly this indicates an error. Go back to ACTIVATION
step 1 and retry the steps using your ACTIVATION CODE.
NOTE:
You may re-enter activation codes anytime before the
key is paired to your vehicle. After the key is paired to your
vehicle, do not attempt to re-enter or change the button code.
This will cause the key to not work.
4.
Move on to STEP 2 (of 2) below to PAIR the key to your vehicle.
STEP 2 (OF 2) KEY PAIRING
Instructions have timing requirements. If you wait too long between steps,
your vehicle’s computer may time out, requiring you to start over. Once
you begin the pairing procedure, move at a quick and even pace.
OPTIONAL STEP: REPLACE BUTTON PAD
Additional button pads are included with Simple™ Key. Select the button
pad that matches your existing key, and follow the steps below to insert it
into the new key.
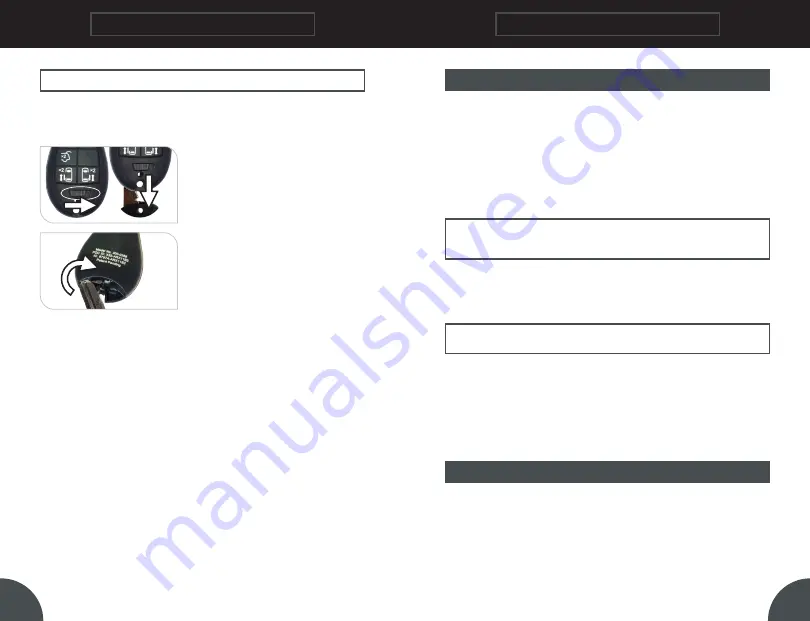
1.
Slide the mechanical latch on
the front of the key fob sideways
and remove the emergency key
by pulling down on the bottom
of the fob.
2.
Place the key fob on a flat
surface with the buttons facing
down. Insert the tip of the
emergency key or a flat head
screwdriver into the area where
the emergency key was located
and twist to pop open the shell.
3.
Remove all components and lay them flat on the surface in front of you.
4.
Remove the originally installed button pad and replace it with the
additional button pad that matches your existing key’s button
configuration.
5.
Reassemble all components of the key fob.
NOTE:
Place the circuit board back in the shell so that the battery
makes contact with the designated area on the circuit board.
6.
Snap the key fob back together ensuring all sides are sealed tightly
all the way around.
7.
Move on to STEP 1 (of 2) to ACTIVATE the key.


