background image


20 


IR-Ctrl


DVB- T


IR-Ctrl


IR-Ctrl


____ _____


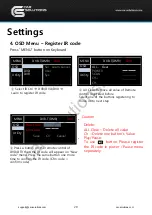
① Select IR Ctrl 


DVB/DVD/DVR 



Learn to register IR code 

MENU 

DVB-T(DMB) 

DVD


OSD 


Sel 

Learn 

Cancel 

User


Sys


DVD 

DVR 

Utility 


MENU 

DVB-T(DMB) 

DVD


OSD 

ALL -  Clear 

POWER 


SCAN 


CH+ 


CH-


Utility 


Settings 

4.


OSD Menu – Register IR code 

Press “MENU” button on Keyboard 


② All Clear: Remove all value of Remote 

control registered before 

Select one of the buttons registering to 

move on to next step 


Caution


Delete:


ALL Clear – Delete all value


Clr – Delete one button’s Value 

Play/Pause


To  use            button,  Please  register 

the IR code in power / Pause menu 

separately


③ Press a button on the remote control of 

DVD/DTV then the IR code will appear on “New 

code” menu. Press the same button one more 

time to confirm the IR code. (Cfm code = 

confirm code) 

MENU 

DVB-T(DMB) 

DVD


OSD 

New Code :


Cfm Code :


Save 

Clr 

Cancel


Utility 


support@car-solutions.com

car-solutions.com

car-solutions.com

Summary of Contents for BM-APIX-PAS

Page 1: ...User Manual Video Interface BM APIX PAS for BMW support car solutions com car solutions com c a r s o l u t i o n s c o m ...

Page 2: ...4 Specifications Diagram support car solutions com car solutions com c a r s o l u t i o n s c o m ...

Page 3: ...5 Specifications Components OSD Board 1 EA LVDS Cable 1 EA Power Cable 1 EA optional RGB Navi Cable 7 pin 1 EA support car solutions com car solutions com c a r s o l u t i o n s c o m ...

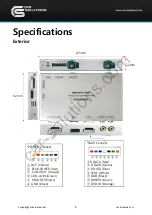
Page 4: ...ange CAN LOW Green REAR DET Brown GND Black NAVI Connect R DATA Red G DATA Green B DATA Blue SYNC White GND Black DMB IR Green DVD IR Orange Specifications Exterior 125mm 22mm 92mm support car solutions com car solutions com c a r s o l u t i o n s c o m ...

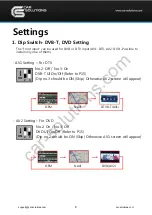
Page 5: ...DVB T ON Skip OFF Display 3 DVD ON Skip OFF Display 4 MHL ON Skip OFF Display 5 Car model Refer to the pictures below 6 7 8 Example F20 6 5 X3 X4 8 8 Made in Hungary F20 8 8 F15 10 2 F30 6 5 MINI 6 5 F30 8 8 MINI 8 8 support car solutions com car solutions com c a r s o l u t i o n s c o m ...

Page 6: ...stall only one of them AV1 Setting For DTV No 2 Off No 3 On DVB T UI On Off Refer to P15 Dip no 3 should be ON Skip Otherwise AV2 screen will appear AV2 Setting For DVD No 2 On No 3 Off DVD UI On Off Refer to P15 Dip no 2 should be ON Skip Otherwise AV1 screen will appear ON 2 3 ON 2 3 support car solutions com car solutions com c a r s o l u t i o n s c o m ...

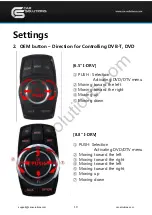
Page 7: ...own 6 5 Jog shuttle Steering wheel Switching MINI Normal Car Audio Button Press long Switching mode Press short Switching to OEM directly PIP function Press long to activate PIP function 8 8 support car solutions com car solutions com c a r s o l u t i o n s c o m ...

Page 8: ...V menu Moving toward the left Moving toward the right Moving up Moving down 8 8 I DRV PUSH Selection Activating DVD DTV menu Moving toward the left Moving toward the right Moving toward the left Moving toward the right Moving up Moving down support car solutions com car solutions com c a r s o l u t i o n s c o m ...

Page 9: ...y Pause stop Audio FR FF POWER DISC UP DISC DOWN Play next chapter Play previous chapter To use this function It is necessary to offer the remote IR code to manufacturer or setting OSD IR Ctrl P 19 POEWER MENU Ch Left Right USB RETURN Ch POWER SCAN Ch Ch support car solutions com car solutions com c a r s o l u t i o n s c o m ...

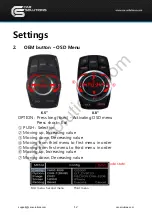
Page 10: ... Increasing value Moving down Decreasing value Moving from third menu to first menu in order Moving from first menu to third menu in order Moving up Increasing value Moving down Decreasing value Mode state PUSH First menu Second menu Third menu 6 5 8 8 support car solutions com car solutions com c a r s o l u t i o n s c o m ...

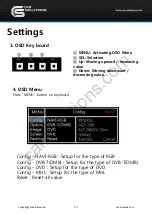
Page 11: ...Moving upward increasing value Down Moving downward decreasing value Config NAVI RGB Setup for the type of RGB Config DVB T DMB Setup for the type of DVB T DMB Config DVD Setup for the type of DVD Config MHL Setup for the type of MHL Reset Reset all value support car solutions com car solutions com c a r s o l u t i o n s c o m ...

Page 12: ...r from the R gear P OEM type When switching to the D gear from the R gear press the activated P button or driving up 20km to display AV RGB OEM screen GEAR Normal type When switching to the D gear from the R gear The AV RGB OEM screen is display right away FrontCam Type Setup for front camera ExtDevice External rear camera OEM Original camera FrontCam RcvOpt Selecting time of displaying Front came...

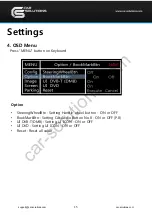
Page 13: ...WheelBtn Setting Handle wheel button ON or OFF BookMarkBtn Setting Car Audio Button No 8 ON or OFF P 8 UI DVB T DMB Setting UI ICON ON or OFF UI DVD Setting UI ICON ON or OFF Reset Reset all value support car solutions com car solutions com c a r s o l u t i o n s c o m ...

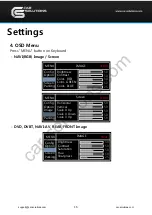
Page 14: ...g Screen Horizontal Vertical Scale X Up Scale X Down Scale X Up NAVI 50 50 50 50 50 Settings 4 OSD Menu Press MENU button on Keyboard NAVI RGB Image Screen DVD DVBT NAVI AV REAR FRONT Image MENU Config Option Screen Parking IMAGE Brightness Contrast Saturation Hue Sharpness Rear 50 50 50 50 25 support car solutions com car solutions com c a r s o l u t i o n s c o m ...

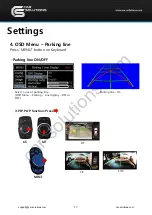
Page 15: ...U button on Keyboard Parking line ON OFF Select a use of parking line OSD Menu Parking Line display ON or OFF Packing line On 6 5 8 8 PIP PIP POP MINI PIP POP function Press support car solutions com car solutions com c a r s o l u t i o n s c o m ...

Page 16: ...GB OEM screen 2 Normal type When switching to the D gear from the R gear The AV RGB OEM screen is display right away Adjusting the position of guide line Possible to adjust the position of line by Keypad in Horizontal Vertical menu Pressing this Horizontal Vertical menu The OSD screen automatically disappears Please adjust from the parking line Screen MENU SEL UP DOWN Left Right Up Down support ca...

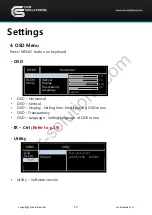
Page 17: ...isplay Transparency Language OSD Horizontal OSD Vertical OSD Display Setting time for displaying OSD menu OSD Transparency OSD Language Setting language of ODS menu IR Ctrl Refer to p 19 Utility MENU Utility OSD IR Ctrl Execute Cancel AD4P52KRX 160509 Version Utility Software version support car solutions com car solutions com c a r s o l u t i o n s c o m ...

Page 18: ...ed before Select one of the buttons registering to move on to next step Caution Delete ALL Clear Delete all value Clr Delete one button s Value Play Pause To use button Please register the IR code in power Pause menu separately Press a button on the remote control of DVD DTV then the IR code will appear on New code menu Press the same button one more time to confirm the IR code Cfm code confirm co...

Page 19: ...21 MONITOR OEM cable LVDS IN cable COMMAND Installation 1 Installation Diagram DVD IR DMB IR GND SYNC BLUE GREEN RED support car solutions com car solutions com c a r s o l u t i o n s c o m ...

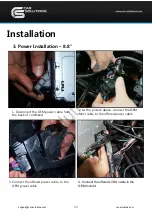
Page 20: ...cable from the back of command 2 Connect the offered power cable to the OEM power cable 3 Connect the offered power cable to the back of command 4 Connect the offered LVDS cable to the OEM monitor support car solutions com car solutions com c a r s o l u t i o n s c o m ...

Page 21: ... the back of command 3 Connect the offered power cable to the OEM power cable 2 As the picture above connect the OEM Most cable to the offered power cable 4 Connect the offered LVDS cable to the OEM monitor support car solutions com car solutions com c a r s o l u t i o n s c o m ...

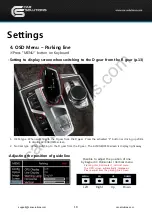
Page 22: ...ng OSD Menu option RearCam Det 1 Caution The device must not be installed in where it interferes driving close to brake pedal steering wheel airbag etc LVDS cable must be connected correctly according to the manual Insulate the end of wire by using electrical tape The installation should be done by expert GU electronic does not take any responsibility for any problem caused by wrong installation s...

Reviews: