background image

839 Central Parkway

West,Mississauga,

Ontario L5C 2V9

Phone: 905-361-1970

Toll Free: 1-877-728-0342

Fax: 905-361-1969

EMail:

info@caramiafurniture.com 

<mailto:info@caramiafurniture.com>

Web: 

www.caramiafurniture.com

:

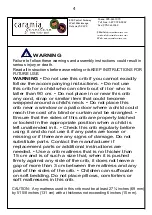
Failure to follow these warnings and assembly instructions could result in 

serious injury or death.

Read all instructions before assembling crib. KEEP INSTRUCTIONS FOR 

FUTURE USE.  

CAUTION:  Any mattress used in this crib must be at least 27 ¼ inches (69 mm)

by 51 5/8 inches (131 cm) with a thickness not exceeding 6 inches (15 mm). 

!

4

WARNING 

WARNING 

• Do not use this crib if you cannot exactly 

follow the accompanying instructions. • Do not use 

this crib for a child who can climb out of it or who is 

taller than 90 cm. • Do not place in or near this crib 

any cord, strap or similar item that could become 

wrapped around a child’s neck. • Do not place this 

crib near a window or a patio door where a child could 

reach the cord of a blind or curtain and be strangled. • 

Ensure that the sides of this crib are properly latched 

or locked in the appropriate position when a child is 

left unattended in it. • Check this crib regularly before 

using it and do not use it if any parts are loose or 

missing or if there are any signs of damage. Do not 

substitute parts. Contact the manufacturer if 

replacement parts or additional instructions are 

needed. • Use a crib mattress that is no thicker than 

15 cm and is of such a size that, when it is pushed 

firmly against any side of the crib, it does not leave a 

gap of more than 3 cm between the mattress and any 

part of the sides of the crib. • Children can suffocate 

on soft bedding. Do not place pillows, comforters or 

soft mattresses in this crib.  

Summary of Contents for TAMMY

Page 1: ...tral Parkway West Mississauga Ontario L5C 2V9 Phone 905 361 1970 Fax 905 361 1969 Toll Free 1 877 728 0342 www caramiafurniture com CARAMIA FURNITURE TAMMY TOMMY CRIBS Assembly Instructions Instructions d assemblage ...

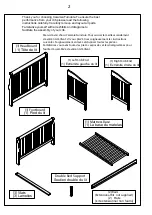
Page 2: ...sure the best performance from your crib please read the following instructions carefully Carefully remove and layout all parts Familiarize yourself with all exhibits and diagrams to facilitate the assembly of your crib Merci d avoir choisi Caramia Furniture Pour assurer le meilleur rendement de votre lit d enfant s il vous plai t lisez soigneusement les instructions suivantes Soigneusement enleve...

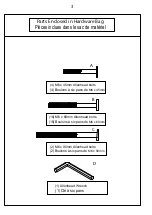
Page 3: ...le sac de matériel 4 Boulons à six pans de 16 Boulons à six pans de 2 Boulons à six pans de 1 Clé à six pans 3 A B C D M6 x 60mm M6 x 90mm M6 x 45mm 16 M6 x 60mm Allenhead bolts 2 M6 x 90mm Allenhead bolts 1 Allenhead Wrench 4 M6 x 45mm Allenhead bolts ...

Page 4: ...or near this crib any cord strap or similar item that could become wrapped around a child s neck Do not place this crib near a window or a patio door where a child could reach the cord of a blind or curtain and be strangled Ensure that the sides of this crib are properly latched or locked in the appropriate position when a child is left unattended in it Check this crib regularly before using it an...

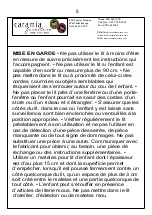
Page 5: ...au et s étrangler S assurer que les côtés du lit dans le cas où l enfant y est laissé sans surveillance sont bien enclenchés ou verrouillés à la position appropriée Vérifier régulièrement le lit préalablement à son utilisation et ne pas l utiliser en cas de détection d une pièce desserrée de pièce manquante ou de tout signe de dommages Ne pas substituer une pièce à une autre Communiquer avec le fa...

Page 6: ...és de lit d enfant Attacher la base du matelas aux extrémités de lit d enfant en insérant Le boulon à six pans de 45 M6x mm A au trou le plus bas En utilisant les clés à six pans qui sont fournis serrer les boulons de part et d autre M6x45 mm A to the lower holes A A 6 4 M6 x 45mm Allenhead bolts 4 Boulons à six pans de M6 x 45mm s ...

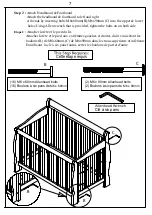
Page 7: ...de part et d autre En utilisant Etape 2 Step 2 Attach Headboard Footboard Attach the headboard footboard to left and right crib ends by inserting bolts M6x60mm B M6x90mm C into the upper lower holes Using Allen wrench that is provided tighten the bolts on on both side Cette étape requis Clé à six pans 7 B B B C C 16 Boulons à six pans de M6 x 60mm 16 M6 x 60mm Allenhead bolts 2 Boulons à six pans ...

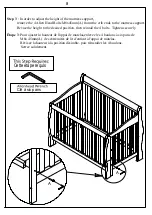
Page 8: ...o the mattress support Revise the height to the desired position then reintall the 4 bolts Tighten securely Étape 3 Pour ajuster la hauteur de l appui de matelas enlevez les 4 boulons à six pans de M6x 45mm A des extrémités de lit d enfant à l appui de matelas Révisez la hauteur à la position désirable puis réinstaller les 4 boulons Serrez solidement 8 A A ...

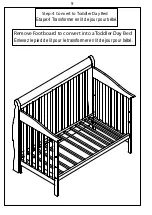
Page 9: ...Etape 4 Transformer en lit de jour pour bébé Enlevez le pied de lit pour le transformer en lit de jour pour bébé Step 4 Convert to Toddler Day Bed Remove Footboard to convert into a Toddler Day Bed 9 ...

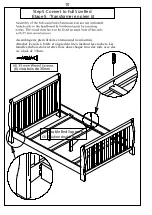
Page 10: ...ttacher les rails à la tête et au pied du lit en insérant les crochets Les lamelles du bois doivent êtres fixés dans chaque trou des rails avec des vis à bois de 35mm Step 5 Convert to Full Size Bed Etape 5 Transformer en plein lit 3 Soutien double du lit 6 vis à bois de 35mm 10 ...

Page 11: ...u plus 15 cm et dont la superficie permet d empêcher lorsqu il est poussé fermement contre un côté quelconque du lit qu un espace de plus de 3 cm soit créé entre le matelas et une partie quelconque de tout côté L enfant peut s étouffer en présence d articles de literie mous Ne pas mettre dans le lit d oreiller d édredon ou de matelas mou Do not use this crib if you cannot exactly follow the accomp...

Reviews: