background image

CARBATEC.C OM.AU

27

CDC-850P

PART

REF.

PART

NUMBER

DESCRIPTION

QTY

PART

REF.

PART

NUMBER

DESCRIPTION

QTY

1

CDC-850P-001

LEFT BRACKET

1

35

CDC-850P-035

SELF-LOCKING NUT M8

2

2

CDC-850P-002 HEXAGON SCREW M8X40

4

36

CDC-850P-036

CROSS HEAD SCREW M4X12

8

3

CDC-850P-003 PULL HANDLE

1

37

CDC-850P-037

MOTOR

1

4

CDC-850P-004 RIGHT BRACKET

1

38

CDC-850P-038

HEXAGON SCREW M8X16

6

5

CDC-850P-005 M8 NUT

4

39

CDC-850P-039

RUBBER PAD

1

6

CDC-850P-006 FLAT WASHER 8

4

40

CDC-850P-040

MOTOR PLATE

1

7

CDC-850P-007 ROUND HEAD SCREW M6X15

16

41

CDC-850P-041

IMPELLER

1

8

CDC-850P-008 WASHER 6

16

42

CDC-850P-042

RETAINING RING

1

9

CDC-850P-009 BASE

1

43

CDC-850P-043

HEXAGON SCREW M6X20-LEFT

1

10

CDC-850P-010

END CAP

4

44

CDC-850P-044

VOLUTE

1

11

CDC-850P-011

CASTERS

2

45

CDC-850P-045

REMOTE CONTROL

1

12

CDC-850P-012

FLAT WASHER 6

16

46

CDC-850P-046

POWER CABLE

1

13

CDC-850P-013

HEXAGON SCREW M6X15

16

47

CDC-850P-047

RING SCREW M8X16

2

14

CDC-850P-014

COVER

2

48

CDC-850P-048

STRAIN RELIEF M20X1.5

3

15

CDC-850P-015

CONNECTOR 1-3

1

49

CDC-850P-049

SWITCH BOX

1

16

CDC-850P-016

CYCLONE FUNEL

1

50

CDC-850P-050

AC CONTACTOR

1

17

CDC-850P-017

CROSS HEAD SCREW M5X8

8

51

CDC-850P-051

PCB

1

18

CDC-850P-018

DRUM CLAMP HANDLE

2

52

CDC-850P-052

SELF-TAPPING SCREW S3.5X20

4

19

CDC-850P-019

HOSE CLAMP 200MM DIA

2

53

CDC-850P-053

SWITCH COVER

1

20

CDC-850P-020 TUBE

1

54

CDC-850P-054

CROSS HEAD SCREW M5X8

4

21

CDC-850P-021

DRUM COVER

1

55

CDC-850P-055

FILTER

1

22

CDC-850P-022 IMPLELLER HOUSING

1

56

CDC-850P-056

BAG CLAMP

1

23

CDC-850P-023 CROSS HEAD SCREW M5X8

1

57

CDC-850P-057

SMALL DUST BAG

1

24

CDC-850P-024 STEEL HOOP

1

58

CDC-850P-058

BIG DUST BAG

1

25

CDC-850P-025 INNER DRUM

1

59

CDC-850P-059

CASTER

2

26

CDC-850P-026 M4 NUT

8

60

CDC-850P-060

BRACKET

1

27

CDC-850P-027

FLAT WASHER 4

8

61

CDC-850P-061

50MM DIA PIPE

1

28

CDC-850P-028 RUBBER PAD

1

62

CDC-850P-062

CLAMP

2

29

CDC-850P-029 PLASTIC PLATE

1

63

CDC-850P-063

M10 NUT

3

30

CDC-850P-030 DUST COLLECTION DRUM

1

64

CDC-850P-064

50MM DIA COVER

2

31

CDC-850P-031

CASTER

3

CDC-850P-ACCYS CYCLONE ACCESSORY BOX

32

CDC-850P-032 HEXAGON SCREW M8X20

2

CDC-850P-MAIN

CYCLONE MAIN BOX

33

CDC-850P-033 HANDLE

1

34

CDC-850P-034 FLAT WASHER 8

2

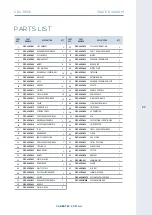
PARTS LIST 

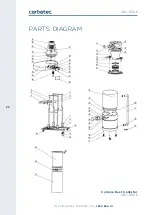
PARTS DIAGRAM

Summary of Contents for CDC-850P

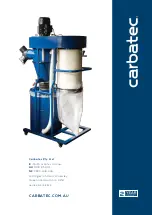
Page 1: ...CARBATEC COM AU C D C 8 5 0 P M A N U A L Cyclone Dust Collector 2 ...

Page 2: ...s and technological advancements more accessible to Aussie woodworkers Backed by our no fuss after sales care and warranty support you can trust Carbatec to keep you woodworking as promised We look forward to sharing in your woodworking journey If you have any questions about our products or service please call us on 1800 658 111 or email us at info carbatec com au Find us on social media facebook...

Page 3: ...is may need to be redone several times before all of the protective coatings are removed completely 3 Compare the items above to verify that all items are accounted for before discarding the shipping box O N M L K J I H G F E D C B A A Base end caps B Base C Handle D Support bracket E Castors for base F Main impeller body G Cyclone funnel top H Cyclone cone I Collection drum and lid J Negative pre...

Page 4: ...serial number and date of purchase in your manual for future reference 2 Made in for CARBATEC PTY LTD Brisbane Australia Model Voltage Freq Phase Amp kW Speed Lot No Serial No Date QUALITY INSPECTED Key information can be found on the inspection panel found on the rear of the machine IMPORTANT ...

Page 5: ...are has been taken to ensure that the information in this manual is correct to provide you with the guidelines for the proper safety assembly and operation of this machine Introduction 2 What s in the box 3 Key information 4 Safety instructions General 6 9 Safety instructions Dust Collector 9 10 Safety instructions Electrical 11 Overview 12 Specifications 13 Assembly 14 20 Operation 21 22 Maintena...

Page 6: ...Safety is the single most important consideration in the operation of this equipment The following instructions must be followed at all times Failure to follow all instructions listed below may result in electric shock fire and or serious personal injury There are certain applications for which this tool was designed We strongly recommend that this tool not be modified and or used for any other ap...

Page 7: ...ts intended applications 3 GROUND ALL TOOLS If the tool is supplied with a 3 prong plug it must be plugged into a 3 contact electrical receptacle The third prong is used to ground the tool and provide protection against accidental electric shock 4 AVOID A DANGEROUS WORKING ENVIRONMENT Do not use electrical tools in a damp environment or expose them to rain 5 DO NOT USE electrical tools in the pres...

Page 8: ...O NOT STORE ANYTHING ABOVE OR NEAR the tool where anyone might try to stand on the tool to reach it 19 MAINTAIN YOUR BALANCE Do not extend yourself over the tool Wear oil resistant rubber soled shoes Keep floor clear of debris grease and wax 20 MAINTAIN TOOLS WITH CARE Always keep tools clean and in good working order Keep all blades and tool bits sharp dress grinding wheels and change other abras...

Page 9: ...ions NEVER use an extension cord rated at less than your machine Longer run extensions will need heavier duty extension cords Only connect your extension cord or machine to a receptacle that accepts your plug and never modify your plug to suit a receptacle DUST COLLECTOR SAFETY INTENDED USE This dust collector is only intended for collecting wood dust and chips from woodworking machines Do not use...

Page 10: ...ine with respect and caution to lessen the possibility of operator injury If normal safety precautions are overlooked or ignored serious personal injury may occur DUST COLLECTOR SAFETY EMPTYING DUST When emptying dust from the collection container wear a respirator and safety glasses Empty dust away from ignition sources and into an approved container DISCONNECT POWER SUPPLY Turn the switch off di...

Page 11: ...tion with or without yellow stripes is the equipment grounding conductor DO NOT connect the equipment grounding conductor to a live terminal if repair or replacement of the electric cord or plug is necessary CHECK WITH A QUALIFIED ELECTRICIAN or service personnel if you do not completely understand the grounding instructions or if you are not sure the tool is properly grounded Use only a 3 wire ex...

Page 12: ...aning handle B Remote control C Electrical control box D Motor E Impeller housing F Inlet adapter G Cyclone funnel H Collection drum I Wheels J Dust collection bag K Handle L Cartridge Filter CDC 850P CYCLONE DUST COLLECTOR OVERVIEW H I J K K G F E D C B A OVERVIEW ...

Page 13: ...E SIZE Ø 150 mm NUMBER OF INTAKE HOLES 3 x Ø 100 mm BAG SIZE Ø 500 x 1100 mm BAG VOLUME 0 216 m3 AIR FLOW MAX 850CFM FILTER AREA 2 6 m2 FILTER CAPACITY 1 micron NOISE LEVEL 84 dB OVERALL SIZE LxWxH 1200 x 660 x 1750 mm PACKING SIZE 1020 x 590 x 900 mm 1240 x 412 x 170 mm 650 x 430 x 430 mm SPECIFICATIONS 1200 mm 1200 mm 660 mm 1750 mm ...

Page 14: ...damage is discovered the carrier and or shipper must be notified of this fact immediately to establish any claim which might arise A PLACEMENT LOCATION Consider anticipated workpiece sizes and additional space needed for auxiliary stands work tables or other machinery when establishing a location for this machine in the shop See dimensions on page 13 for reference ASSEMBLY To keep freight costs to...

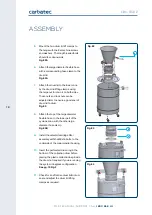
Page 15: ...n heavy duty rust preventative if applicable B INSTALLING THE MAIN BRACKET 1 Install the wheels to the base by using the hexagon socket head bolt M6x15 and flat washers Ø6 Fig B1A 2 Insert the end cap into the four sides of the base Fig B1B 3 Fix the support bracket to the base by using the hexagon socket head bolt M6x15 and washer Ø6 Note the bends facing inwards Fig B1C 4 Attach the handle to th...

Page 16: ... C2 Fig C1 C DUST COLLECTION DRUM ASSEMBLY 1 Install the three wheels to the base of the dust collection drum Fig C1A 2 Install the handle bar to the dust collection drum by hexagon socket head bolt M8x20 and flat washer 8 self locking nut M8 Fig C2 ASSEMBLY ...

Page 17: ...n flip over and position it on top of the installed side support brackets 2 While it is being held in place adjust as required and fasten the main impeller assembly to the support brackets with the M8x20 bolts Fig E1A 3 The Cyclone funnel is attached to the underside of the impeller housing with internal bolts You may need to separate the lower cone from the upper section to allow easy access to t...

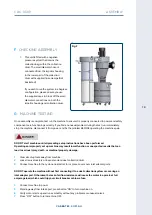
Page 18: ...usted later to ensure a good seal of drum lid to drum Fig E3 8 Attach the top of the large diameter flexible hose to the lower part of the cyclone cone with the other large diameter hose clamp Fig E3B 9 Install the canister cartridge filter assembly with the M8x16 bolts to the underside of the main impeller housing 10 Insert the perforated drum ring in the bottom of the collection drum before plac...

Page 19: ...power and fix the problem BEFORE operating the machine again DO NOT start machine until all preceding setup instructions have been performed Operating an improperly set up machine may result in malfunction or unexpected results that can lead to serious injury death or machine property damage 1 Clear all setup tools away from machine 2 Lock all swivel casters on base stand and dust collection drum ...

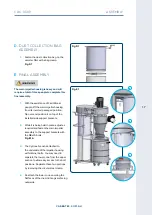
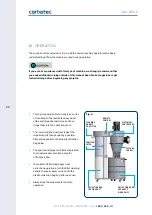
Page 20: ...r filters are pleated to provide maximum surface area for efficient air flow To maintain CFM during heavy dust extraction operations turn the filter cleaning handle to knock caked on dust into the plastic collection bag and after each use Always lock the swivel casters before operation H OPERATION The purpose of this overview is to provide the novice machine operator with a basic understanding of ...

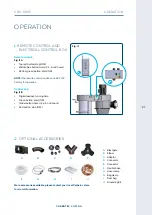
Page 21: ...t your local Carbatec store for more information OPERATION OPERATION I REMOTE CONTROL AND ELECTRICAL CONTROL BOX Remote control Fig I1A Top red button stop OFF Middle blue button timer 2 4 6 or 8 hours Bottom green button start ON NOTE The remote control requires one A23 12V battery for operation Control box Fig I1B Digital readout running time Green button start ON Yellow button timer 2 4 6 or 8 ...

Page 22: ...ll have a minimum rated CFM extraction requirement available Please note that CFM requirement is usually measured at the point where the dust hose is connected to the machine s dust port which is very different to the rated CFM of the dust collector The length and complexity of your entire dust extraction and collection network should be taken into account Bandsaws Table Saws Lower volume waste pr...

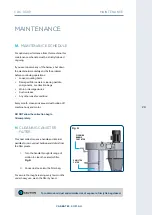
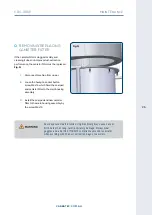
Page 23: ...uction leaks Any other unsafe condition Every month clean and vacuum dust buildup off machine body and motor DO NOT allow the collection bag to fill completely N CLEANING CANISTER FILTER This dust collector uses a handle and internal paddles to remove dust buildup and debris from the filter pleats 1 Turn the handle through its range of motion to clean the canister filter Fig N 2 Knock dust cake in...

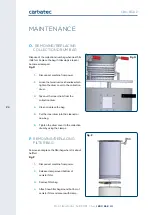
Page 24: ...rum cover to the collection drum 3 Take out the inner drum from the collection drum 4 Clean or replace the bag 5 Put the inner drum into the cleaned or new bag 6 Tighten the drum cover to the collection drum by using the clamps P REMOVING REPLACING FILTER BAG Remove and replace the filter bag when it is about half full Fig P 1 Disconnect machine from power 2 Release clamp around bottom of canister...

Page 25: ... power 2 Loose the hexagon socket button screw M6x15 which fixed the seal pad and canister filter to the main housing assembly 3 Install the seal pad and new canister filter to the main housing assembly by the screw M6x15 Dust exposure created while using machinery may cause cancer birth defects or long term respiratory damage Always wear goggles and a AS NZS 1716 2012 compliant approved respirato...

Page 26: ...FOR TECHNICAL SUPPORT CALL 1800 658 111 26 CDC 850P Cyclone Dust Collector CDC 850P PARTS DIAGRAM ...

Page 27: ...15 CONNECTOR 1 3 1 49 CDC 850P 049 SWITCH BOX 1 16 CDC 850P 016 CYCLONE FUNEL 1 50 CDC 850P 050 AC CONTACTOR 1 17 CDC 850P 017 CROSS HEAD SCREW M5X8 8 51 CDC 850P 051 PCB 1 18 CDC 850P 018 DRUM CLAMP HANDLE 2 52 CDC 850P 052 SELF TAPPING SCREW S3 5X20 4 19 CDC 850P 019 HOSE CLAMP 200MM DIA 2 53 CDC 850P 053 SWITCH COVER 1 20 CDC 850P 020 TUBE 1 54 CDC 850P 054 CROSS HEAD SCREW M5X8 4 21 CDC 850P 0...

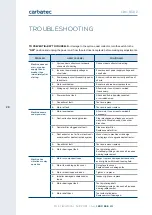
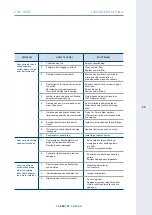
Page 28: ...nds close other branches 3 Canister filter clogged or at fault Clean canister filter Replace canister filter 4 Dust extractor too far from machine or undersized for dust extraction system Move closer to machine or redesign ducting layout or upgrade dust extractor 5 Capacitor at fault Test and repair or replace 6 Motor bearings at fault Test by rotating shaft Rotational grinding or loose shaft requ...

Page 29: ...anch lines at one time causing velocity drop in main line Open 1 or 2 more blast gates to different branch lines to increase main line velocity 8 Ducting and ports are incorrectly sized Install correctly sized ducts and fittings 9 The machine dust extraction design inadequate Use dust extraction hood on stand 10 Dust collector undersized Install larger dust collector Dust extractor blows sawdust i...

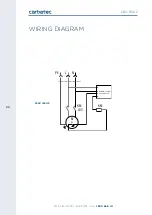
Page 30: ...FOR TECHNICAL SUPPORT CALL 1800 658 111 30 CDC 850P WIRING DIAGRAM 230 V 50 HZ PE L N KM JD3 M KM Remote control circuit board OL ...

Page 31: ... in the email the following information 1 a copy of the order or receipt for the goods 2 the serial or batch number printed on the machinery manufacturing plate and 3 a detailed description of the fault and how and when it arose and 4 If the fault is a type covered by this warranty we will then make arrangements with you for the return of the goods to us for repair or replacement at our cost using...

Page 32: ...2 CARBATEC COM AU Carbatec Pty Ltd E info carbatec com au AU 1800 658 111 NZ 0800 444 329 128 Ingleston Road Wakerley Queensland Australia 4154 ABN 84 010 706 242 ...

Reviews: